SAML SSO login provides to securely accessing the OmniVista Cirrus for users whose identity is managed by an external authentication source. This is based on the SAML 2.0 Authentication and Authorization framework which is an XML-based open standard for exchanging authentication and authorization data between an application service provider and an identity management system used by an enterprise.
OmniVista Cirrus currently supports “Service Provider” initiated SSO. “Service Provider” is the provider of a business function or OmniVista Cirrus service. The OmniVista Cirrus requests and obtains an identity assertion from the customer’s Identity Provider (IDP). Based on this assertion, the OmniVista Cirrus allows users to access the service.
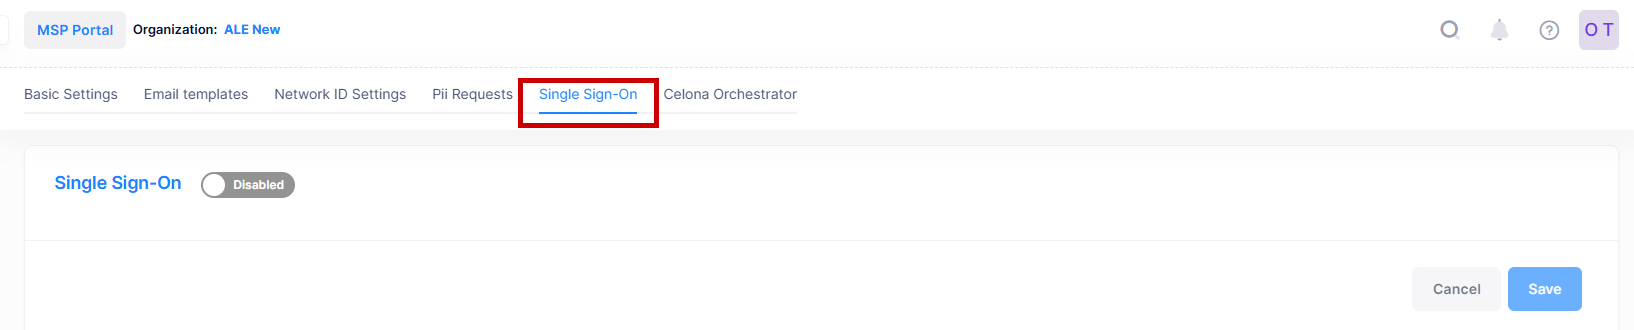
To configure Single Sign-On settings, click on Settings > Single Sign-On under “Organization” section to access the Single Sign-On screen.
Single Sign-On Configuration
Follow the step-by-step process below to configure Single Sign-On for OmniVista Cirrus Services.
-
Basic Information: Navigate to the Single Sign-On screen by accessing the “Settings” section. By default, the Single Sign-On is disabled, click on the enable button to access the SSO detail configuration screen. Enter the basic details described below as move to next section.
-
SSO Domain - Enter a unique domain name for the organization. Use an email address with this domain to log in via Single Sign-On. The domain must be private, not public.
-
Identity Provider - Select the Identity Provider from the drop-down list used by the organization for Single Sign-On.
-

-
Service Provider Information: Copy the Assertion Consumer Service URL, OmniVista Cirrus Logout URL and Entity ID to update it to the IdP Portal.
-
Assertion Consumer Service URL - Specifies the endpoint on the OmniVista Cirrus that receives the SAML assertions from the IdP after authentication.
-
OmniVista Cirrus Logout URL - Specifies the endpoint on the OmniVista Cirrus that handles SSO logout requests initiated by the Identity provider. This option appears only when Azure is selected for the Identity Provider.
-
Entity ID - Specifies the unique identifier for the OmniVista Cirrus as the Service provider in the SSO integrations. This value is used by the IdP to recognize the OmniVista Cirrus service.
-
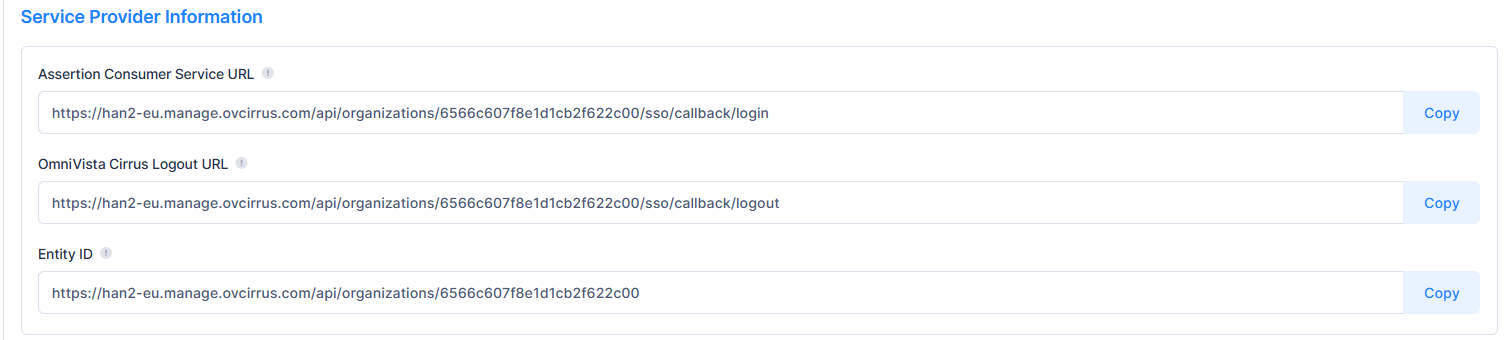
OmniVista Cirrus Logout URL only required for Azure and not required for Okta.
-
Identity Provider Information: The OmniVista Cirrus Single Sign-On is integrated with Okta and Azure identity Providers to follow the SAML 2.0 protocol authentication. Enter the below field value details and move to next section.
-
Login URL - Enter the URL for the Identity Provider where users are redirected to authenticate via SSO.
-
Logout URL - Enter the URL for the Identity Provider where users are redirected to logout of the SSO sessions.
-
Certificate - Upload the certificate to validate the SAML assertions received from the Identity Provider during SSO authentication.
-
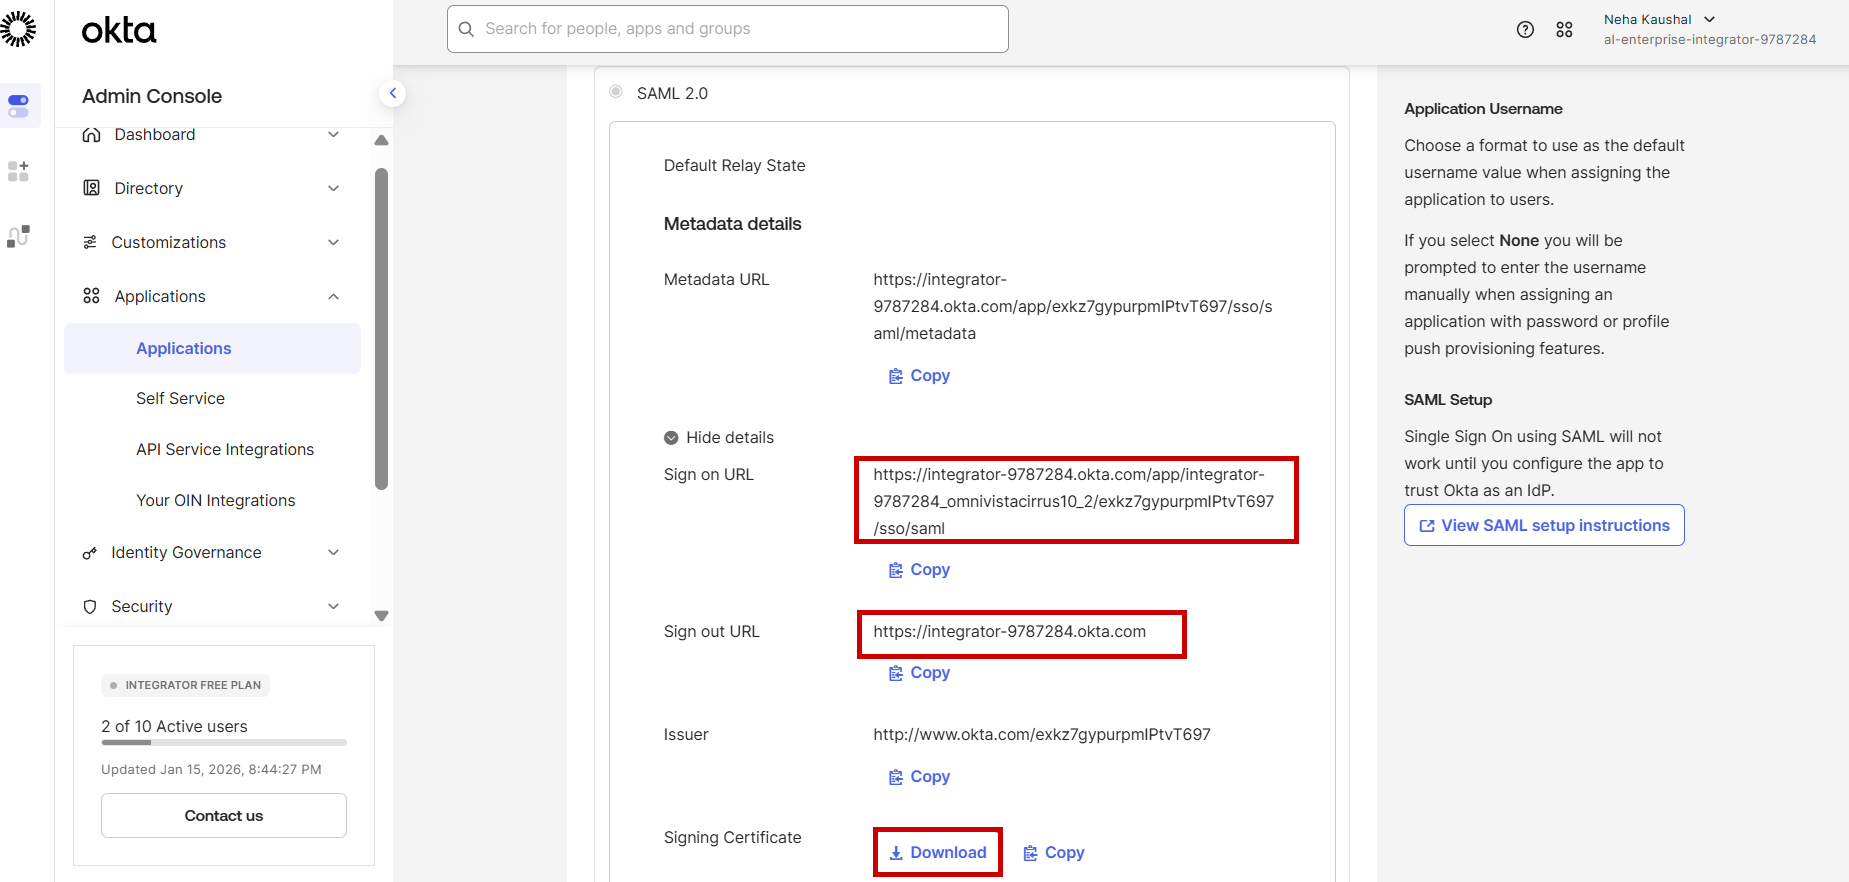
For OKTA as IdP: Copy the Sign on URL, Sign out URL and Download the Signing Certificate field values as shown below by navigating to Applications > Sign On screen.
-
-
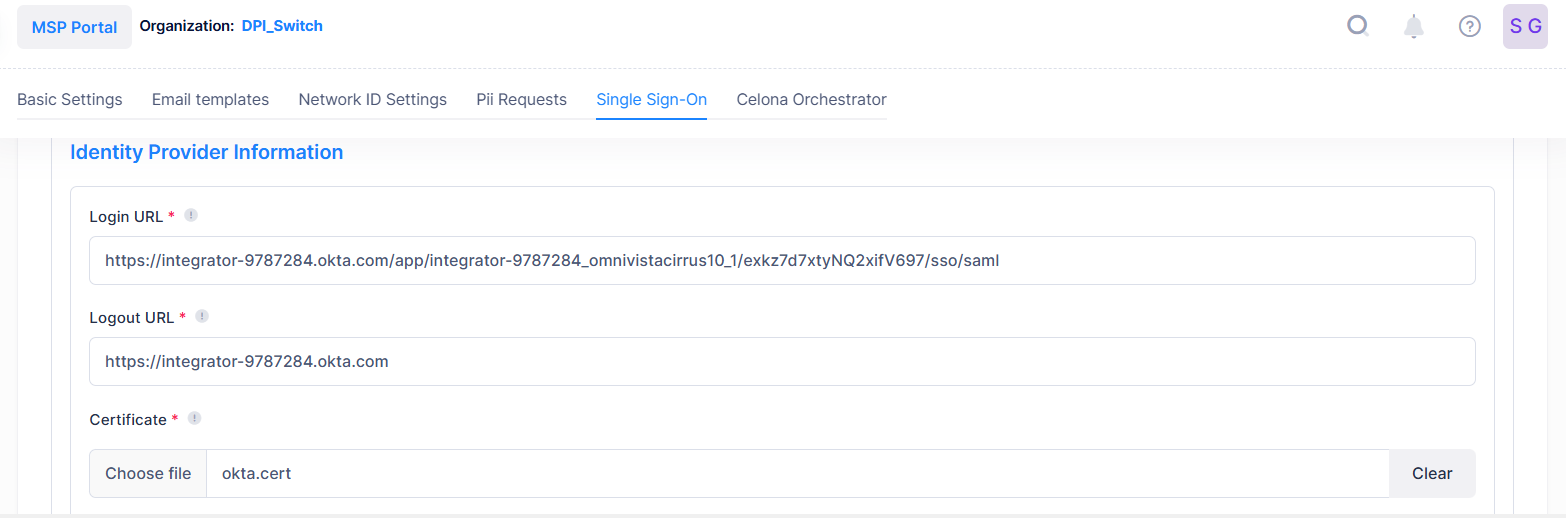
Update the copied value into OmniVista Cirrus Identity Provider Information section as shown below:
ii. For Azure as IdP: Copy the Login URL, Logout URL and download the Certificate (Base64) field values as shown below by navigating to Applications > Single sign-on screen.
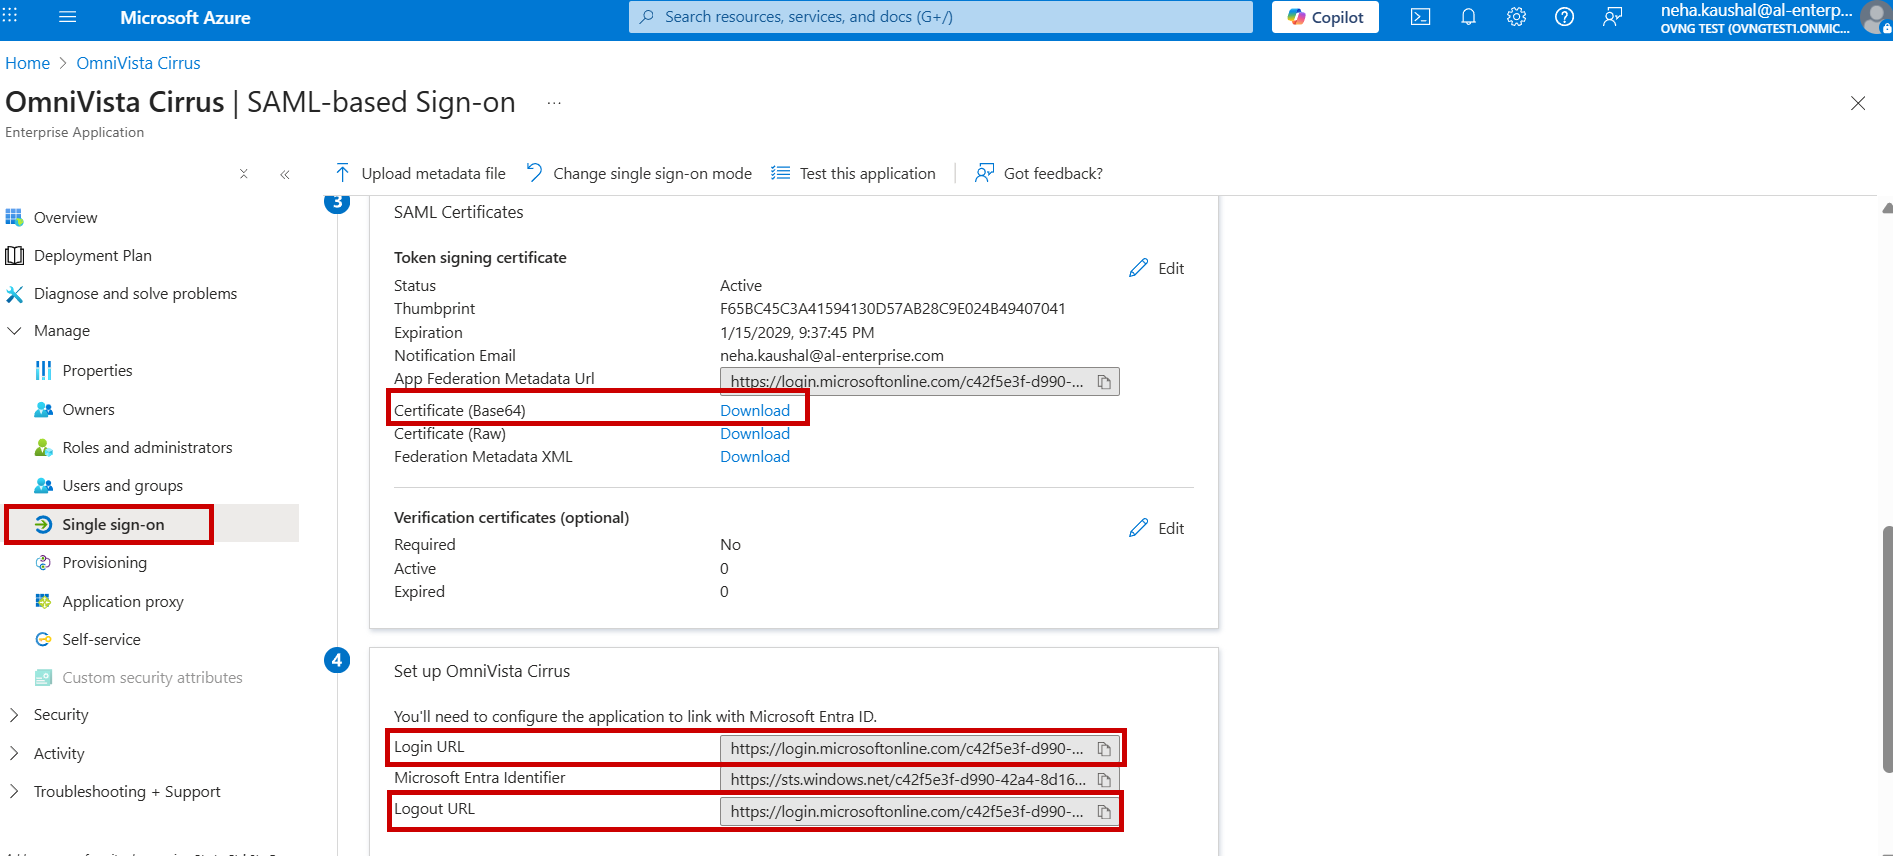
Update the copied value into OmniVista Cirrus Identity Provider Information section as shown below:

-
OmniVista Cirrus Role - IdP Group Mapping: Assigns groups or roles from your Identity provider to corresponding OmniVista Cirrus Roles(Admin or Viewer) to manage user permissions during SSO login.
-
OmniVista Cirrus Role - Admin or Viewer.
-
IdP Group - For OKTA, Map the Group Name to OmniVista Cirrus role. For Azure, Map the Role Value to OmniVista Cirrus role.
-
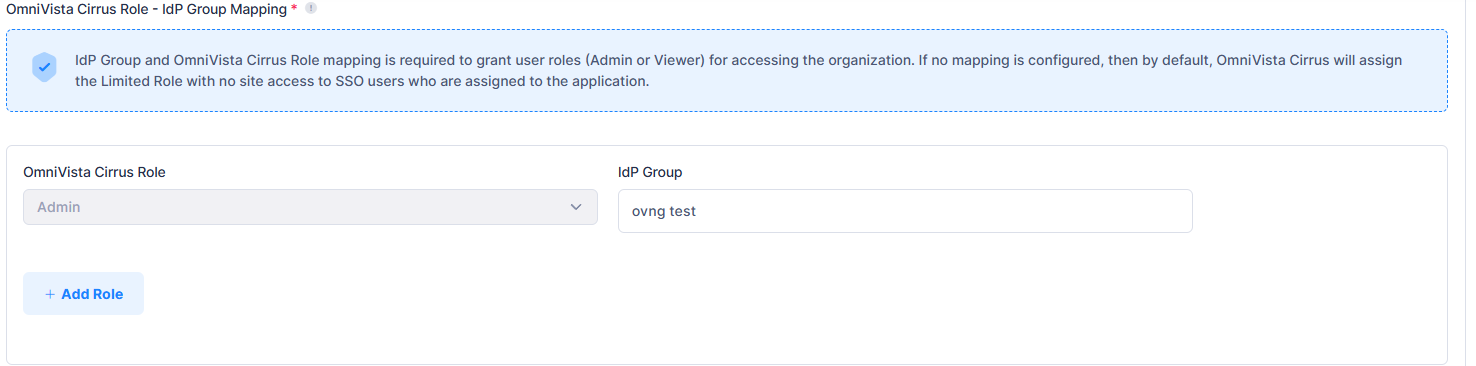
IdP Group and OmniVista Cirrus Role mapping is required to grant user roles (Admin or Viewer) for accessing the organization. If no mapping is configured, then by default, OmniVista Cirrus will assign the ‘Limited Role with no site access’ to SSO users who are assigned to the application in IdP.
-
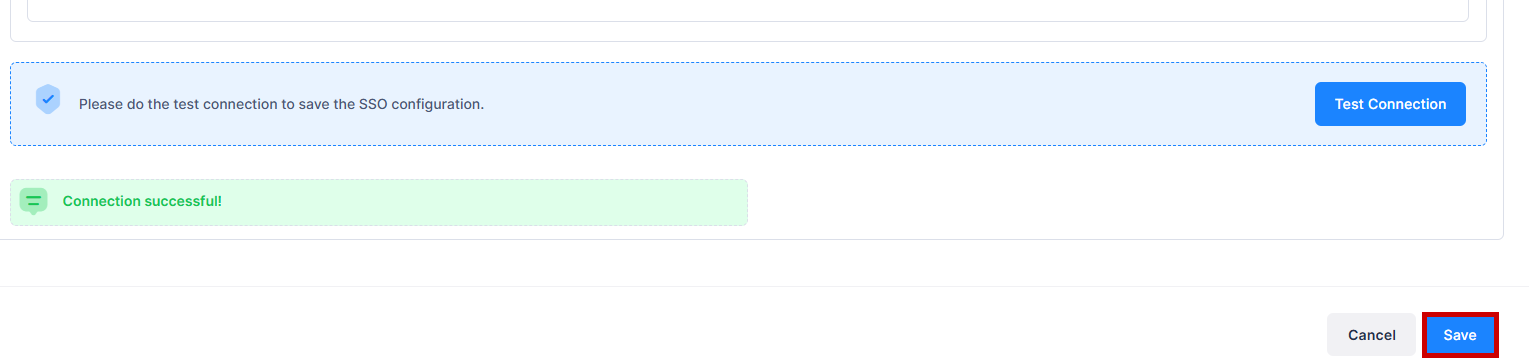
Test Connection: The test connection must pass to save the configuration. Use the IdP user for the test connection. Click Save to save the SSO configuration.
For more information on the steps to configure Okta and Azure IDP portal, visit the SSO Configuration on Okta and SSO Configuration on Azure section.
SSO Configuration on Okta
Follow the below step-by-step process to set up Okta as the Identity Provider for OmniVista Cirrus 10:
-
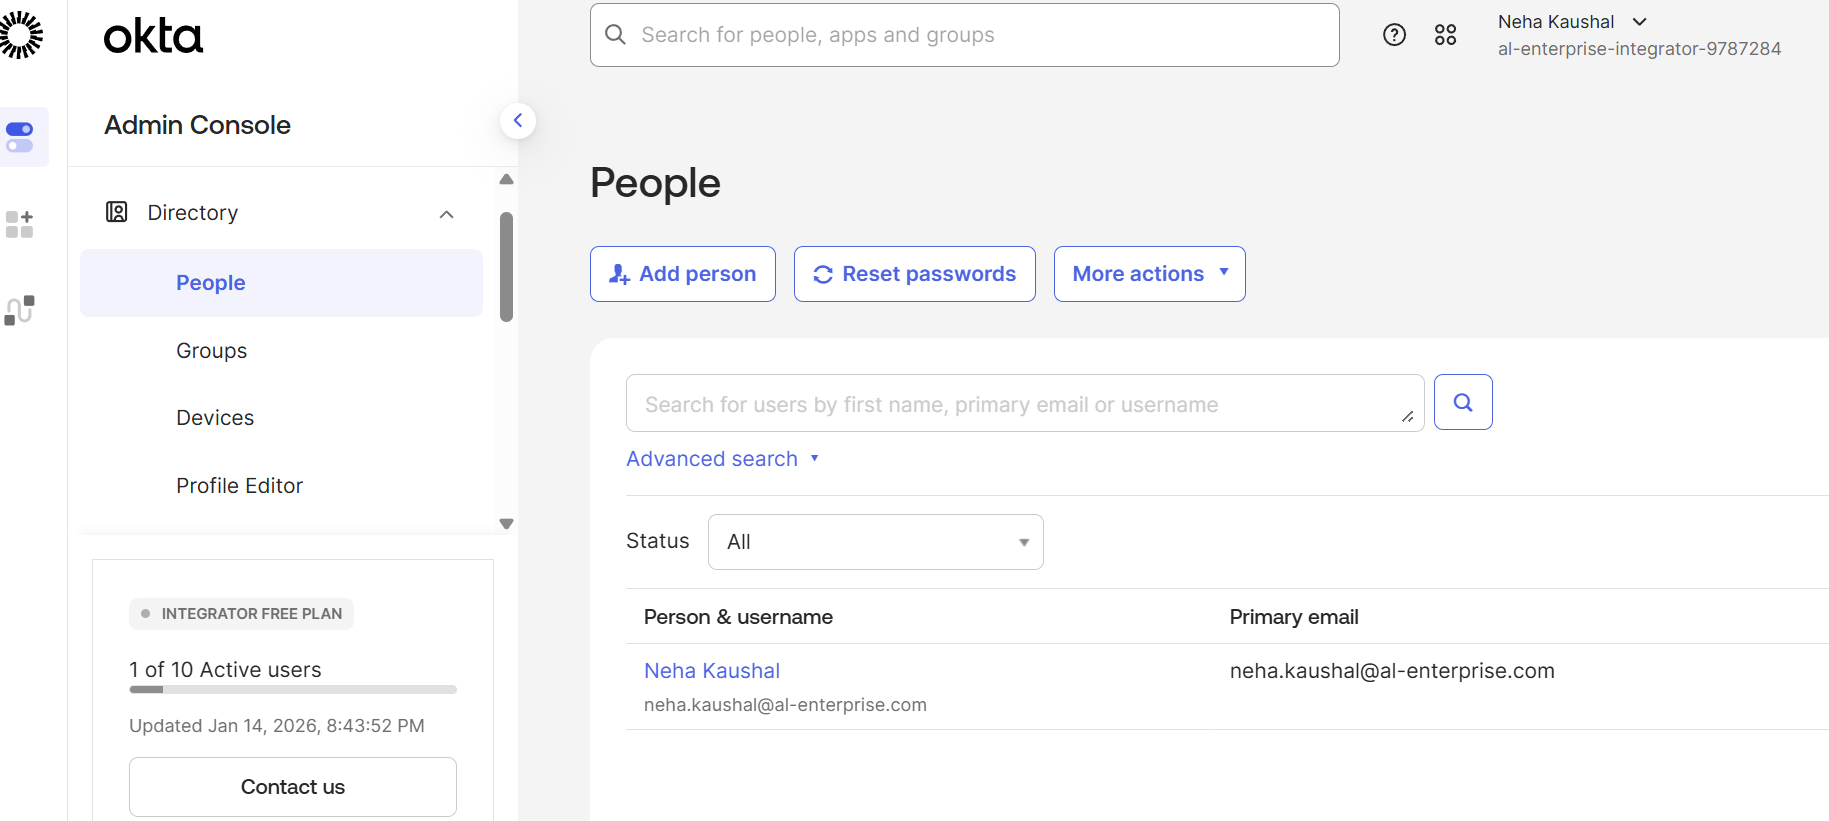
Login into Okta Integrator portal with the Organization username and password. The following dashboard appears:
-
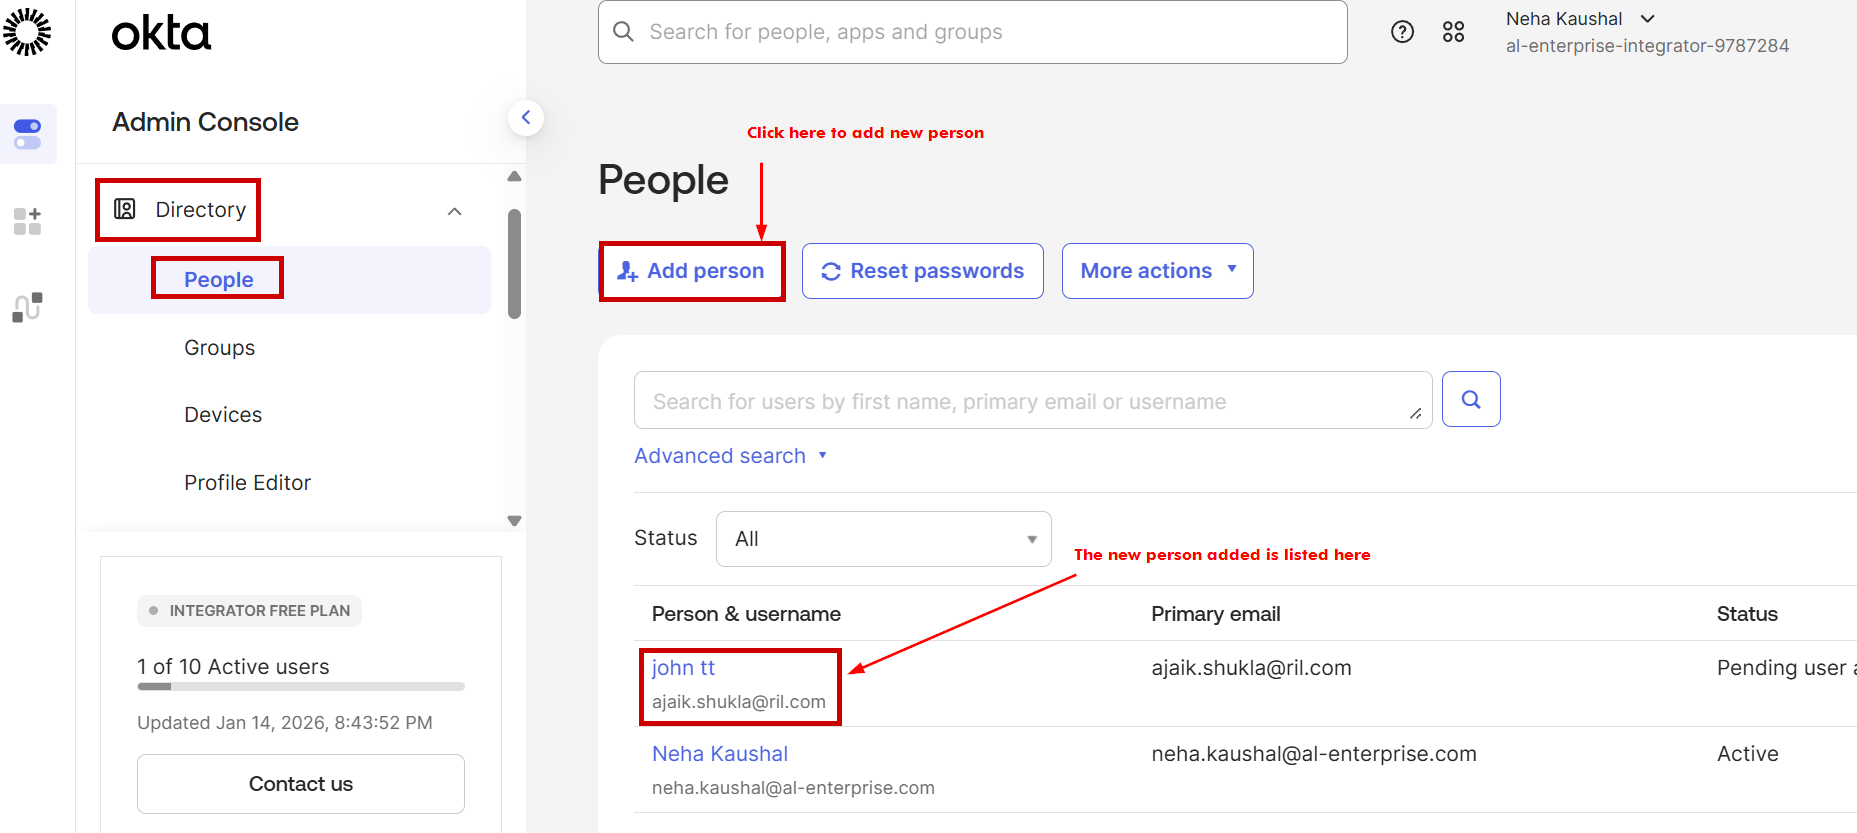
Create new person under the Directory by clicking on Directory > People > Add person. Fill the required fields. Username (must be an Email) is mandatory for the person. Then click on Save to save the changes. You can view the new person added under the List column.
-
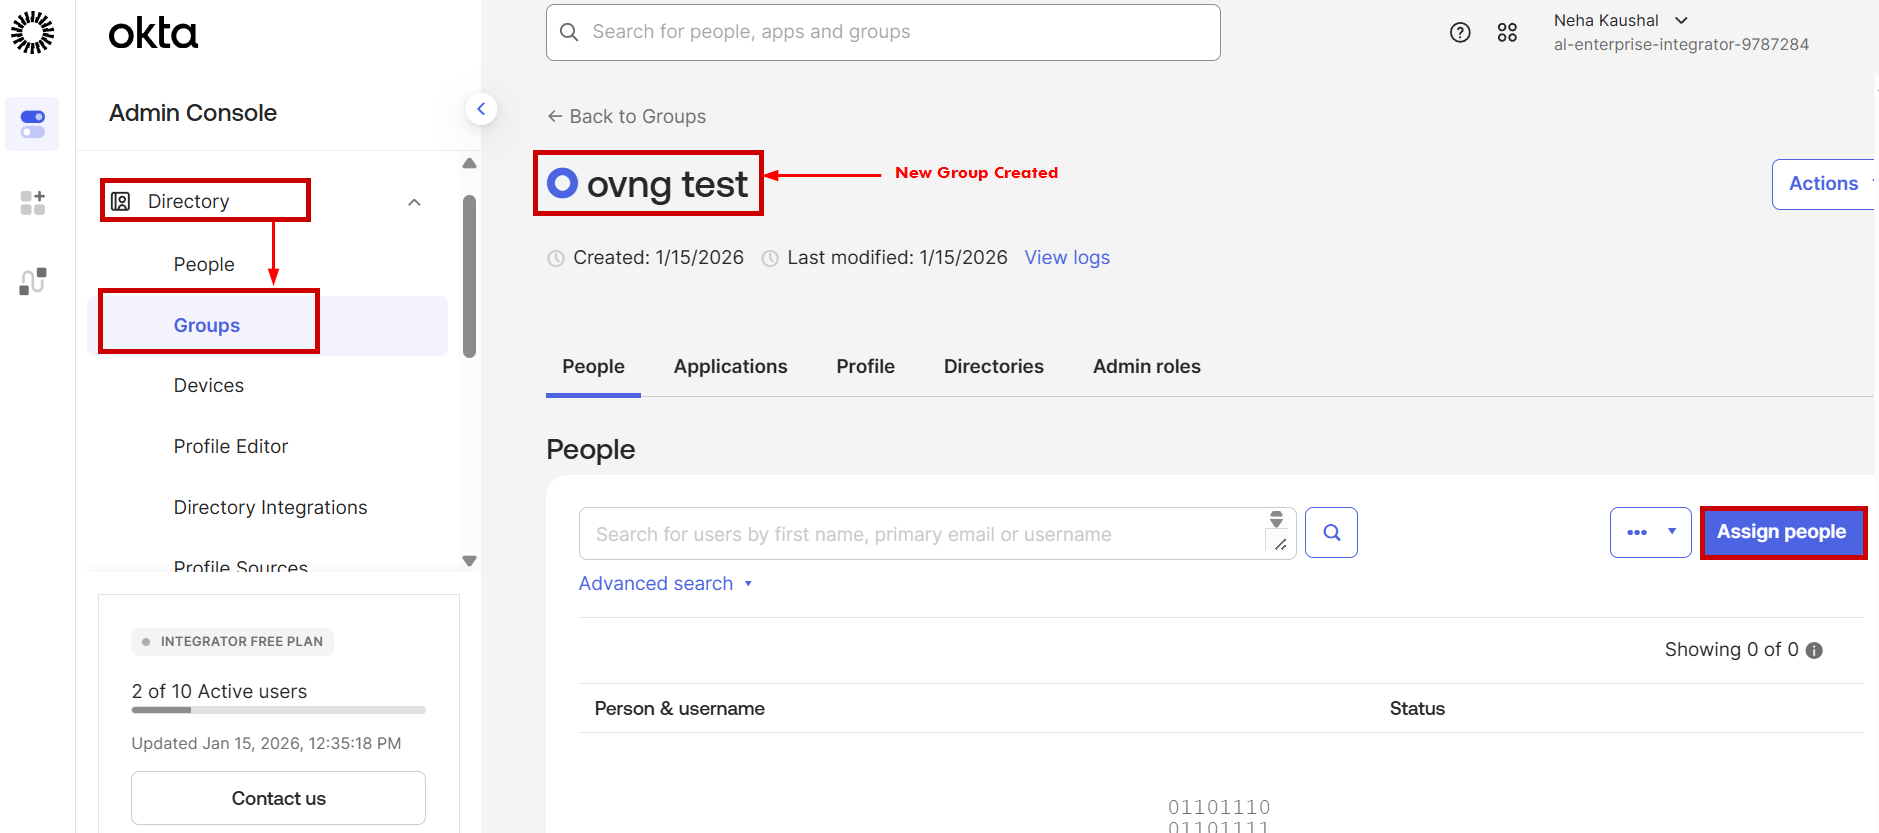
Add Group under the Directory by clicking on Directory > Group > Add Group. Enter the Group Name and Description(optional). Select the group to assign person and then click on Assign people tab.
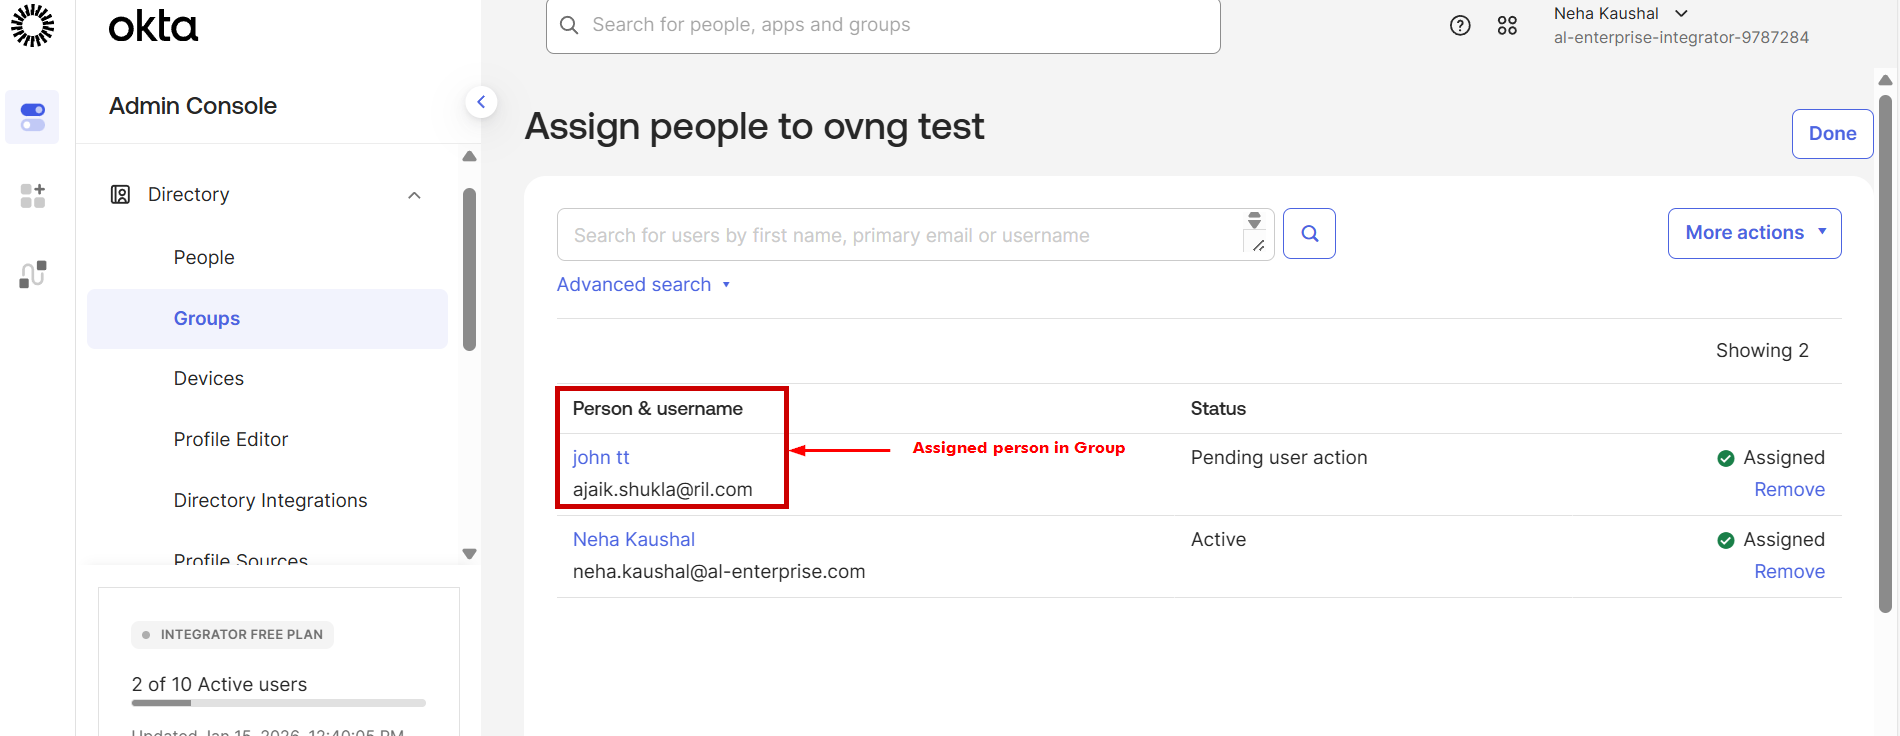
Add person to the group by clicking on “+”, the assigned person with username list will be displayed as shown below:
-
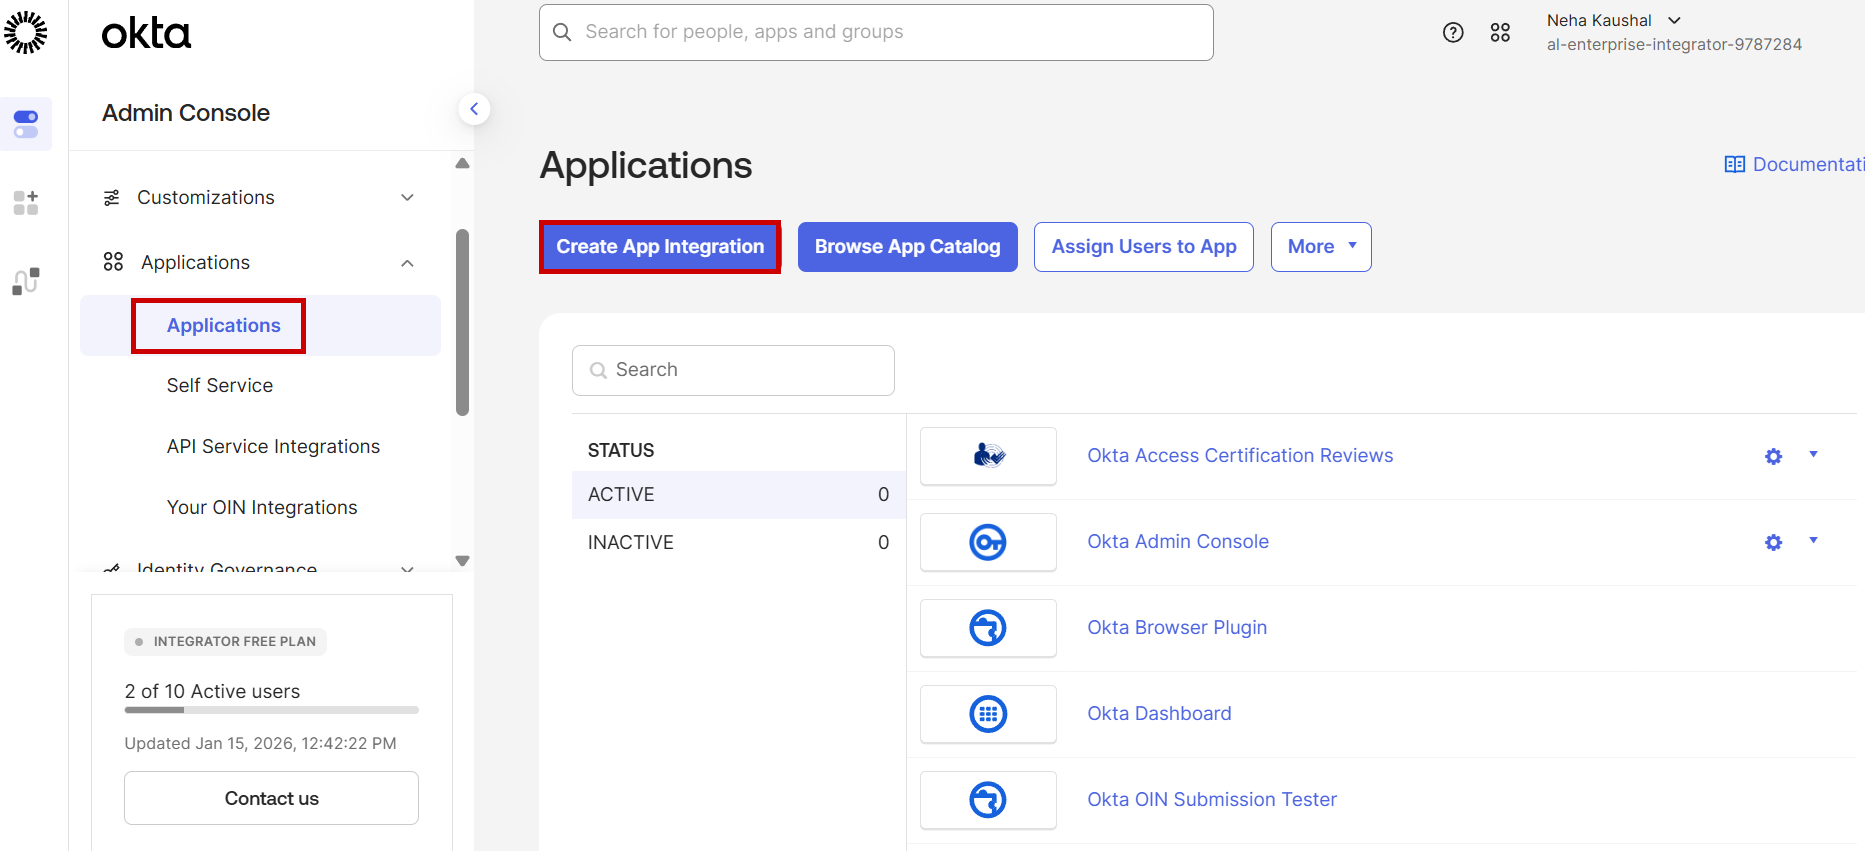
For creating a new SAML SSO Application, go to Applications > Create App Integration under the Admin Console section.
Then, Select SAML 2.0 and click Next as shown below:

-
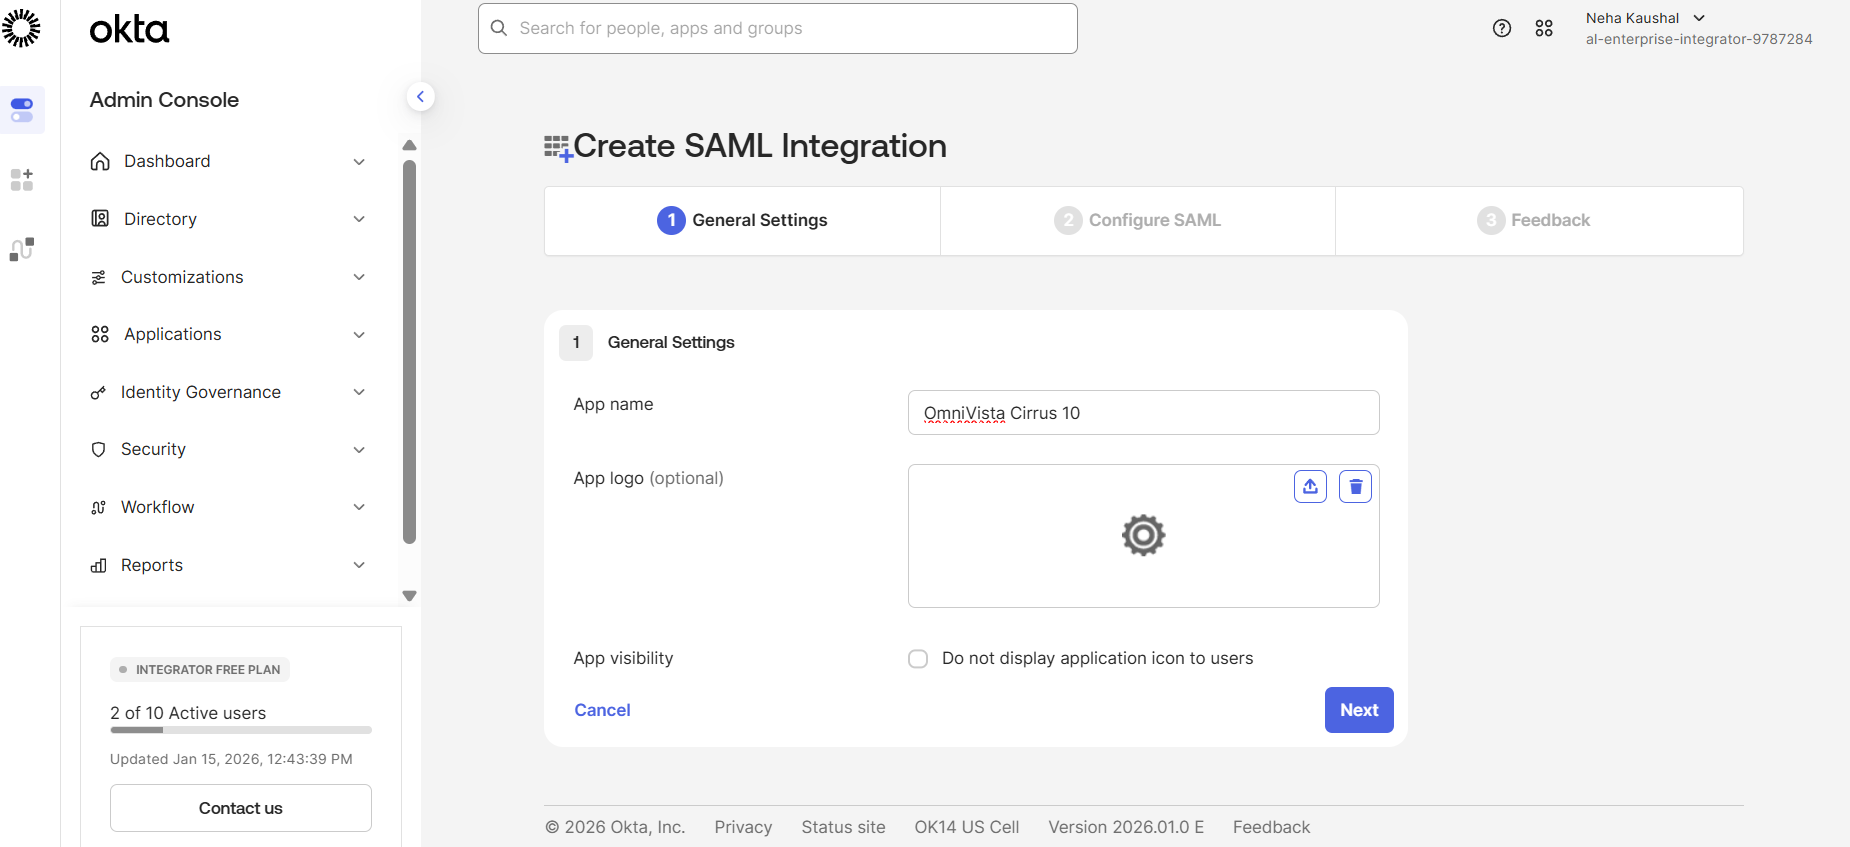
You will be directed to the Create SAML Integration screen. Enter the field values as described below for the General Settings section and then click on Next.
-
App Name: Enter a name for the application (e.g., OmniVista Cirrus 10).
-
App Logo : Upload a logo if desired.(Optional)
-
App Visibility: Specify whether users can see this app in their Okta dashboard.
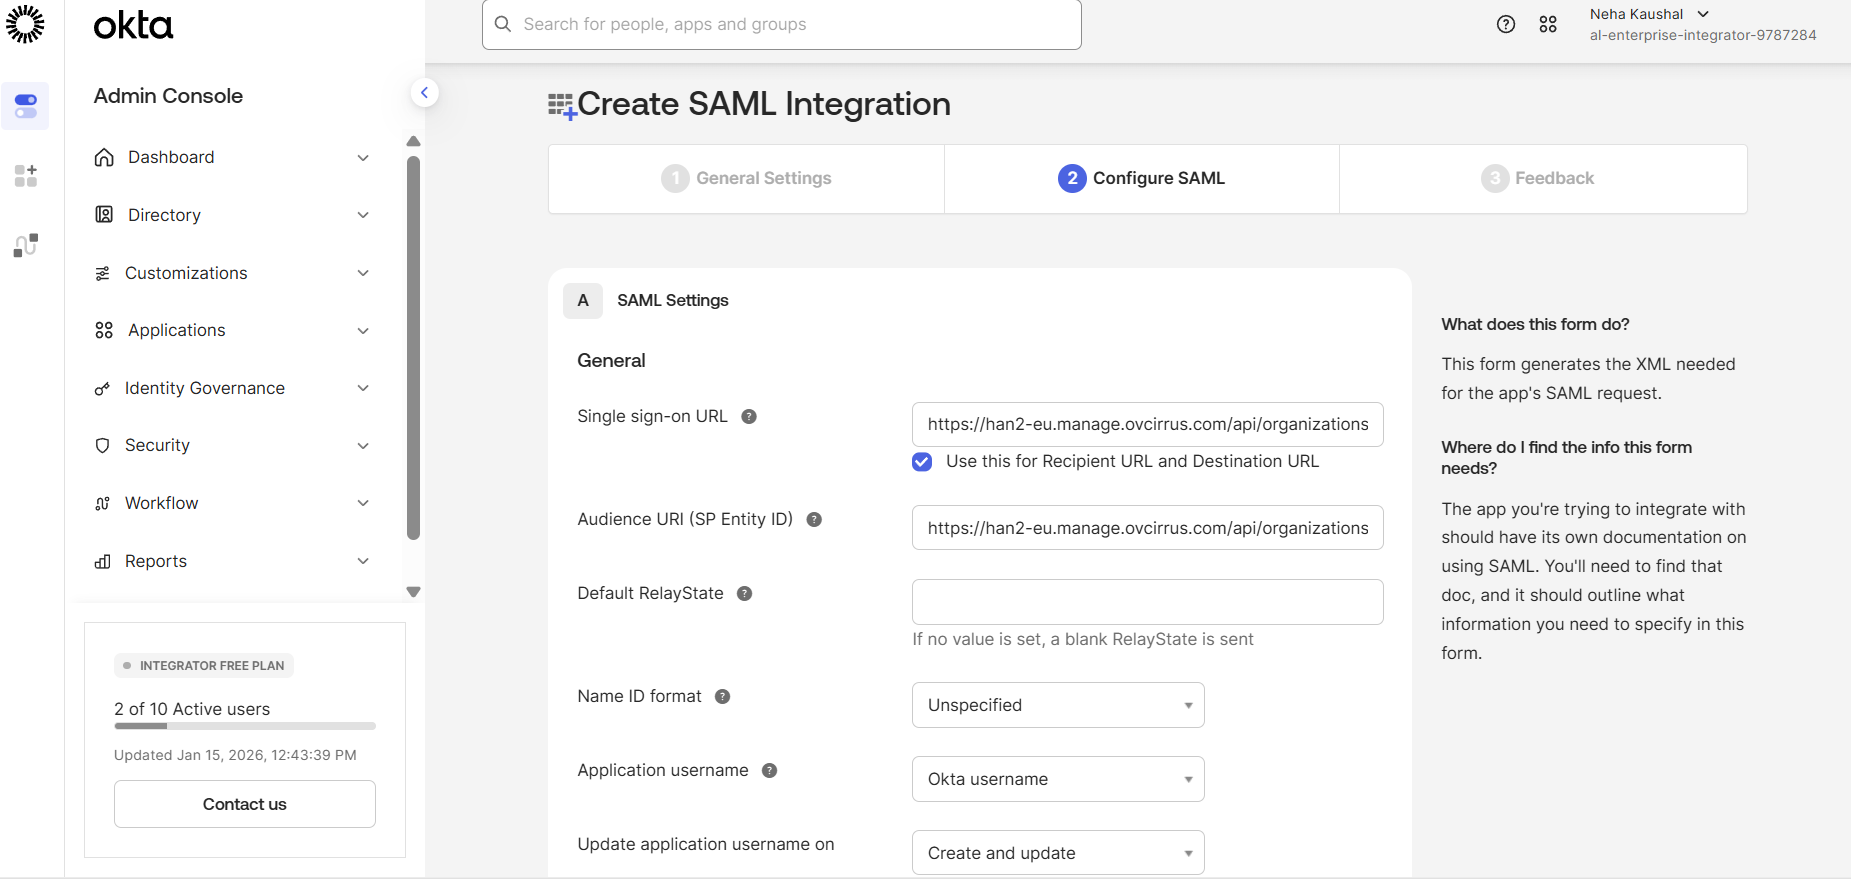
6. Configure the SAML Settings as described below and click on Next tab to complete the settings.
-
Single sign-On URL- Copy the Assertion Consumer Service (ACS) URL from the OminVista Cirrus 10 and paste it into the Single sign-on URL field.
-
Audience URI (SP Entity ID)- Copy the Entity ID from the OminVista Cirrus 10 and paste it into Audience URI(SP Entity ID) field.
The rest of the field values are auto filled.
-
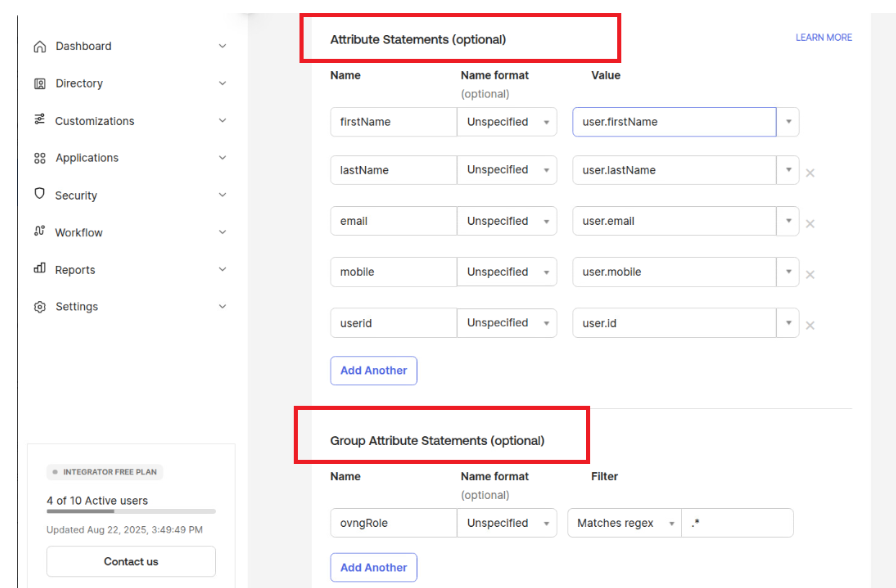
You will be directed to the Sign On Settings screen. Add Attribute Statements as needed for user identification. The Name should be same in the below given table.
|
Attribute Name |
Mandatory |
OKTA Value |
OVNG Mapping |
|---|---|---|---|
|
firstName |
Yes |
user.firstName |
Profile: Full Name |
|
lastName |
Yes |
user.lastName |
Profile: Full Name |
|
|
Yes |
user.email |
Profile: E-mail |
|
mobile |
No |
user.mobile |
Profile: Contact Phone |
|
userId |
Yes |
user.id |
Settings: unique Id |
Note: Attribute Name is case-sensitive. “N” and “I” is capital letter.
Now, Add the Group attribute. The Name should be same in the given table.
|
Attribute Name |
Mandatory |
OKTA Value |
OVNG Mapping |
|---|---|---|---|
|
ovngRole |
Yes |
Matches regex:.* |
OVNG Role mapping |
Note: Attribute Name is case-sensitive. “R” is capital letter.
-
Grant SAML SSO application access to the Group created by you and to other associated groups. Go to Applications > Assignments > Assign > Assign to Groups tab and select the appropriate groups to grant access to the OmniVista Cirrus 10 application.
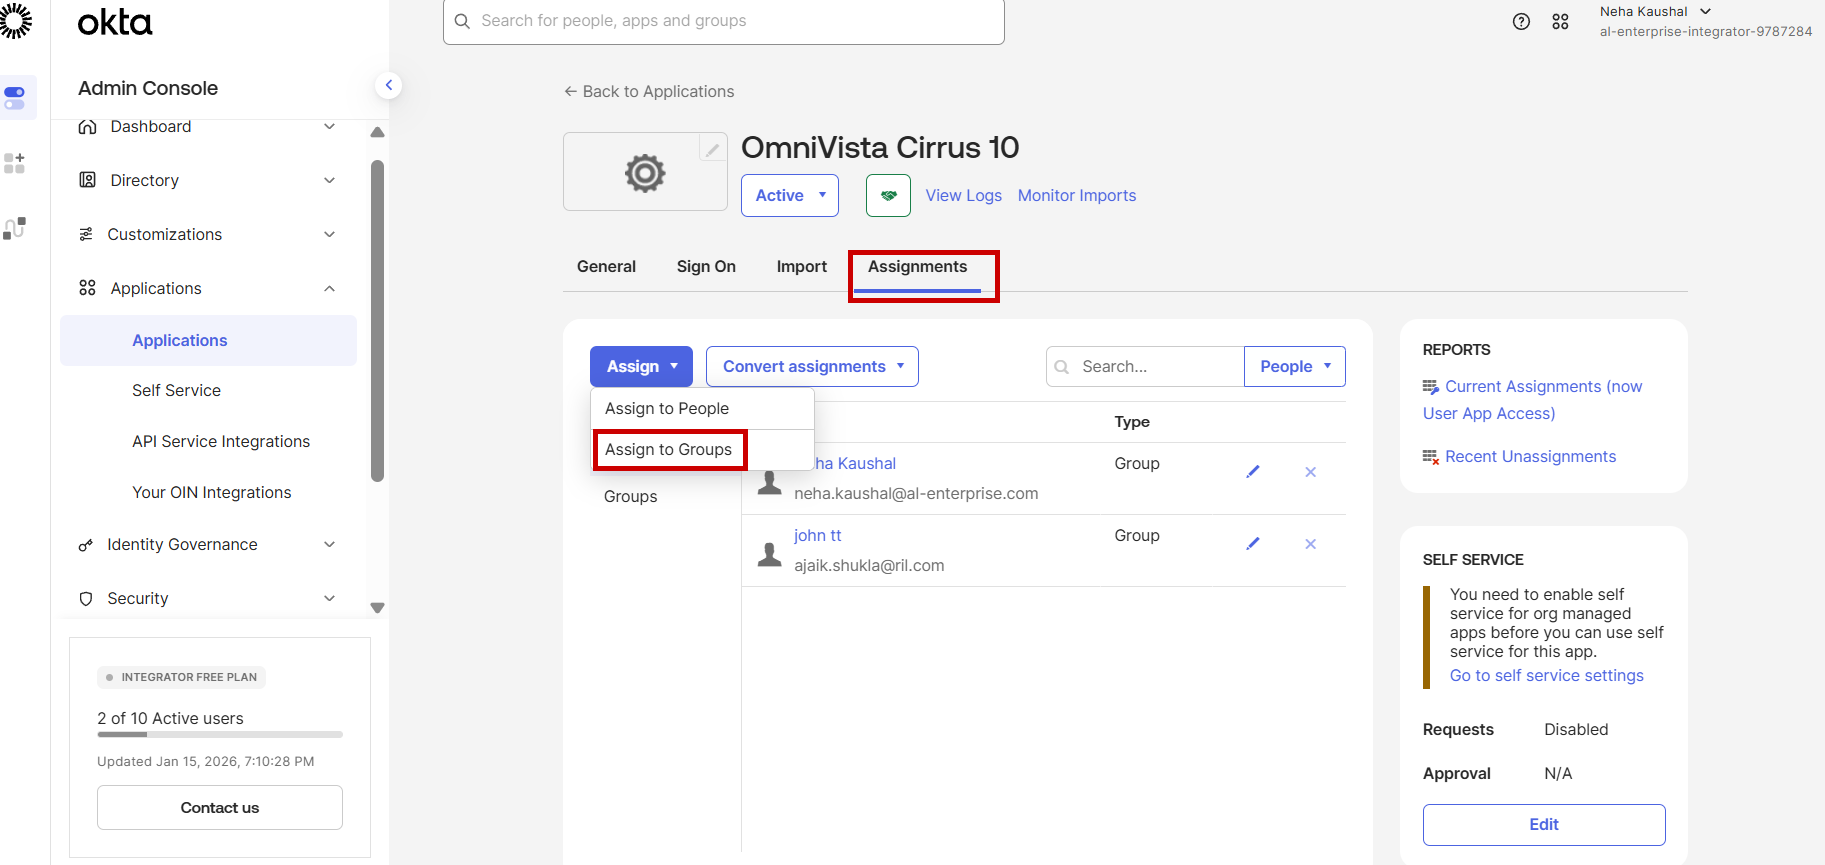
An admin can assign a user directly to the SSO application using the 'Assign to People' option. By default, OmniVista Cirrus 10 assigns the 'Limited Role with no site access' to these users.
-
Configure the OmniVista Cirrus URL as Trusted Origins in the Security section. Go to Security > API > Trusted Origins and select the Add origin tab.
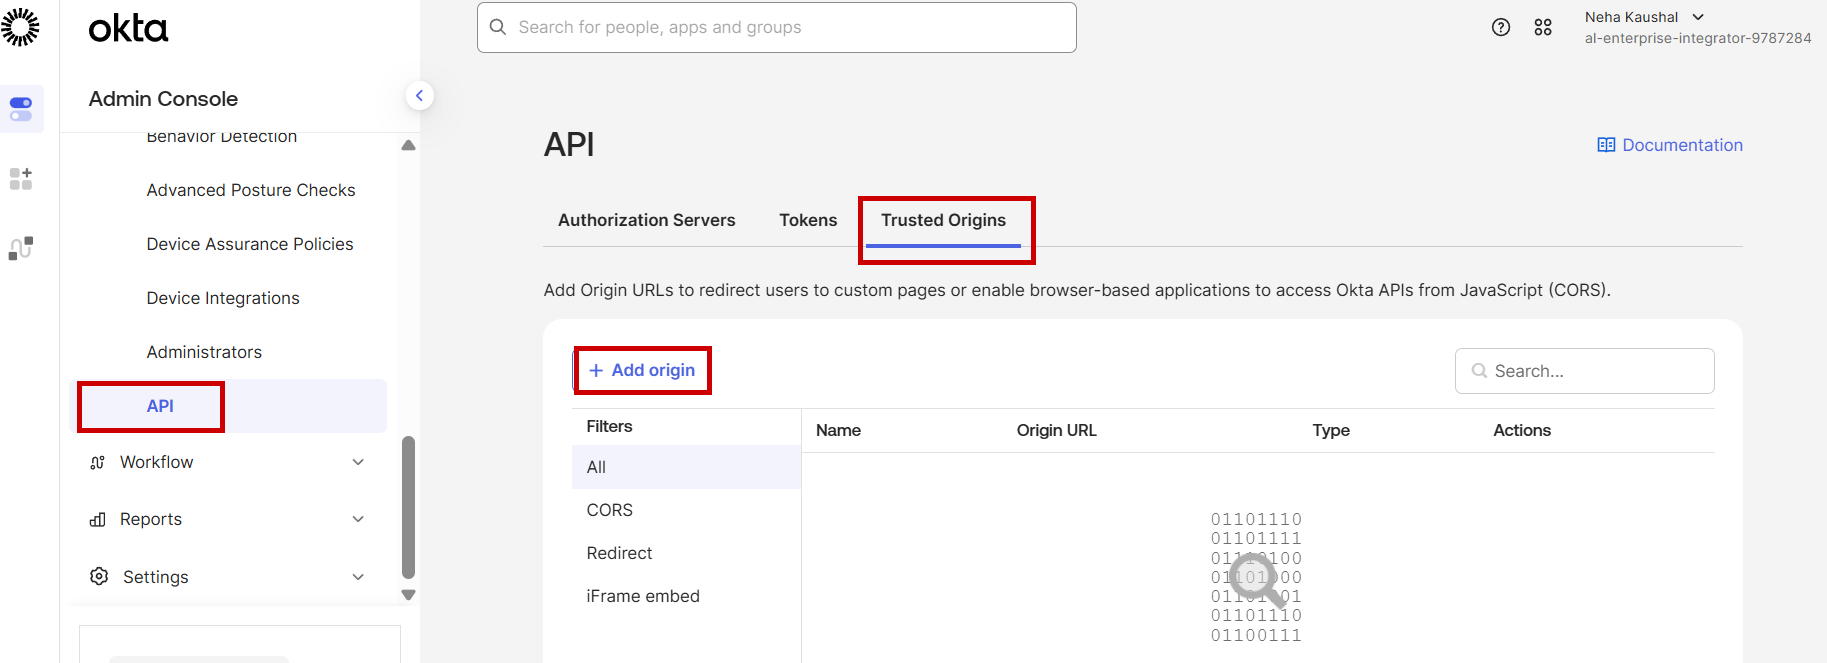
The below screen appears:
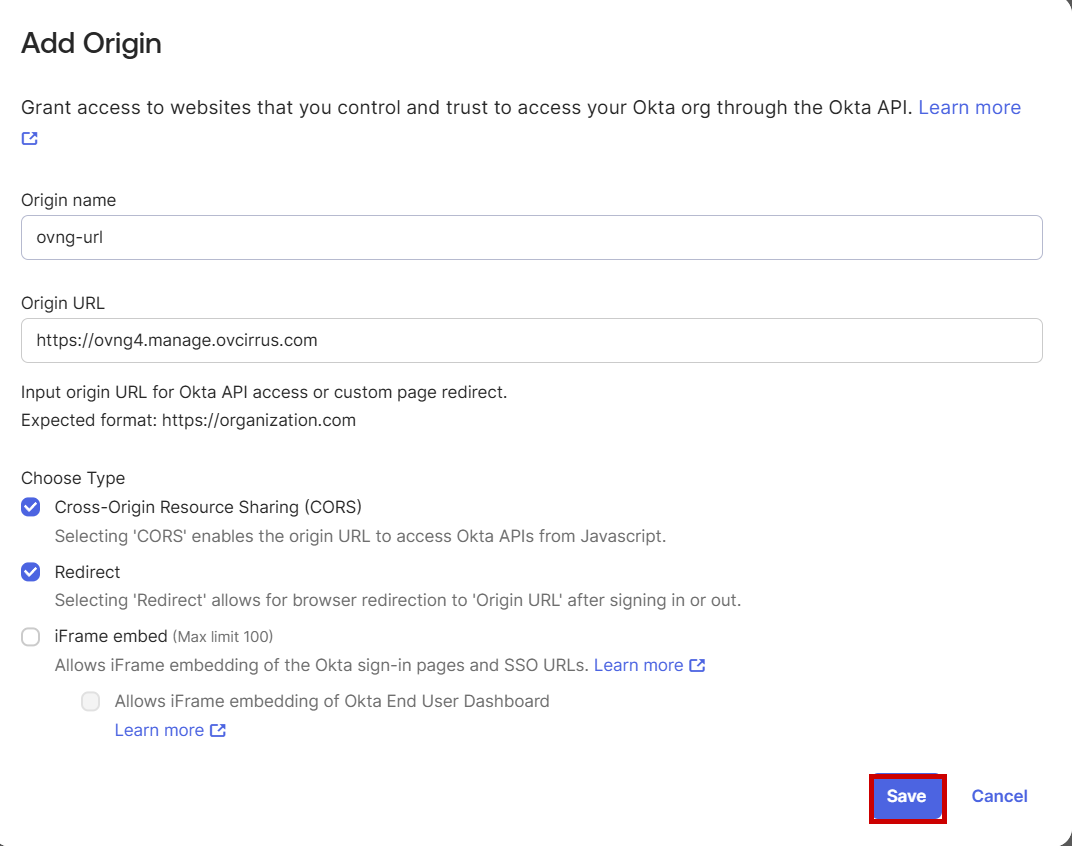
Enter the field values as described and click on Save to save the settings.
-
Origin name: ovng-url
-
Origin URL: https://ovng4.manage.ovcirrus.com
Enable the CORS and Redirect option.
The configuration on Identity provider end is done. Go to step 3 of Single Sign-On Settings for Omnivista Cirrus end Configuration details.
SSO Configuration on Azure
Follow the below step-by-step process to set up Azure as the Identity Provider for OmniVista Cirrus 10:
-
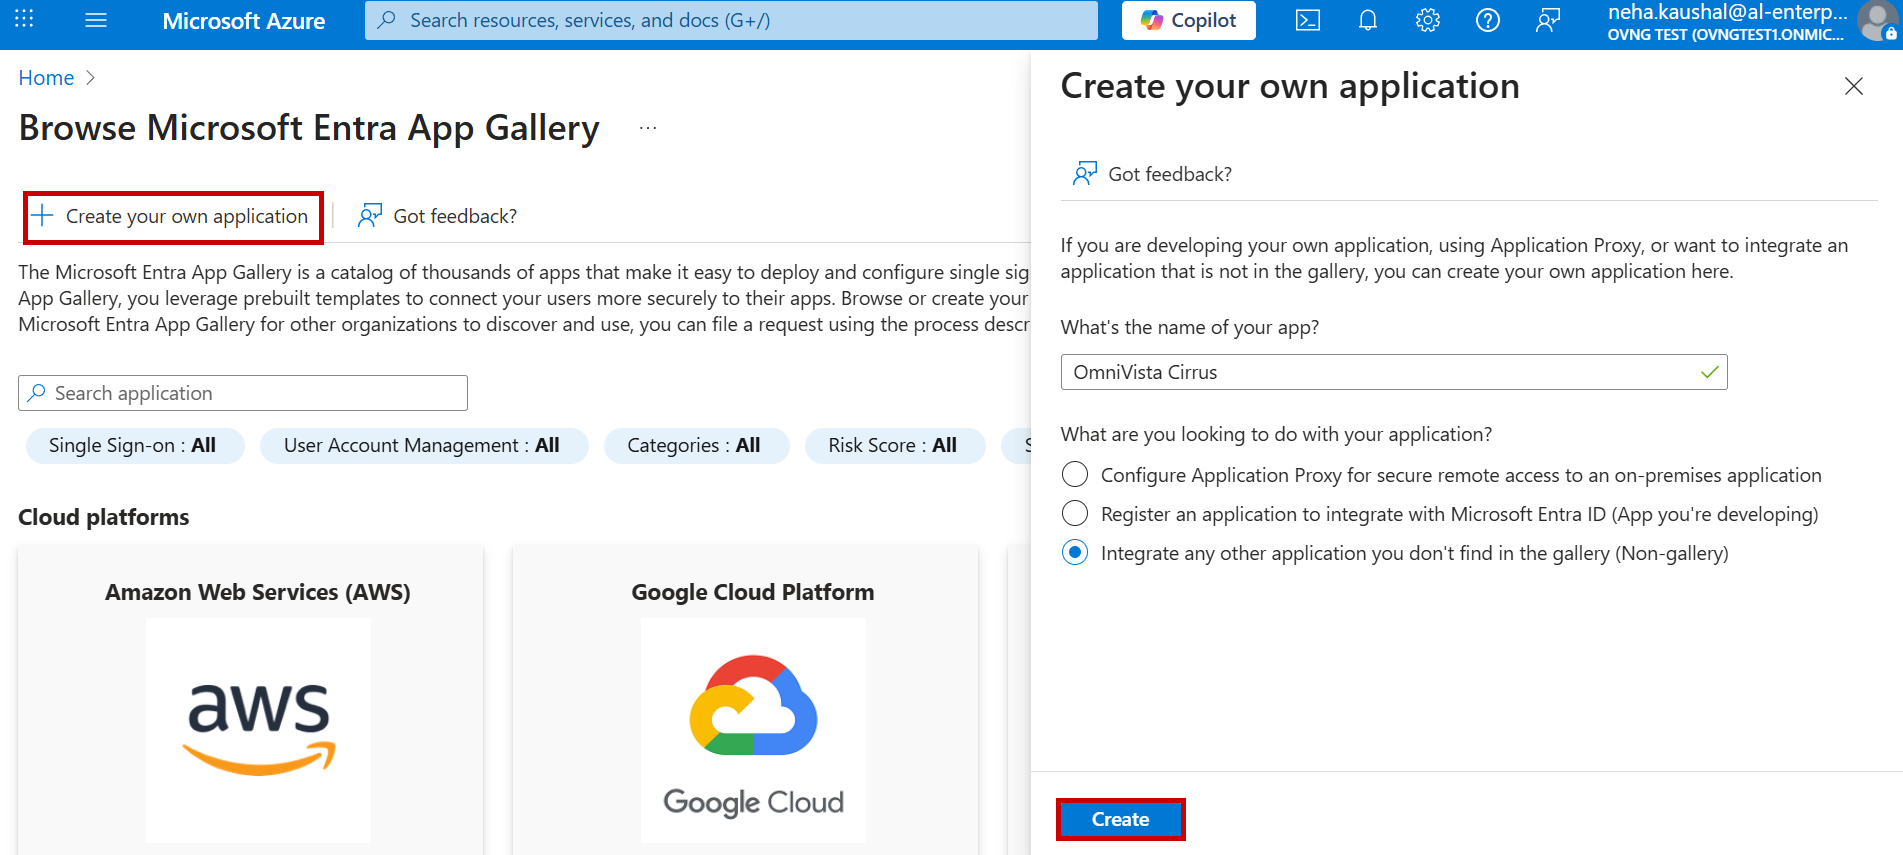
Login into Azure portal with the Organization username and password. Create a new Enterprise Application. Go to Enterprise Application > New Application and select Create your own application tab. Enter the name of your app(Example: OmniVista Cirrus) and click on Create as shown below:
-
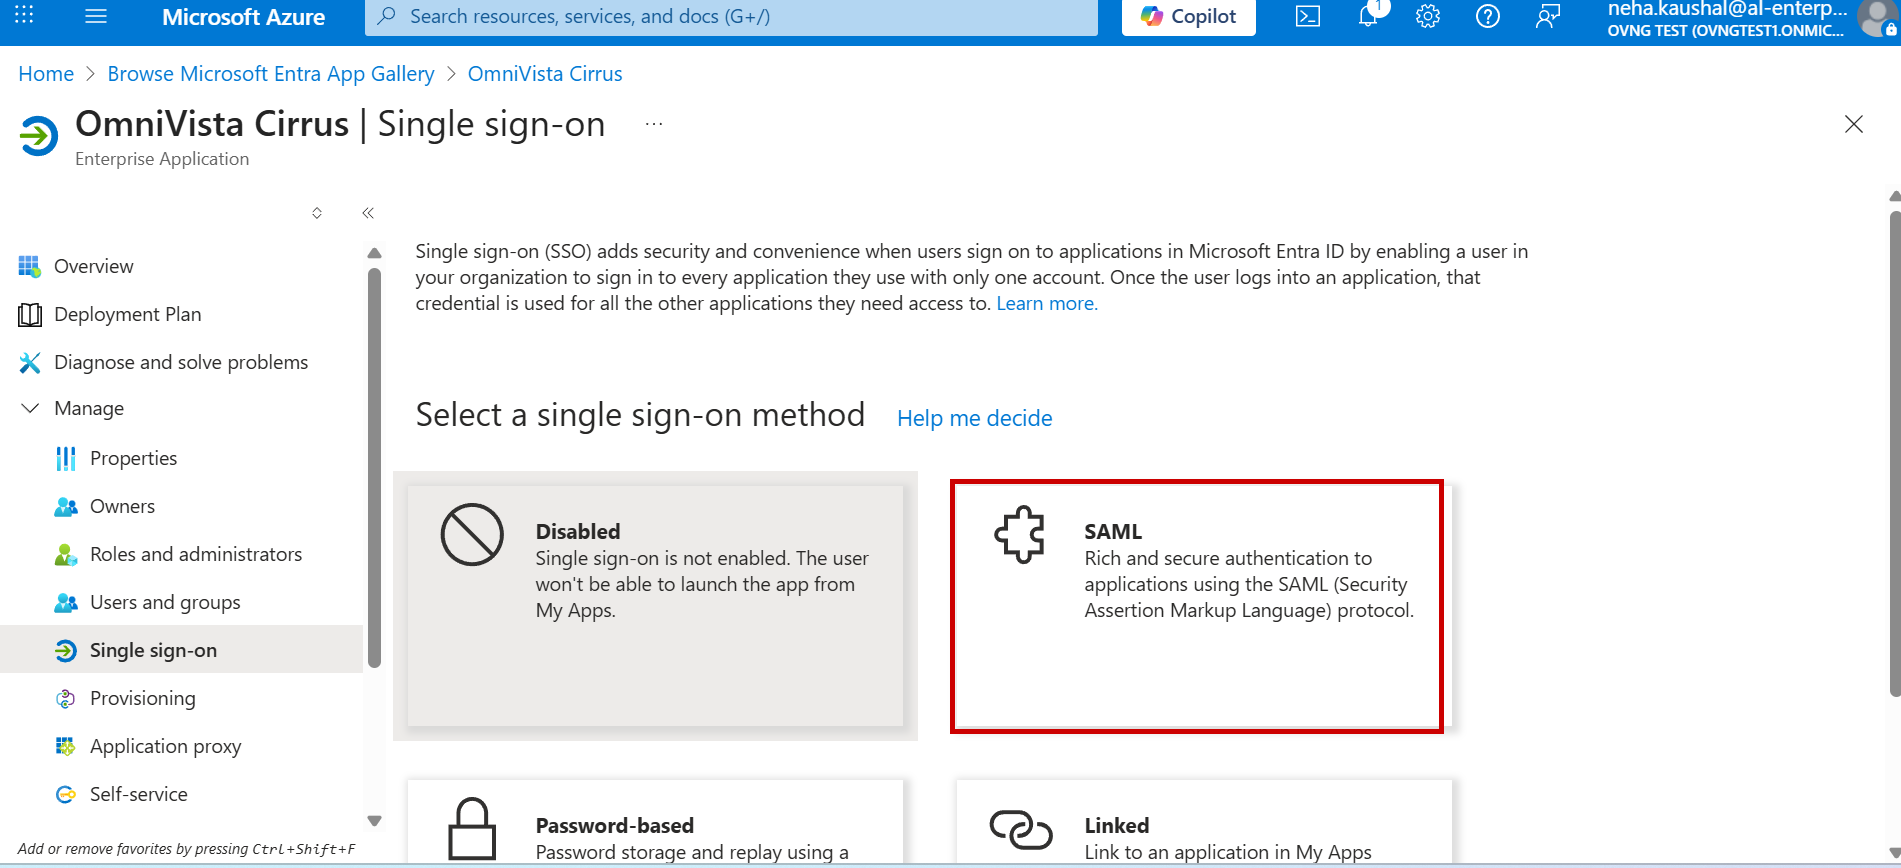
Select the Set up single sign on option under the New Application Properties screen.
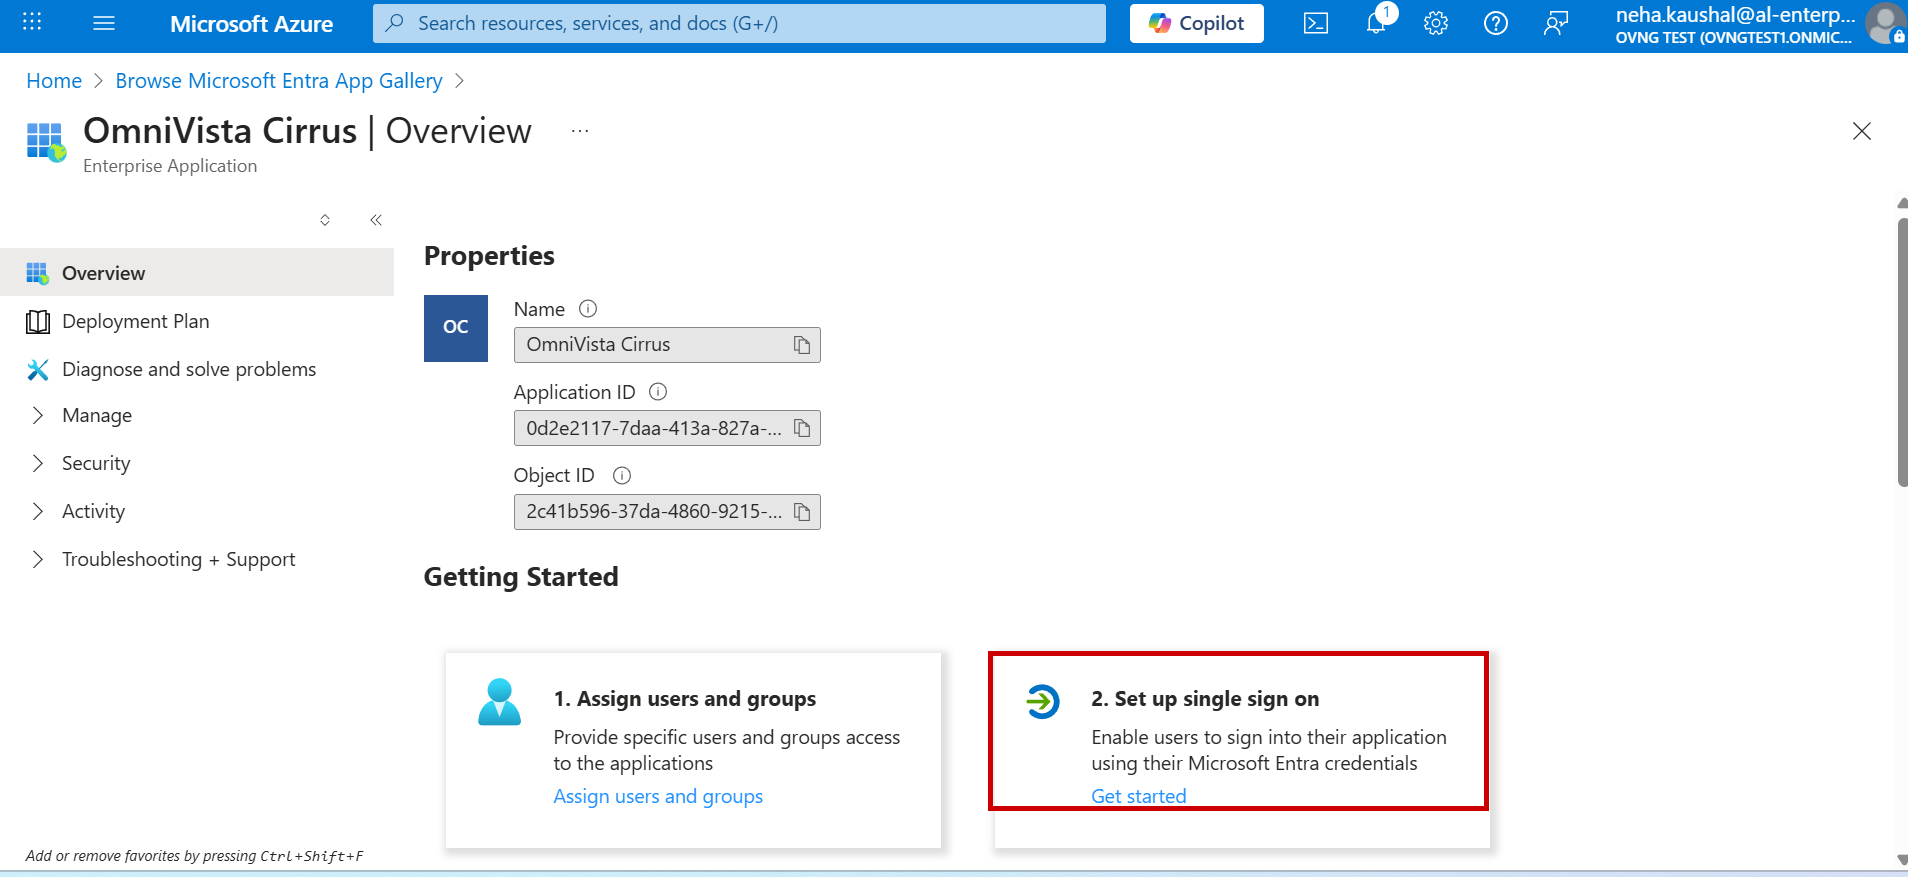
Then choose SAML as the SSO method for configuration as shown below.
-
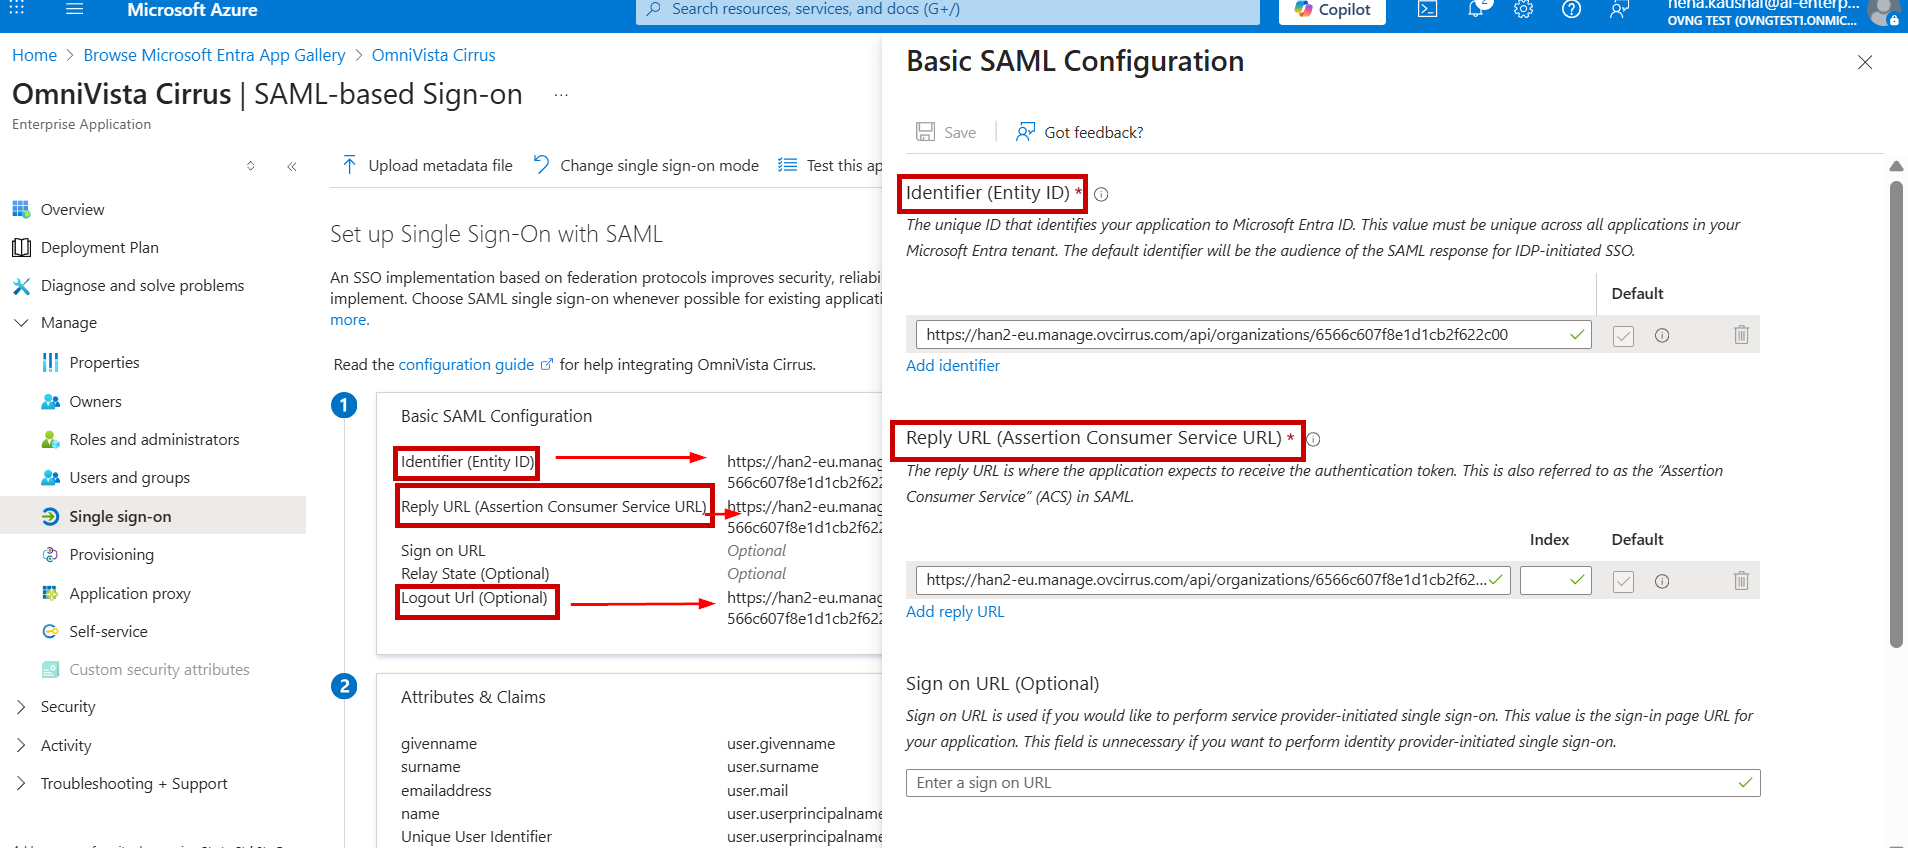
You will be redirected to the Set up SSO with SAML Configuration screen. Configure the Basic SAML Settings as described below and move to next step to complete the settings.
-
Reply URL(Assertion Consumer Service URL)- Copy the Assertion Consumer Service (ACS) URL from the OminVista Cirrus 10 and paste it into the Reply URL field.
-
Identifier (Entity ID)- Copy the Entity ID from the OminVista Cirrus 10 and paste it into Identifier (Entity ID) field.
-
Logout URL - Copy the OmniVista Cirrus Logout URL from the OminVista Cirrus 10 and paste it into the Logout URL field.
-
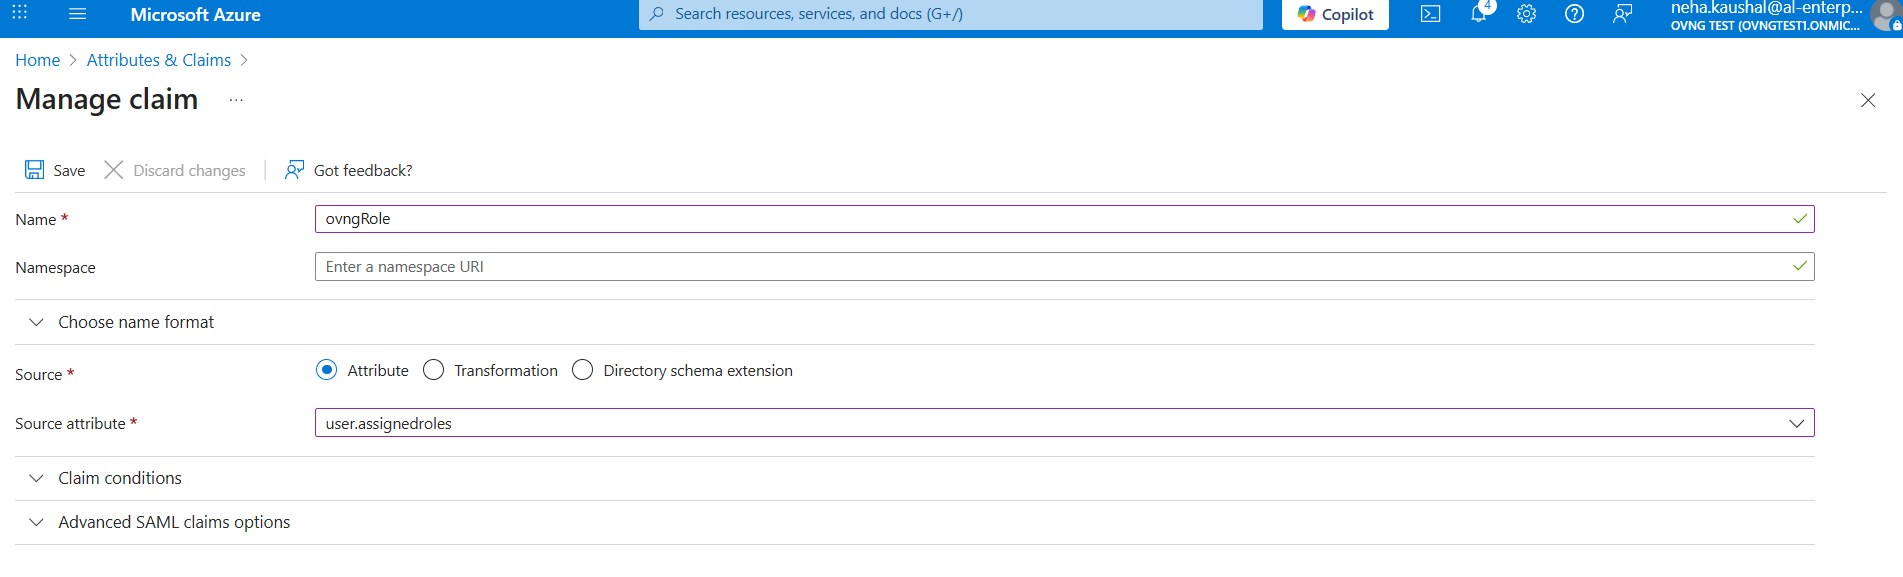
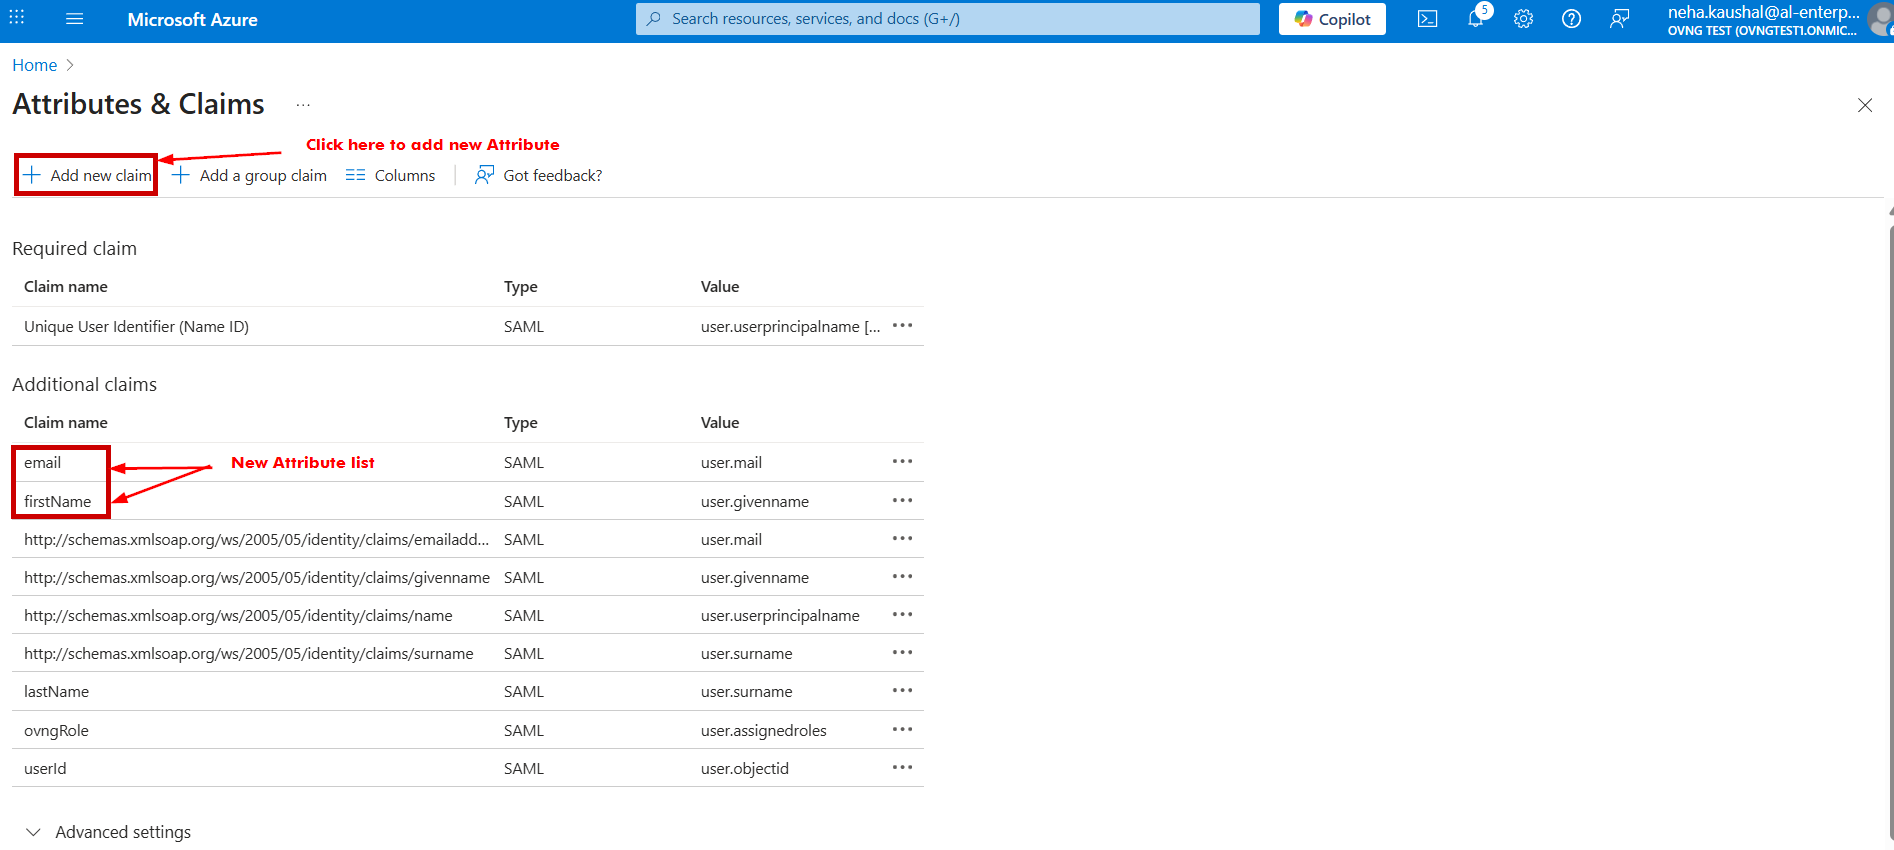
Go to the Attributes and Claims section to configure and define attributes in the SAML token. Click the edit tab under Attributes and Claims and add attribute statements for user identification. The Name must match the table below.
|
Attribute Name |
Mandatory |
OKTA Value |
OVNG Mapping |
|---|---|---|---|
|
firstName |
Yes |
user.givenname |
Profile: Full Name |
|
lastName |
Yes |
user.surname |
Profile: Full Name |
|
|
Yes |
user.mail |
Profile: E-mail |
|
mobile |
No |
user.mobilephone |
Profile: Contact Phone |
|
userId |
Yes |
user.objectid |
Settings: unique Id |
|
ovngRole |
Yes |
user.assignedroles |
OVNG Role mapping |
Note: Attribute Name is case-sensitive. “N”, “I” and “R” is capital letter.
The below screen appears:
The SAML SSO configuration is done.
-
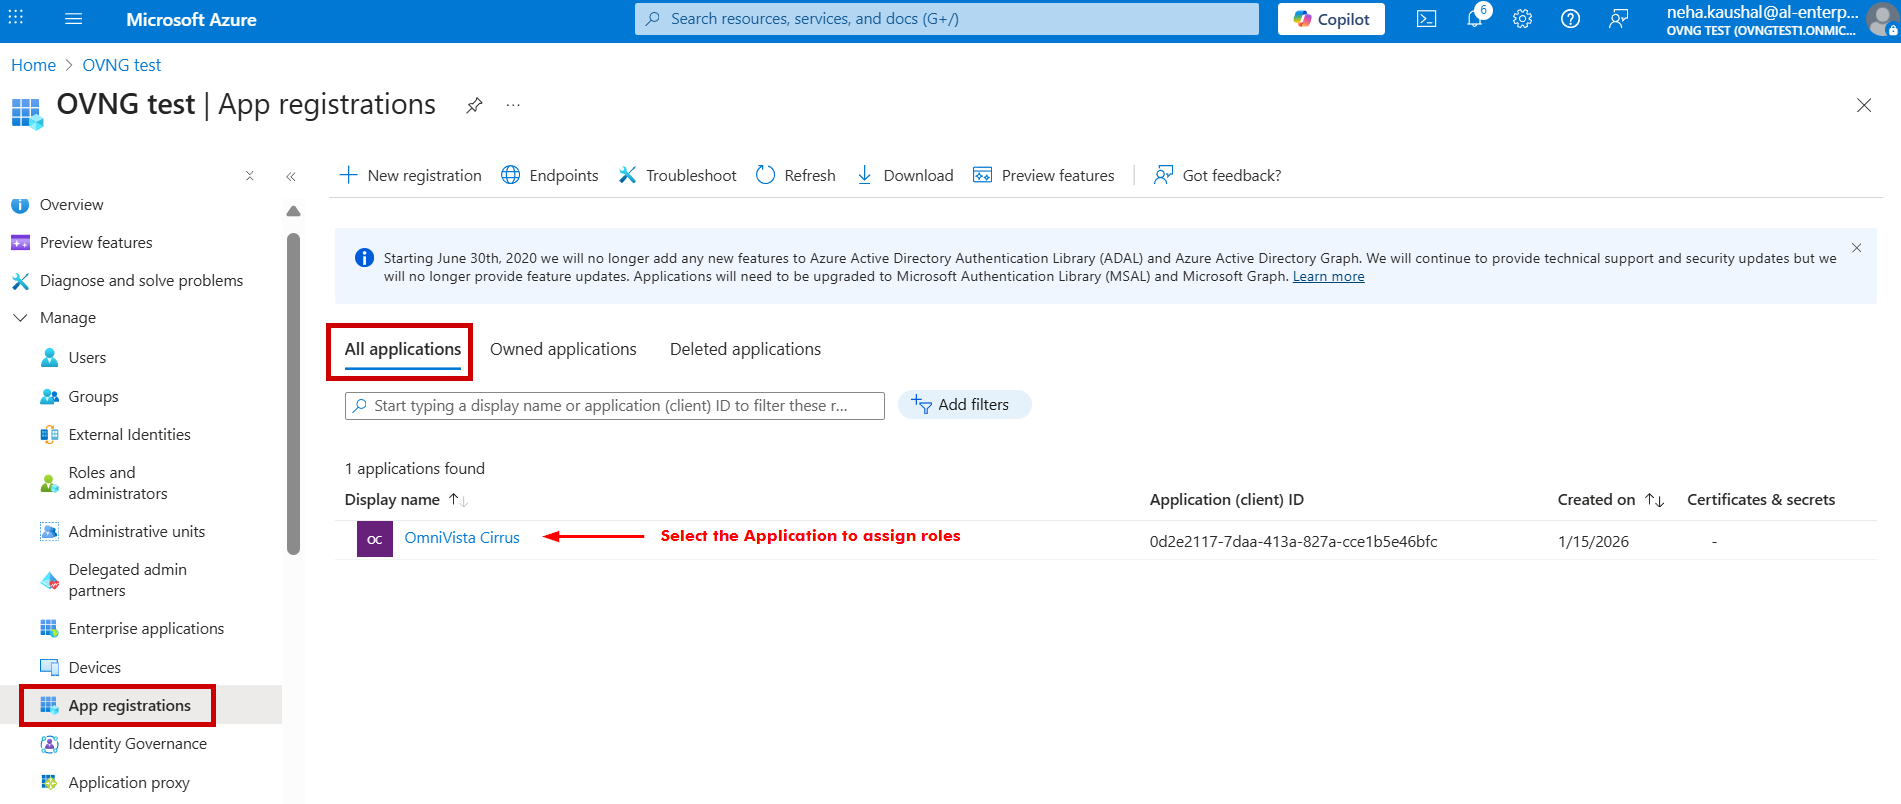
The next step is to configure the roles for the OmniVista Cirrus Application you have created. Go to the OVNG test Application and under the Manage section, select App registrations > All applications tab and click on Application Name.
-
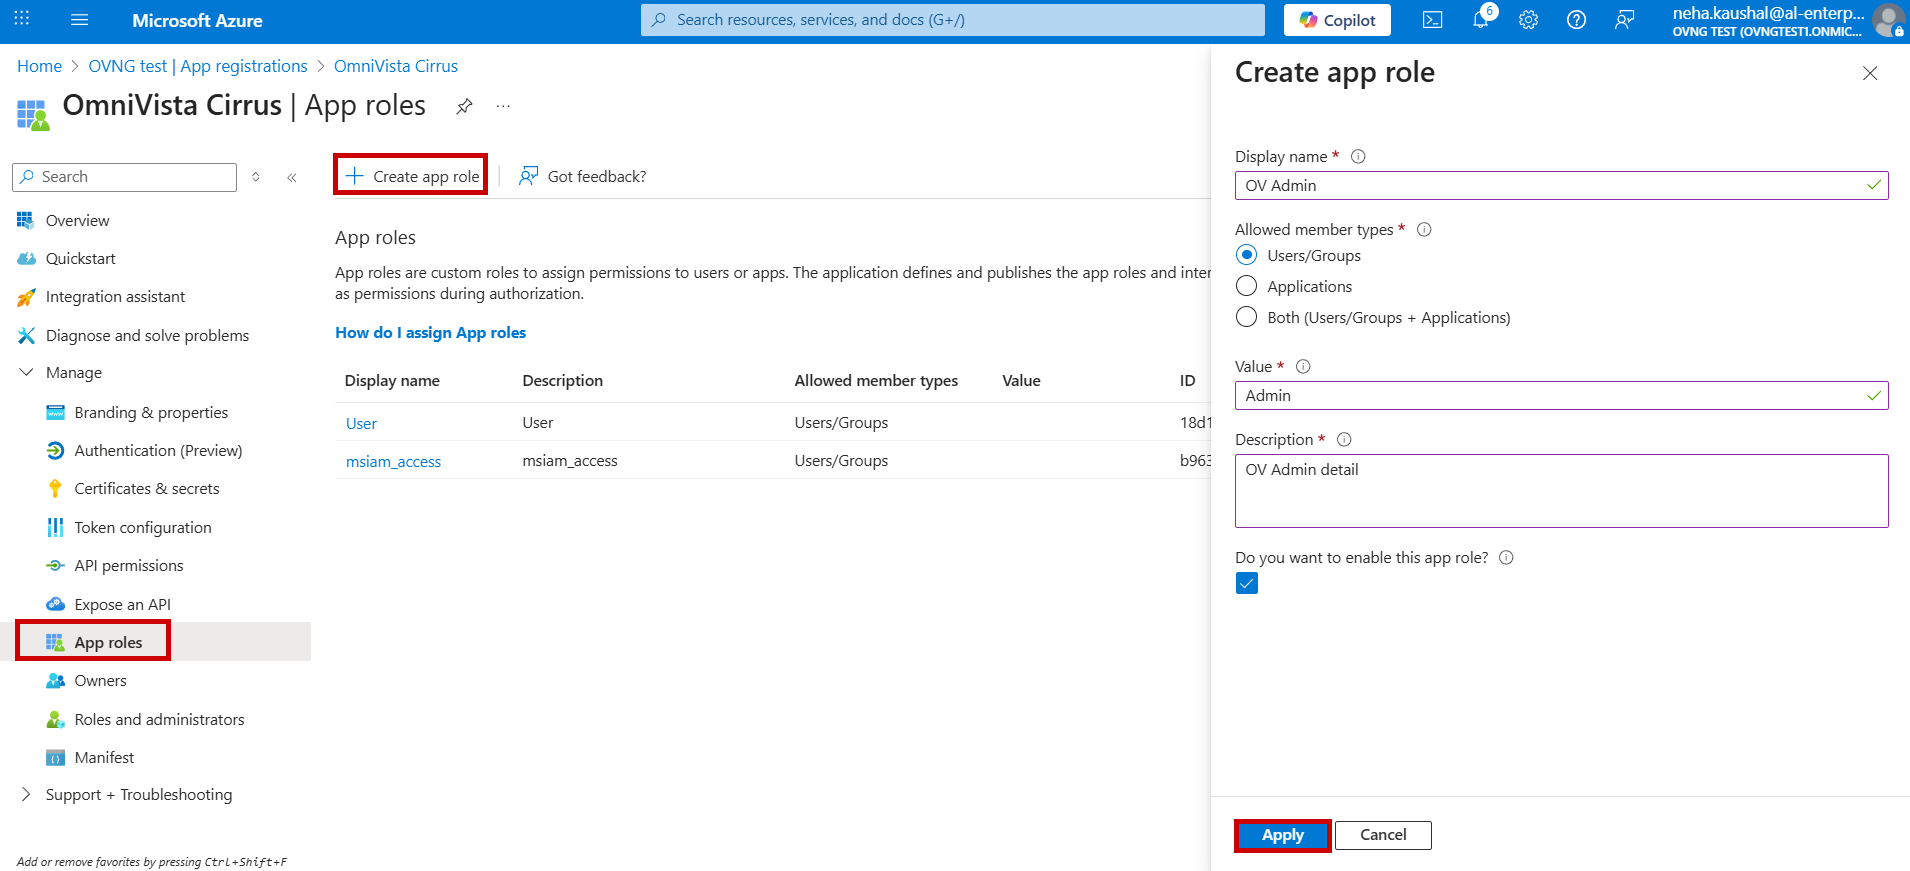
Go to App roles section and select Create app role tab. The Create screen appears. Enter the below field values and click on Apply button.
-
Display name: Enter the name of app role.
-
Allowed member type: Choose Users/Groups option.
-
Value: Enter a role value. (Note: This value is used to map OmniVista Cirrus role for SSO configuration).
-
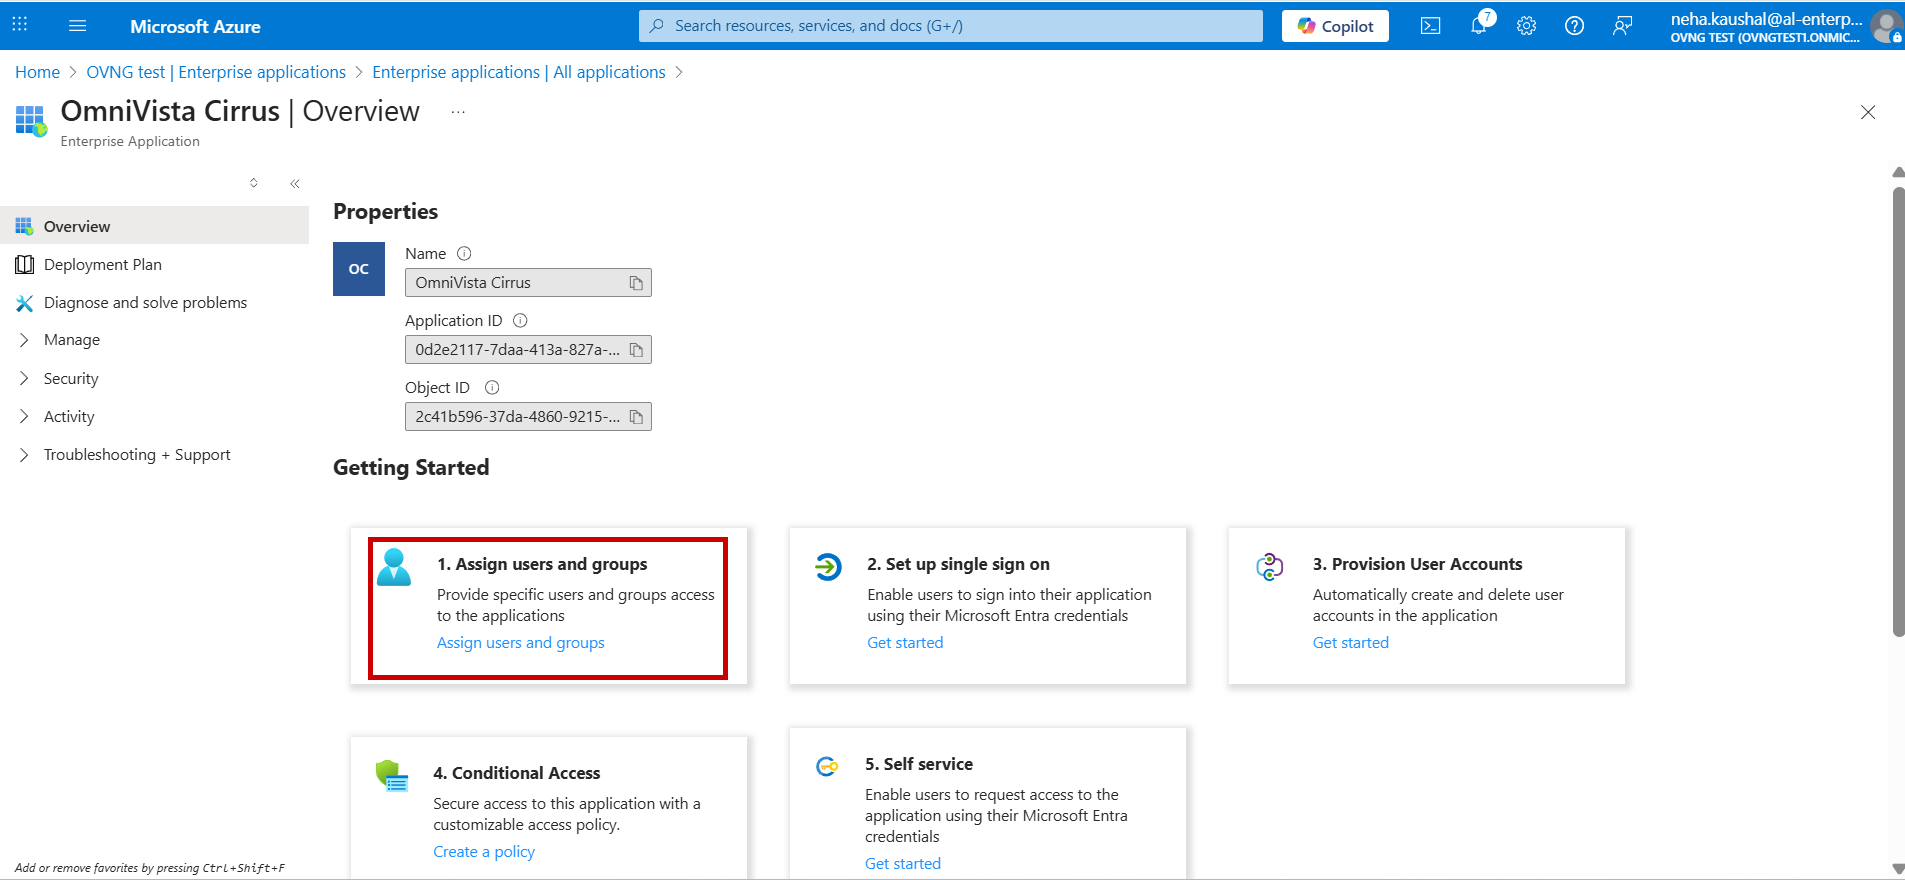
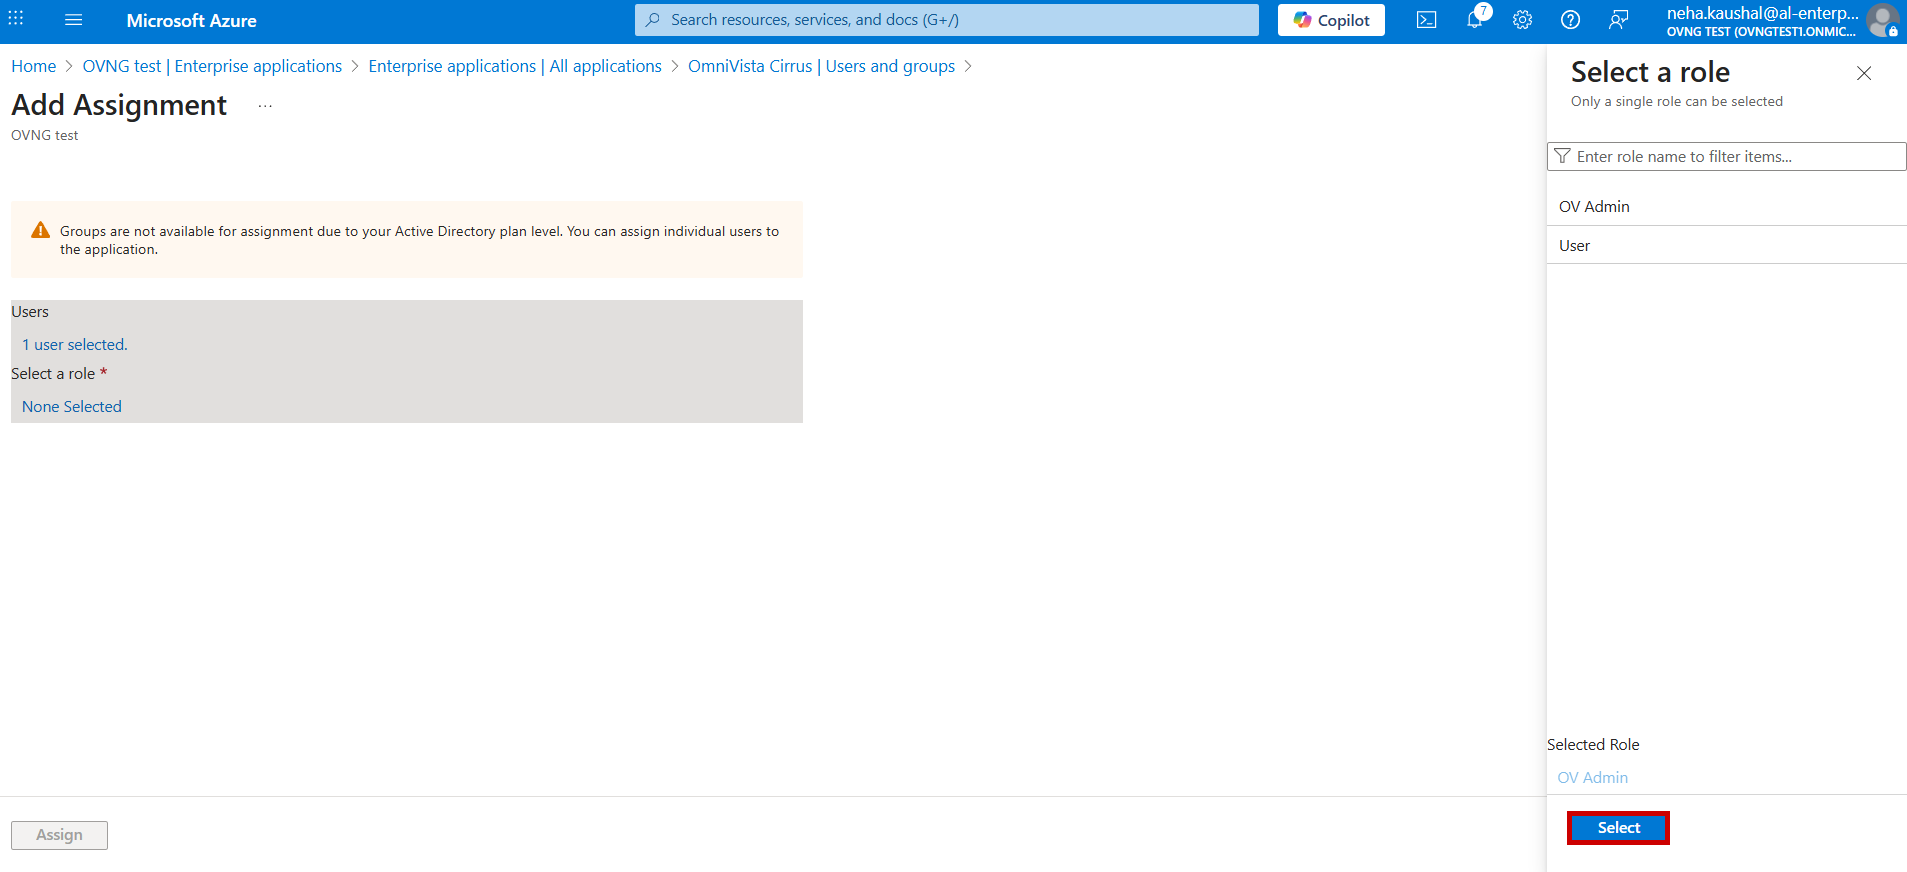
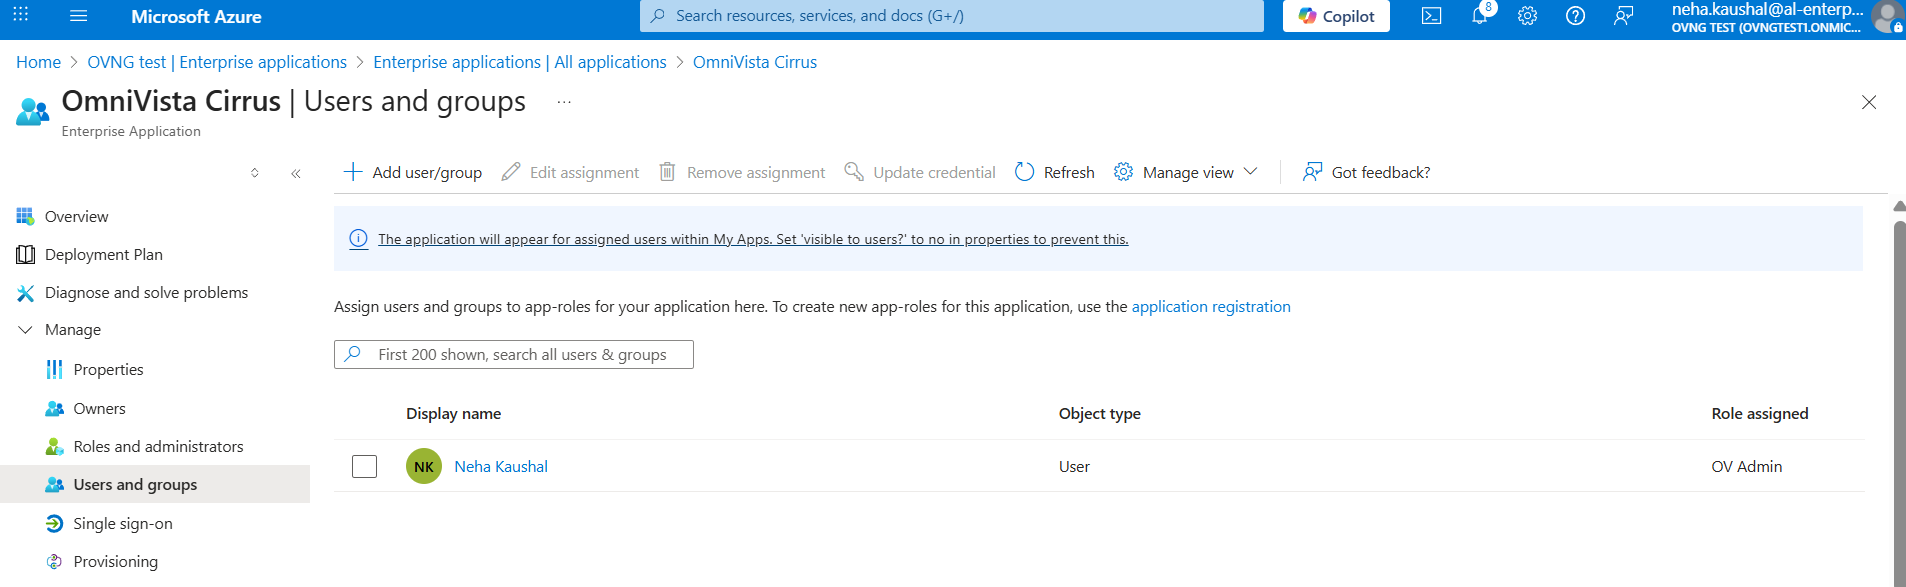
Now, assign the Application Role to Users. Go to Enterprise Application, select the Application and click on Assign users and groups.
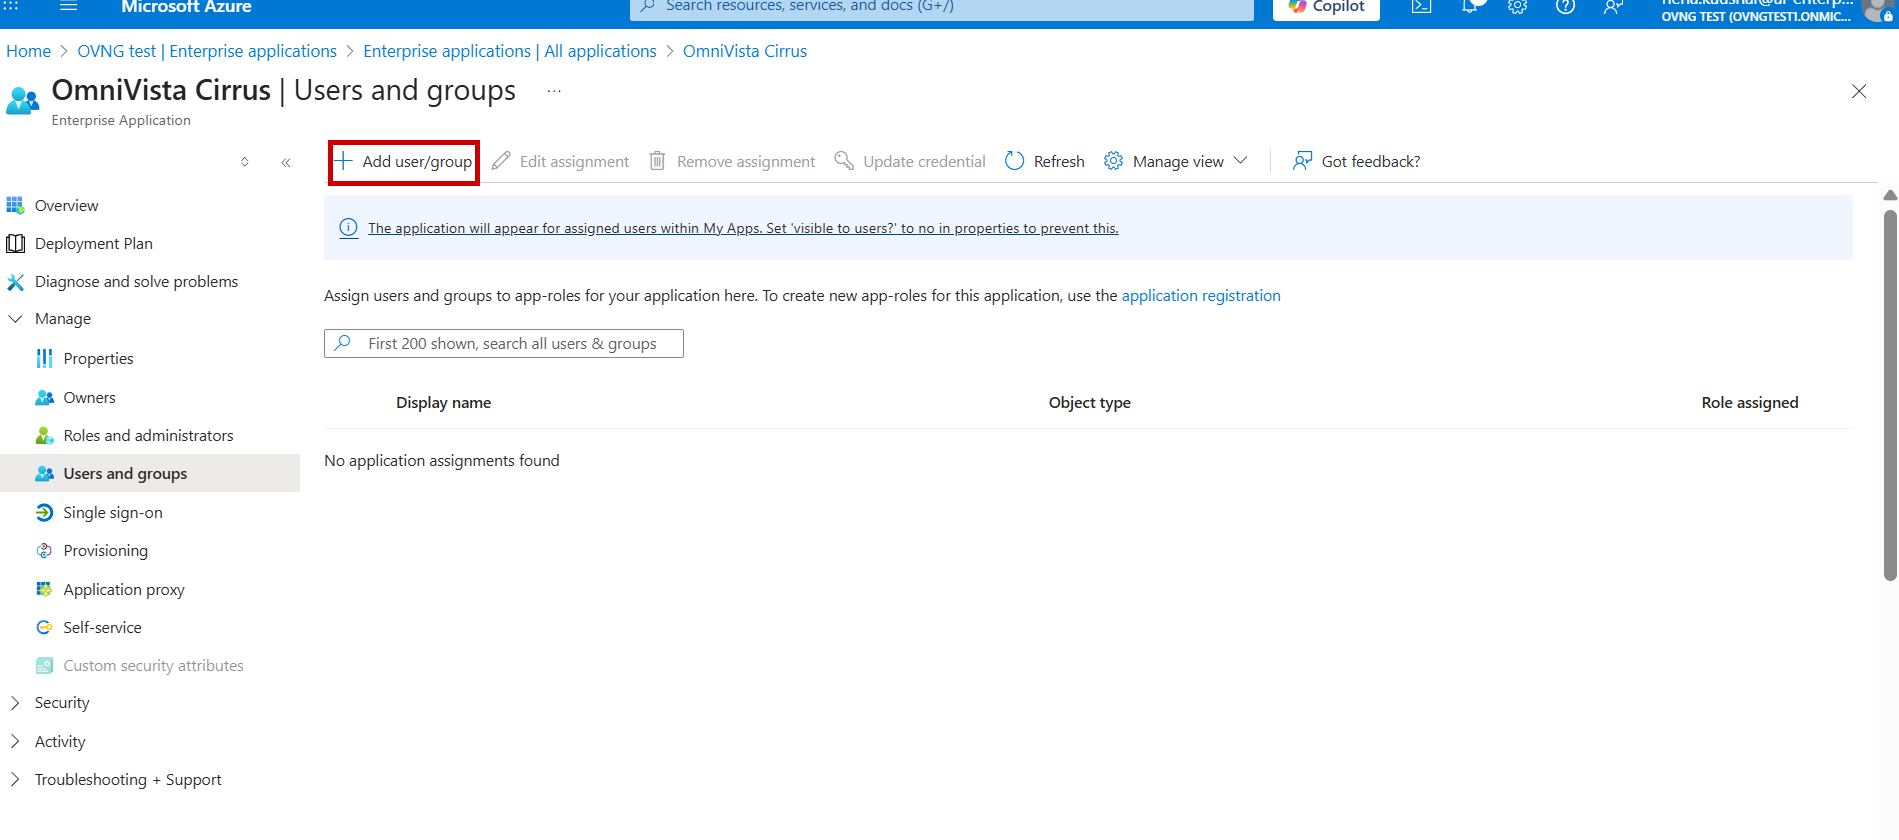
The below screen appears. Click on Add user/group tab.
The below screen appears. Select Users and Roles, then Assign to the application.
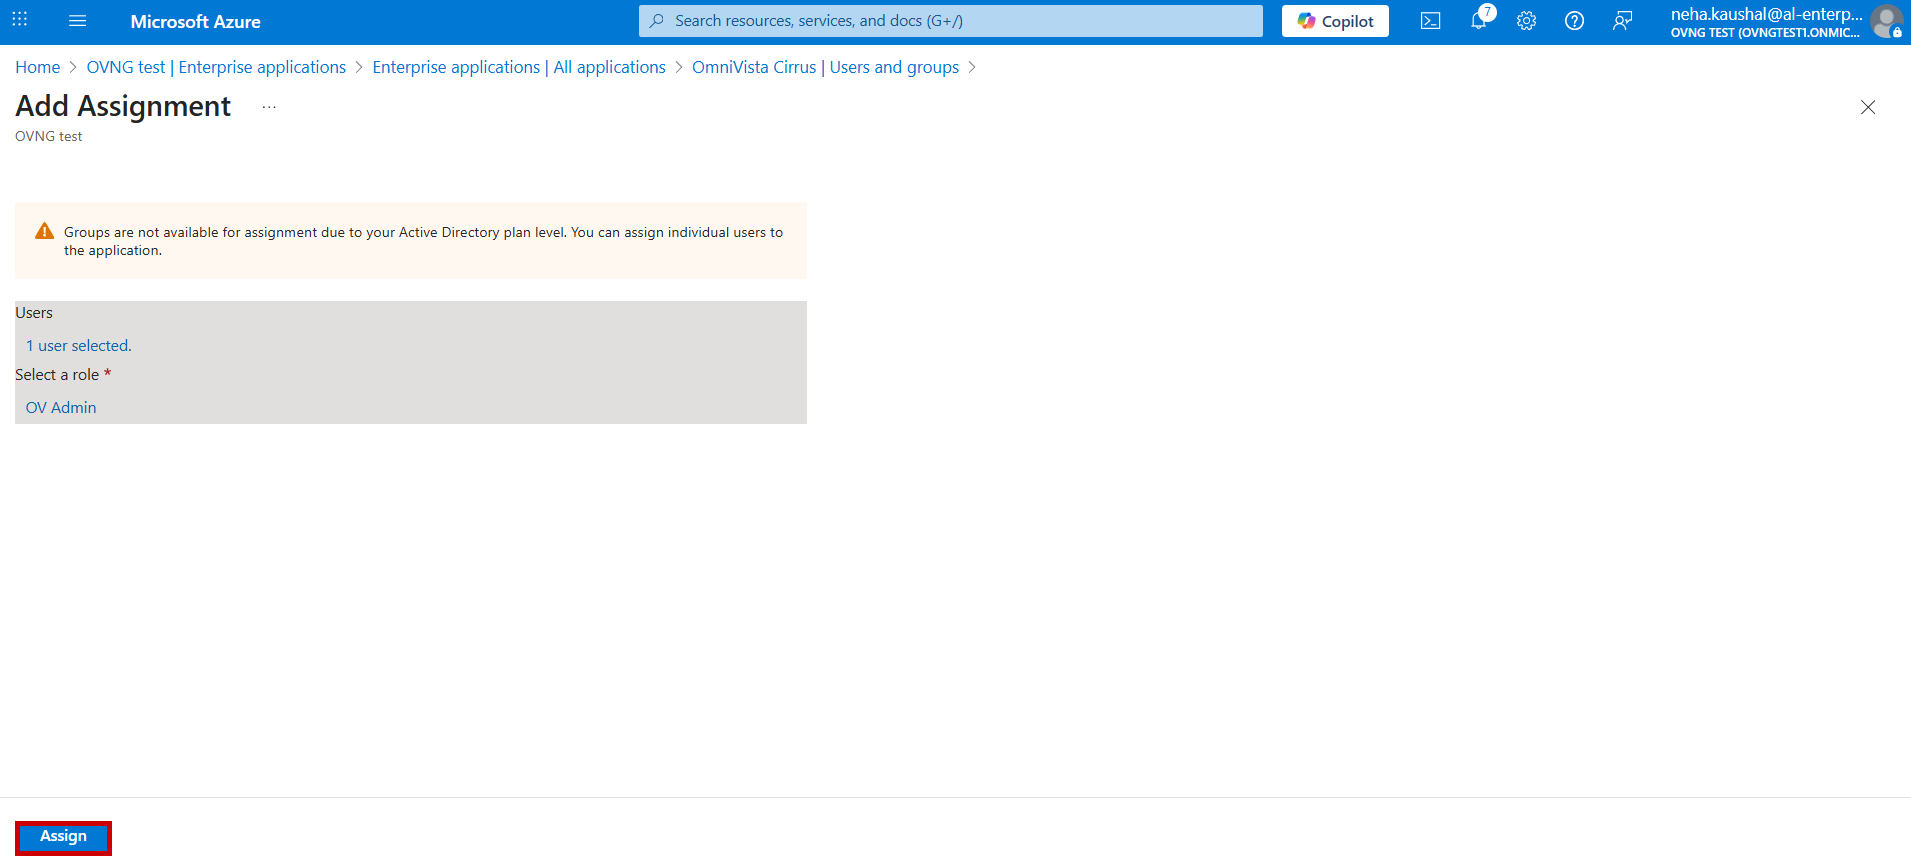
The below screen displays the list of Users and roles assigned for the Application.
The configuration on Identity provider end is done. Go to step 3 of Single Sign-On Settings for Omnivista Cirrus end Configuration details.