
The L3 VPN Configuration feature lets network administrators create and manage L3 VPN bindings on SPB-capable switches. These bindings connect VRFs to SPB services for inter-site Layer 3 connectivity. It supports both IPv4 and IPv6 gateways.
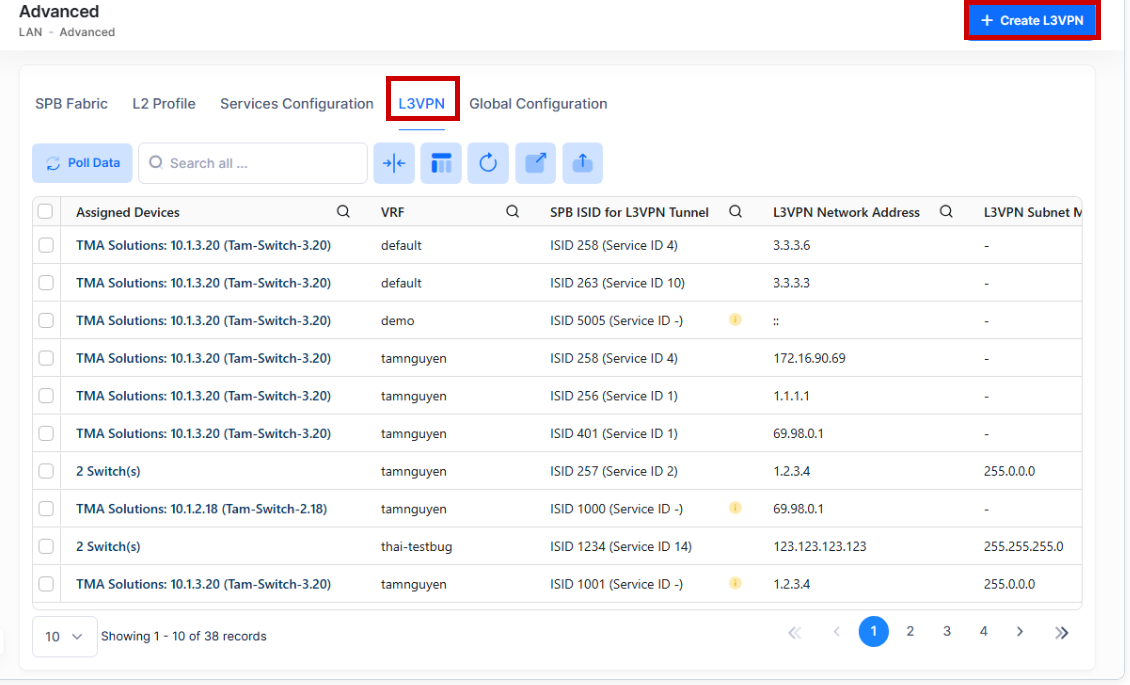
Use the L3VPN screen to display information about the configured L3 VPN bindings on the Switch devices. Refer to the troubleshooting section for solutions to your queries. This screen also allows you to create, edit, or delete L3 VPN configuration. To access the L3VPN screen, click on LAN > Advance > L3VPN under the “Configure” section of the OmniVista Cirrus Menu. The below screen appears:
Creating an L3 VPN
The Create L3VPN screen is used to create L3 VPN bindings across the organization on the selected devices. Click on Create L3VPN to access the Create L3 VPN screen.
Consider the following use cases while configuring L3 VPN bindings on the devices.
-
Configure at least one SPB Service Profile before creating an L3 VPN binding. The system must ensure both the SPB service and the VRF are configured on the target device. If the device lacks an SPB service device config for the L3VPN's ISID, the system auto-creates the SPB Service device configuration record and marks its status as PENDING. The system auto-provisions them in this order:
-
VRF device configuration exists for this device and VRF.
-
If a VRF template exists but no device configuration, auto-create the device configuration using the template and push the VRF configuration to the device.
-
If neither VRF device configuration nor VRF template exists, the system auto-creates both and pushes the VRF configuration to the device.
-
-
Target switch devices must be online (management connectivity ON) to receive configuration.
-
If the SPB service does not exist on the device but the L3 VPN includes that SPB, and the SPB exists in OmniVista Cirrus, the polling service will find it by ISID and map it to the L3 VPN template.
-
L3 VPN is fully supported from package version 6.6. If you use an earlier version, L3 VPN features may not work as expected. Upgrade to version 6.6 or later for full compatibility.
-
An L3 VPN binding record in the system is uniquely identified by a composite key consisting of four fields: VRF ID, ISID, Gateway Type, and Org ID. The Gateway Type distinguishes between IPv4 and IPv6 bindings. This means a single logical L3VPN service (same VRF + same ISID) can have up to two separate binding records — one for IPv4 and one for IPv6. These are not duplicates; they are distinct records because the Gateway Type differs.
-
When an L3 VPN poll message arrives with an empty data list for a vrf Context, check the database for existing L3VPN records matching the vrf Context name. If none are found, ignore the message; this indicates the VRF never had L3VPN bindings managed by OmniVista or was already cleaned up. If a match exists, the L3 VPN configuration was removed on the switch, but the OmniVista database still holds stale records. The backend should remove these L3 VPN assignments to synchronize the database with the switch state.
-
When creating an L3 VPN, the user assigns a gateway IP address to each L3 VPN. The user or switch may enter an IP address that does not exist as an IP interface on the target device. In this case, OmniVista automatically creates the IP interface using default values.
-
The organization administrator can create, edit, and delete L3 VPN bindings. The administrator can assign and remove devices. Users with view-only rights can see L3 VPN data, including device configuration status, but cannot create, update, or delete configurations. The server validates all write operations regardless of client-side restrictions. Unauthorized requests return a 403 response.
-
The supported device platforms for L3 VPN are:
-
OS6860N_P24M
-
OS6860N_P48M
-
OS6900-T24C2
-
OS6900-X24C2
-
OS6900-T48C6
-
OS6900-X48C6
-
OS6900-X48C4E
-
OS6900-C32E
-
OS6900-V48C8
-
The Create L3VPN screen provides the following step-by-step process for creating a L3VPN:
-
Basic Information - Configures the VRF name, L3 VPN network address, subnet mask and the ISID.
-
Switch Selection - Select the Switch or LAN devices from the available list to create a L3 VPN.
Complete the following sections of the Create L3VPN screen, then click on Create Button.
Basic Information
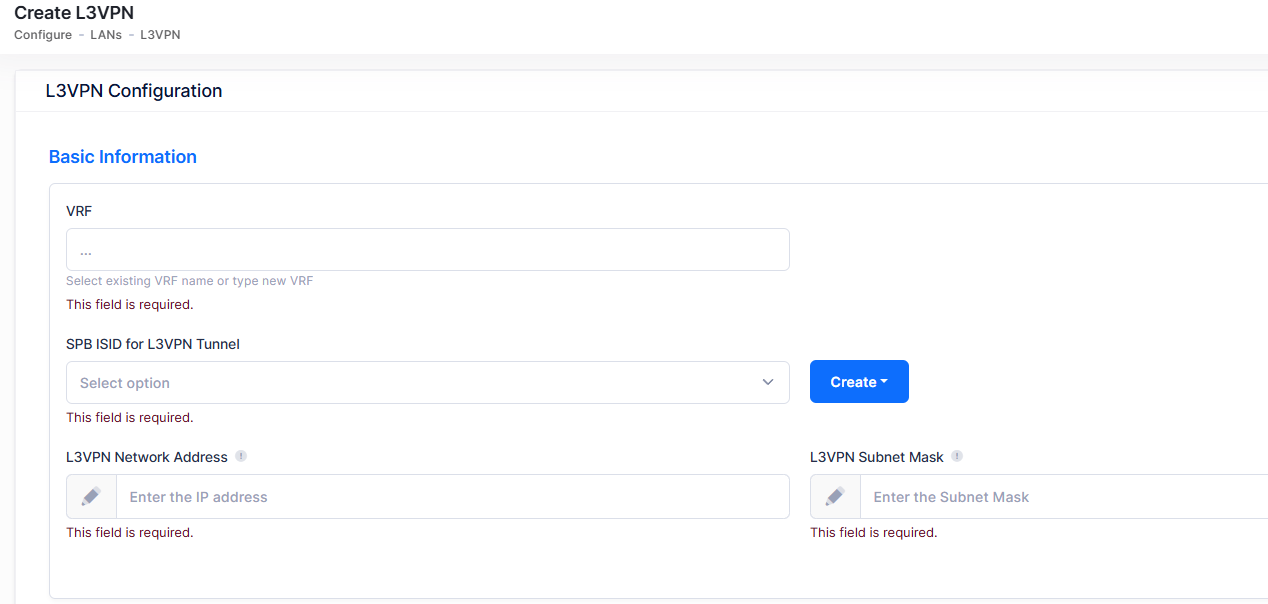
Complete the fields as described below for configuring basic information:
-
VRF Name - Enter or select an existing VRF name. If you enter a name that does not exist, a new VRF is automatically created with default settings (Max profile, no VRRP).
-
SPB ISID for L3VPN Tunnel - Select from the drop-down list the available SPB ISID number and the corresponding Service ID. You can click on the Create button to configure a new SPB service profile.
-
L3VPN Network Address - Defines the WAN-side IP network used for validation only. This value is not sent to switches and is used to verify that all configured WAN-side IPv4 and IPv6 interfaces belong to the same L3VPN network.
-
L3VPN Subnet Mask - Specifies the subnet mask of the L3VPN WAN-side network for validation purposes. This value is not sent to switches and helps ensure all WAN-side interfaces are within the same L3VPN network, preventing configuration errors.
Switch Selection
Select the switch devices from the available list to receive the L3VPN configuration. You can select multiple target switch devices.
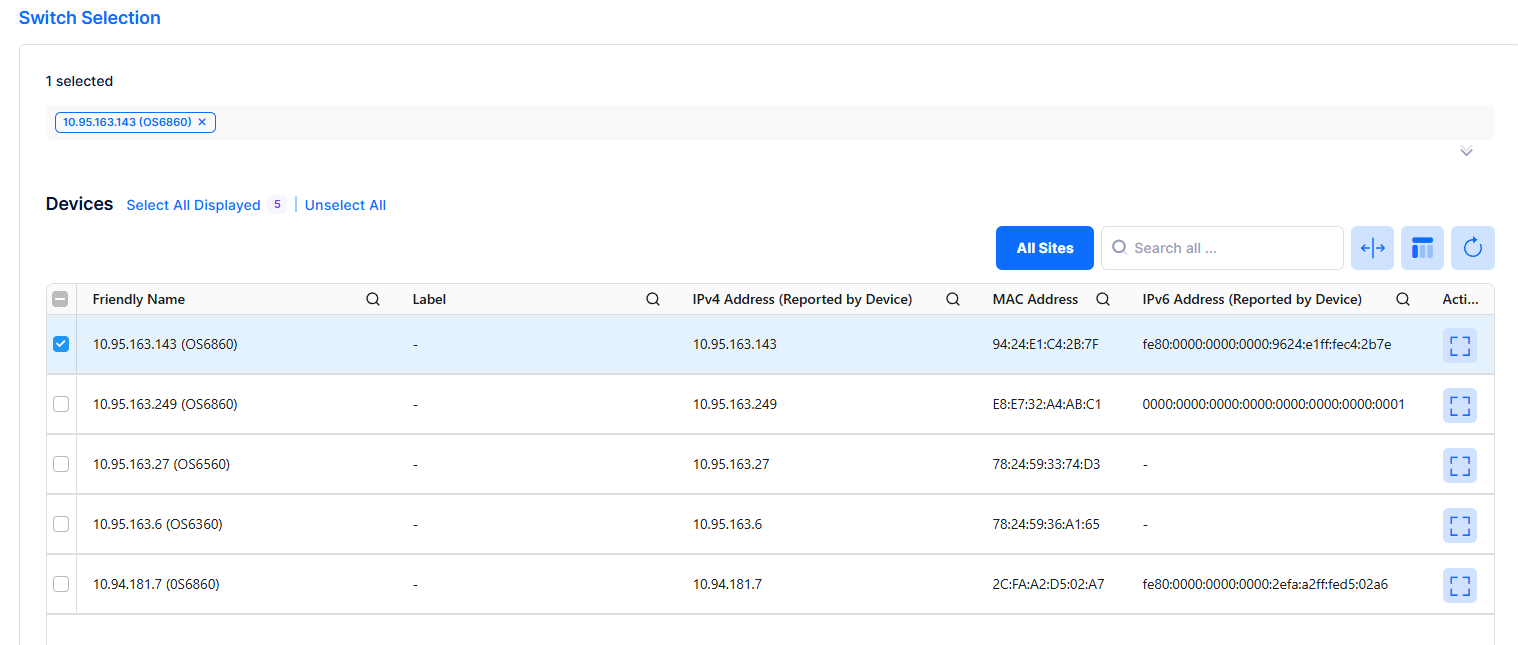
Once devices are selected, the Selected Devices table appears below, showing per-device configuration.
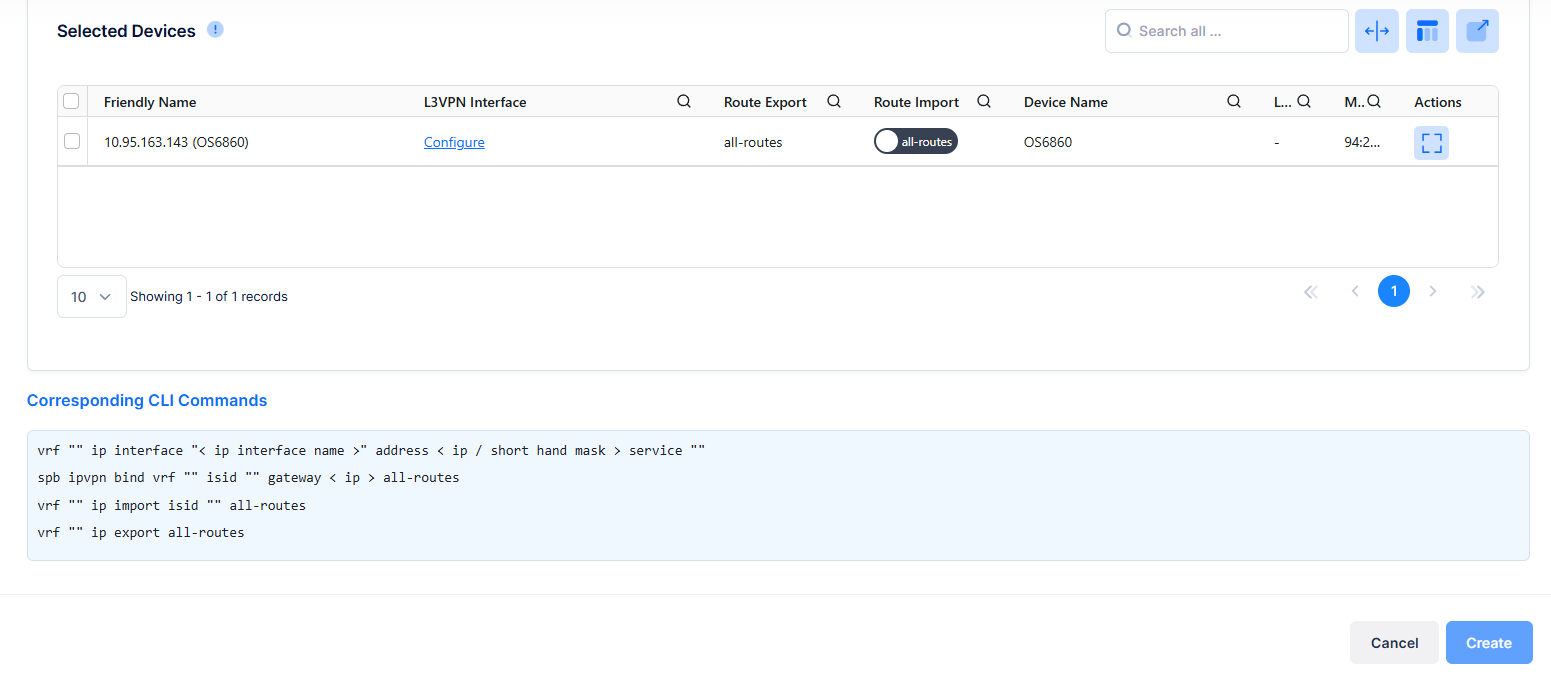
The following field values are displayed:
-
Device Name - The name of the selected switch.
-
Friendly Name - The name assigned to the device is derived from the Preferred Device Naming convention specified in the user preference settings. By default, the Friendly Name is set to IP Address (System Name).
-
L3VPN Interface - The IP interface assigned to this device for the L3 VPN. The system auto-assigns incremented IP addresses based on the gateway address.
-
If the device already has an IP interface with VRF and an ISID is specified, the L3VPN interface is auto-populated from that existing interface.
-
Otherwise, the L3VPN interface is populated from the L3VPN network address, or you can edit it.
-
-
Route Export - The export route-map name. (Default = all-routes)
-
Route Import - Enable or disable route import for this device.
-
VRF to IPVPN Binding - The binding relationship between the VRF, IP interface, and SPB service.
A Corresponding CLI Commands section at the bottom shows the exact commands that will be sent to each device. Click on Create tab to complete the configuration. The new L3 VPN appears in the list with status PENDING, updating to SUCCESS or FAIL as devices respond.
The configured L3 Gateway of one or more devices is not in the same subnet as the others. This may result in routing or connectivity issues for the L3VPN.
-
If a corresponding CLI command fails, the profile's L3VPN config status updates to FAILED.
-
An alert is raised for each part (SPB/VRF/IP Interface) affected; the L3VPN alert includes messages from all parts.
-
L3VPN poll data relies on commands. In the next poll cycle, the L3VPN config status may update to match the device config (Failed → Success).
Editing an L3 VPN
Use one of the following methods to access the Edit L3VPN configuration screen:
-
Select the profile to edit by clicking on the checkbox next to the profile, click on Actions, then select Edit from the drop-down menu.
-
Click on the pencil icon under the “Actions” column next to the profile that you want to edit.
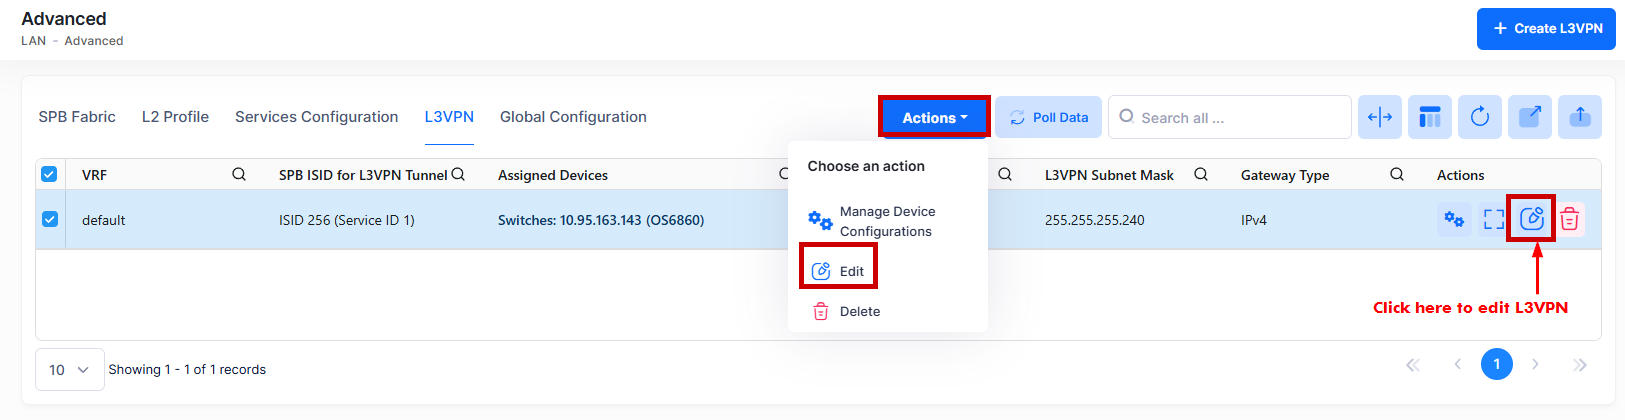
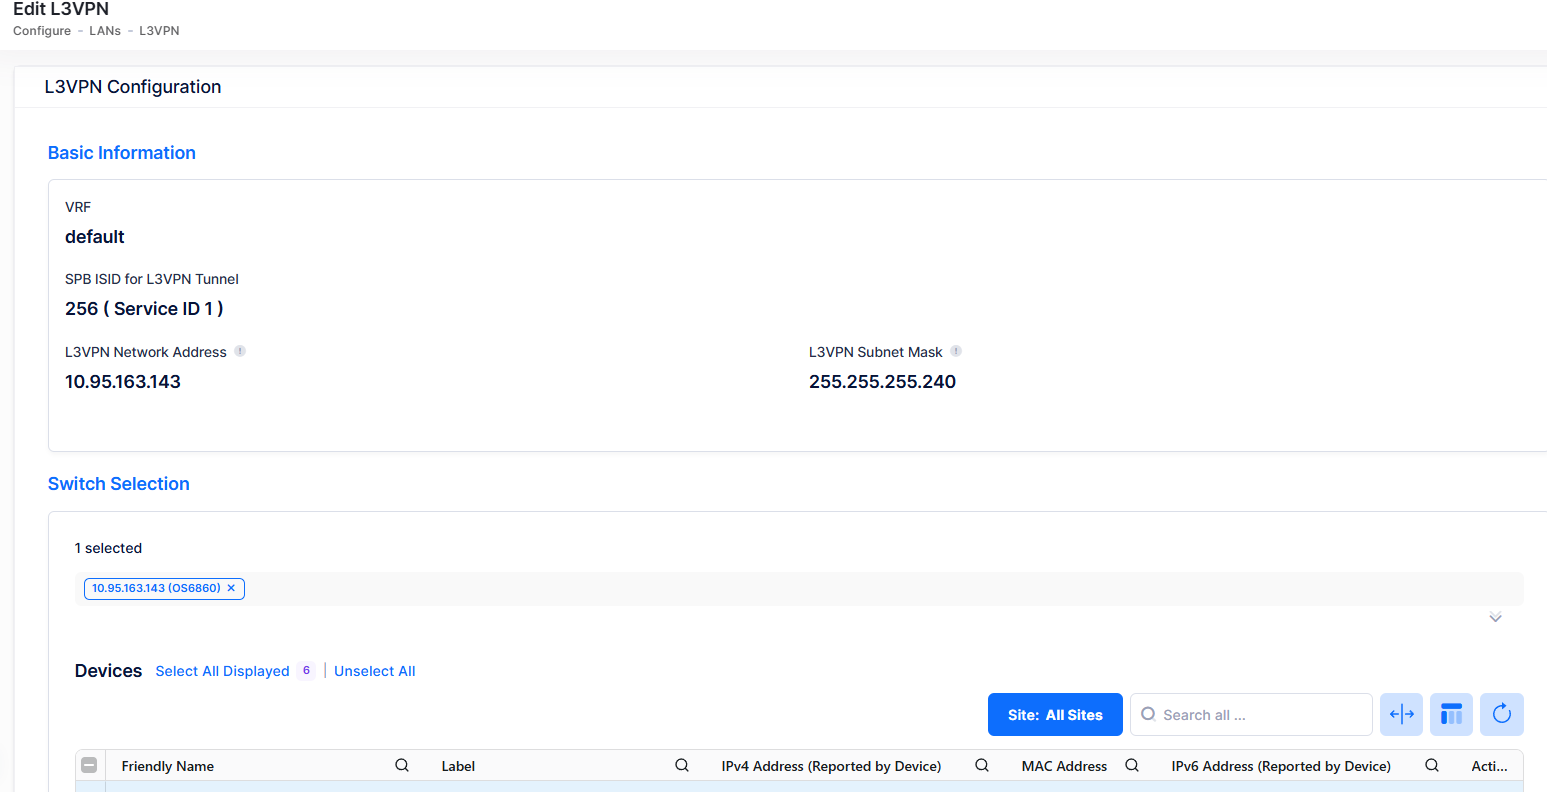
The following Edit L3VPN configuration screen displays. Edit the fields as described above, then click on Save.
-
The VRF, ISID, and gateway configuration fields are read-only for devices that are already configured.
-
For old devices, you cannot edit any field. To change the L3VPN parameters for a device, unassign it first, apply the changes, then reassign it in a new edit session with the new parameters. For newly added devices, you can configure L3VPN and route import settings.
-
If a device is offline (management connectivity is OFF), its configuration row locks and cannot be modified until the device returns online.
-
The Save button is enabled only when changes have been made.
Deleting an L3 VPN
To delete a L3 VPN configuration, use one of the following methods to select the L3 VPN you want to delete:
-
Select the name to delete by clicking on the checkbox next to the list, click on Actions, then select Delete from the drop-down menu.
-
Click on the trash can icon under the “Actions” column next to the list that you want to delete.
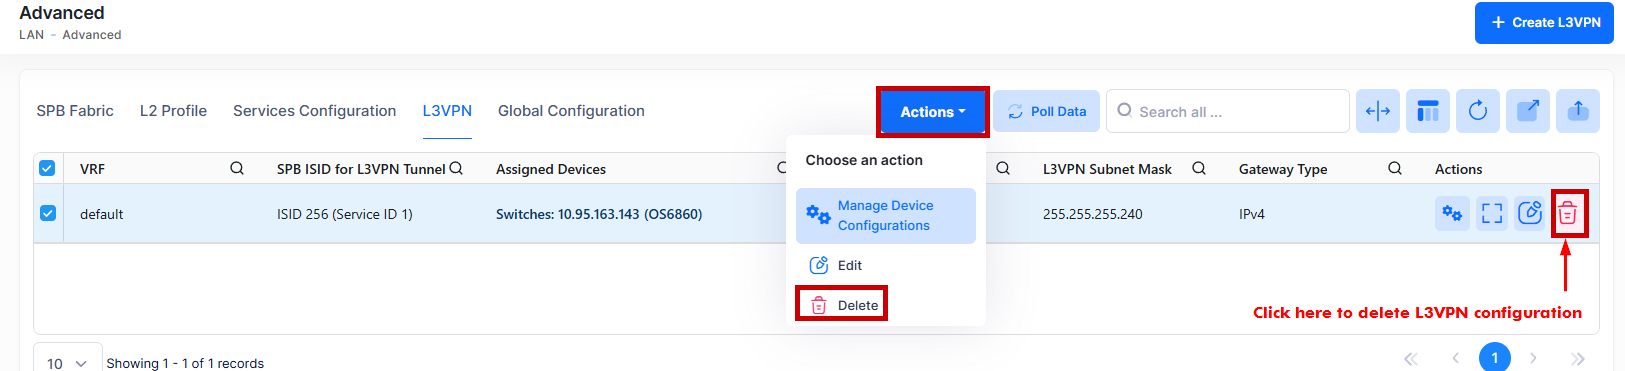
The following confirmation prompt appears:
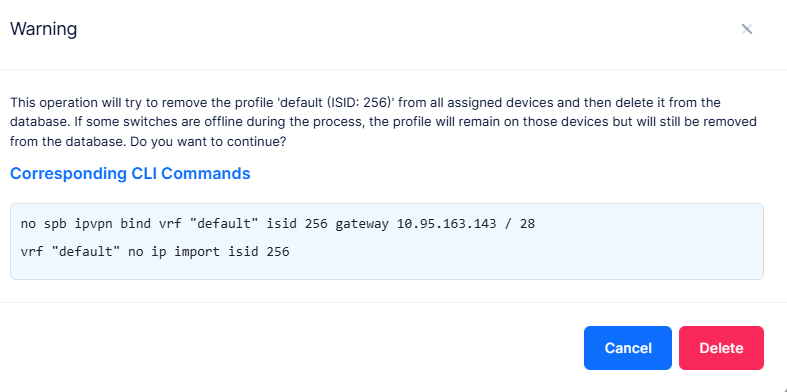
Click on Delete to proceed. The system removes the L3 VPN binding from all assigned devices.
-
Deleting an L3 VPN on one device does not affect the same ISID binding on other devices within the L3 VPN template.
-
Deleting L3 VPN only removes the IP VPN binding; it does not delete the VRF configurations, services, or IP interfaces that were automatically created when L3VPN was created.
Polling L3 VPN Data
The Poll Data button on the L3 VPN list page lets you manually refresh L3 VPN configuration data from all managed devices. This ensures the displayed data reflects the network's current state without waiting for the next automatic polling cycle.
To access Poll Data option, click on the tab as shown below:
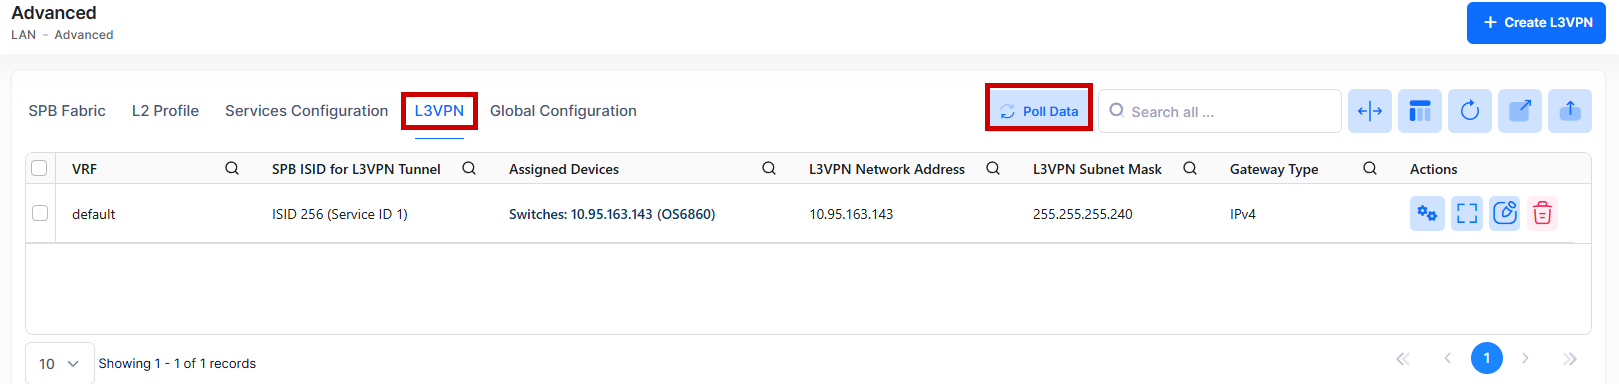
The system retrieves the latest L3 VPN configuration from all managed switches. The L3VPN table updates with this information.
Viewing L3 VPN Bindings
The L3VPN List displays basic and detailed information for all configured L3 VPN bindings across the organization. Click on an entry in the list to view additional information about an l3 VPN binding.

The following information is displayed:
-
VRF - The VRF instance associated with this L3 VPN binding.
-
SPB ISID for L3VPN Tunnel - The SPB service ISID used for the L3 VPN tunnel. If the corresponding Service Profile is not found, a warning indicator is displayed.
-
Assigned Devices - The switch devices where this L3 VPN is configured, grouped by site.
-
L3 VPN Network Address - The gateway IP address of the L3 VPN interface.
-
Subnet Mask - The subnet mask (IPv4) or prefix length (IPv6) for the gateway interface.
-
Gateway Type - Specifies the type of Gateway. (IPv4 or IPv6).
-
Config Status - The provisioning status of the binding on assigned devices.
Display Assigned Device Configuration Details
The L3VPN Profile List displays information for the configured L3 VPN Profiles. You can click on the entry Name to view the assigned device configuration details of a specific profile as shown below.
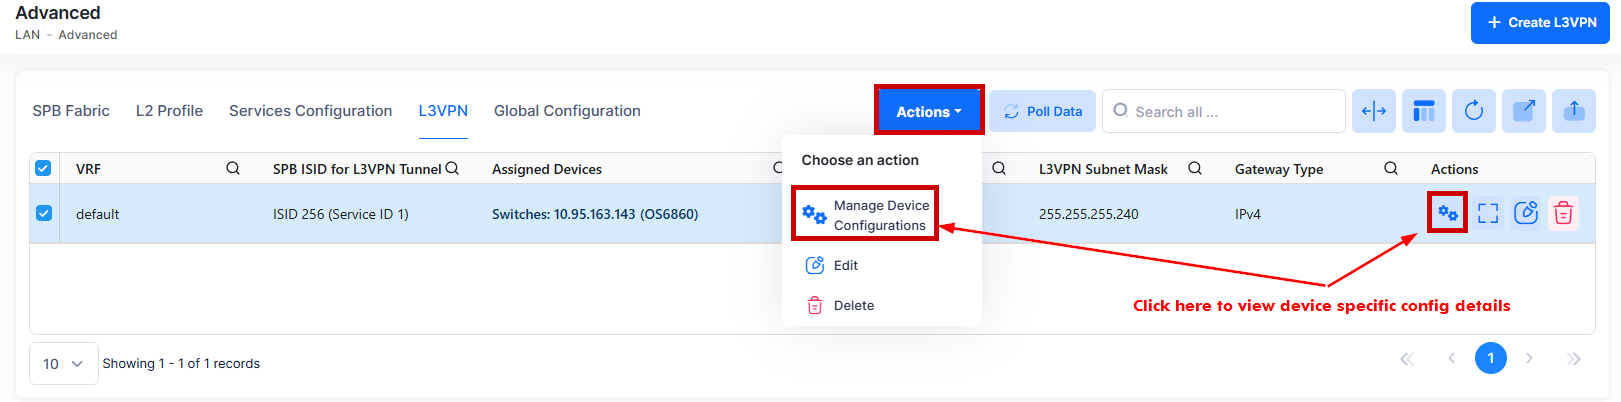
The following screen appears:
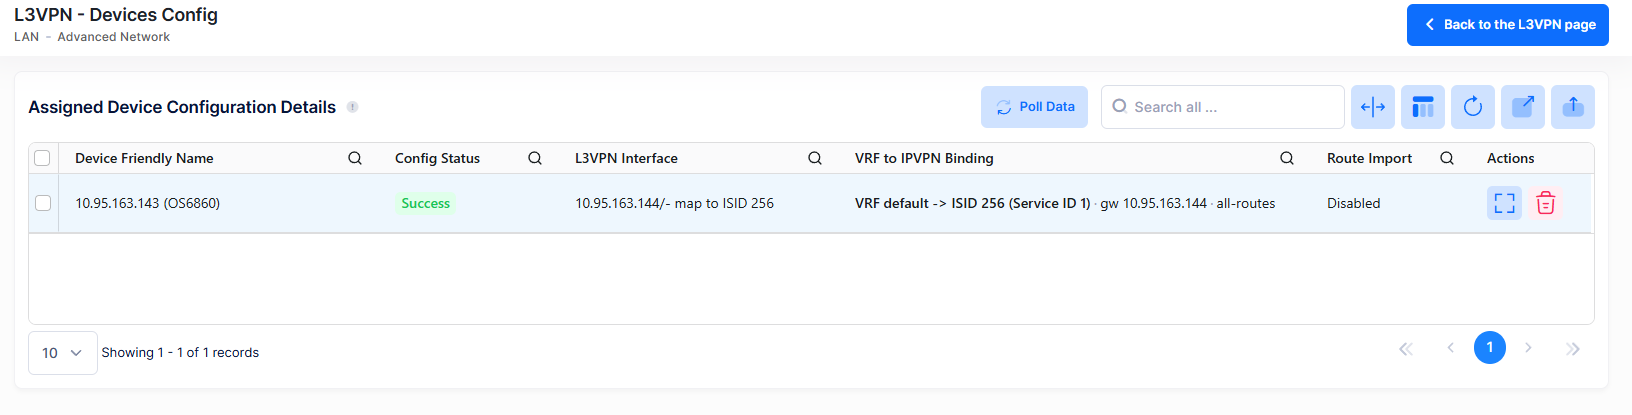
The following information is displayed for each of the L3 VPN Profile:
-
Device Friendly Name - The name assigned to the device is derived from the Preferred Device Naming convention specified in the user preference settings. By default, the Friendly Name is set to IP Address (System Name).
-
Config Status - The configuration status of the device. (Successful or Failed or Pending).
-
Pending - The configuration is being pushed to the device and is still not receiving a response from the device.
-
Failed - The configuration failed to apply to the device. Possible reasons include a timeout while applying the configuration due to the device being unreachable or a network issue, or the configuration being invalid and rejected by the device. Check alerts to identify the specific reason.
-
Successful - The configuration is pushed to the device successfully.
-
-
L3VPN Interface - The IP interface assigned to this device for the L3 VPN.
-
VRF to IPVPN Binding - Displays the binding relationship between the VRF, IP interface, and SPB service.
-
Route Import - Displays route import for this device. (enabled or disabled).
-
IPv4 Address (Reported by Device) - The IPv4 address of the device.
-
IPv6 Address (Reported by Device) - The IPv6 address of the device.
-
SPB ISID for L3VPN Tunnel - The SPB service ISID used for the L3 VPN tunnel. If the corresponding Service Profile is not found, a warning indicator is displayed.
-
VRF - The VRF instance associated with this L3 VPN binding.
-
Service ID - Specifies a unique numerical value to identify a specific SPB service. The valid service ID range is 1 - 32767. The field is pre-filled with a Service ID that is auto-generated by OmniVista based on the last highest Service ID configured (current highest value + 1). If you want to modify it, you must avoid entering an existing ID.
-
Route Export - The export route-map name. (Default = all-routes)
Note: The L3 VPN Device configuration does not support editing.
Troubleshooting/FAQs
The Create button is disabled on the L3 VPN form.
Consider the following steps while creating the L3 VPN Binding:
-
Entered VRF name is valid.
-
ISID is selected from the dropdown.
-
Gateway IP Address is a valid IPv4 or IPv6 address.
-
Subnet Mask (IPv4) or Prefix Length (IPv6) is valid.
-
All selected devices have an L3 VPN Interface configured.
A warning icon appears next to the SPB ISID column in the L3 VPN list.
This means the Service Profile for the ISID was not found. The SPB service may have been deleted or is not synchronized. Click Poll Data to refresh or check that the SPB Service Profile exists.
Device shows offline warning in edit mode.
When a device's management connectivity is off, its configuration row locks. The device cannot receive new commands until it reconnects. A banner at the top of the Switch Selection section shows which devices are offline.
The configuration status shows FAIL after creating an L3 VPN.
The device did not respond within the expected timeout window due to following reasons:
-
The device is unreachable or overloaded.
-
The device does not support the requested configuration (check firmware version).
-
A conflicting configuration already exists on the device.
-
If one of these commands to push to the device fails, the Config status will update to FAIL. However, Others CLI Commands apply FAILED, but IPVPN binding success, config status will update from FAIL to SUCCESS after data poll.
Try removing the failed device assignment and re-adding it. If the issue persists, verify device connectivity and firmware compatibility.
I see "Invalid subnet mask" or "Invalid prefix length" notification.
For IPv4: The subnet mask must be in valid dotted-decimal format (e.g., 255.255.255.0).
For IPv6: The prefix length must be a whole number between 3 and 128.
IPv6 is not valid when sent from User Interface to device.
When the user configures an IPv6 address via the User Interface screen and sends it to the device, the device may reject the request and return an "invalid IPv6" error response. Some of the IPv6 formats accepted by the User Interface are not recognized as valid by the device firmware, causing the device to reject the configuration.
Does routing support IPv4 and IPv6 for both VRF profile max and low.
-
IPv4 routing supports both VRF profiles: max and low (low is limited to 9 routes and 3 IP interfaces).
-
IPv6 routing is supported only with the VRF profile max autoload-vrrp. IP interfaces remain inactive when configured with max no-autoload-vrrp.
-
In VRF for IPv4, one IPv4 interface is allowed per service.
-
In VRF for IPv6, multiple IPv6 interfaces are allowed per service.
-
Enable IP interface forwarding and route import for routing to work.
-