
The U-Boot Upgrade tab allows you to update the U-Boot firmware on your AOS network switches directly from the management interface. Use this screen to upload a U-Boot package, select target switches, and monitor file transfer, installation, and reboot—all in one workflow. This functionality is intended for network administrators managing AOS switch infrastructure to keep U-Boot firmware current across their deployment.
U-Boot upgrades are higher risk than standard software upgrades because they modify bootloader components. Plan a maintenance window, ensure console access to the switch is available, and confirm rollback or recovery procedures before starting.
Consider the following prerequisites before attempting a U-Boot upgrade:
-
Administrator privileges for the Organization.
-
Target devices are AOS Switches running software version 8.x with Management Connectivity on.
-
The U-Boot firmware file is a valid
.tar.gzarchive named in the formatu-boot..tar.gz(for example,u-boot.8.10.R02.42.tar.gz).
The U-Boot Upgrade screen displays a list of all uploaded U-Boot firmware packages for the current Organization. From this screen you can perform any of the following actions:
To access the U-Boot Upgrade screen, click Inventory > Firmware-Scheduler on the OmniVista Cirrus Menu and select the U-Boot Upgrade tab.
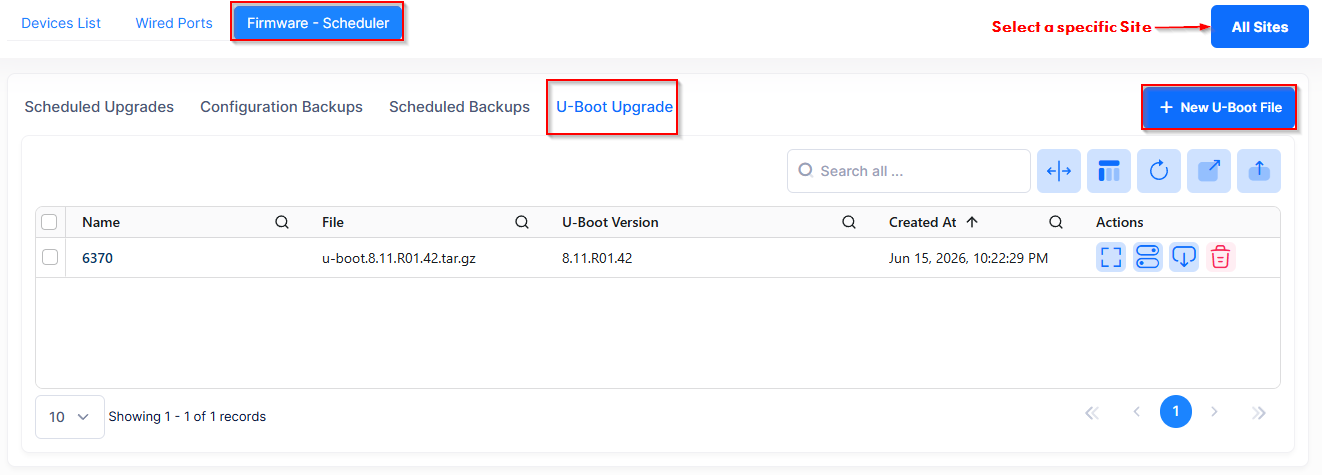
The U-Boot Upgrade screen displays the following information for each upgrade entry:
-
Name - The task name assigned when the U-Boot file was uploaded. Click the name to open the device status page for that task.
-
File - The original file name of the uploaded U-Boot package.
-
U-Boot Version - The U-Boot firmware version extracted from the uploaded package.
-
Applicable Device Families - The AOS switch device families supported by this U-Boot package (for example, OS6360, OS6465).
-
Created At - The date and time when the file was uploaded.
Standard toolbar controls are provided: search, column selection, refresh, export to XLS/CSV, print, and full-width toggle.
When no U-Boot files are uploaded, a message indicates no U-Boot upgrade packages are available.
Uploading a U-Boot File
To upload a new U-Boot firmware package, click on + New U-Boot File above the task list table. The following Upload U-Boot screen appears:
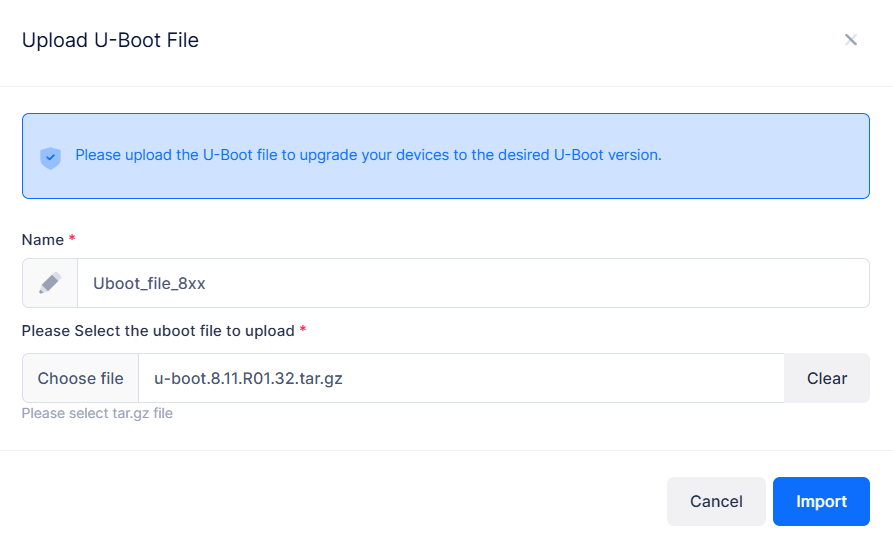
Complete the Upload U-Boot File fields as described below, then click Import to upload the U-Boot package file.
-
Name - Enter a task name to identify the upload (for example, Uboot_file_8xx).
-
Choose file - Click on this field to select a valid
.tar.gzU-Boot firmware archive from your local system (for example, u-boot.8.11.R01.32.tar.gz).
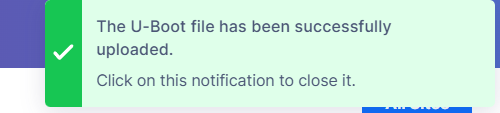
During upload, a progress indicator is displayed and the Import button is disabled to prevent duplicate submissions. On success, a confirmation message appears and the task list refreshes to show the new entry, as shown below.
If you select an invalid file format, the system displays a validation error explaining the accepted formats. The following screen shows the error for an invalid file:
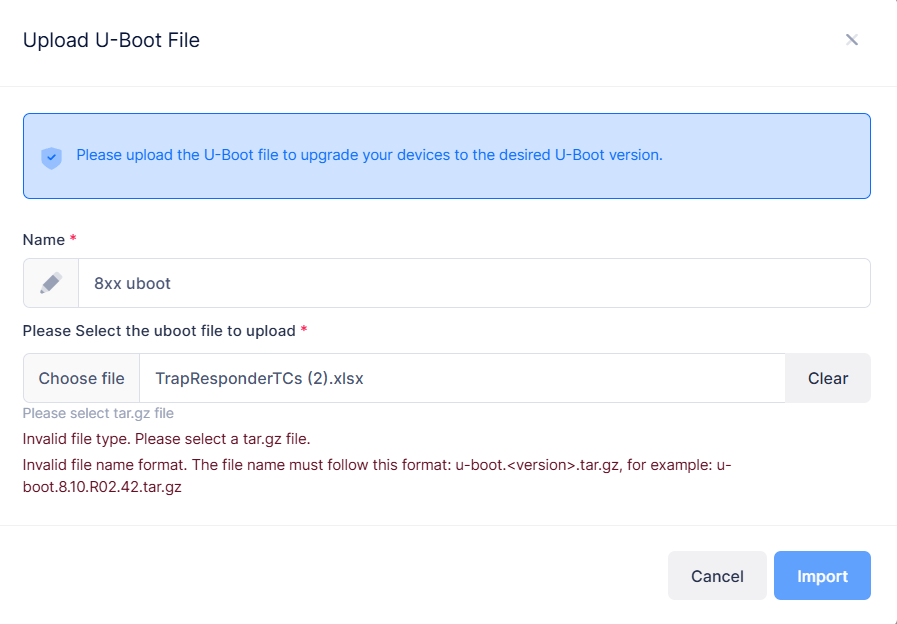
Only files with the .tar.gz extension following the naming convention u-boot..tar.gz are accepted. Selecting a file with an incorrect format disables the Import button and displays an inline error message.
Installing U-Boot On AOS Switches
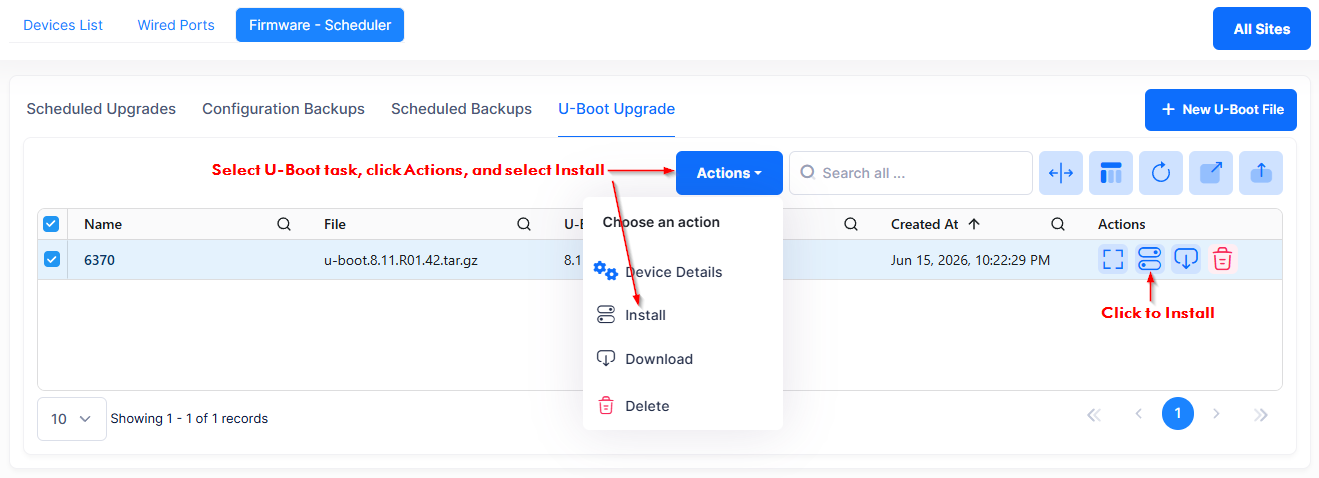
To transfer and install a U-Boot package onto switch devices, select a single U-Boot task from the U-Boot Upgrade list, then click on Actions and select Install from the drop-down menu. You an also click on the Install icon under the “Actions” column for the U-Boot task entry.
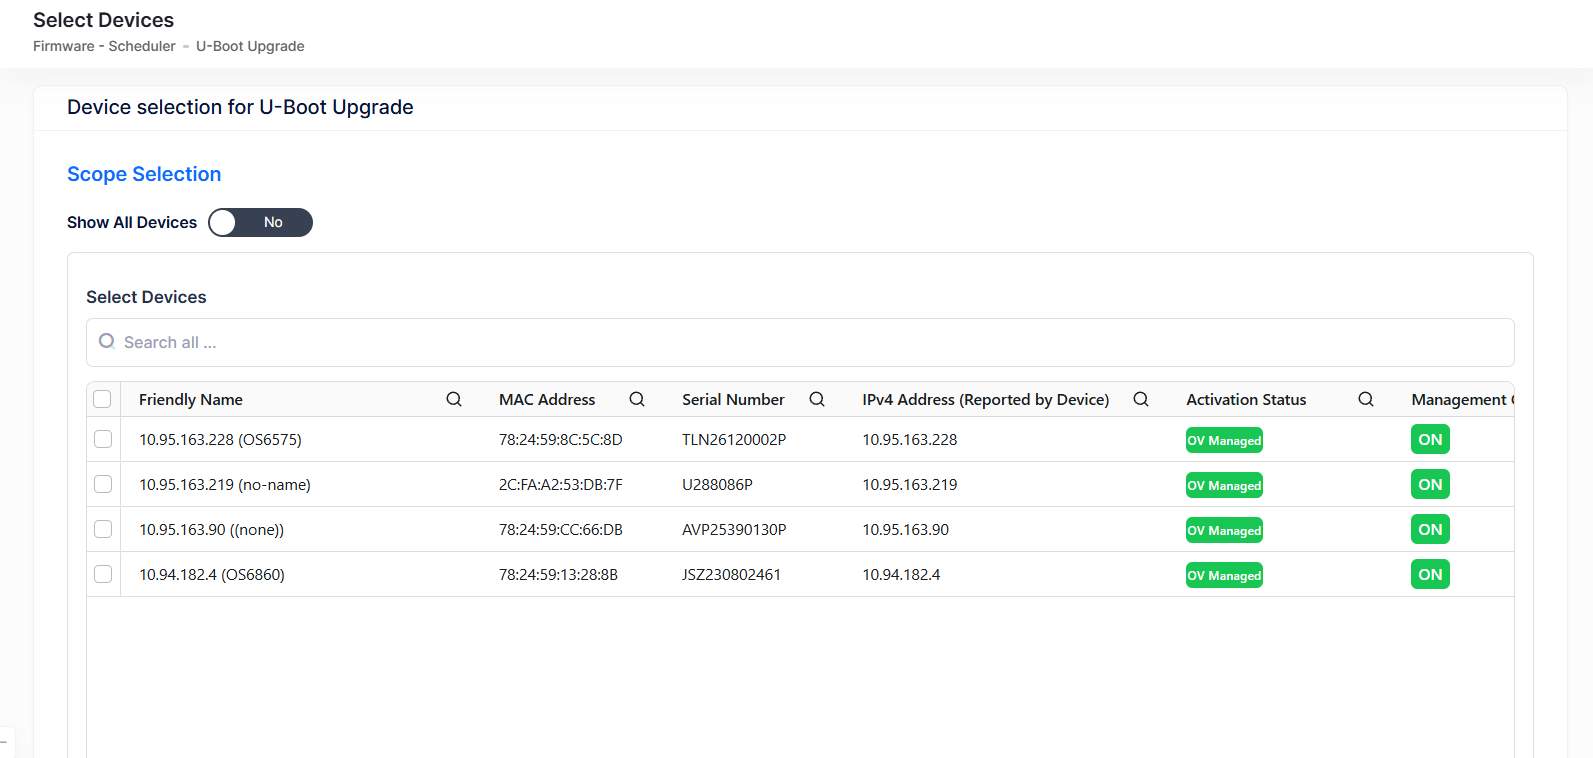
The Select Devices screen displays a list of eligible devices that meet the following criteria:
-
Device family is AOS.
-
Management connectivity is “ON”.
-
Software version starts with 8.x.
-
Device model matches one of the supported device families listed in the U-Boot package.
For each device, the following information is displayed:
-
Friendly Name - The name assigned to the device is derived from the Preferred Device Naming convention specified in the user preference settings. By default, the Friendly Name is set to IP Address (System Name).
-
MAC Address - The device MAC address.
-
Serial Number - The Serial Number for the device.
-
IPv4 Address (Reported By the Device) - The IP v4 address of the device.
-
Activation Status - The real-time device activation/provisioning status for the device, if applicable (for example, Waiting for Validation, First Contact Pending, OV Managed).
-
Management Connectivity - The following management connectivity values indicate the various stages of device connectivity with OmniVista Cirrrus.
-
Blank - The device is in an initial state (not yet onboarded).
-
ON - When a device is successfully provisioned or OmniVista Cirrus receives heartbeat from the device, management connectivity transitions to “On”.
-
UNKNOWN - If OmniVista Cirrus does not receive any heartbeat, the management connectivity status transitions from “On” to “Unknown”.
-
OFF - After a certain amount of time with no heartbeat, the management connectivity status transitions from “Unknown” to “Off”.
-
Select one or more devices with Management Connectivity set to “ON”. Selected devices appear as badges above the device list.
Note that devices that do not match the supported device families for the U-Boot package are automatically filtered out. To include all AOS regardless of device family compatibility, toggle Show All Devices to Yes. A message appears warning that installing to unsupported device families may cause issues.
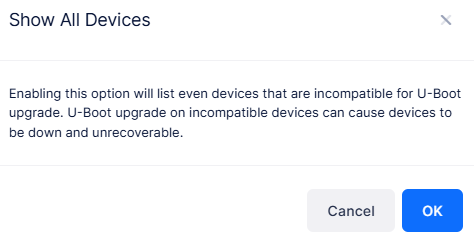
Click OK to confirm or Cancel to keep the filtered view.
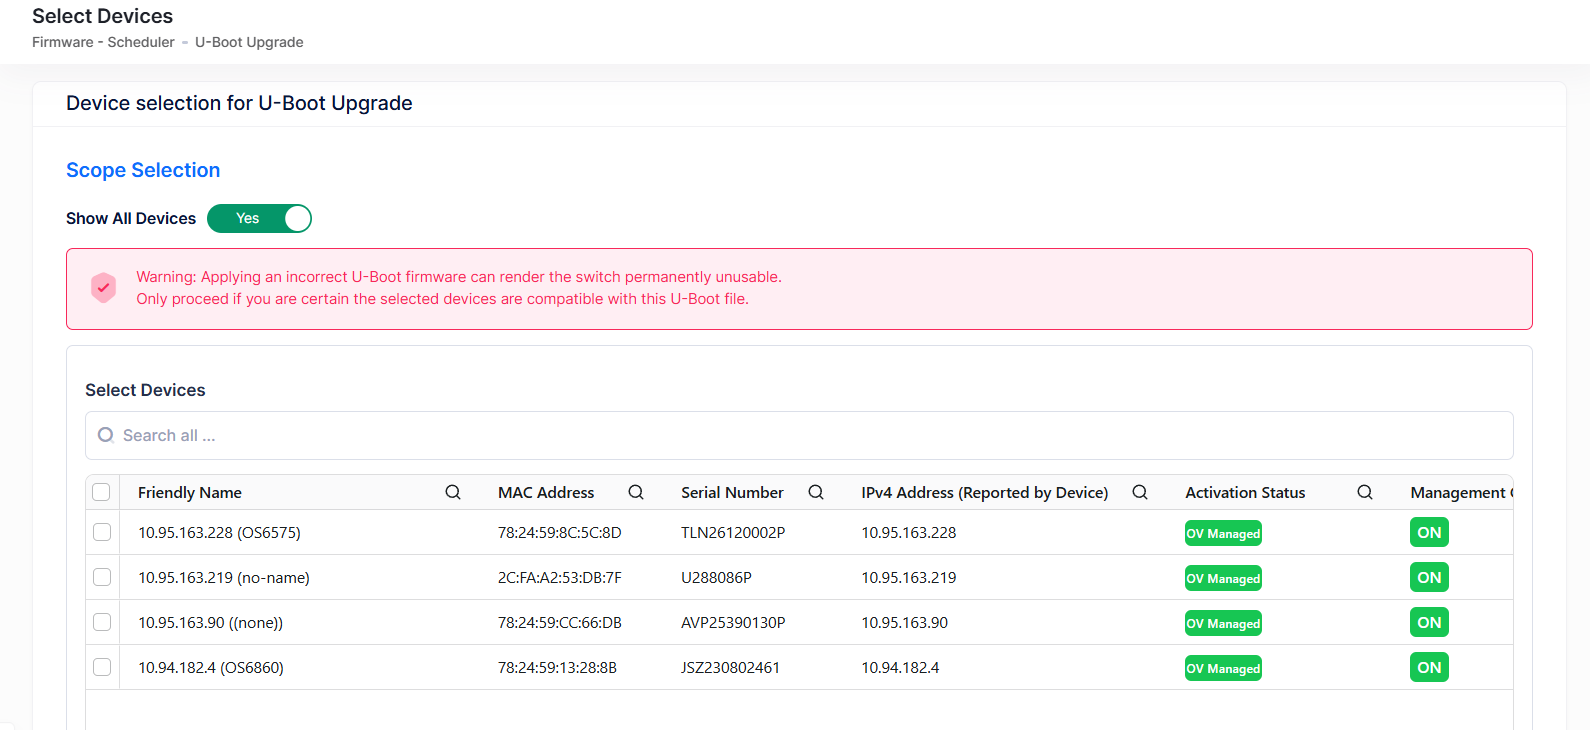
Click Install at the bottom of the screen to submit the selected devices for U-Boot file transfer and installation. The process runs asynchronously in the background, and you are redirected to the device monitoring page.
Monitoring the Device Upgrade Process
After initiating an installation, you are redirected to the the Device Details screen. You can also open this screen by clicking on the U-Boot task name on the U-Boot Upgrade screen. The Device Details table displays real-time progress for each switch.
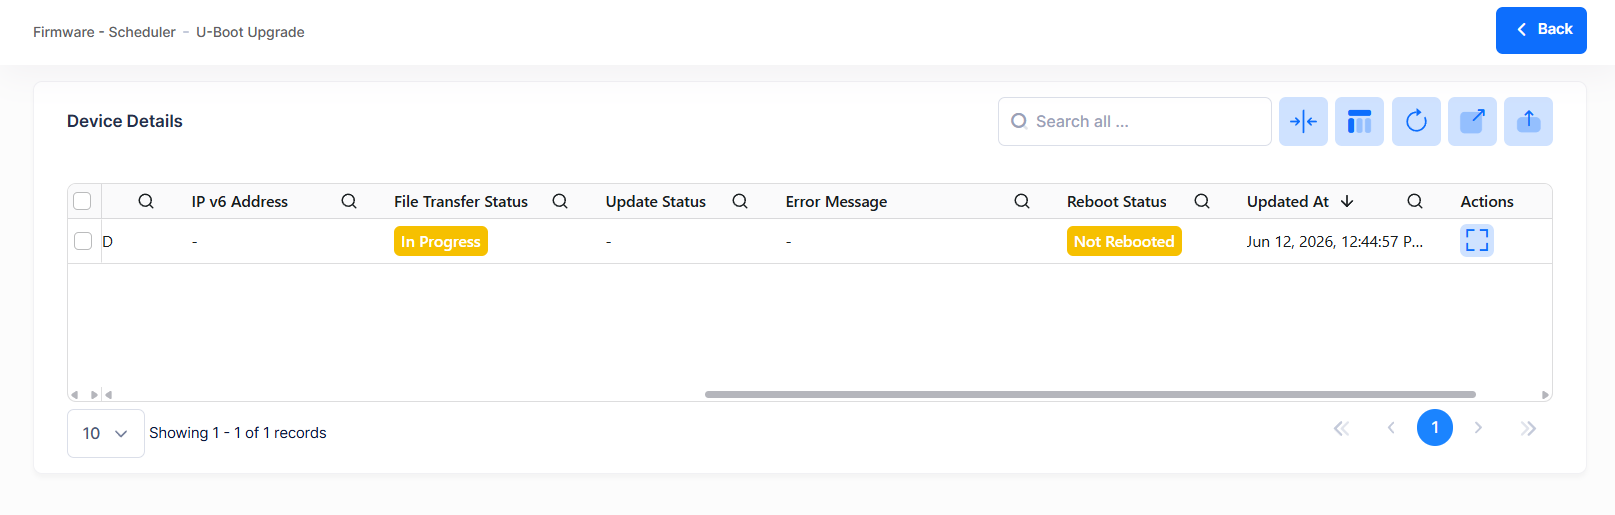
The Device Details screen displays the following information for each device entry:
-
Friendly Name - The name assigned to the device is derived from the Preferred Device Naming convention specified in the user preference settings. By default, the Friendly Name is set to IP Address (System Name).
-
IPv4 Address (Reported By the Device) - The IP v4 address of the device.
-
Serial Number - The Serial Number for the device.
-
Current SW Version - The current AOS software version on the device.
-
MAC Address - The device MAC address.
-
IPv6 Address - The device IPv6 address (when available).
-
File Transfer Status - The progress of copying the U-Boot file to the switch.
-
In Queue - File transfer is scheduled but has not started.
-
In Progress - File is being transferred to the switch.
-
Success - File was transferred successfully.
-
Failed - File transfer failed — check the error message.
-
-
Update Status - The progress of installing the U-Boot firmware on the switch.
-
In Queue - Installation is scheduled but has not started.
-
In Progress - U-Boot firmware is being installed on the switch.
-
Success - Installation completed successfully.
-
Failed - Installation failed—check the error message.
-
Skipped - Installation was skipped for this device.
-
Timed Out - Installation did not complete within the expected time.
-
-
Error Message - Any error details if the transfer or update failed.
-
Reboot Status - The reboot state of the device after installation.
-
Not Rebooted - Device has not been rebooted after the update.
-
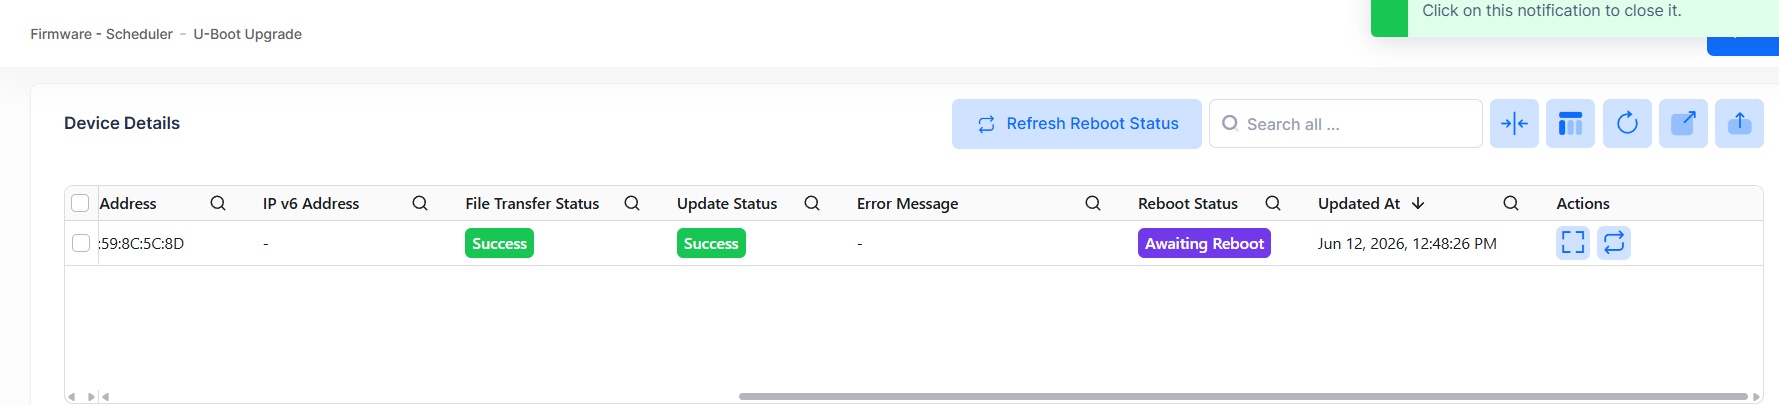
Awaiting Reboot - Reboot command was sent; waiting for the device to restart.
-
Verifying - System is verifying whether the reboot completed successfully.
-
Rebooted - Device has successfully rebooted with the new U-Boot firmware.
-
Verification - Failed - Reboot verification failed—the device may need manual intervention
-
-
Updated At - The timestamp of the last status change.
Managing Device Details Table Entries
On the Device Details screen, you can perform the following tasks for each device entry:
Rebooting Devices
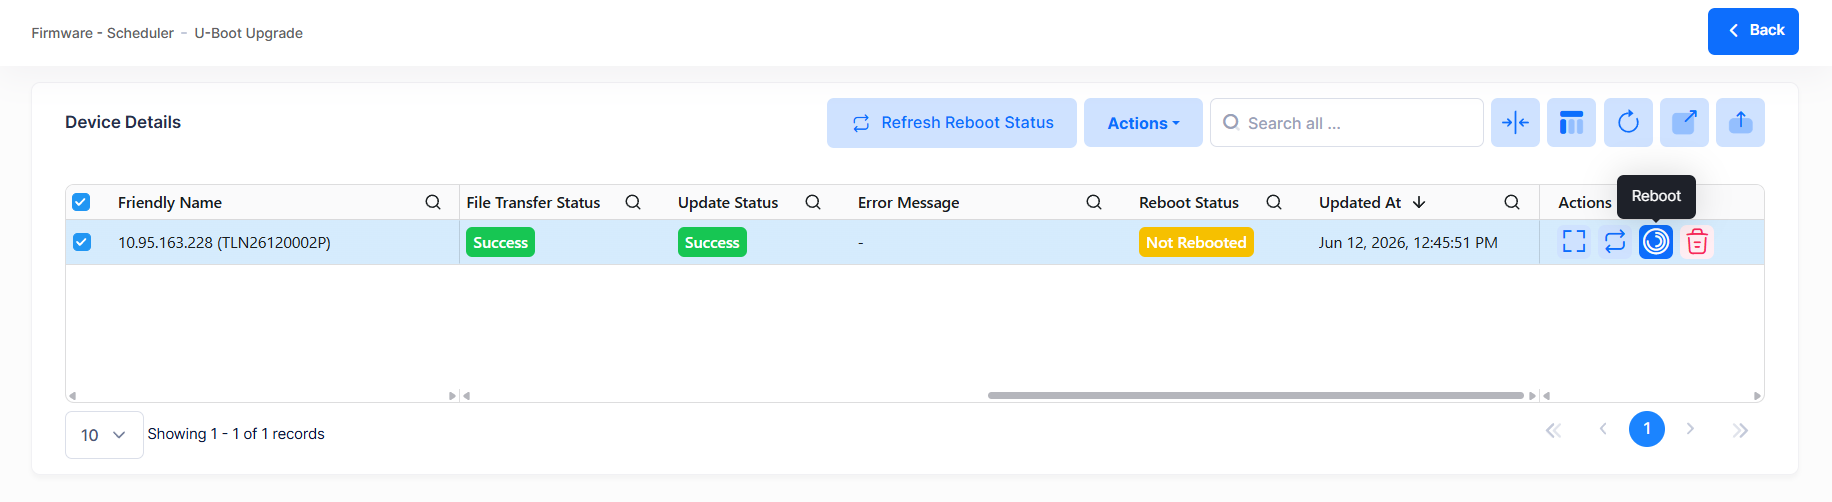
After a successful U-Boot installation, you must reboot devices to activate the new firmware. The reboot action is available only for devices where the Update Status is “Success” and the reboot status is “Not Rebooted” or “Verification - Failed”.
To reboot a device, select one or more devices from the Device Details list, click Actions and choose Reboot from the drop-down menu. You can also click the Reboot icon under the “Actions” column for a single device.
The reboot action is available only for devices that successfully completed the update and have not been rebooted.
The reboot confirmation dialog appears showing the selected devices.
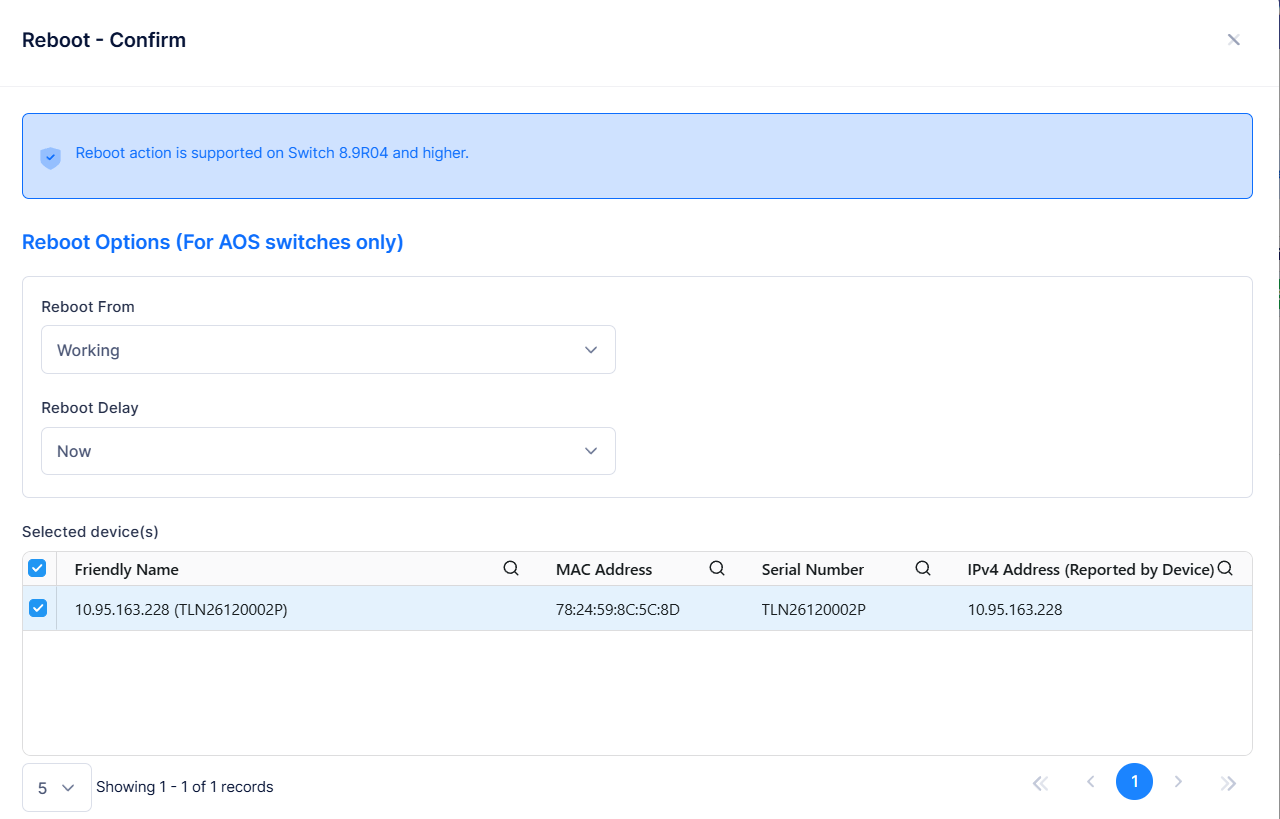
Complete the Reboot options as described below, then click Reboot.
-
Reboot From - Select the source: Working, Certified, or Others.
-
Reboot Directory - Specify a directory if using Others as the source.
-
-
Reboot Delay - Set a delay before the reboot begins (optional).
After the reboot command is sent, the reboot status changes to “Awaiting Reboot”.
Refreshing the Reboot Status
After rebooting devices, you can verify whether the reboot completed successfully by refreshing the reboot status. This action sends a verification request to the switches and updates the reboot status column with the current state.
The refresh reboot status action is available for devices where the Update Status is “Success” and the Reboot Status is “Verification - Failed”, “Not Rebooted”, “Awaiting Reboot”, or “Verifying”.

To refresh the reboot status:
-
Click Refresh Reboot Status to refresh all devices.
-
Select one or more devices, click Actions and choose Refresh Reboot Status from the menu.
-
Click the Refresh icon under the “Actions” column to update the reboot status for a single device.
Retrying Failed Devices
When a device experiences a file transfer or update failure, the retry action becomes available. Retry is possible when the File Transfer status is “Failed” or the Update Status is “Failed”, “Skipped”, or “Timed Out”.
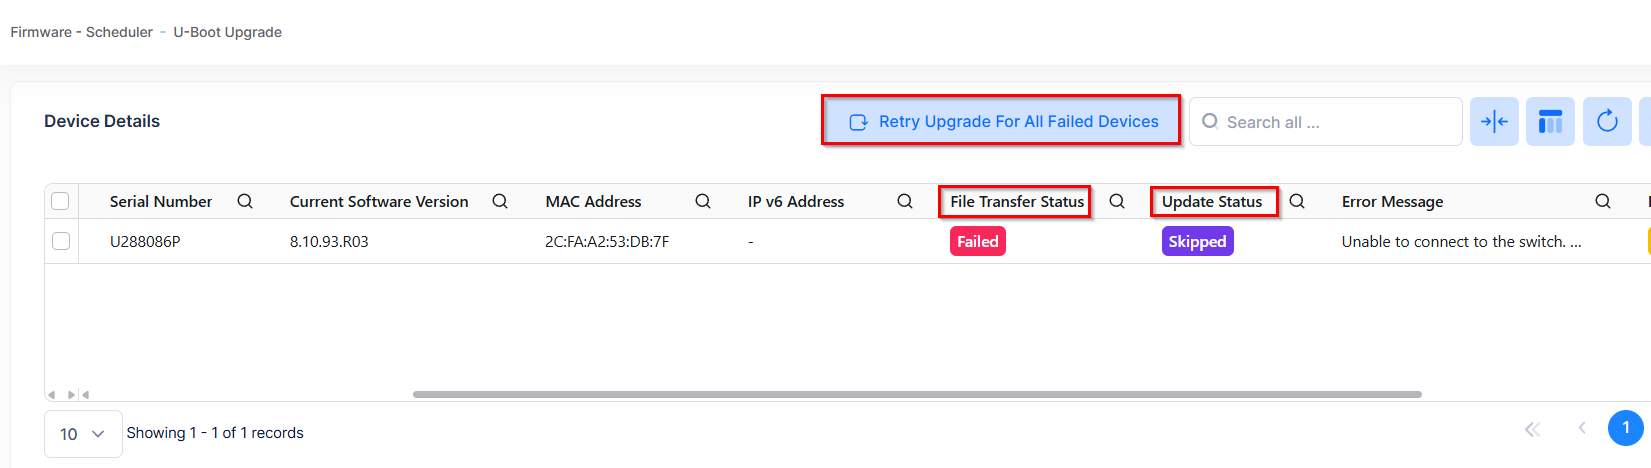
To retry a file transfer or update for a failed device(s):
-
Click Retry Upgrade For All Failed Devices to retry all failed devices.
-
Select one or more devices, click on Action and choose Retry.
-
Click the Retry icon under the “Actions” column to retry a single device.
If retries continue to fail, verify that the switch is reachable and that its management connectivity is still active.
Deleting Devices From a U-Boot Task
To delete a device from a U-Boot task, select one or more devices from the Device Details list, click Actions and choose Delete from the menu. You can also click on the Delete icon under the “Actions” column for the device.
You can only delete a device after all its operations reach a terminal state: file transfer completed or failed, update completed or failed, and reboot completed or not started.
Confirm deleting the device from the U-Boot task.
Downloading U-Boot Files
To download a U-Boot file, select a U-Boot task from the U-Boot Upgrade list, click Actions and choose Download from the menu. You can also click on the Download icon under the “Actions” column for the U-Boot task entry.
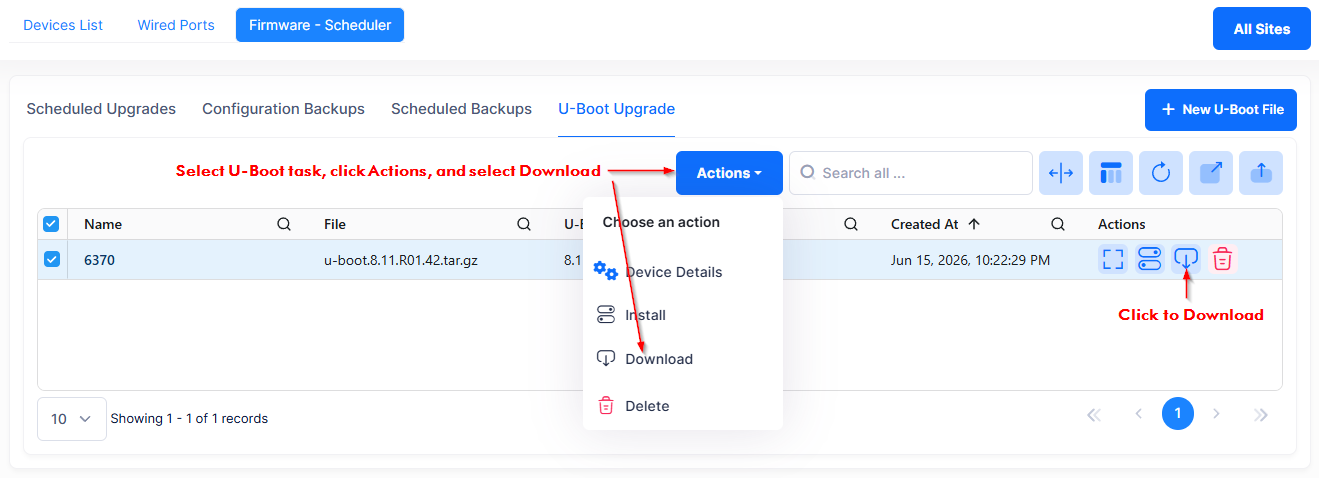
The original .tar.gz file is downloaded to your local system.
Deleting U-Boot Files
To delete a U-Boot file, select one or more U-Boot tasks from the U-Boot Upgrade | download screen, click on Actions and choose Delete from the menu. You can also click the Delete icon under the “Actions” column for a single U-Boot task.
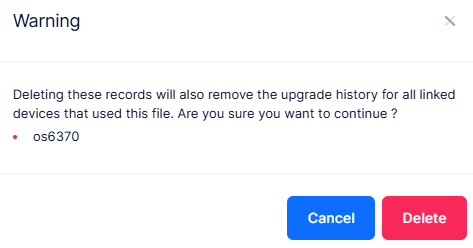
Deleting a task removes the uploaded file and all associated device records from the system.
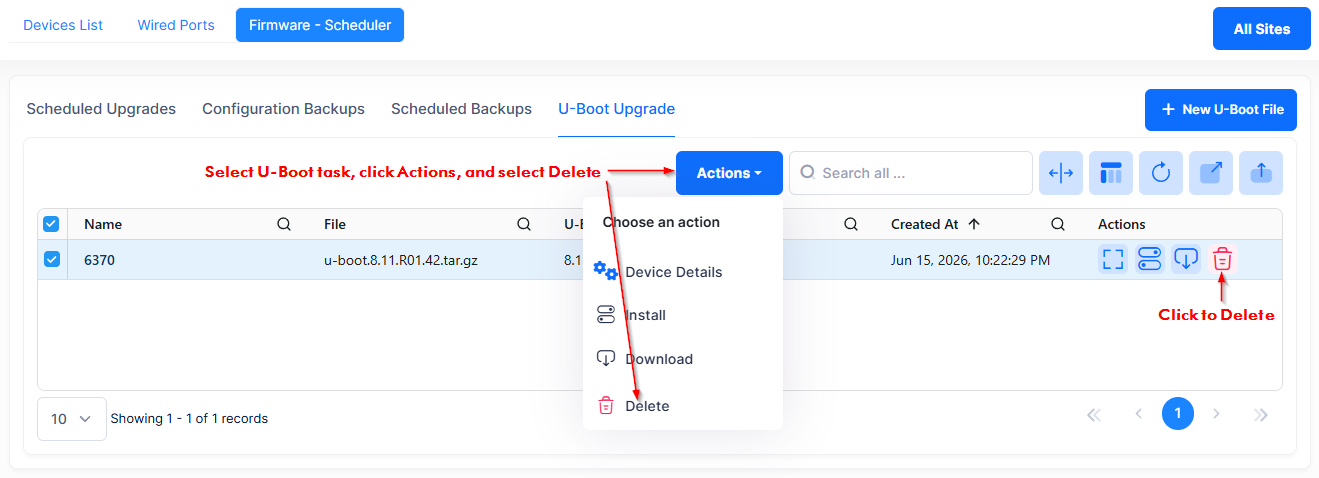
Confirm removing the U-Boot task(s) when prompted.
Troubleshooting/FAQs
The Import button is disabled after selecting a file
The Import button remains disabled until a valid file is selected. Verify that the selected file has a .tar.gz extension and follows the naming convention u-boot..tar.gz. If the file format is incorrect, an inline error message is displayed below the file picker explaining the accepted format.
File Transfer status = “Failed”
A file transfer failure indicates that the U-Boot package could not be copied to the switch. Possible causes include network connectivity loss between the application and the switch, or the switch is unreachable. Verify that the device management connectivity is “ON”, then use the Retry action to attempt the transfer again.
Update Status = “Timed Out”
A timed-out update means the installation did not complete within the expected duration. This can occur if the switch is under heavy load or if a network interruption occurred during installation. Use the Retry action to re-initiate the update for affected devices.
Update Status = “Skipped”
The device was skipped during processing. This may occur if the device became unreachable during the batch operation. Use Retry to attempt the update again.
Reboot Status = “Verification - Failed”
After sending a reboot command, the system verifies that the switch restarted with the new U-Boot firmware. A verification failure means the system could not confirm the reboot completed. Click Refresh Reboot Status to re-check. If the status persists, verify the switch is reachable and powered on, then consider rebooting again.
The Install button is not available
Organization Administrator privileges are required to transfer and install a U-Boot package onto switch devices. Contact the Administrator for your Organization to request access.
No Devices Appear on the Device Details Screen
The device list is filtered to show only compatible switches. Verify that:
-
The organization has managed AOS devices.
-
Devices have management connectivity “ON”.
-
Devices are running AOS software version 8.x.
-
Device models match the supported families listed in the U-Boot package.
If devices exist but do not match the package's supported families, enable Show All Devices to see all eligible AOS switches regardless of family.
The Reboot Button Is Not Available for a Device
The reboot action is available only when the update status is “Success” and the reboot status is “Not Rebooted” or “Verification - Failed”. If the update is still in progress or has failed, the reboot action is not shown. Complete or retry the update first.