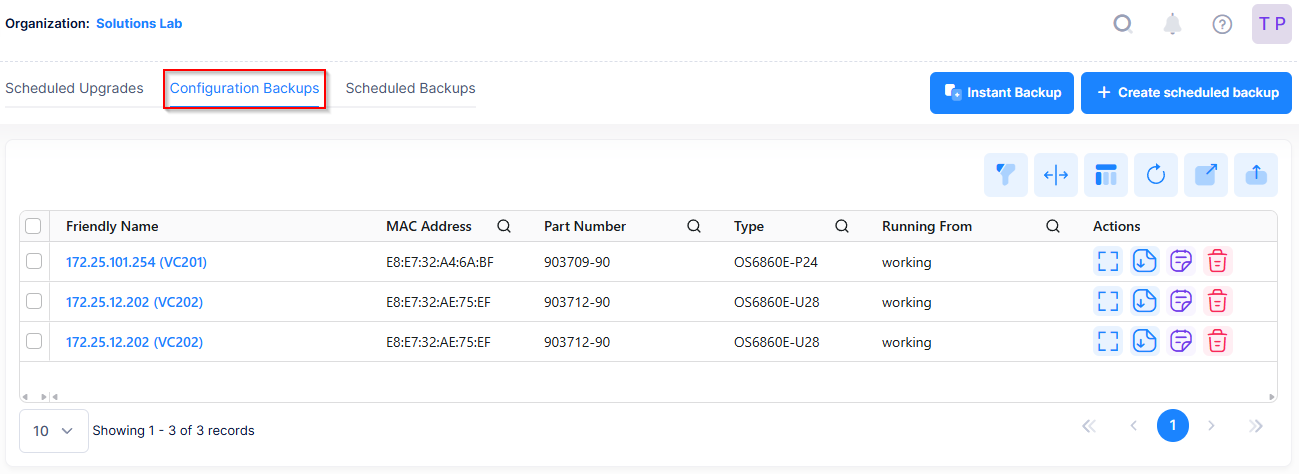
The Configuration Backups tab on the Inventory Backup/Restore/Upgrade screen displays a list of all switch configuration backups that currently exist in OmniVista Cirrus 10. From this screen, you can perform any of the following actions:
-
Backup switch configuration files - Perform immediate or create scheduled backups.
-
Download configuration backups - Download a configuration backup to view on your local system.
-
Delete configuration backups - Deletes selected backups from OmniVista Cirrus.
-
View configuration backup files - View the files that are included in a specific configuration backup.
-
Display configuration backup information - View basic information about a configuration backup. You can also customize the display to show the last backup created per device first or only backups with a specific scope (Site, Switch, Floor).
-
Restore a configuration backup - Restore configuration files to the AOS devices from which they were originally taken
To configure and manage switch configuration backups, navigate to the Configuration Backups screen by clicking on Inventory > Firmware - Scheduler and selecting the Configuration Backups tab under the “Configure” section of the OmniVista Cirrus Menu.
Note that the Configuration Backups tab is also accessible from the Device Catalog screen (Inventory > Device Catalog) by selecting a switch device(s) in the Device Catalog List and clicking on Actions. From the Actions drop-down menu, select the Configuration Management > Configuration Backups option.
Performing a Backup
There are two ways to perform a configuration backup:
-
Trigger an instant backup from the Configuration Backups tab, the Scheduled Backups tab, the Device Catalog screen, or the Topology screen.
-
Schedule a configuration backup from the Configuration Backups tab or the Scheduled Backups tab.
Note that including security files in a configuration backup results in “Partial Success” on an AOS Switch running build 8.10.86.R04 or later.
Downloading a Configuration Backup
To download the contents of a configuration backup, select the backup file entry, click on Actions, then select Download file from the drop-down menu. You can also click the Download icon under the “Actions” column for the configuration backup file entry.
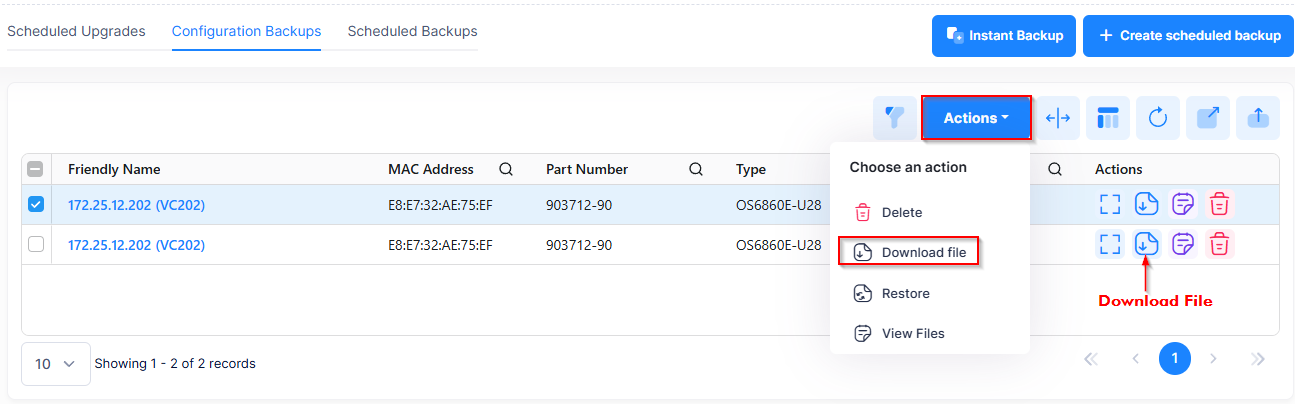
When you perform a backup file download, you are prompted to specify where on your system you would like to save the backup file. Once the downloaded file is saved, you can view the contents of the backup.
If the configuration backup partially failed (“Status” field shows “Partial Success” or “Failed”), the download option is not available. Instead you will see an option to “Retry” the backup again.
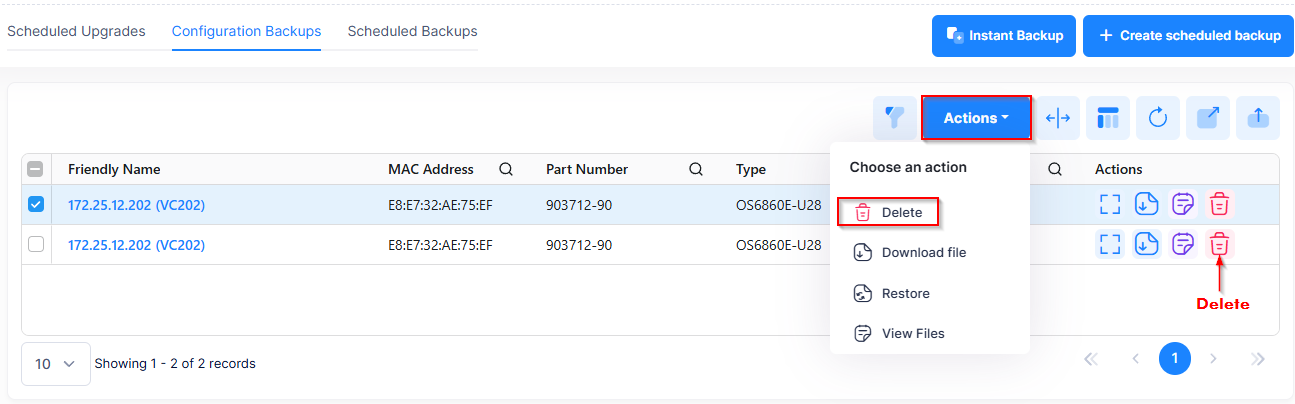
Deleting a Configuration Backup
To delete a configuration backup, select the backup file entry, click on Actions, then select Delete from the drop-down menu. You can also click the Delete icon under the “Actions” column for the configuration backup file entry.
When you select the backup file that you want to delete, the following confirmation popup appears.
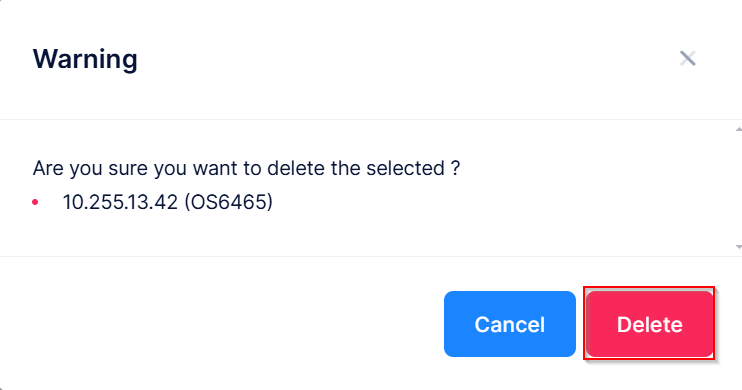
Click on Delete to remove the backup file from the Configuration Backups list.
When a device is deleted from the Device Catalog, all configuration backups for that device are also deleted.
Viewing Configuration Backup Files
The Configuration Backups list provides the following methods for viewing the contents of configuration backups:
-
Click on the Friendly Name of the device.
-
Select the device, then click on Actions and select View Files from the drop-down menu.
-
Click on the View Files icon under the “Actions” column next to the configuration backup entry.
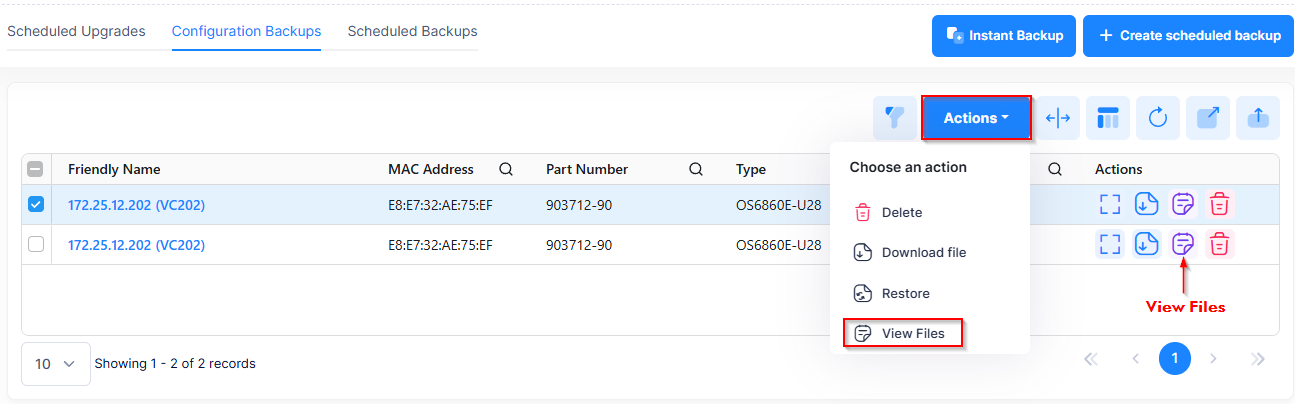
When you select one of the above options, the Backup Files screen for the selected device appears.
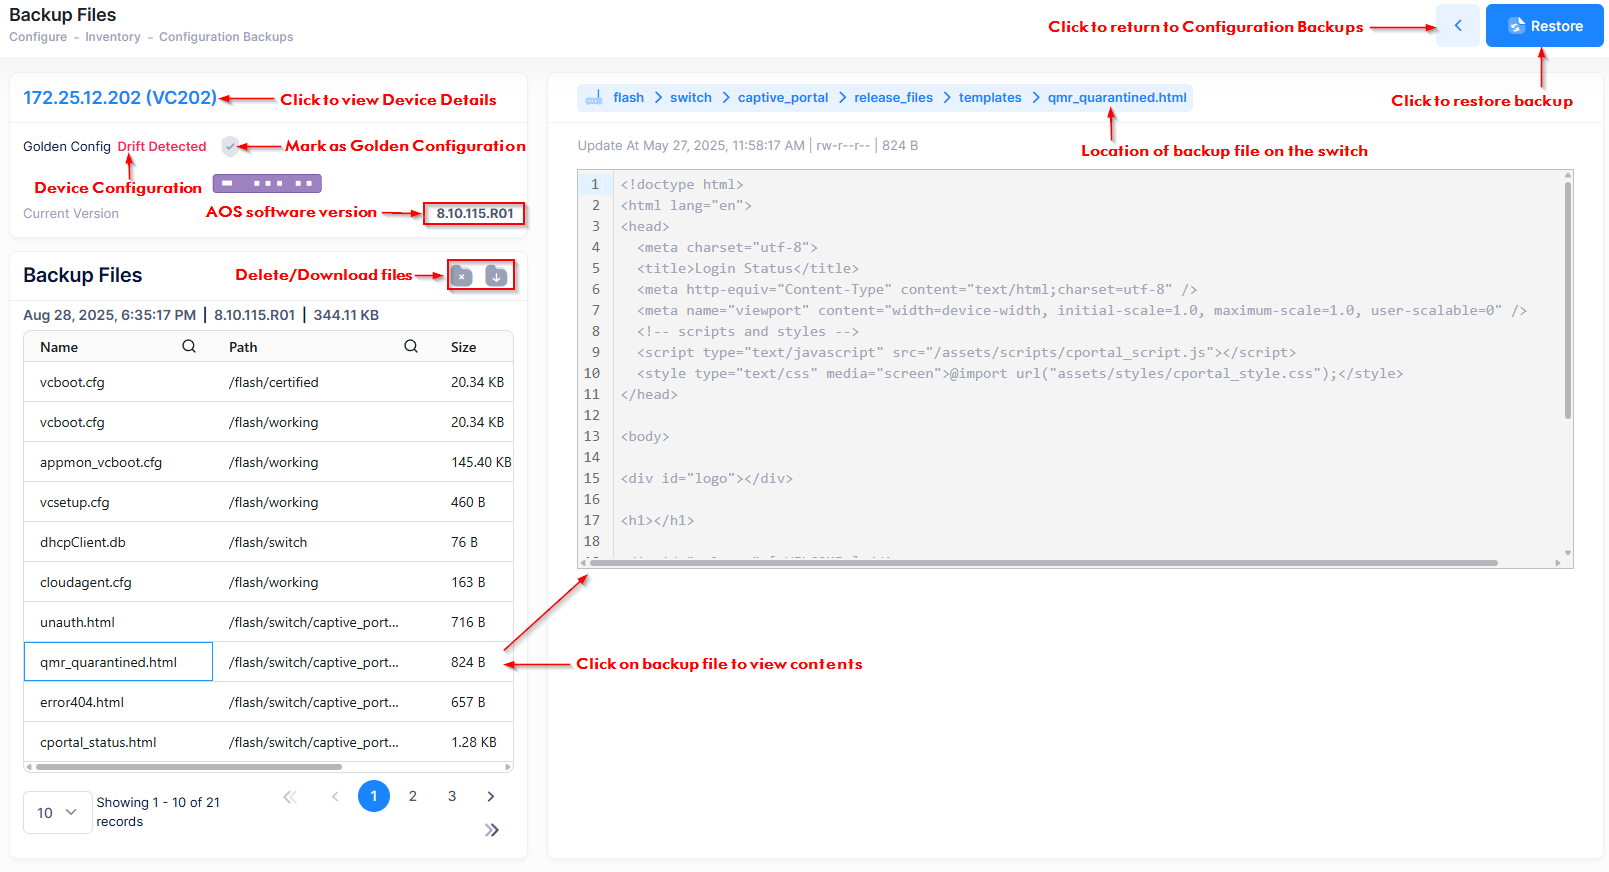
The Backup Files screen provides the following information:
-
IP Address - The IP address of the device, which is a link to the Device Details page for the device.
-
Golden Config - Whether the configuration backup is a Golden Configuration for the device.
-
Current Version - The AOS software version for the switch device (for example, 8.9.224.R03).
-
Backup Files - The configuration files that were included in the configuration backup. Click on any one configuration file to see the contents of the file, as shown above. Note that the file contents is not configurable at this time.
To restore a configuration backup from the Backup Files screen, click Restore in the top-right corner.
Display Backup Information
The Configuration Backups table displays the following basic information for each backup:
-
Friendly Name - The name assigned to the device is derived from the Preferred Device Naming convention specified in the user preference settings. By default, the Friendly Name is set to IP Address (System Name).
-
MAC Address - The device MAC address.
-
Part Number - The part number for the device.
-
Type - The model number for the device (for example, OS6900-X20).
-
Running From - The directory from which the switch is running (for example, “working”).
-
Security Files - Whether security files on the switch were included in the backup (“Included” or “Excluded”).
-
Current Software Version - The software version of the backup files (for example, 8.9.224.R03)
-
Status - Indicates if the backup was successful, partially successful, or failed. If partially successful, a Retry icon appears in the “Actions” column that you can click to try the backup again.
-
Failed Reason - If the backup failed, displays the reason for the failure (for example, invalid credentials)
-
Description - The user-configured description for the backup, if one was entered for the backup.
-
Created At - The date and time the backup was initiated.
-
# Files - The number of files that were included in the backup.
-
Size - The size, in bytes, of the backup file.
You can search for information in a specific column by clicking on the Search icon at the top of the column and entering search criteria. Delete the search criteria to return to the previous display. For example, you can select to search for “working” in the “Running From” column.
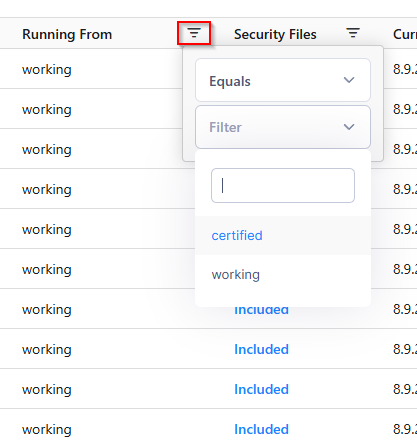
Note that each column in the Configuration Backups table has search criteria specific to the column field values.
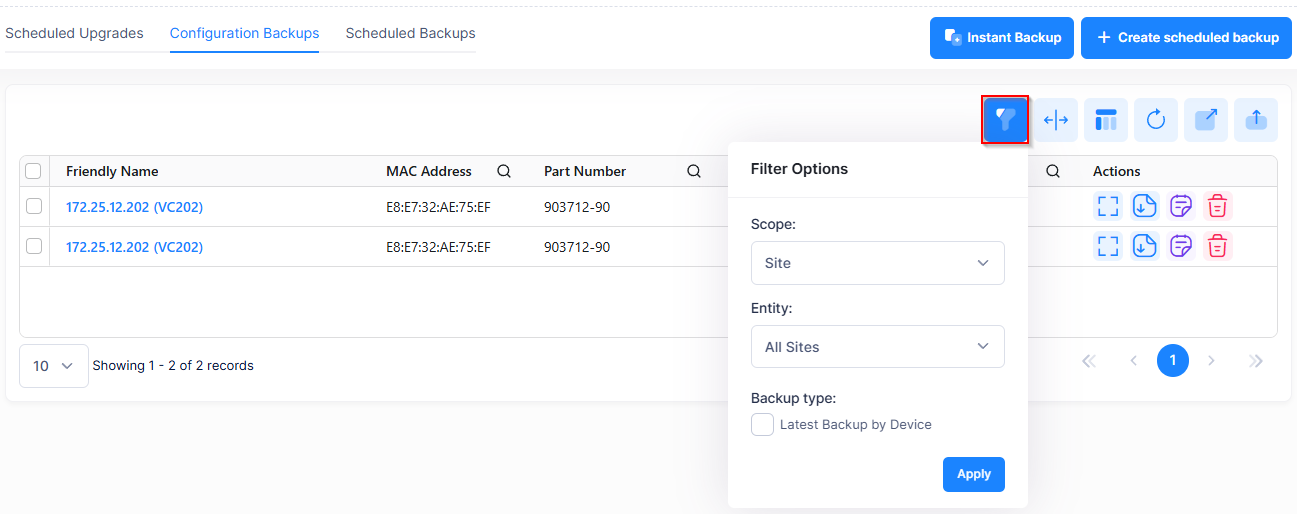
Customizing the Configuration Backups Display
By default, information about all backups is displayed. To change the display to show customized views of the configuration backups, click on Show Filter Options and select the filters as described below:
-
Filter Options:
-
Scope - Select Site (the default), Floor, or Switch.
-
Entity - Based on the scope selected, select one of the following entities from the drop-down list:
-
Site - Select All Sites (the default) or an individual site. Displays only backups for the selected Site.
-
Floor - Select a floor. Displays only backups for devices associated with the selected floor.
-
Switch - Select a switch. Displays only backups for the selected switch.
-
-
Backup Type
-
Latest Backup by Device - Select this option to display the latest backup per device.
-
-
After you have selected the filters to customize the display, click Apply. The Configuration Backups display will change according to the filters you applied. For example:
-
By default, “Site” is selected for the Scope and “All Sites” is selected as the Entity and the Backup Type is not selected, so all backups for all devices within the Organizations are listed.
-
If you change the filters to “Floor” for Scope and select a floor for the Entity, only backups for devices assigned to the selected floor are displayed.
Restore a Switch Configuration Backup
You can restore a configuration to the device from a previous backup, or restore the configuration to another device if that device is compatible with the backup configuration.
Restoring a configuration from a previous backup to another device that is not compatible with the backup configuration can cause network problems. See Restore Backup on Another Device for more information.
To restore the contents of a configuration backup, select the backup file entry, click on Actions, then select Restore from the drop-down menu.
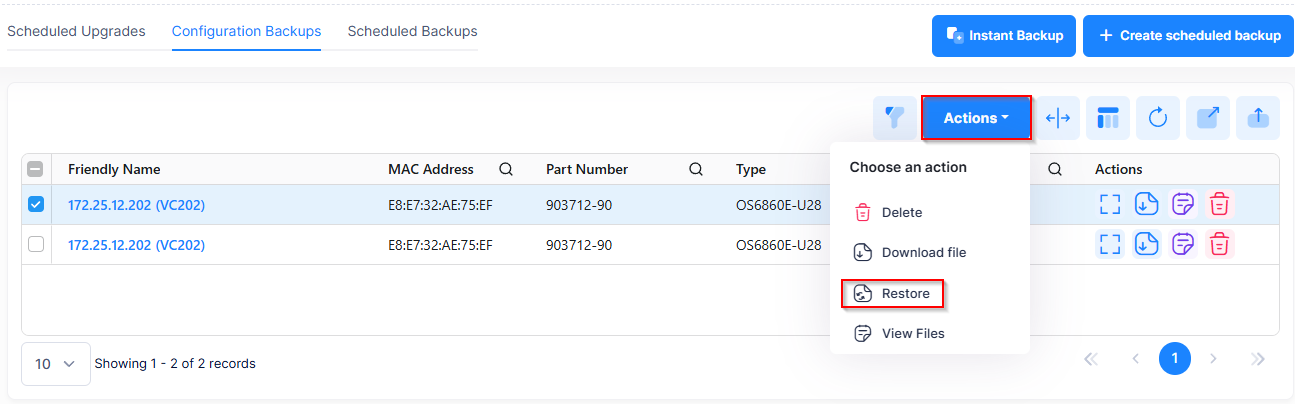
When you select the configuration backup file that you want to restore, the following Restore screen appears:
The Restore screen gives you the option of restoring the backup on the current device or restoring the backup on another device.
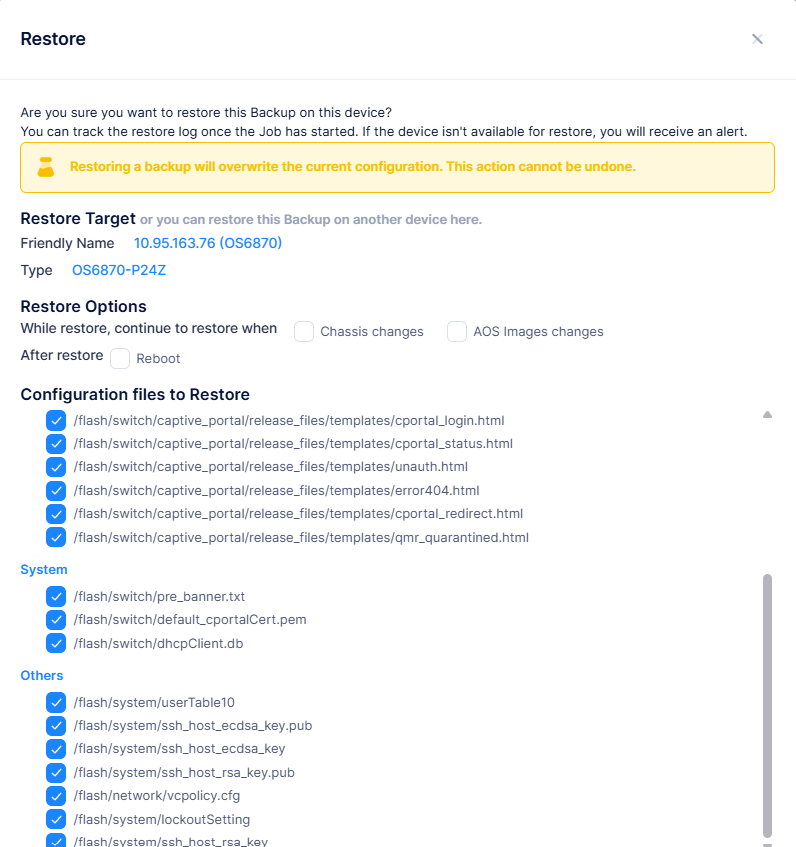
Restore Backup on Current Device
Use the Restore screen to select the files you want restored on the device currently associated with the configuration backup. Complete the following, then click on Restore.
-
Select Files - Select the configuration files that you want to restore.
-
Chassis changes - Select this option to continue the backup restore even if the chassis changed since the last backup.
-
AOS Images changes - Select this option to continue the restore backup even if there were changes to the AOS images.
-
After restore - Specify if you want the device to automatically reboot after the backup restore is done.
Restore Backup on Another Device
Restoring a configuration backup on another device is useful when a switch is replaced with the same or newer switch model. If you click you can restore this Backup on another device here on the Restore screen, the following Select Device screen appears from which you can select another device:
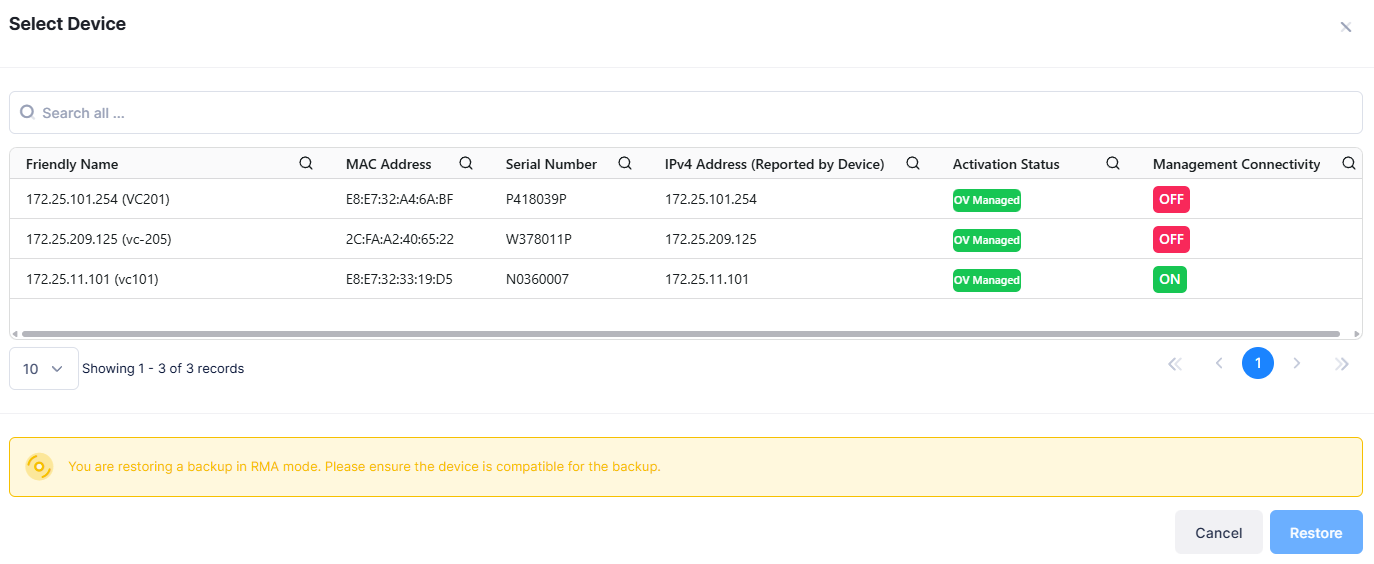
To restore the configuration backup on another device, click on the device entry, then click Restore.
Make sure the device you select is compatible with the backup.
The Restore screen appears from which you can select the files you want restored on the selected device with the configuration backup. Complete the following, then click on Restore.
-
Select Files - Select the configuration files that you want to restore.
-
Chassis changes - Select this option to continue the backup restore even if the chassis changed since the last backup.
-
AOS Images changes - Select this option to continue the restore backup even if there were changes to the AOS images.
-
After restore - Specify if you want the device to automatically reboot after the restore backup is done.
Monitoring the Restore Backup
When you have initiated the restore backup process, a notification icon in the upper-right corner of the screen appears.
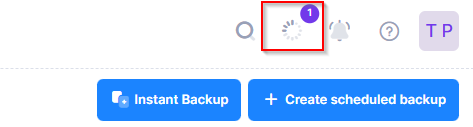
Click on the icon to view the task notification.
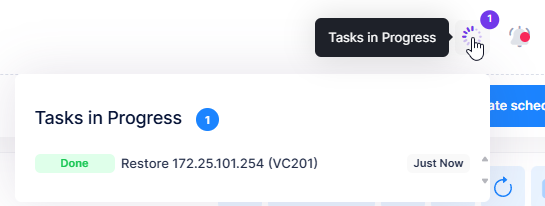
Click on the Restore task to view the Restore Logs screen.
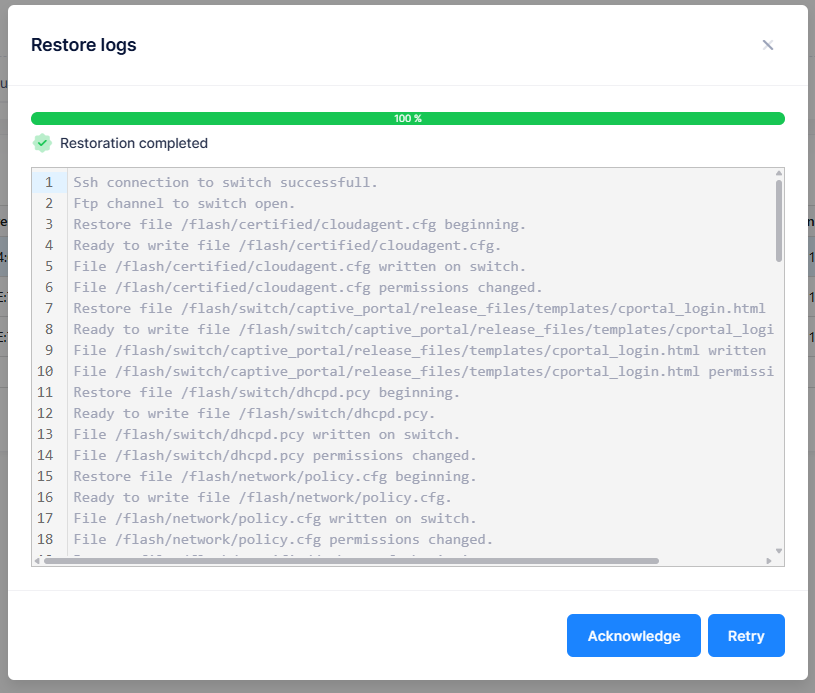
Use the Restore Logs screen to monitor the restoration process. This screen will also indicate any failures encountered during the restore backup.
-
Click Acknowledge if you’re satisfied with the completed restoration tasks.
-
Click Retry to restart the restoration process.