
The CLI Scripts screen used to cerate, manage, and run CLI Scripts across network devices in the organization.
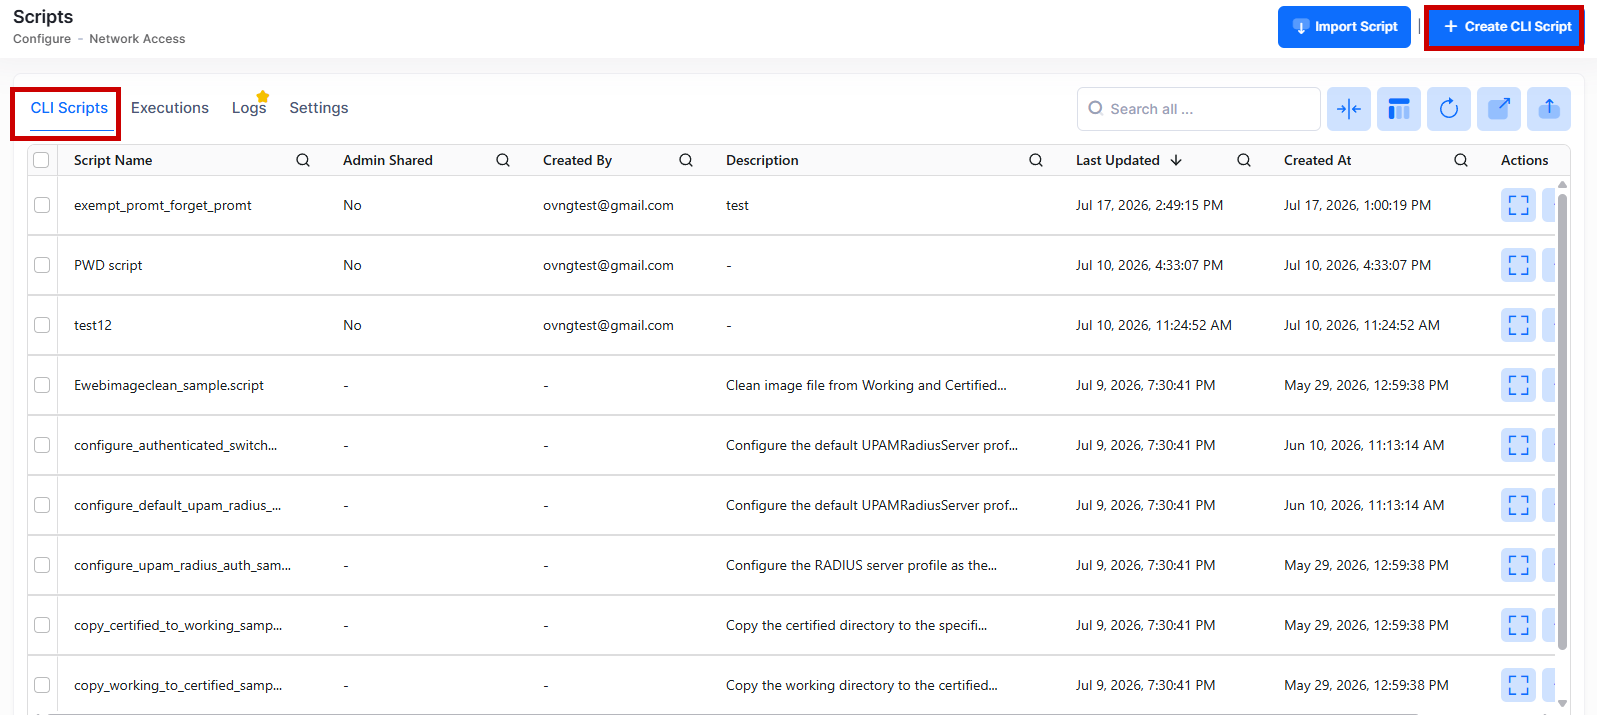
Use the CLI Scripts screen to display information about all of the configured CLI scripts across the organization. Refer to the troubleshooting section for solutions to your queries. This screen also allows you to create, edit, clone, delete or Import CLI Scripts. To access the CLI Scripts screen, click on Auth & Automation > Scripts > CLI Scripts under the “Configure” section of the OmniVista Cirrus Menu. The below screen appears:
Creating a CLI Scripts
The Create CLI Scripts screen is used to create a script across the organization on the selected devices. Click on Create CLI Script to access the create CLI Script screen as shown below:
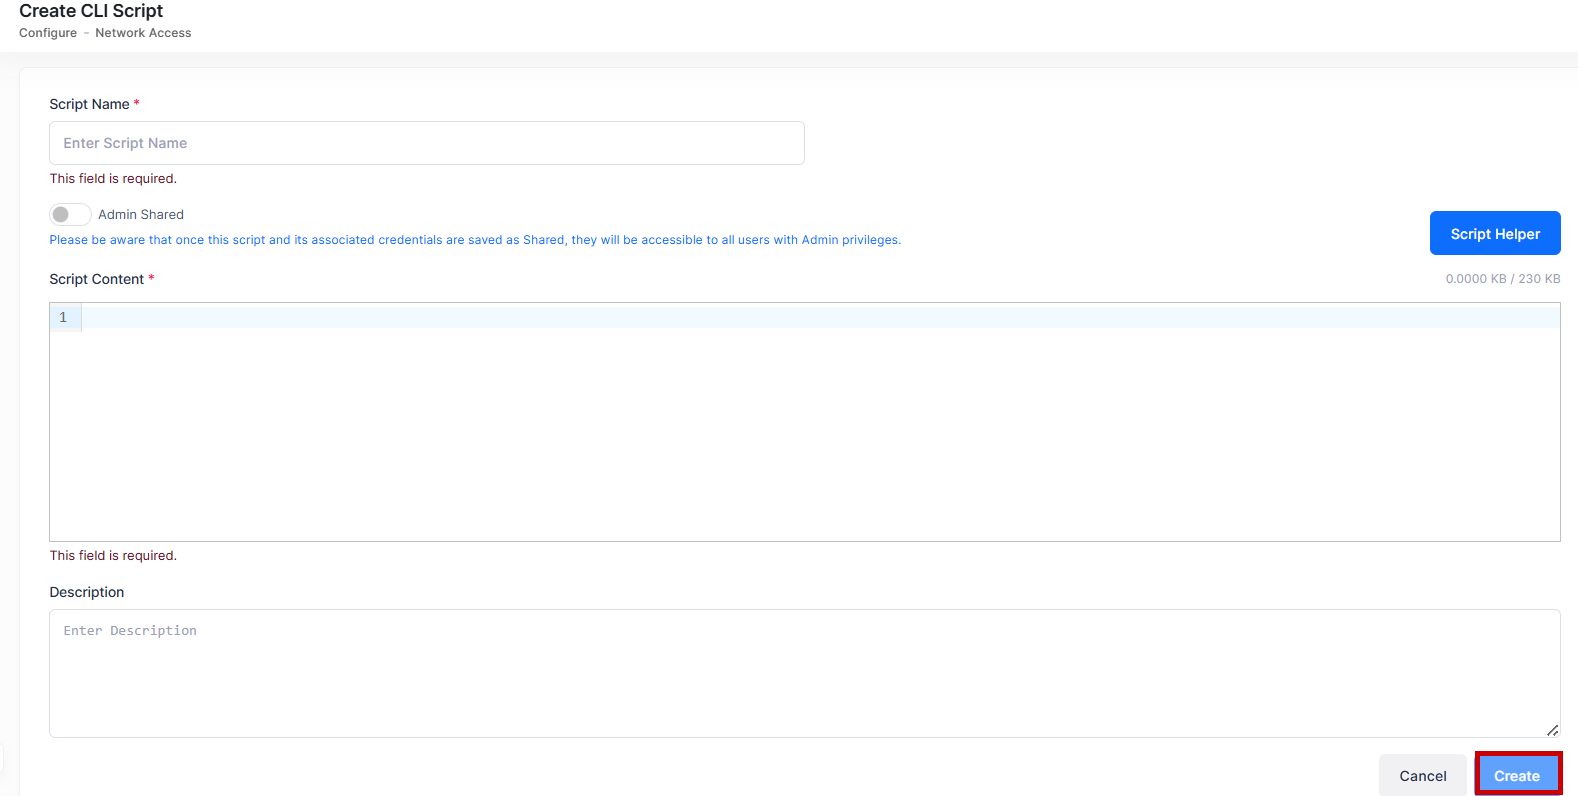
Complete the fields as described below and click on Create to complete the process of creating first script :
-
Script Name - Enter a unique name for Script. (Range = maximum 64 characters).
-
Admin Shared - Toggle the tab to enable sharing this script with all the organization administrators. (Note: When Admin Shared is enabled, the script and its associated credentials become accessible to all users with Admin privileges).
-
Script Content - Enter the CLI commands. (Range = maximum 10,000 characters). CLI Scripts support the following type of inputs:
-
JS — Pure JavaScript. Write the logic directly in the editor.
-
CFG — Pure CLI configuration commands, executed line by line on the target device.
-
Mixed JS + CFG — Combine JavaScript logic and CLI commands in the same script by wrapping JavaScript blocks in “…” tags. Lines outside those tags are treated as CFG commands.
-
-
Description - Enter a description for CLI Script.
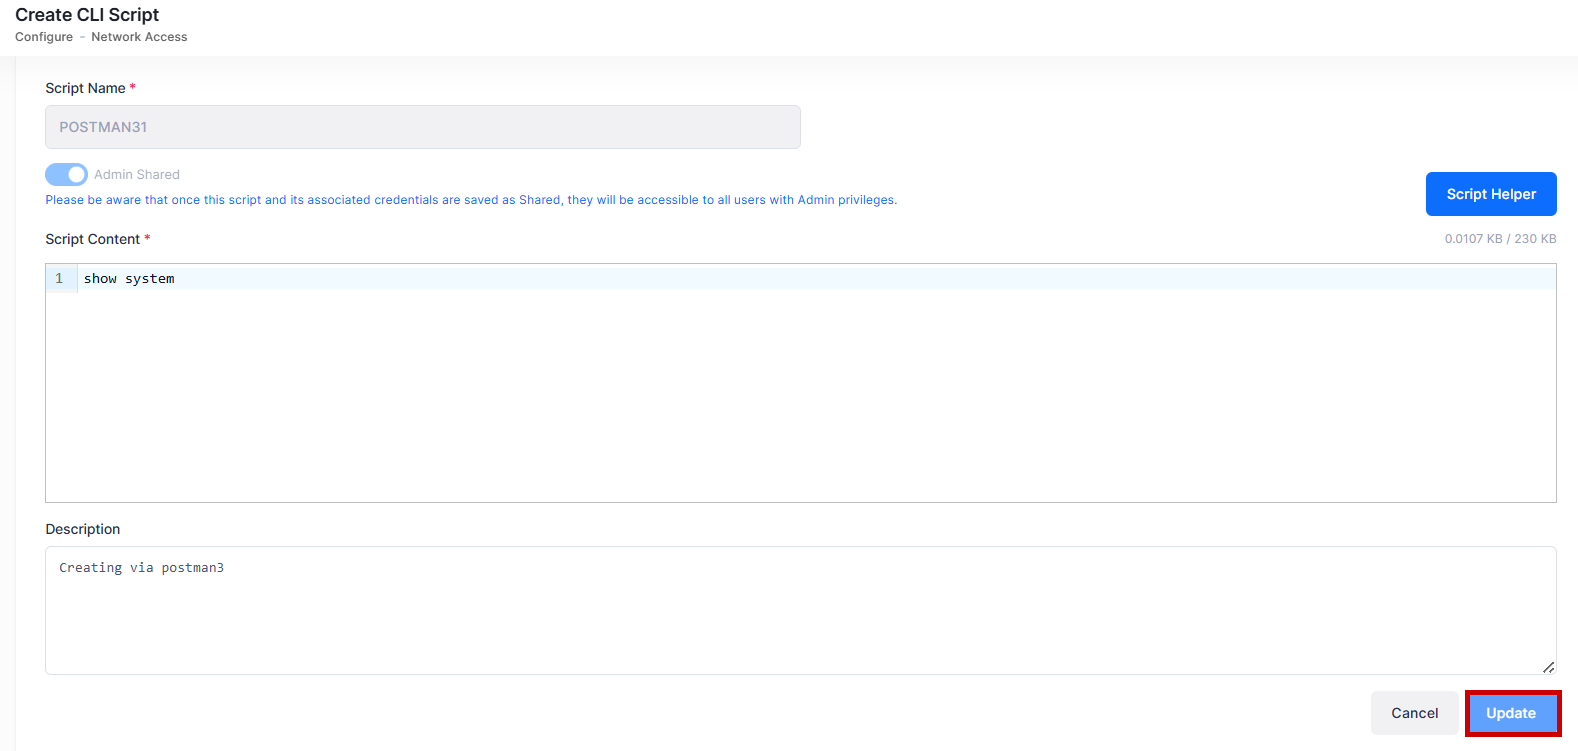
The Script Name cannot be changed after the script is created.
Editing a CLI Script
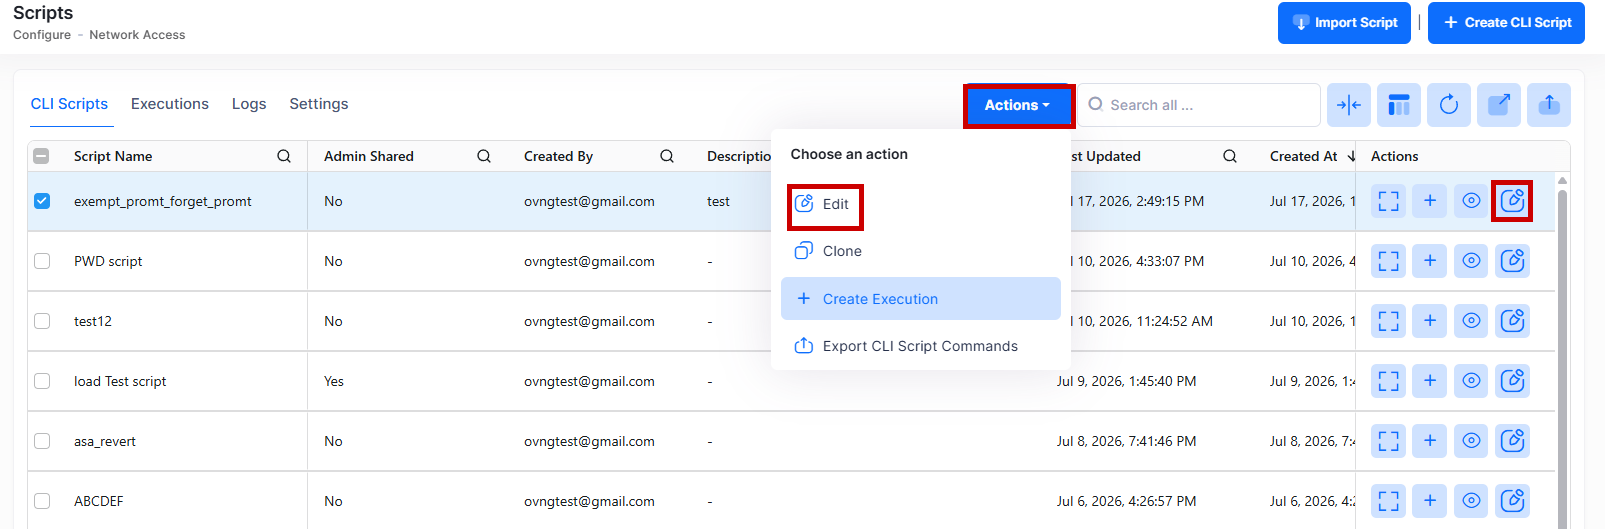
Use one of the following methods to access the Edit CLI Script screen:
-
Select the Script to edit by clicking on the checkbox next to the profile, click on Actions, then select Edit from the drop-down menu.
-
Click on the pencil icon under the “Actions” column next to the Script Name that you want to edit.
The following Edit CLI Script screen appears. Edit the fields as described above, then click on Update.
Only the script's creator or an organization administrator can edit a script.
Deleting a CLI Script
To delete a CLI Script, use one of the following methods to select the Script you want to delete:
-
Select the name to delete by clicking on the checkbox next to the list, click on Actions, then select Delete from the drop-down menu.
-
Click on the trash can icon under the “Actions” column next to the Script Name that you want to delete.
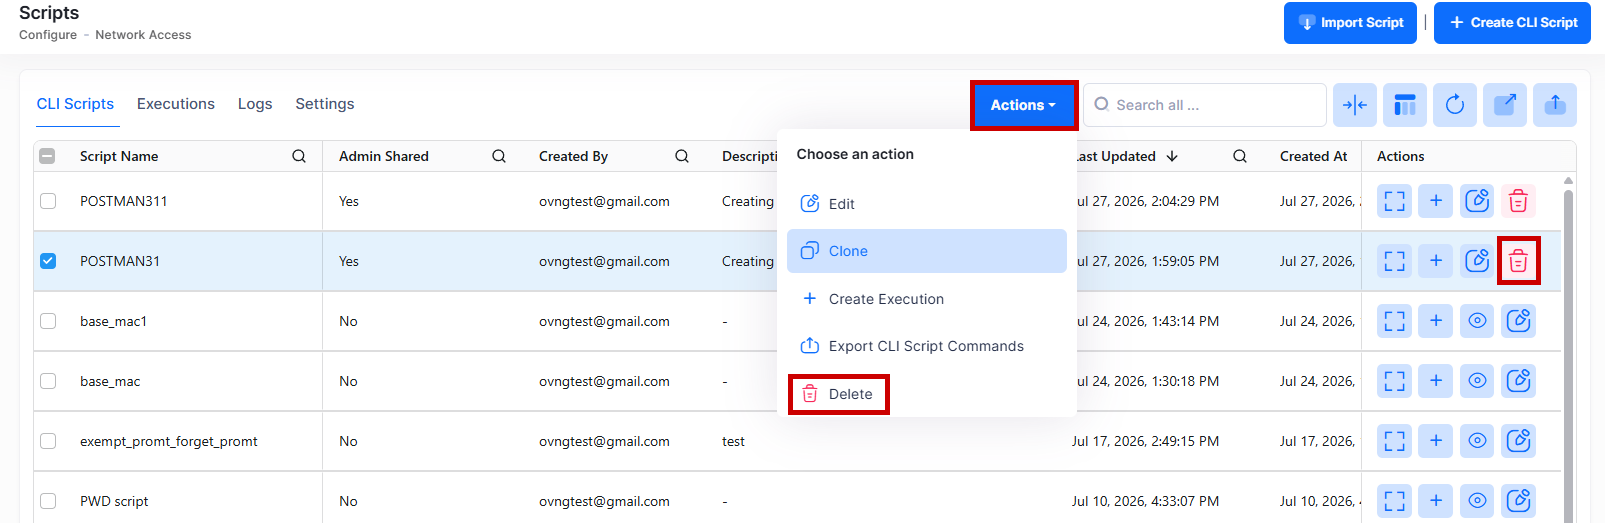
The following confirmation prompt appears:
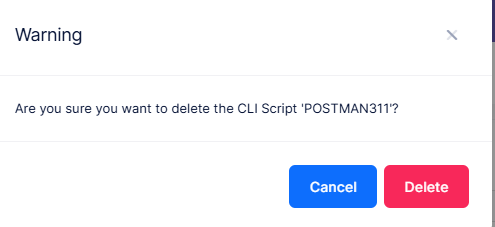
Click on Delete to confirm.
-
Only the script's creator or an organization administrator can delete a script.
-
A CLI Script cannot be deleted while it is referenced by one or more active executions.
Importing a CLI Script
You can import previously exported CLI script files to restore or bulk-update scripts. To import multiple scripts from an existing Excel sheet (.xlxs), click on Import Script tab.
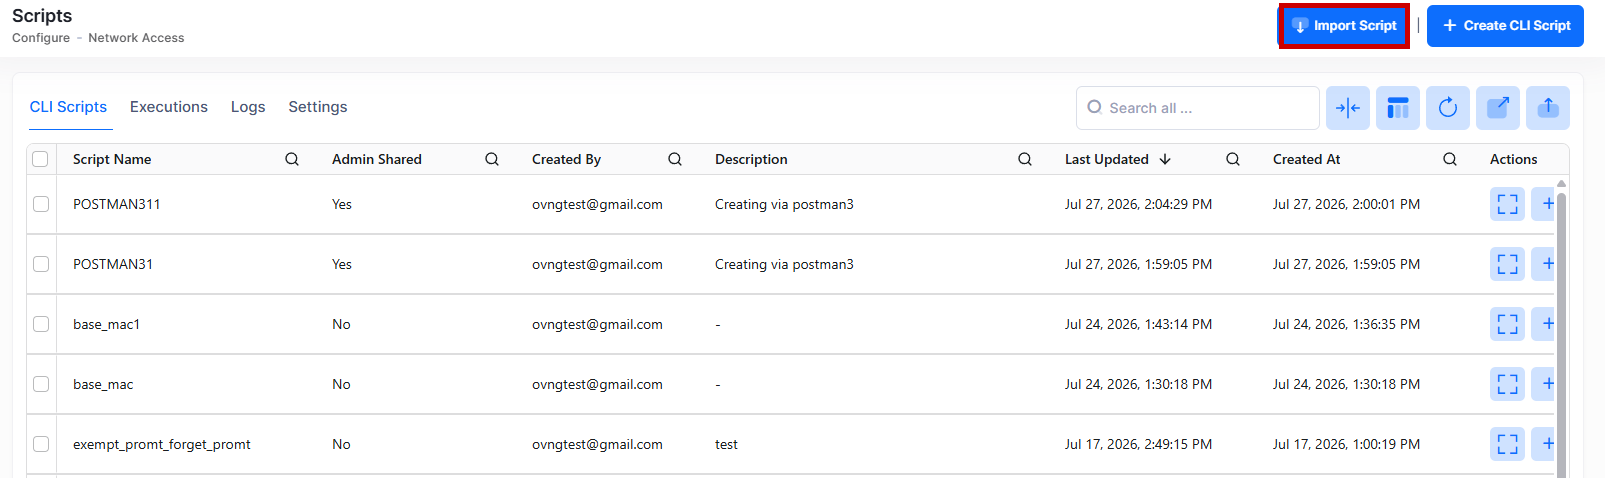
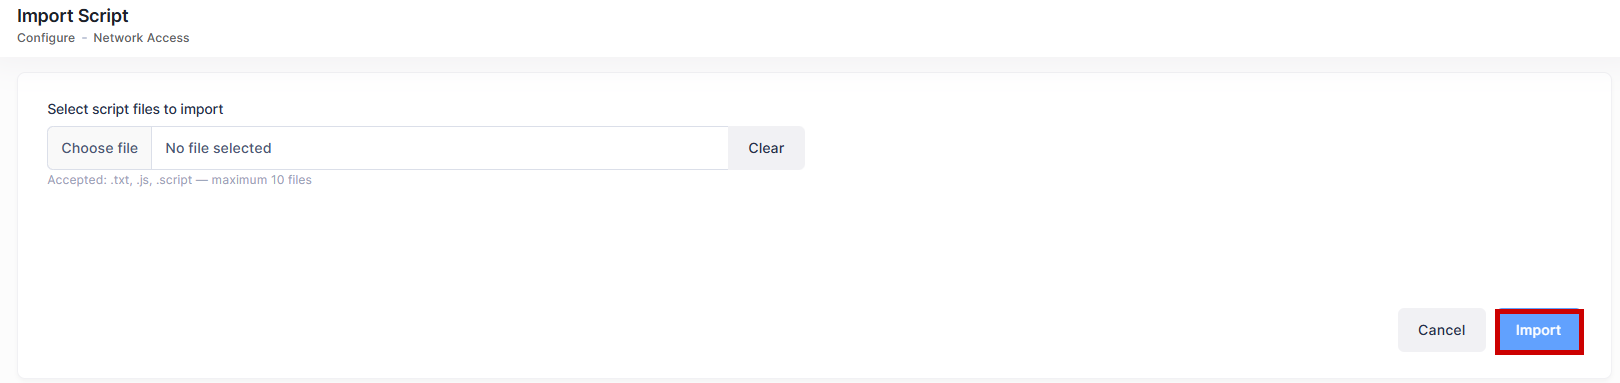
You will then be prompted to below screen.
-
File Browser - Click in this field to find and select the existing template file to import.
Once the Import form is complete, click on Import and refresh the page to see the newly imported scripts. The CLI Script list is populated with the imported Scripts.
Exporting CLI Script Commands
To export the CLI Script commands, Select the Script Name from the list by clicking on the checkbox next to the list, click on Actions, then select Export CLI Script Commands from the drop-down menu.
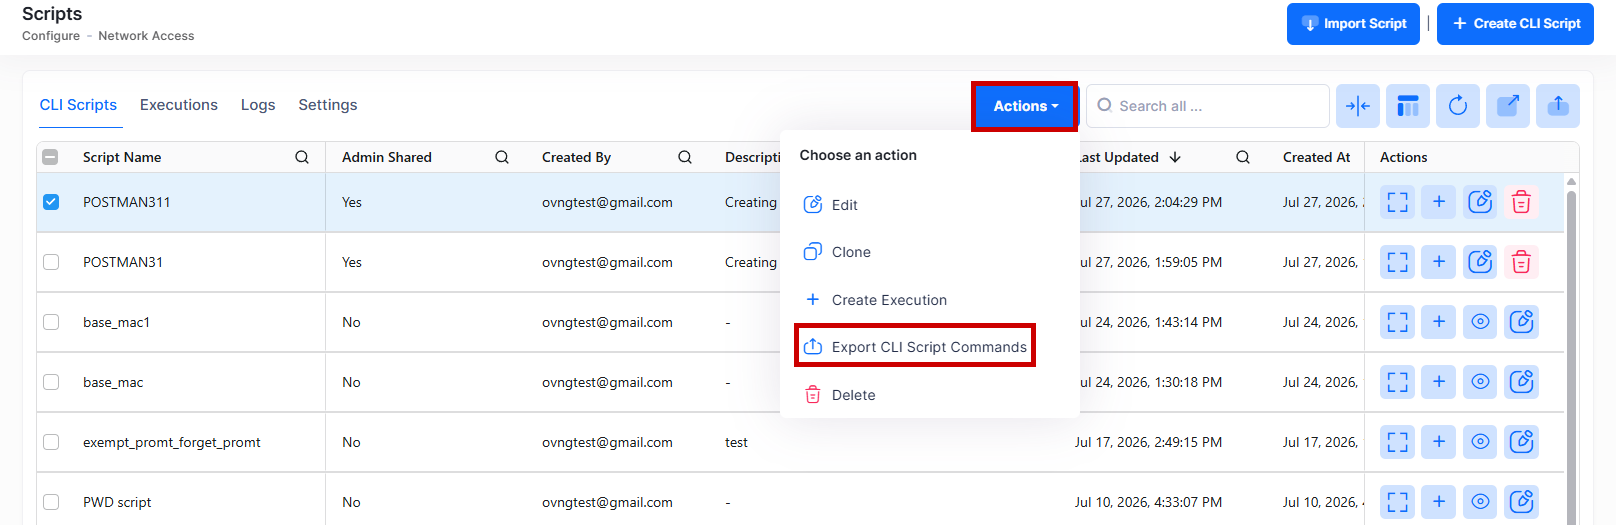
The Script commands will be exported in the zip folder.
Clone a CLI Script
You can clone an existing CLI Script and edit it to create a new Script. To clone an existing Script, click on the Actions icon and select Clone from the drop-down menu.
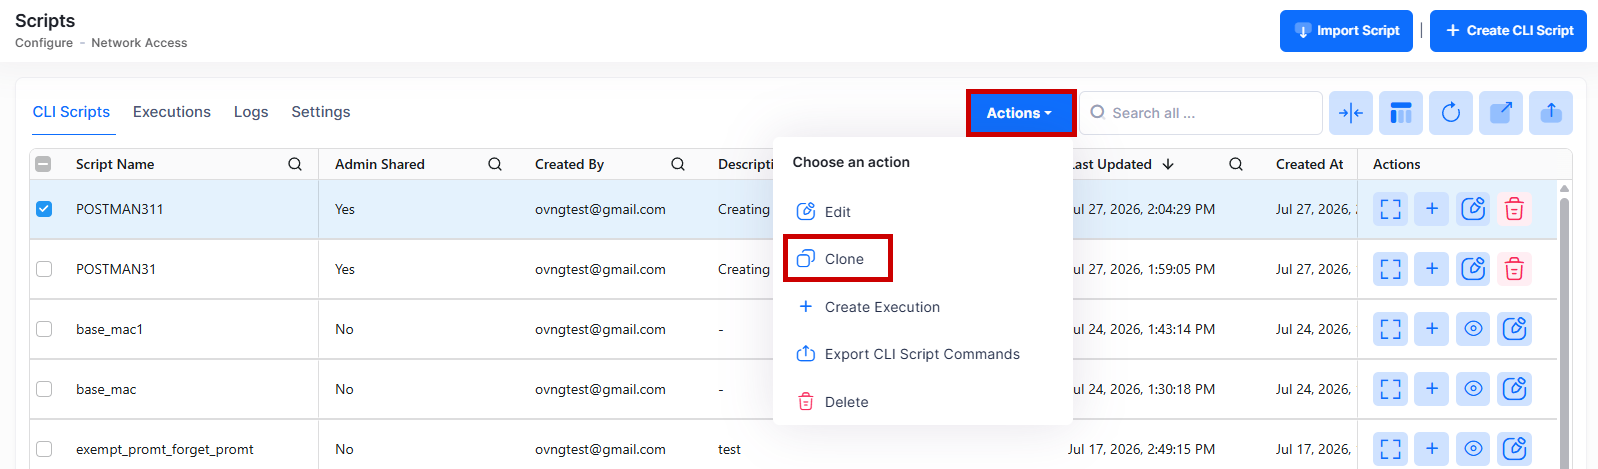
The following screen appears:
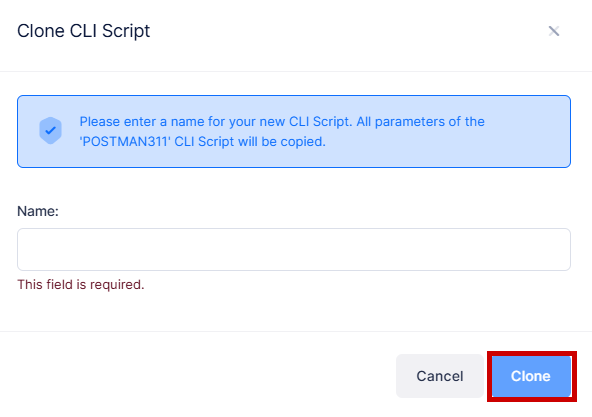
Enter the name you want to assign to the new Script and click Clone. The Create Site screen will open containing all the information copied from the Script you were cloning. You can change any of the Script parameters and Click on Create when you are done.
The script is cloned with the new name and appears in the list.
Sample Scripts
The CLI Scripts list includes these built-in sample scripts you can use directly or as references:
-
create_vlan_ip_interface_sample - Creates VLANs and IP interfaces on the target device.
-
configure_upam_radius_auth_sample - Configures UPAM as the RADIUS authentication server. This script uses the
$IP_ADDRESSbuilt-in variable to resolve the UPAM server IP at execution, avoiding hard-coded values.
Both scripts appear in the CLI Scripts list and can be selected in the standard execution flow.
Script Helper
The Script Helper is available to assist in generating consolidated report logic without manually writing cli.report() calls.
To use the Script Helper, go to Create CLI Script screen and click on Script Helper. The following screen appears:
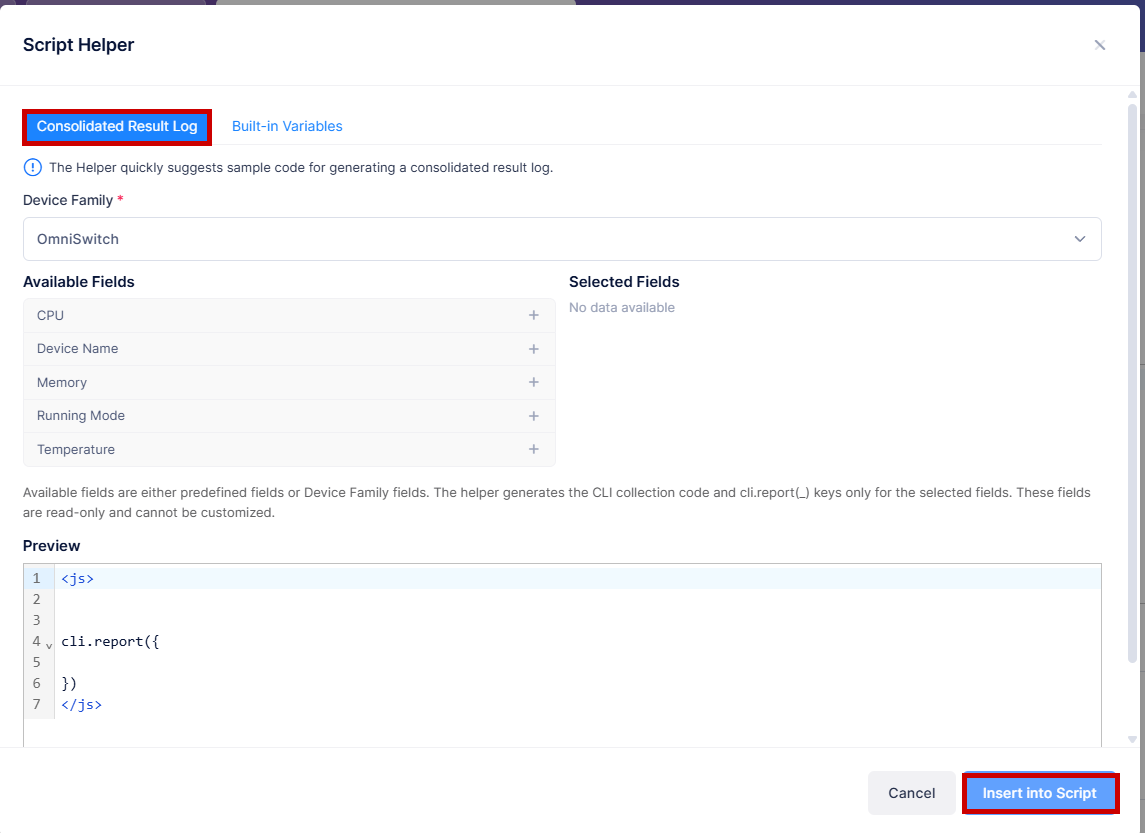
The following sections are displayed:
-
Device Family - Select a Device family from the available drop-down list. By default, OmniSwitch is selected.
-
Available Fields - Displays the fields available for the selected device family - CPU, Device Name, Memory, Running Mode, or Temperature. Select the fields you want to include in the report.
Available fields include predefined and Device Family fields. The helper generates CLI collection code and cli.report(_) keys only for selected fields. These fields are read-only and cannot be customized.
-
Preview - Review the generated
cli.report()code snippet in the Preview area.
Click on the Insert into Script tab to place the snippet into the Script Content field. The inserted code is fully editable after insertion.
Built-in Functions and Variables
CLI scripts (Script type) support a set of built-in functions and variables that simplify authoring and ensure scripts work consistently across different devices.
Built-in Functions
You can use below defined functions within your script to interact with the target device:
-
sendCmd(String cmd)- Sends a CLI command to the target device. -
lastResponse()- Returns the output of the most recently executed command. -
setTimeout(int minutes, int seconds)- Sets the timeout for the next command only. The timeout reverts to the default for subsequent commands. -
cliSleep(int milliseconds)- Pauses execution for the specified duration before the next command. -
expectPrompt(String prompt)- Waits for a specific prompt string before continuing execution. Used for commands that require confirmation input. -
forgetPrompt()- Clears the current prompt expectation. -
deviceType()- Returns the device type string for the target device. -
is6xDevice()- Returns true if the target device is an AOS 6x device. -
is8xDevice()- Returns true if the target device is an AOS 8x device. -
is3rdDevice()- Returns true if the target device is a 3rd-party device.
Built-in Variables
The following variables resolve automatically from the target device's context during execution. Provide only the variable name in your script; OmniVista resolves the actual value at runtime:
-
$BASE_MAC- The device's base MAC address. -
$BOOT_DIR- The device's boot directory. -
$CHASSIS_TYPE- The device chassis type. -
$IP_ADDRESS- The device's IP address. -
$SYS_LOCATION- The device's physical location as configured on the device. -
$SYS_NAME- The device's system name. -
$SYSTEM_OID- The device's system OID. -
$SYS_VERSION- The device's current software version.
Login Credentials Variables
The following variables resolve to the device's login credentials at execution time. The actual values are always masked in the script view, execution logs, exports, audit logs, and error messages and are never exposed in plain text:
-
$LOGIN_ID- The login username. -
$LOGIN_PWD- The login password. -
$READ_PWD- The read-only password. -
$SECOND_PWD- The secondary password. -
$WRITE_PWD- The write password.
If a credential variable cannot be resolved for the target device at execution time, the system returns a clear error message without revealing any secret value.
Display CLI Scripts
The CLI Scripts tab displays all configured CLI scripts in your organization. Data displayed can be exported into a CSV, PDF or Excel sheet format. You can also switch to full-screen mode for a better display. The following screen appears:
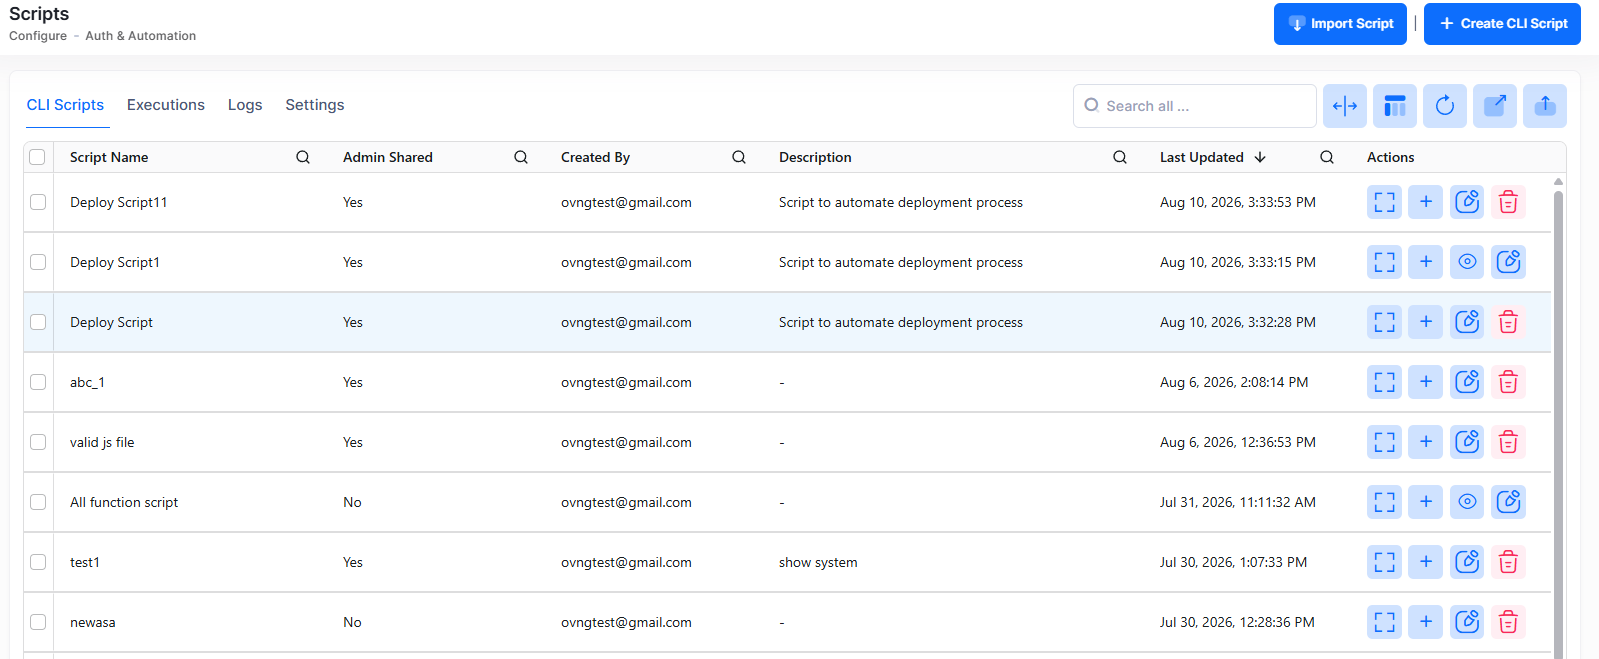
The following information is displayed:
-
Script Name - The unique name of the CLI script.
-
Admin Shared - Indicates whether the script is visible to all organization administrators (Yes or No).
-
Command Type - The content type of the script. (JS (JavaScript), CFG (configuration commands), or mixed JS + CFG).
-
Description - The description for the script's purpose.
-
Created By - The user who created the script.
-
Last Updated - The date and time the script was last modified.
Creating an Execution
An execution combines a CLI script, a set of target devices, a schedule, and device credentials into a single runnable configuration. Scripts can be applied to OmniSwitch (AOS 6x and AOS 8x) and 3rd-party devices.
Use one of the following methods to access the Creating an Execution screen:
-
Select the Script by clicking on the checkbox next to the profile, click on Actions, then select Create Execution from the drop-down menu.
-
Click on the + icon under the “Actions” column next to the Script Name to create an Execution.
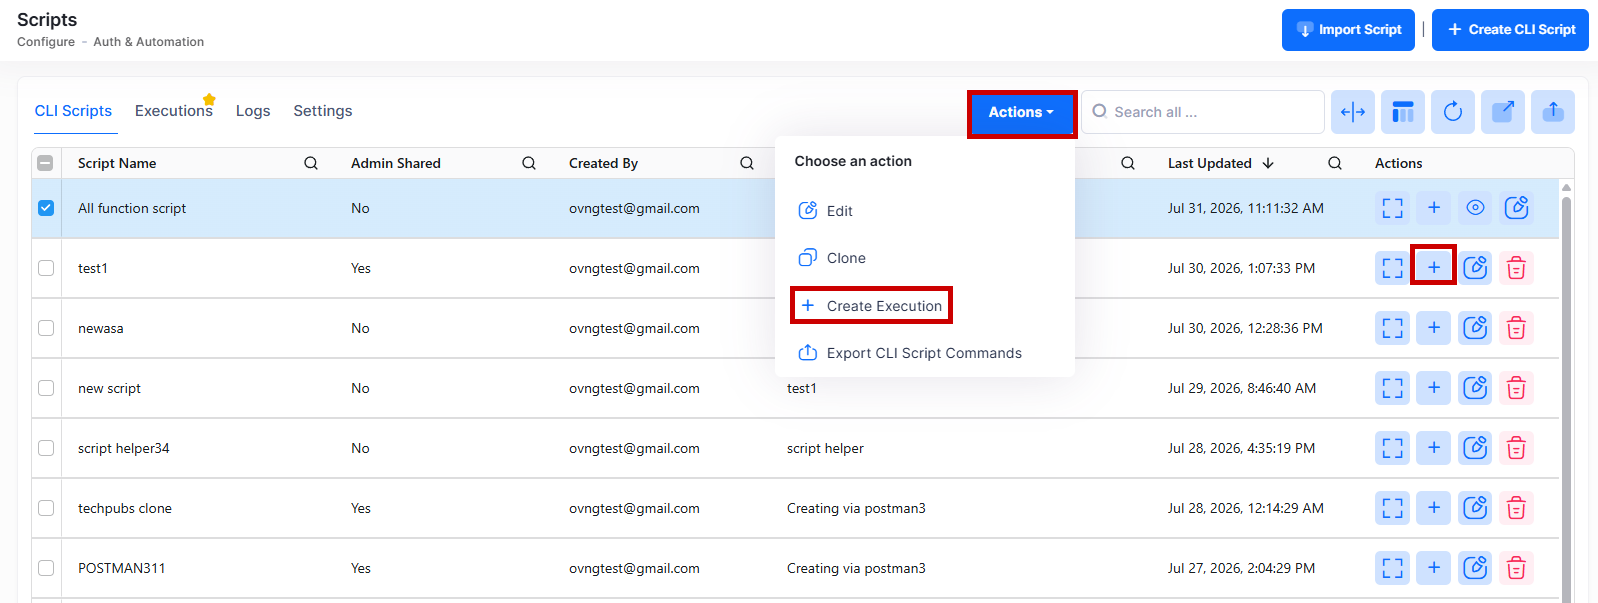
The Create Execution screen provides the following step-by-step process to create an Execution. Complete the fields for the sections on the Create Execution tab as described below, then click Next to move to the next tab (Step 2).
1. Script Info
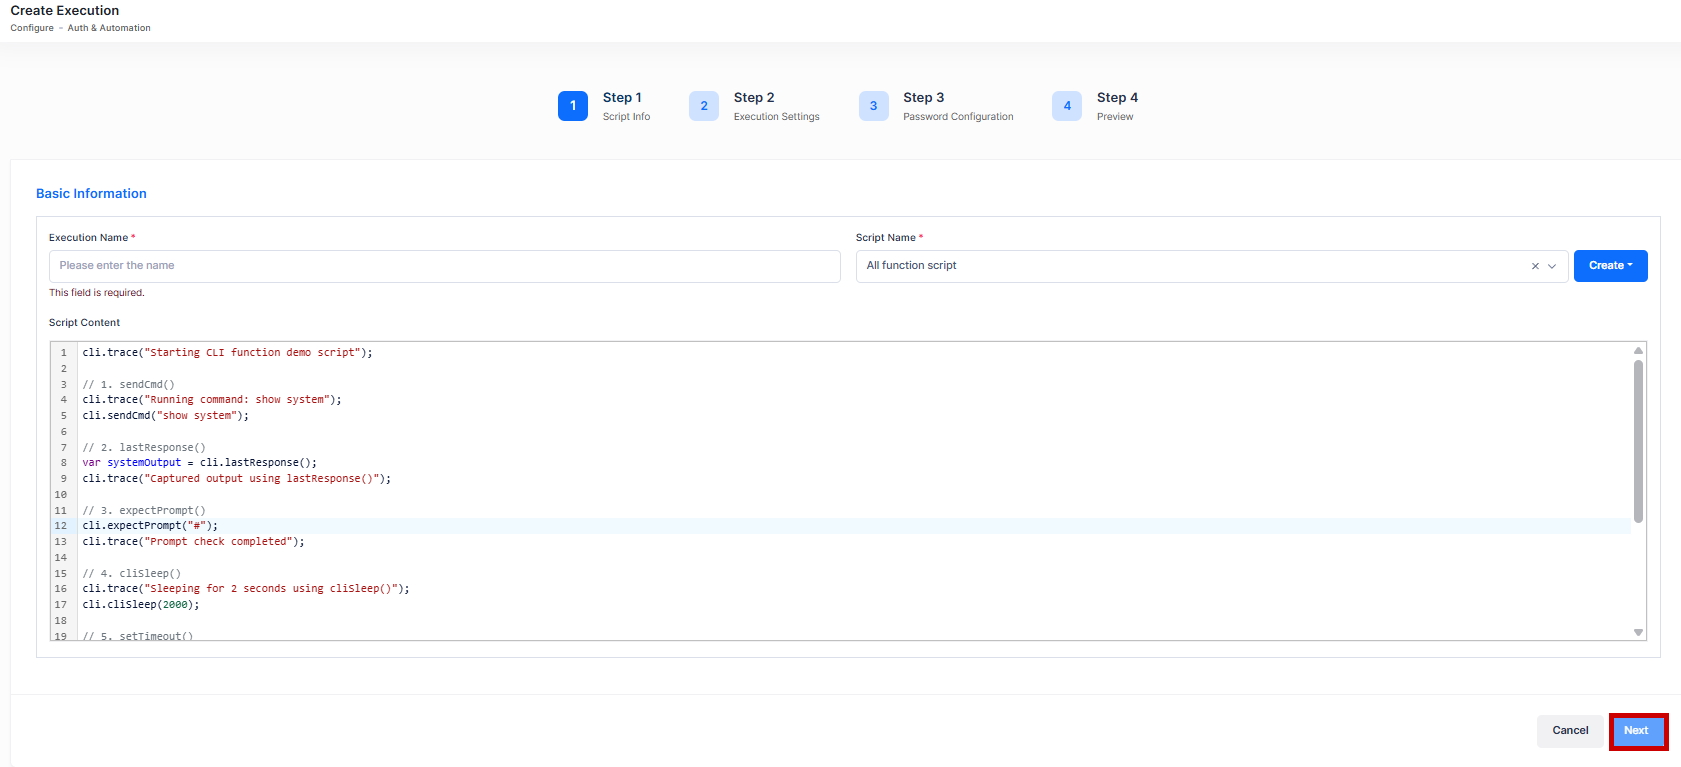
Complete the fields as described below to assign a Execution name:
-
Execution Name - Enter the name of the execution configuration.
-
Script Name - Select the Script Name from the drop-down menu or click on Create CLI Script to open the Create CLI Script screen and create a new CLI Script.
-
Script Content - Displays the content below for reference (read-only). If the script contains user-defined variable placeholders, fill them in under Define User Variables.
2. Execution Settings
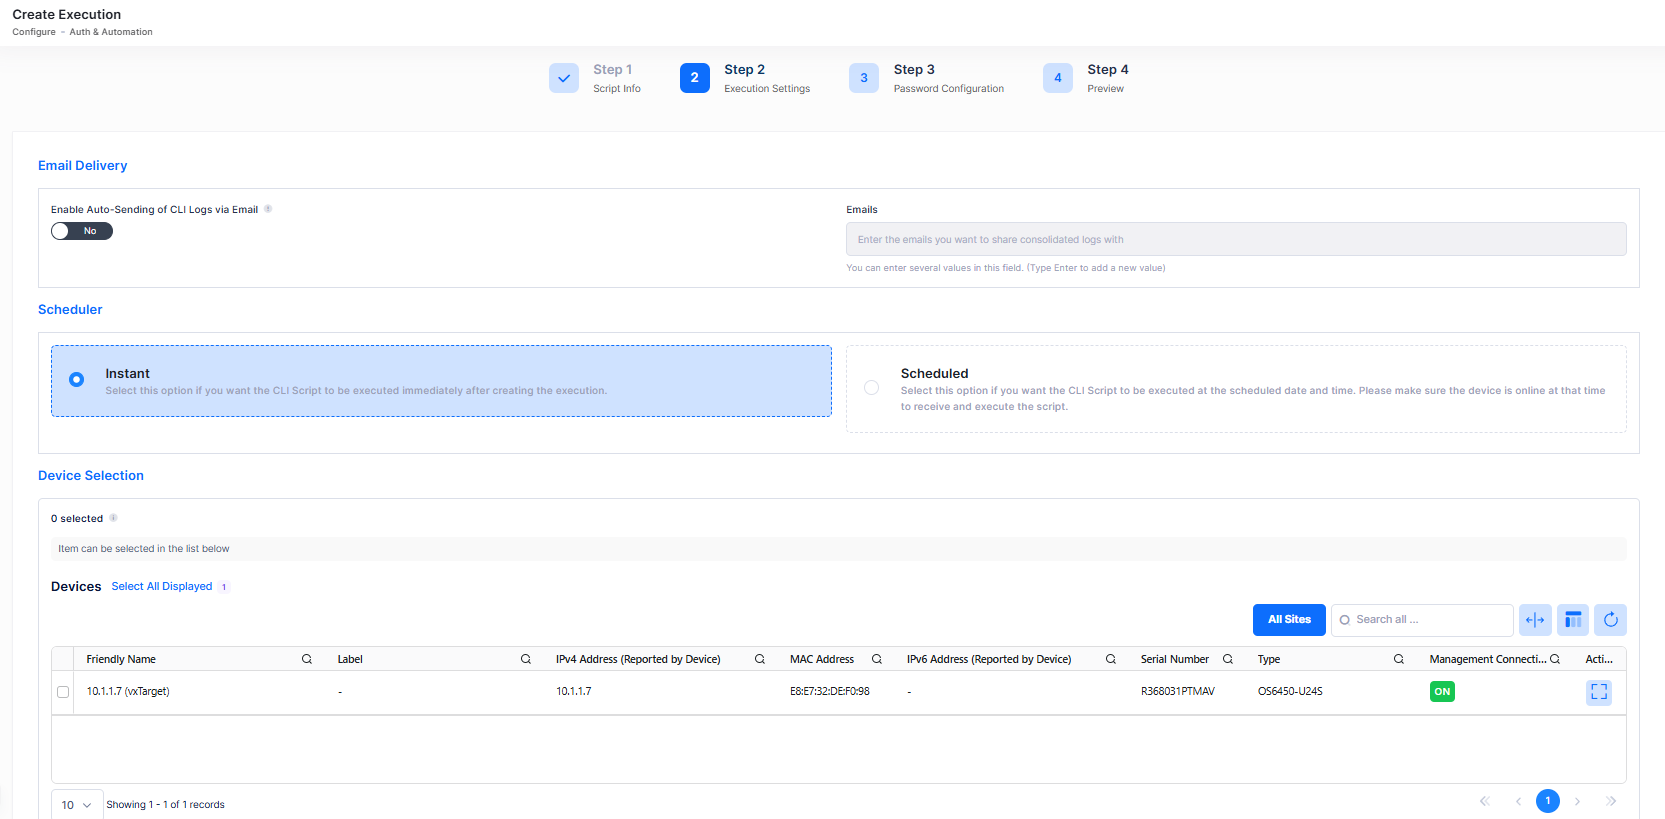
Email Delivery
Consolidated execution logs can be delivered automatically by email on a defined schedule. Complete the fields as described below and move to next tab (Step 3).
-
Enable Auto-Sending of CLI Logs via Email - When enabled, consolidated logs are automatically sent via email based on the Email Scheduler time settings. By default, disabled.
-
Emails - Enter the email addresses to share consolidated logs with.
Scheduler
Select the type of schedular to generate the execution logs.
-
Instant - The script runs immediately after the execution is created.
-
Scheduled - The script runs at the configured date and time. Set the recurrence (daily, weekly, or monthly), the start date, the end date (or enable Never for no end date), and the execution time.
Device Selection
Select devices to include in the execution from the available device list.
3. Password Configuration
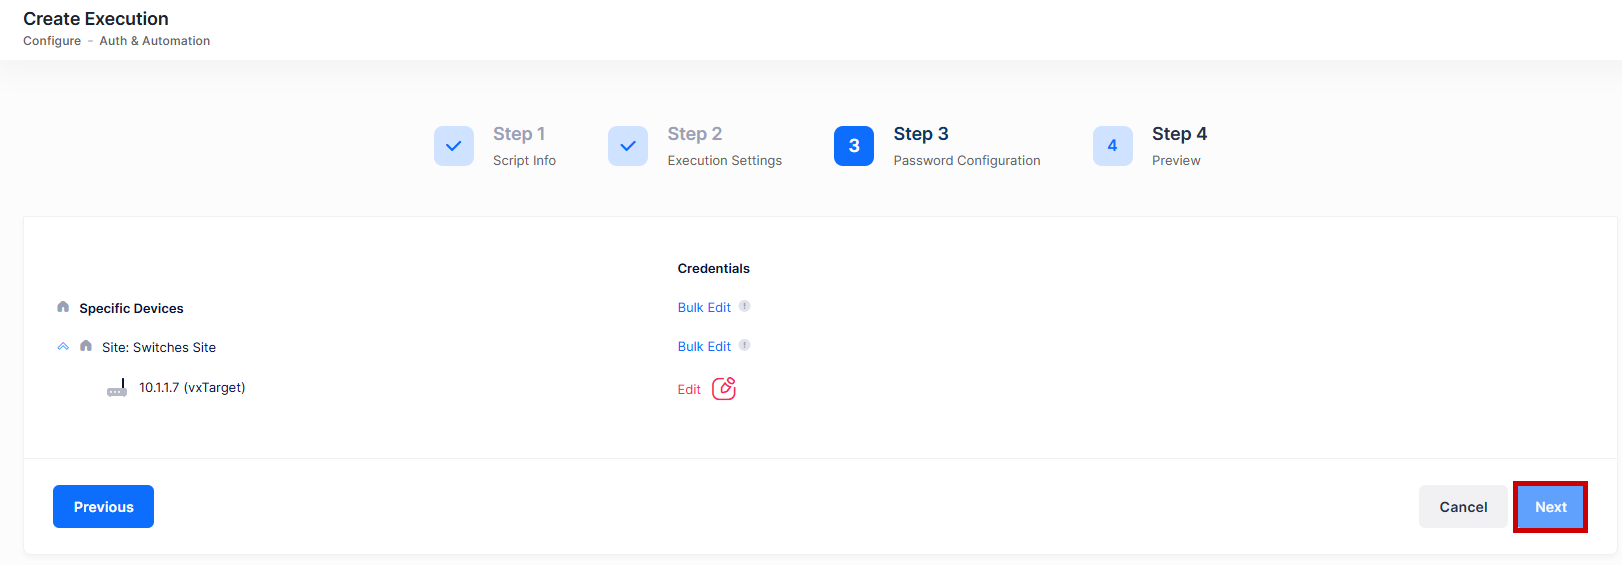
For each selected device, enter the login credentials. Click on edit tab to enter the credentials for the specific selected device. The below screen appears:
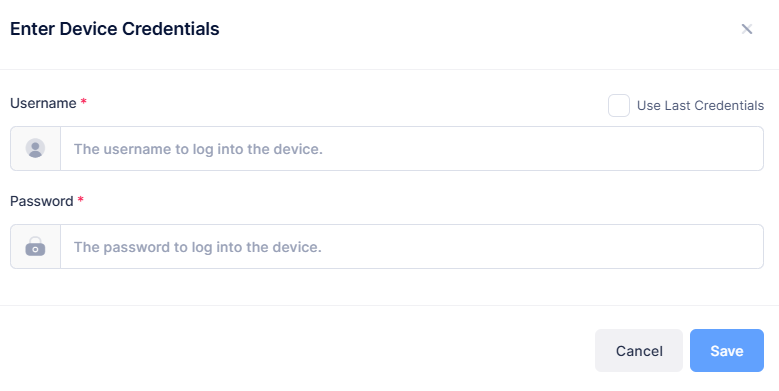
Enter the device credentials. To reuse the credentials from a previous execution on the same device, click the checkbox for Use Last Credentials. Click Next to move to the next tab (Step 4).
4. Preview
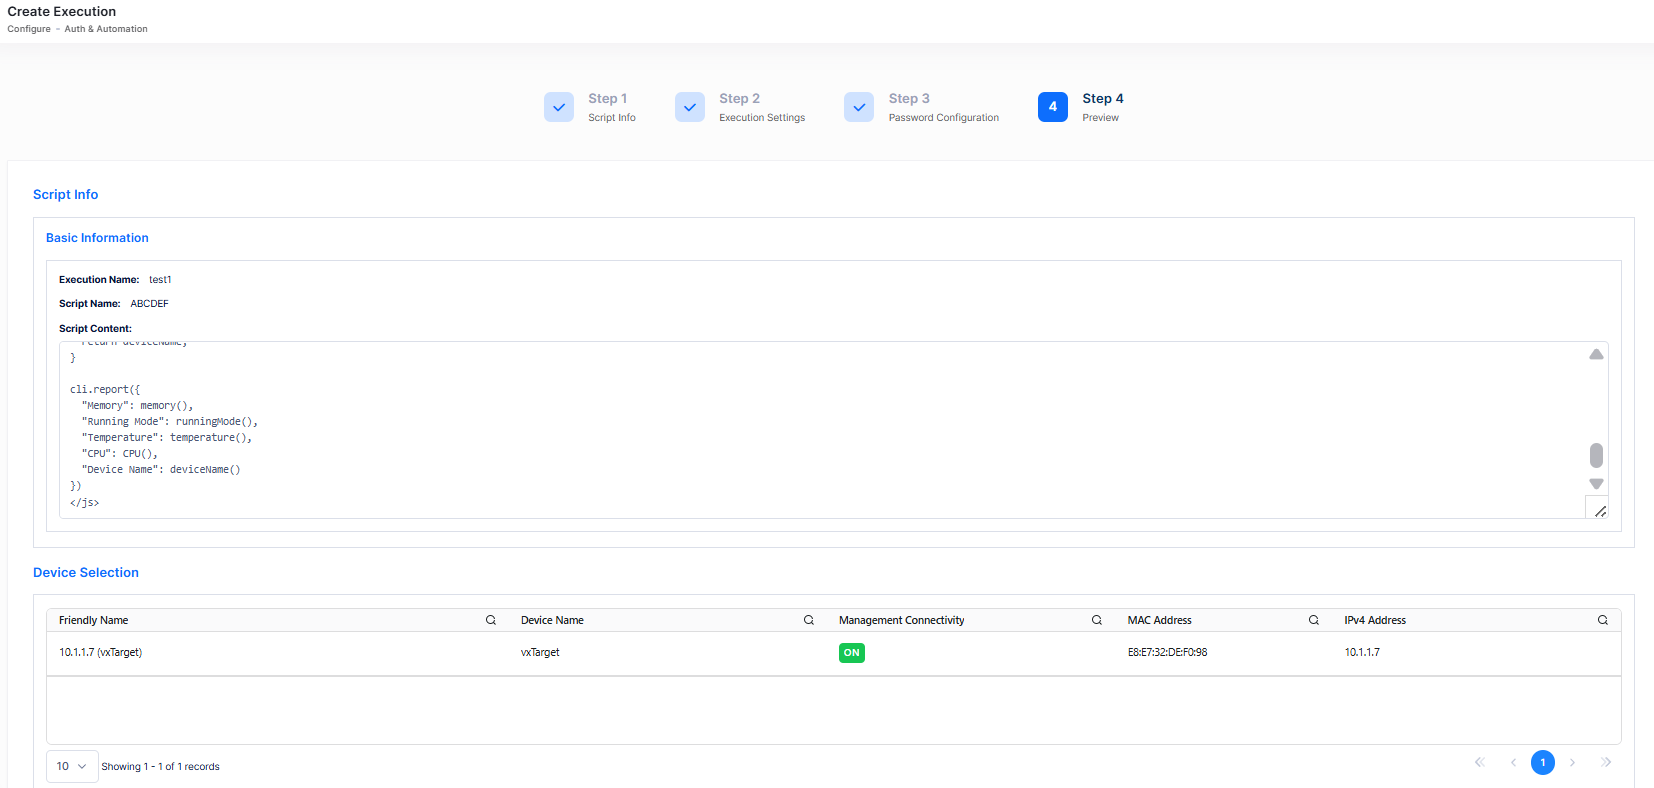

Review the full configuration such as selected script, devices, schedule, and email settings. Click on Create to submit the execution.
For scheduled executions, target devices must be online at the scheduled time to receive and run the script. When a script runs on multiple devices, the system processes devices in parallel.
Troubleshooting/FAQs
A CLI Script cannot be deleted.
A script cannot be deleted while one or more active executions reference it. The system lists the executions blocking deletion. Remove or update those executions to clear the script reference, then retry the deletion.