In addition to performing actions, such as adding, editing or deleting devices, you can perform additional device operations by selecting a device(s) in the list, then clicking on Actions to select one of the operations described below. Note that the Actions button does not appear until you select a device.
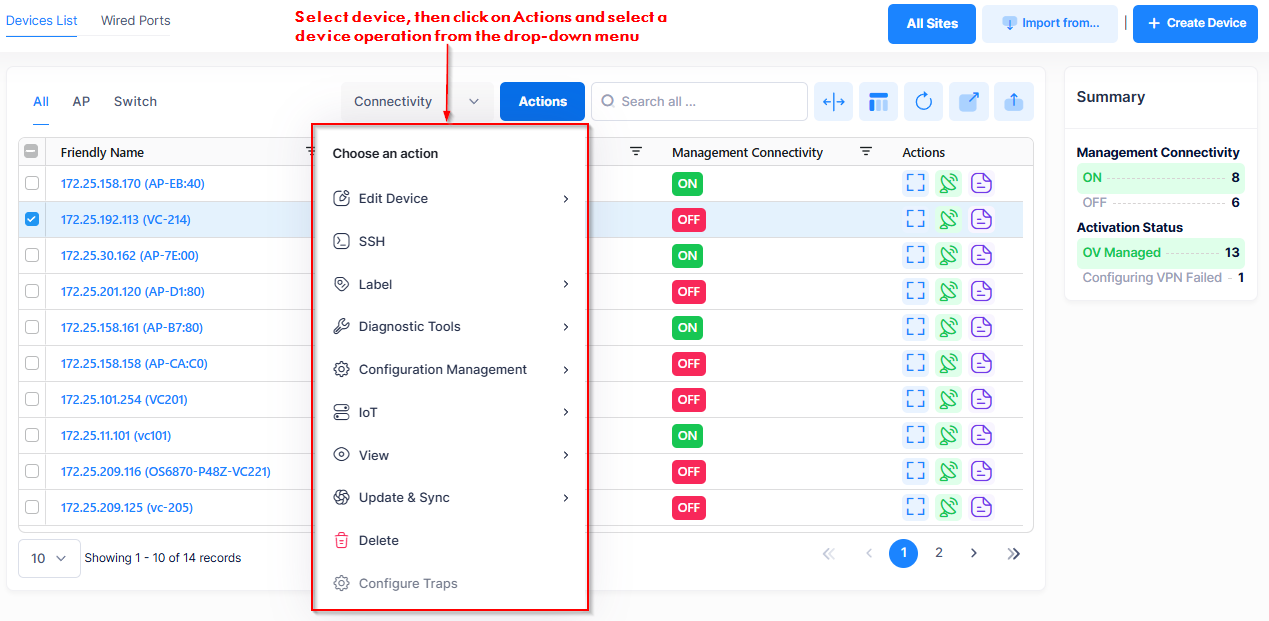
Not all operations are supported on all devices, and some operations can only be performed on a single device, not multiple devices. If an operation is not supported for the selected device(s), it will be grayed out or not included in the list.
-
Edit Device - Edit the device settings.
-
SSH - Opens up an SSH or Telnet session with the selected device on the Terminal screen.
-
Label - Assign one or more labels to the device. Assigning labels to device(s) allows you to group managed devices together. All devices that have the same label belong to the same group. This also allows grouping of different device types. For example, if you assign the same label to Switches and to APs, both of those device types are included in the same group.
-
Web UI (AP only) - You can connect to individual Stellar APs using the Web UI Device Management Tool. The tool can be used to view and configure certain management parameters on an individual AP. Select an AP device in the catalog list, then click on Actions and select AP Web from the drop-down menu. The Login page for the Web UI Management Tool will appear. The password is set on the Provisioning Configuration Screen (AP Web configuration).
-
License - Assign or release a license for the selected device(s). See the online help for Using the Device Catalog to Manage Device Licenses for more information.
-
Diagnostic Tools
-
OmniVista Cirrus Agent (Switch only) - When a Switch running AOS 8.9R1 or higher is added to the Device Catalog, OmniVista pushes the OmniVista Cirrus Agent to the Switch, then installs and starts the agent on the Switch. The following options allow you to manage the OmniVista Cirrus Agent on the Switch from the OmniVista UI:
-
Upload Package File - Upload the OmniVista Cirrus Agent package on the Switch. Note that after the Agent package is uploaded to the Switch, the running configuration should be saved before the Desired Software Version for the switch is set.
-
Upload Configuration File - Update the OmniVista Cirrus Agent Config and/or Monitoring files.
-
Status - View the status of the OmniVista Cirrus Agent that is running on the selected Switch. Use this screen to verify device information, agent version, status, and the last start or stop times of the Monitoring/Config agent components. After a package and/or configuration file updated, the agent is restarted. You can view the Status screen to check the agent status and start times.
-
Restart Agent - Manually restart the Config/Monitoring agent components.
-
Download/Install Latest Version - Update the OmniVista Cirrus Agent running on managed switches with the new version of the Agent. The next time the managed switch calls home, the new Agent is downloaded to the switch.
-
-
Ping - Immediately pings the selected device when you click on Ping in the Actions drop-down menu. OmniVista pings the device to determine reachability and manageability. The “Management Connectivity” field for the device will reflect the results of the ping for approximately two minutes (On = success, Off = failure). If after two minutes a message is received from the device, the Management Connectivity status updates to On. However, if the status is Unknown, then after approximately three minutes with no message from the device, the status changes to Off.
-
Reboot - Manually reboots the selected device(s). The reboot operation is different depending on the device type. Note that the Reboot action is supported on Switches running AOS 8.9R4 or higher, and that if you select both Switch and AP devices,, only the Switches will be rebooted.
-
Switch Device - When you select a Switch(es) and click on Reboot from the Actions drop-down menu, you are prompted to select the switch directory that you want to reboot from (Working, Certified, or Other Directory) and when you want the reboot to occur (now, a specific number of minutes from now, or at a specific date and time). Note that when you reboot multiple devices, there is a minimum delay of 30 seconds before the devices reboot (even if you select the Reboot now option). If you select a large number of devices, the delay is equal to roundoff of (30 + (deviceCount/4), in seconds (e.g., if you select 1,000 devices, the delay is 280 seconds, or 4 minutes). The delay allows time to push the "Reboot" command to all devices.
-
AP Device - When you select an AP device(s) and click on Reboot from the Actions drop-down menu, you are prompted to confirm the reboot of the selected AP device(s). Click OK to continue. When a Stellar AP device is rebooted, the latest configuration available on OmniVista is downloaded to the device. If the device is unable to connect to OmniVista, the device will reboot with the latest saved local configuration.
-
-
Reset (AP only) - You can reset an AP by selecting the AP(s), then click Actions and select Reset from the drop-down menu. The AP will reset to the factory default configuration and reboot. When an AP is rebooted as part of a reset, the latest configuration available on OmniVista is downloaded to the AP. If the AP is unable to connect to OmniVista, the AP will come up with the factory default configuration.
-
Ping from device (AP only) - Specify the host FQDN or IP address that you want to ping from the device.
-
Traceroute from device (AP only) - Specify the host FQDN or IP address that you want to run a traceroute from the device.
-
Collect Support Info - Collects log information from the device that you can then send to the Alcatel-Lucent Enterprise (ALE) team to troubleshoot problems. See the Collect Support Information online help for more information.
-
Troubleshoot Device - Opens the Device Troubleshooting screen for the selected device. From this screen, you can view a list of assigned commands previously issued to network devices, create troubleshooting commands to issue to network devices, edit and delete assigned commands.
-
View Activation Log - Displays the current call-home activation log file for the selected device.
-
-
Configuration Management
Note: All of the following Action options, except for “Save to Running”, apply only to switch configurations.-
Save to Running - Saves the current running configuration to the current “working” directory of the selected device.
-
Copy Running to Certified - Copies the contents of the working/running directory to the certified directory of the selected switch.
-
Copy Certified to Running - If the selected switch is running in the working or a custom directory, this action copies the configuration of the certified directory to the working or custom directory.
Note: If the selected switch is running in the certified directory, this action appears to work in the UI; however, it is not allowed on the switch. OmniVista will raise an Alert indicating that the action failed to apply the configuration. -
Instant Backup - Triggers an immediate backup of the switch configuration.
-
Configuration Backups - Redirects to the Configuration Backups screen to display configuration backup files for the selected device.
-
Mark as Golden Config - Sets the current Running Configuration as the Golden Configuration for the switch. Once the Golden Configuration is set, a periodic audit function is automatically activated. When the audit is running, it will compare the Running Configuration to the Golden Configuration to detect any changes and will raise Alerts if OmniVista detects any deviations.
-
View Device Configuration - Redirects to the Device Detail screen where you can view and compare the Running Configuration and saved Golden Configuration for the switch. This option is available only when the Running Configuration has drifted from the Golden Configuration. The Summary panel on the Device List Configuration view provides a “Drift detected” counter that indicates the number of switches with a Running Configuration that is different from the Golden Configuration.
-
Unmark as Golden Config - Remove the Golden Configuration designation from the Running Configuration for the switch. Note that removing the Golden Configuration automatically disables the periodic auditing for the device(s).
-
Resume Periodic Audit - Restarts an activated periodic audit. When this option is greyed out, a periodic audit of the Running Configuration is currently running.
-
Pause Periodic Audit - Pause a periodic audit of the Running Configuration. By default, a periodic audit is performed once a day. You can set the time of day that the audit is performed by configuring the Audit Configuration setting on the Basic Settings screen.
-
Perform Audit - Triggers an immediate audit of the Running Configuration.
-
-
Enable/Disable IoT- The IoT feature provides a detailed, "real-time" view of all endpoint devices connected to Stellar AP or AOS switch devices (e.g., PCs, Tablets, Smartphones). IoT is disabled on devices by default. You can enable the IoT feature by selecting the device(s), then click on Actions and select Enable IoT from the drop-down menu. (Note that enabling or disabling IoT is not offered in the Actions drop-down menu if the device does not support IoT.) When IoT is enabled, OmniVista will begin collecting IoT information for endpoints connected to the selected devices. To view the IoT information collected, go to the IoT Devices screen (Network > Access Records > IoT Devices) under the “Monitor” section of the OmniVista Cirrus Menu.
-
Change LED Mode (AP only) - Select one of the following options to set the LED mode for the AP:
-
Save as Normal Mode - The LED displays in normal mode (Red/Green/Blue).
-
Save as Night Mode - The LED indicator is shut off.
-
Save as Blink Mode - LED alternately blinks Red/Green/Blue so that you can visually locate the AP(s).
-
-
View
-
Application Visibility (AP only) - Redirects to the Application Visibility screen where you can view analytics for application/protocol flows based on Application Signatures that identify an associated application or protocol.
-
Collect Support Info - Redirects to the Collect Support Information screen where you can collect log information from network devices for the Alcatel-Lucent Enterprise (ALE) team to troubleshoot problems.
-
In Topology - Displays the selected device in the network topology map.
-
IoT Devices - Redirects to the IoT Devices screen to display detailed information for all endpoint devices that are connected to the network (e.g., PCs, Tablets, Smartphones).
-
Mesh Topology (AP only) - Displays the Mesh topology for the organization. This option is available if the AP device is participating in a Mesh configuration. See the AP Mesh Configuration online help for more information.
-
Neighbor APs - Displays a list of neighbor APs to which the connected wireless client might roam. The list includes static and automatically-discovered neighbors. See the Managing Access Point Neighbors online help for more information.
-
Traps - Redirects to the Network Events screen to display trap notifications for the selected device(s).
-
Wired Clients - Redirects to the Wired Client Sessions screen to display sessions for the selected devices. Note that you can select up to 10 devices in the Device List. However, you cannot select both Switch and AP devices to display Wired Client Sessions.
-
Wireless Clients (AP only) - Redirects to the Wireless Client Sessions screen to display sessions for the selected AP devices. Note that you can select up to 10 APs in the Device List. However, you cannot select both AP and Switch devices to display Wireless Client Sessions. In addition, you cannot view wired clients connected to AP devices from the Device List; instead, go directly to the Clients screen.
-
-
Update & Sync (Switch only)
-
Rediscover - Triggers an immediate polling of the selected device(s) to update Switch information known to OmniVista Cirrus. For example, you may not want to wait until the next polling interval to update any changes to the Switch configuration (such as status, VLAN members, ports, IP address). When you click on Rediscover in the Actions drop-down menu, you are prompted to confirm the rediscovery of the selected device(s). Click OK to continue and a progress screen will appear. When the discovery is complete, the Device Catalog information for the device(s) is updated.
-
Poll Links - Triggers an immediate polling of the selected device(s) to discover links.
-
Poll for Traps - Triggers an immediate polling of the selected device(s) to update trap information.
-
-
Delete - Deletes the selected device(s) from the Device List. Note that the device is then no longer managed by OmniVista Cirrus, but may still be up and running in the network.
-
Configure Traps - Redirects to the Create Event Configuration screen where you can configure the traps that you want the selected device to send to OmniVista Cirrus.
-
More Actions… - Displays the Detailed Device Information screen for the selected device. This screen displays all of the configuration information about the device and allows you to perform actions on the device.
-
Advanced Actions - This option is available on the Actions drop-down menu of the Detailed Device Information screen.
-
Launch Heat Map - Opens the Wi-Fi Heatmap screen which provides a visual representation of the wireless signal coverage and strength of Access Points connected to the network. See the Wi-Fi Heatmap online help for more information.
-