
The following options allow you to specify the desired software version for a device(s) directly from the Device List:
-
Select a single device, then click on Edit Device - Information from the Actions drop-down menu. This opens the Edit Device Information screen where you can set the desired software version for the device. The device is updated to the specified software version the next time the device calls home.
-
Select one or more devices, then click on Edit Device - Schedule Software Upgrade from the Actions drop-down menu. This opens the Schedule Software Upgrade screen where you can set the desired software version for the device(s). The device is updated to the specified software version according to the schedule associated with the device.
-
Select one or more devices (AP or Switch), then click on Edit Device - Set Desired Software Version from the Actions drop-down menu. This option allows you to trigger a software upgrade the next time the selected device(s) call home, instead of waiting for a scheduled upgrade that is associated with the device.
When Desired Software Version is set to any value other than "Do Not Upgrade," OmniVista continuously monitors the device's running software version through each periodic call-home request. If the device reports a version different from the desired software version—whether lower or higher—OmniVista automatically initiates a software update. During the upgrade, the device downloads the software image from OmniVista and then reboots.
Using the Set Desired Software Version Option
To use the “Set Desired Software Version” option, select the device(s) to upgrade and click Actions. From the Actions drop-down menu, click Edit Device - Set Desired Software Version. The following Set Desired Software Version screen opens:
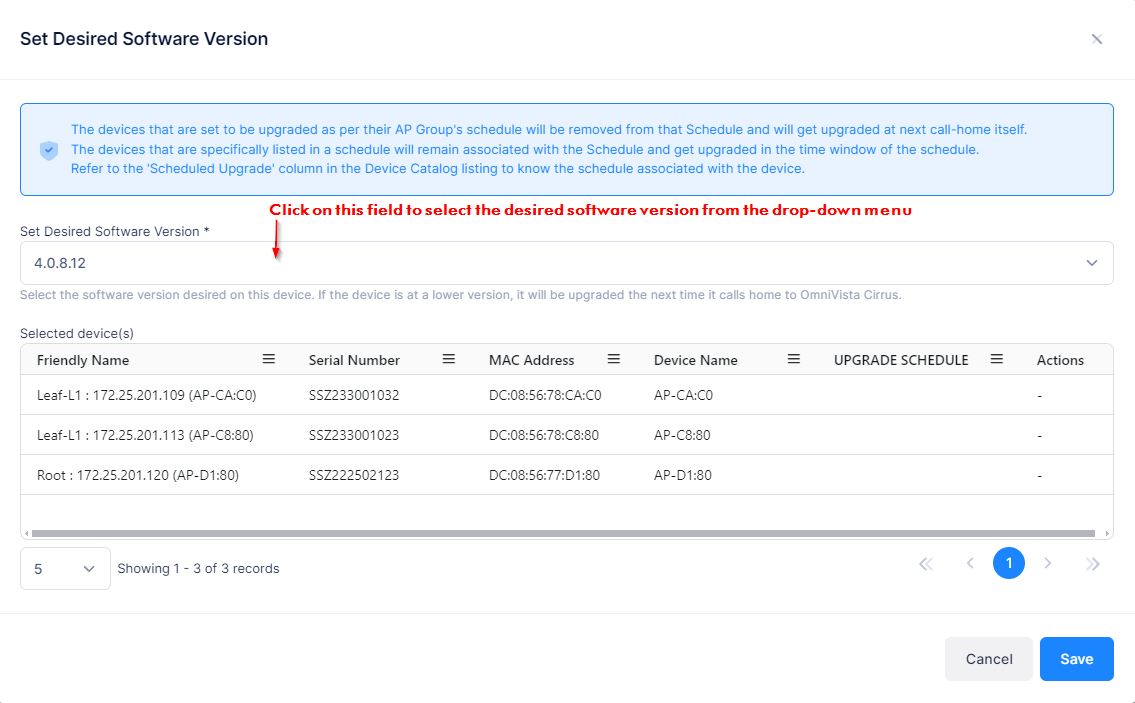
This screen shows the device(s) you selected from the Device Catalog List. Use it to specify the software version for the upgrade.
-
Set Desired Software Version - click on this field to select one of the following options from the drop-down menu:
-
Do Not Upgrade - Do not upgrade the software on the device. If the device is part of an existing network, selecting “Do Not Upgrade” will leave your device running its current software version.
-
Upgrade As Per Group’s Schedule - Upgrade the device based on the upgrade schedule for the AP Group to which the device belongs.
-
Available software versions - Select one of the available software versions listed.
-
-
Mandatory update to 8.11R1 U-Boot (or later) is required before updating OS6360, OS6465, OS6560, and OS6570M switches to AOS 8.11R1 (or later). Failing to update U-boot will cause boot failure.
-
OmniVista supports U-Boot upgrades; however, you must perform the U-Boot upgrade before setting the Desired Software Version to 8.11.R1 to avoid onboarding and network issues.
-
For all other switch models, a U-Boot upgrade is not mandatory but is recommended. Refer to the AOS release notes for details.
-
To check the U-Boot version on a switch, select the switch in the Device Catalog, click the Additional Information icon, and locate the U-Boot version in the Modules section. Alternatively, you can run the show hardware-info CLI command on the switch.
-
Note the following about using the “Set Desired Software Version” option:
-
The devices that are set to be upgraded per their AP Group's schedule will be removed from that Schedule and will be upgraded at the next call-home.
-
The devices that are specifically listed in a schedule will remain associated with the Schedule and get upgraded during the time window of the schedule.
-
Refer to the “Upgrade Schedule” column in the Model & Firmware view of the Device List entry to determine the schedule associated with the device.