You can edit the information for one or more devices. For example, if a device fails validation due to an incorrect serial number or MAC address, you can edit those fields. Note that not all fields are available when editing multiple devices.
The Device Catalog screen displays a list of all of the devices known to one or more Sites.
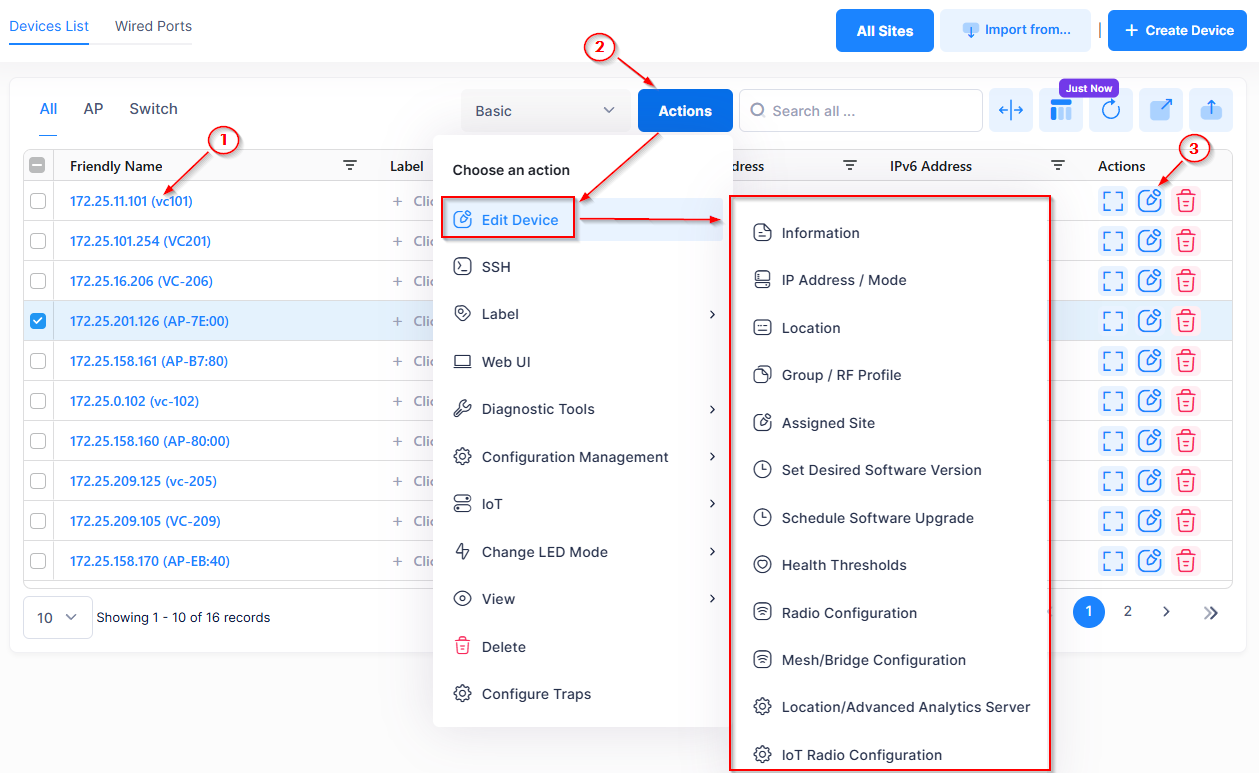
From this screen, you can use one of the following methods to edit the device information:
1. Click on the Friendly Name for the device to open the detailed Device Information screen. From this screen, you can click on Actions and select Edit Device. If you’re editing an Access Point, you can also set the LED mode for the Access Point device using LED Mode next to Actions.
2. Select a device that you want to edit by checking the box next to the device entry, then click on Actions. From the Actions drop-down menu, hover over Edit Device to display a drop-down list of configurable settings for the device.
3. Under the “Actions” column, click on the Edit icon next to the device that you want to edit to access the Edit Device Information screen.
Detailed Device Information
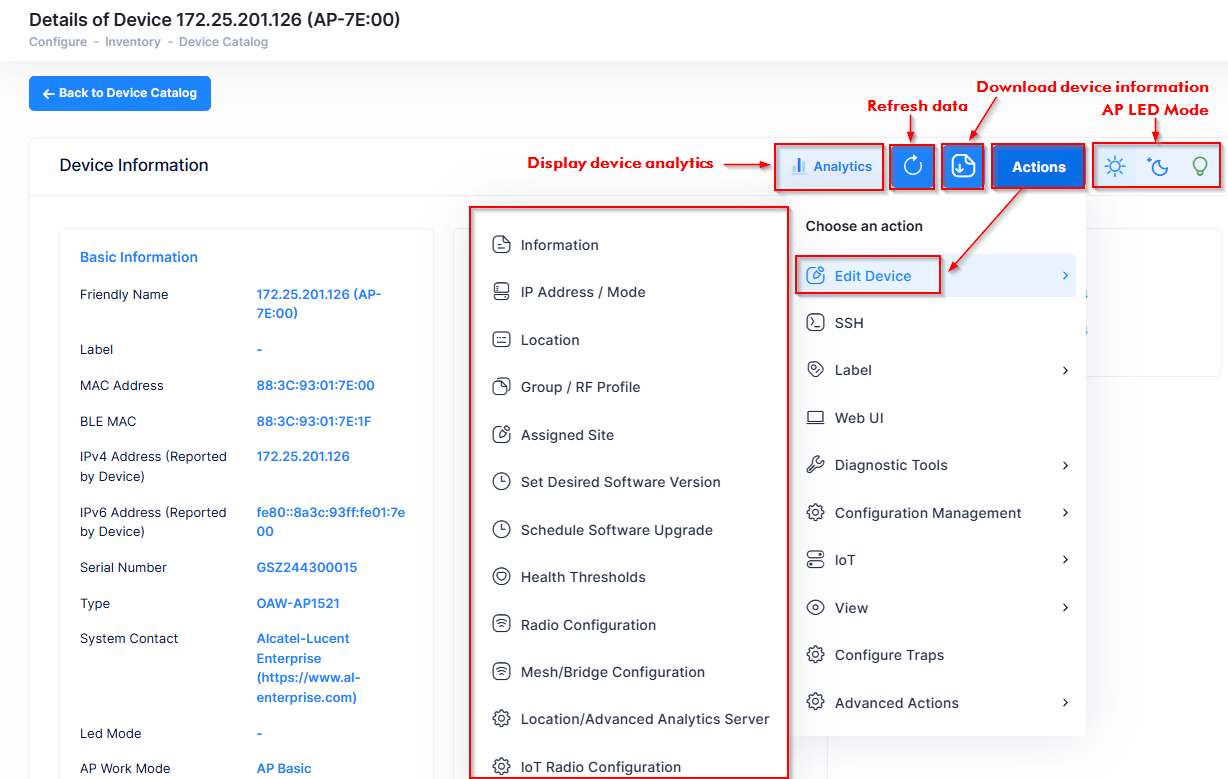
The detailed Device Information screen displays all of the configuration information about a device. From this screen you can
-
Click on Actions and hover your cursor over Edit Device to display another drop-down menu of available settings you can edit for the device.
-
Display Network Analytics for the device.
-
Refresh the screen to update the information provided.
-
Set the LED mode for the selected Access Point.
Setting the LED Mode for the Access Point
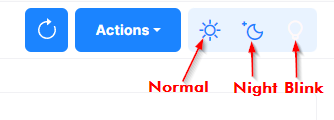
You can set the LED mode on an Access Point by clicking on one of the LED Mode buttons at the top of the detailed Device Information screen, next to Actions.
-
Normal Mode (Default) - The LED displays in normal mode (Red/Green/Blue).
-
Night Mode - The LED indicator is shut off.
-
Blink Mode - LED alternately blinks Red/Green/Blue so that you can visually locate the AP(s).
LED Indicators
The LED light on the AP indicates the following conditions:
-
RED (Flashing) - System abnormal, link down
-
RED (Solid) - System startup
-
RED and BLUE (Rotate Flashing) - OS upgrading
-
BLUE (Solid) - System running, dual bands working
-
GREEN (Flashing) - No SSID created
-
GREEN (Solid) - System running, single band working
-
RED, BLUE, and GREEN (Rotate Flashing) - System running (used to visually locate an AP).
Edit Device Settings
The Edit Device (Actions - Edit Device) drop-down menu provides the following list of device settings that you can edit for the selected device:
Note that changing the RF profile for a selected device overrides the RF Profile assigned to the device through the Provisioning Configuration. The “Information”, “Group/RF Profile”, and “Assigned Site” settings all offer the option to change the RF Profile assignment for a device.
-
Information - Opens the Edit Device screen from which you can change the information used to declare the device in OmniVista Cirrus.
-
IP Address/Mode - Opens the Edit IP Mode/IP Address screen from which you can change how an AP obtains an IP address (DHCP or Static) or the IP address assigned to a Switch. Note that OmniVista Cirrus obtains and saves the IP address information reported by the device. When you make any changes to the IP address or mode, the changes are pushed directly to the device; however, the Edit IP Mode/IP Address screen may still display the previous IP address information until OmniVista receives the updated information from the device.
-
If you select an AP device, you can change how the AP obtains an IP address by editing the following fields:
-
DHCP - Obtain the IP address from a DHCP Server.
-
Static - Configure a static IP address by completing the following fields:
-
IP Type - Select IPv4 and/or IPv6.
-
IP Address - The IPv4/IPv6 address for the AP.
-
Netmask - The IPv4 address network mask for the AP.
-
Subnet Prefix Length - The length of the subnet prefix for the IPv6 address network mask.
-
Default Gateway - The default gateway used for AP forwarding.
-
Preferred DNS - The IP address of the DNS Server used by the AP.
-
Alternate DNS - The IP address of the alternate DNS Server used by the AP.
-
-
-
If you select a Switch, you can select an IP address to apply to the Switch. The IP mode (DHCP or Static) is not available for a Switch.
-
-
Location - Opens the Edit Device Location screen from which you can specify the location of the device.
-
If you select an AP device and the “From LLDP” checkbox, OmniVista will use LLDP to automatically add the location; otherwise, enter a user-defined string for the location (for example, “Lab1/1/12”).
-
If you select a Switch, enter a user-defined string for the location (for example, “Lab1/1/14”). The LLDP option is not available for a Switch.
-
-
Group/RF Profile (AP only) - Opens the Edit Group/RF Profile screen from which you can change the Access Point Group or RF Profile associated with the device.
-
Group - Change the Access Point Group associated with the device. Note that when assigning a Stellar Access Point to a different group , all current configuration of the Access Point will be lost. This would potentially impact the services (for example, SSIDs) currently offered by the Access Point. The Access Point will get the configuration associated with its new Access Point Group.
-
RF Profile - Change the RF Profile associated with the device. The RF Profile assigned at the device level takes precedence over the RF Profile assigned in the Provisioning Configuration.
-
If you want to change the RF Profile association for multiple APs, make sure that there is no conflict between the country code for the RF Profile and the selected AP devices. If there is a conflict, OmniVista Cirrus will reject the RF Profile update for all of the selected APs and display an error message indicating the APs that are causing the conflict. Otherwise, the RF Profile update is applied to all of the selected APs.
-
Assigned Site - Opens an Edit Assigned Site Information screen in which you can change the location (Site, Group name, Building, Floor, and RF Profile) of the device. Note that when assigning a Stellar Access Point to a different Site or AP Group, all current configuration of the AP will be lost. This would potentially impact the services (for example: SSIDs) currently offered by the AP. The AP will get the configuration associated with its new Site or AP Group.
-
Discovery Manager Entry (Switch only) - Opens the Edit Discovery Manager Entry popup screen from which you can edit the CLI/FTP Username and Password for a managed switch.
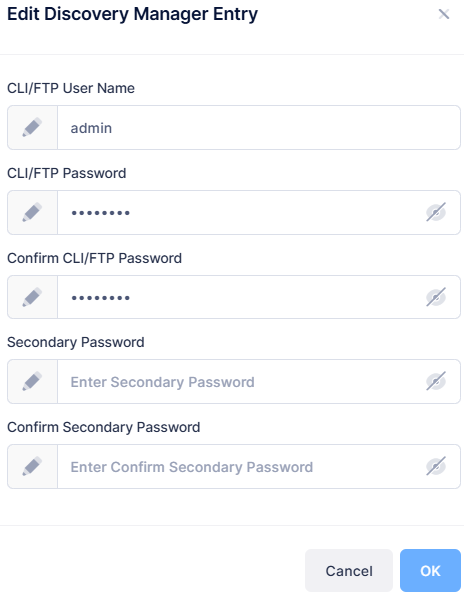
The CLI/FTP User Name and Password fields enable you to inform OmniVista Cirrus of the device's CLI/FTP User Name and Password. A device's CLI/FTP User Name and Password cannot be configured from OmniVista, they must be configured directly on the device. If you do not define the CLI/FTP User Name and Password and you attempt to save, restore, or upgrade configuration files for a device, you will be individually prompted for the CLI/FTP User Name and Password of each individual device for which configuration files are being saved, restored, or upgraded. Also, OmniVista will be unable to auto-login to the device when establishing CLI Scripting sessions.
-
CLI/FTP User Name - The user name that OmniVista will use to establish CLI/FTP sessions with the managed devices. The user name specified will be used to auto-login to devices when CLI sessions are established. It will also be used to perform FTP with the device when configuration files are saved and restored (see note below).
-
CLI/FTP Password - The password that OmniVista will use to establish CLI/FTP sessions with the managed devices. The user name specified will be used to auto-login to devices when CLI sessions are established. It will also be used to perform FTP with the device when configuration files are saved and restored.
-
Confirm CLI/FTP Password - Re-enter the CLI/FTP password.
-
Secondary Password - The secondary CLI/FTP password, if applicable.
-
Confirm Secondary Password - Confirm the secondary CLI/FTP password, if applicable.
-
-
Set Desired Software Version - Opens the Set Desired Software Version screen from which you can specify the software version that a device(s) will be update to on the next call home. This allows you to trigger an upgrade without waiting for a scheduled upgrade that is associated with the device.
-
Schedule Software Upgrade (AP only) - Opens the Schedule Software Upgrade screen from which you can determine if the Access Point device is scheduled for a software update. You can also define or modify an upgrade schedule for the device.
-
Health Thresholds - Opens the Edit Health Thresholds screen from which you can configure the CPU, memory, and flash threshold values for the device.
-
Radio Configuration (AP only) - Opens the Edit Radio Configuration screen. On this screen, set Use Private Config to On to configure the radio band for the Access Point. Note that if you select the 6G band, APs that support 6G will accept the configuration; APs that do not support 6G will ignore the configuration.
-
Mesh/Bridge Configuration (AP only) - Opens the Edit Mesh/Bridge Configuration screen from which you can configure the mesh configuration settings for the AP device. Note that updating the mesh configuration for the AP will affect the existing mesh network. During this time, the APs in mesh network will briefly lose connectivity and will re-establish a mesh network based on the new configuration.
-
Location/Advanced Analytics Server (AP only) - Opens the Edit Location/Advanced Analytics screen from which you can configure the Location/Advanced Analytics Server options described below for the selected AP. Note that if you configure these options at the AP level, make sure that Advanced Analytics Server Profile and Wi-Fi RTLS Server Profile are selected in the AP Group to which the select AP belongs.
-
Use Private Config - Set to On to edit the following Location/Advanced Analytics Server options.
-
OmniVista Cirrus Wi-Fi RTLS - Enables/disables OmniVista Wi-Fi RTLS. If you enable OmniVista Cirrus Wi-Fi RTLS, then you should also enable OmniVista Cirrus Advanced Analytics.
-
OmniVista Advanced Analytics - Enables/disables OmniVista Advanced Analytics functionality.
-
-
-
IoT Radio Configuration (AP only) - Opens the Edit IoT Radio Configuration screen from which you can configure BLE (if the Access Point supports this function). On this screen, set Use Private Config to On to configure BLE for the Access Point. Click here for more information.
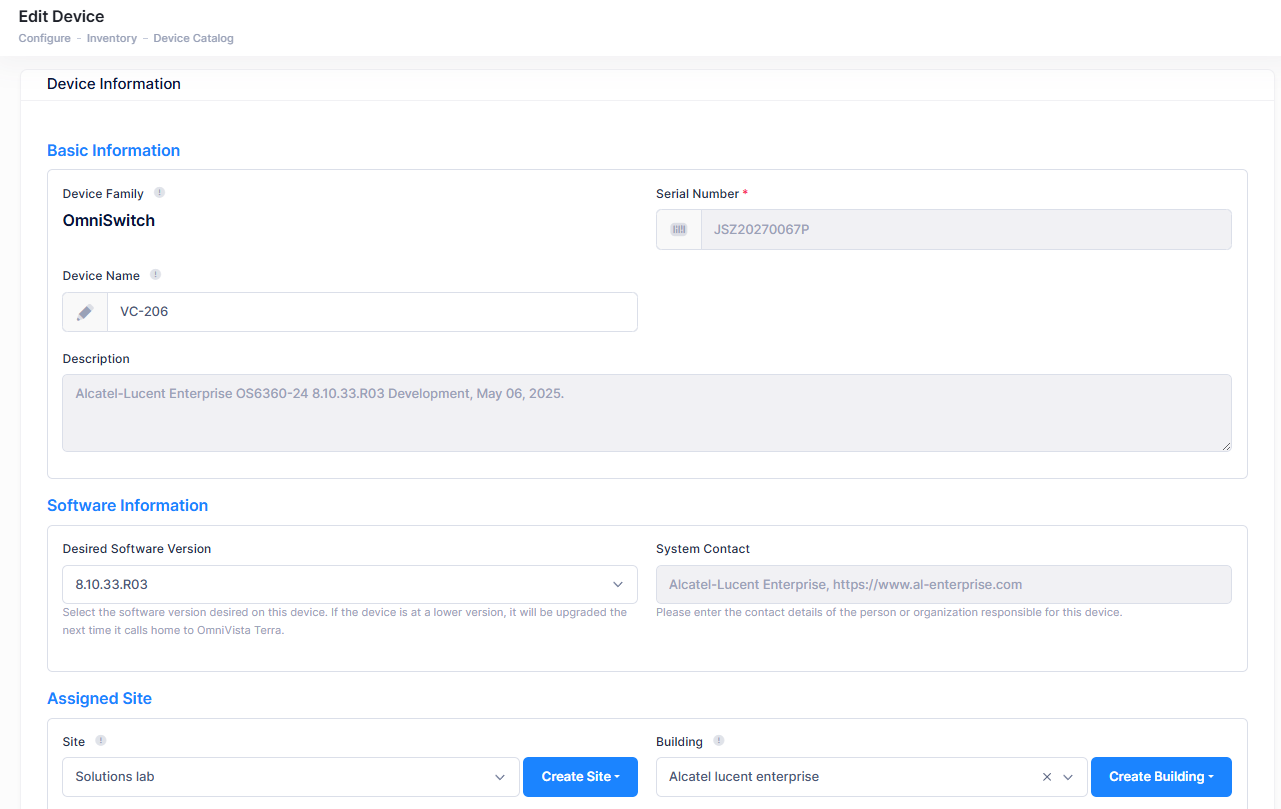
Edit Device Information
The Edit Device Information screen displays the information for the device you selected from the Device Catalog list. Use this screen to change the information in any of the fields. When you are done editing any of the device information fields, as described below, click on Save.
Please read the information below about changing the Desired Software Version before you make any changes from the Edit Device Information screen.
Setting the Desired Software Version
Note the following when you change the Desired Software Version for the selected device from the Edit Device Information screen:
-
If you select the Upgrade as per AP Group’s Schedule option for the selected AP device, but there is no AP Group schedule, the message below is displayed. Click on OK to continue.
"Desired Software Version will be set to 'Do Not Upgrade' as there is no schedule for the associated AP Group. When the AP Group gets associated with a schedule, it will reflect in this device's information automatically."
-
If a device-level schedule exists for the selected device, then the software version displayed in the “Desired Software Version” field is the one associated with the schedule. If you select another option for this field, the message below is displayed. Click OK to continue.
"This device is part of schedule <schedule-name> and hence it will be upgraded to this version in the time window specified in that schedule. To upgrade the device on next call-home instead, navigate to 'Configure -> Inventory -> Scheduled Upgrades', Edit the schedule <schedule-name> and remove the AP from the selected devices list."
-
If a device is a member of an AP Group for which a scheduled software update exists and you modify the “Desired Software Version” field, then the devices is removed from the schedule. The “Schedule Name” field for this device is set to empty and the following message is displayed for you to confirm whether you want the device to be updated per the associated AP Group schedule or on the next call home:
"This device is currently attached to schedule <schedule-name>.
If you want software version to be upgraded during the time selected in that schedule, then click "Cancel" and just edit the schedule to change the Desired Software Version associated to this device. However, If you want the software version to be updated on the device at next call-home itself, then click "Ok". This option will remove the device from schedule <schedule-name>."
-
If you select 8.10R4 as the desired software version for the selected switch, the message below displayed.
OS6360, OS6465, OS6560, and OS6570M switches require a manual u-boot update to version 8.10R4 prior to this upgrade. Failure to update the u-boot externally will result in boot failure.
-
OmniVista does not support U-Boot upgrades; therefore, the U-Boot update must be performed outside of OmniVista.
-
For all other switch models, a U-Boot upgrade is not mandatory but is recommended. Refer to the AOS release notes for details.
-
To check the U-Boot version on a switch, select the switch in the Device Catalog, click the Additional Information icon, and locate the U-Boot version in the Modules section. Alternatively, you can run the show hardware-info CLI command on the switch.
BLE Configuration
If an Access Point supports the IoT Radio function, the IoT Radio Configuration option will be activated on the Edit Device drop-down menu. When you select this option, the Edit IoT Configuration screen opens. By default, the “Use Private Config” option on this screen is off and the BLE configuration is derived from the Access Point Group to which the Access Point belongs. If you want to configure private BLE parameters for a single Access Point, enable "Use Private Config" and specify the private settings. If the "Use Private Config" option is turned off at a later time, the private BLE configuration is removed from the AP and the AP Group settings are pushed to the AP or BLE Gateway.
To configure BLE for a single Access Point, set Use Private Config to On, set the IoT Radio Mode to BLE, complete the fields as described below, then click on Save.
-
Advertising
-
Advertising - Enables/Disables the BLE advertising function for the AP. If enabled, the AP will broadcast BLE packets. If Advertising is enabled, the AP will broadcast BLE packets. BLE Advertising is optional for Asset Tracking. If disabled, the AP will detect surrounding BLE Tags/Beacons and will report information to the server for analysis.
-
Emission Frequency - The time circle during which the BLE packets will be broadcast, in milliseconds. (Range = 20 - 9,000,000, Default = 200)
-
Tx Power - The transmit power used to broadcast BLE packets, in dBm. (Range = -20 - 10, Default = 4)
-
Tx Channel - The transmit channel used to broadcast BLE packets. It is recommended that you use a different channel than the channel used for the WLAN.
-
Advertising Protocol - Specify the BLE protocol used to define the broadcasting BLE beacon format.
-
iBeacon - Apple iBeacon format.
-
Eddystone-URL - Google Eddystone format. A compressed URL that, once parsed and decompressed, is directly usable by the client.
-
Eddystone-UID - Google Eddystone format. A unique static ID with a 10-byte Namespace component and a 6-byte Instance component.
-
Namespace - 20 characters containing 0-9a-f.
-
Instance ID - 12 characters containing 0-9a-f.
-
-
-
-
Scanning
-
Scanning - Enables/Disables the Bluetooth beacon scanning function for the AP.
-
Scanning Interval - The Bluetooth scanning interval for the AP, in milliseconds. (Range = 4 -10240, Default = 100)
-
OUI Allowlist - Specify the MAC OUI Allowlist to filter devices for BLE beacon broadcasting. Only those beacons broadcasting from the devices within the OUI Allowlist are valid and will be reported.
-