Out-of-Box Mesh is primarily designed to improve mesh deployment efficiency. To enable it, the administrator must first log in to the AP’s Express Mode of the intended Root AP and configure it as the Root using the Express Mode UI. Other leaf mesh points can then automatically join the mesh network without requiring manual configuration. For more details, refer to the Stellar AP User Guide.
By default, a Stellar AP in its factory configuration, when powered on without a wired uplink, will attempt to establish a mesh link automatically using its built-in configuration (Mesh SSID: [Stellar-MESH] and password on the 2.4 GHz band). Once an AP has been connected to a wired uplink, the out-of-box mesh function is permanently disabled. It can only be restored by resetting the AP to factory defaults.
After the mesh is formed, both root and leaf APs can be managed through OmniVista, where the user can also modify the mesh configuration.
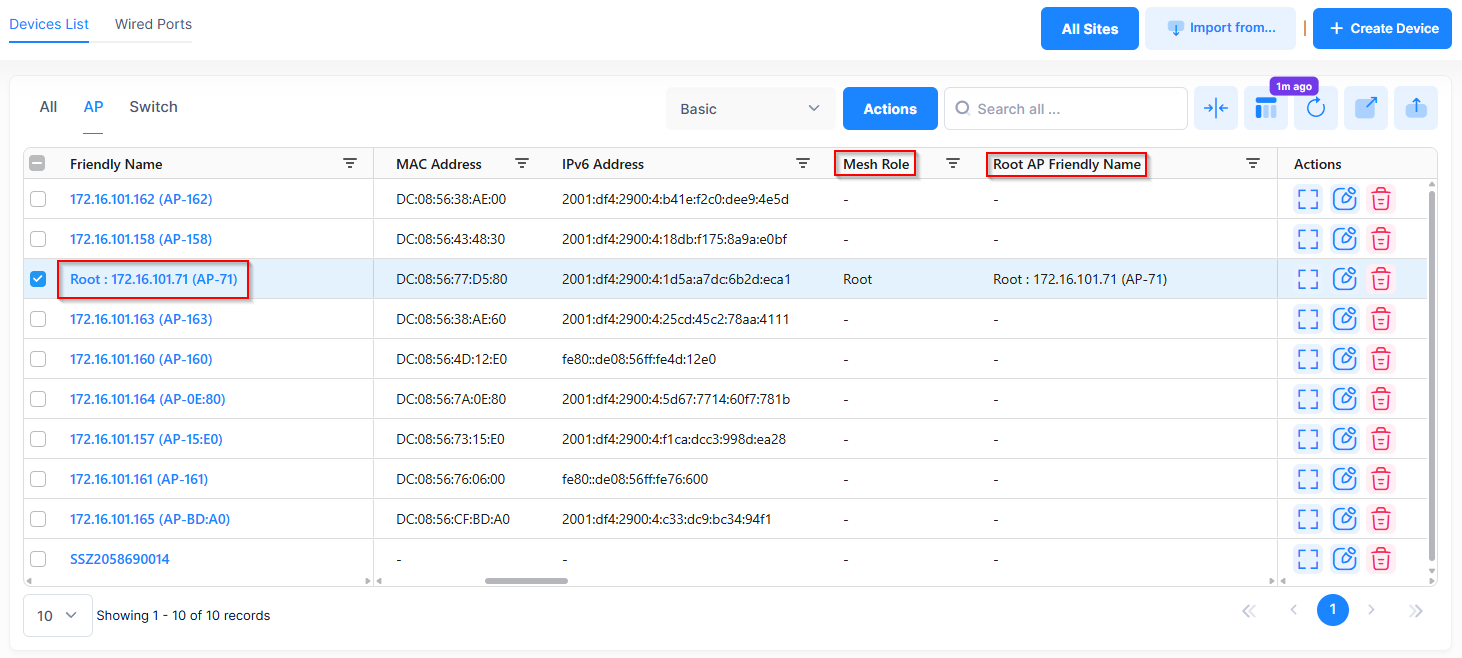
The Device List of AP devices provides the following information to identify APs that are participating in a mesh configuration:
-
If the Preferred Device Naming convention in the user preference settings is set to “Mesh Level: IP Address (System Name)”, then the Friendly Name for the AP indicates the mesh level for the AP.
-
The “Mesh Role” field indicates if the AP serves as the root of the mesh or is a repeater. If this field is blank, the AP is not participating in a mesh configuration.
-
The “Root AP Friendly Name” field identifies the root AP for the mesh. The information in this field displays only for mesh APs.
You can also use the Device Catalog List to configure the Mesh settings for an AP and view the Mesh topology for the Organization.
Configuring the AP Mesh/Bridge Settings
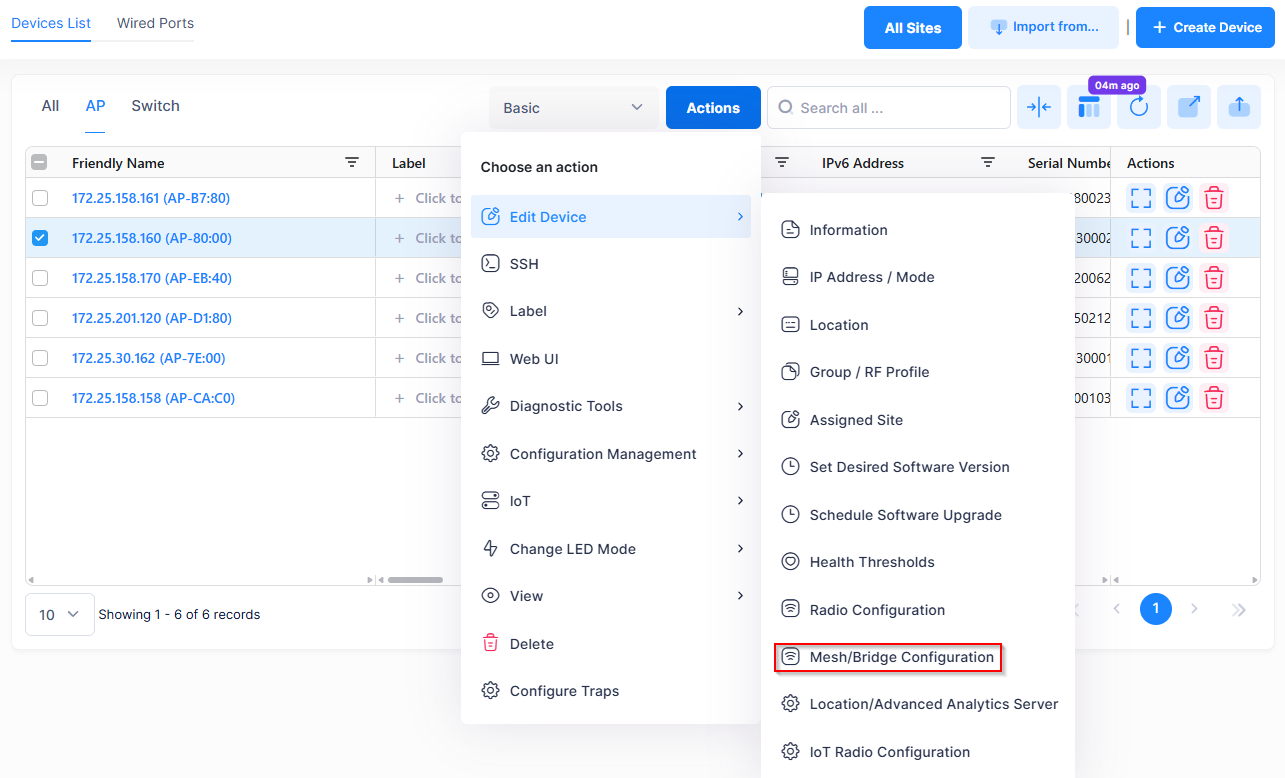
To configure the Mesh settings for a specific AP device, select an AP device from the the Device Catalog List then click on Mesh/Bridge Configuration from the Actions - Edit Device drop-down menu. The Edit Mesh/Bridge Configuration screen displays the mesh/bridge configuration for the selected AP device.
Note that if Management Connectivity for the device is “Off”, the Mesh/Bridge Configuration option is not available.
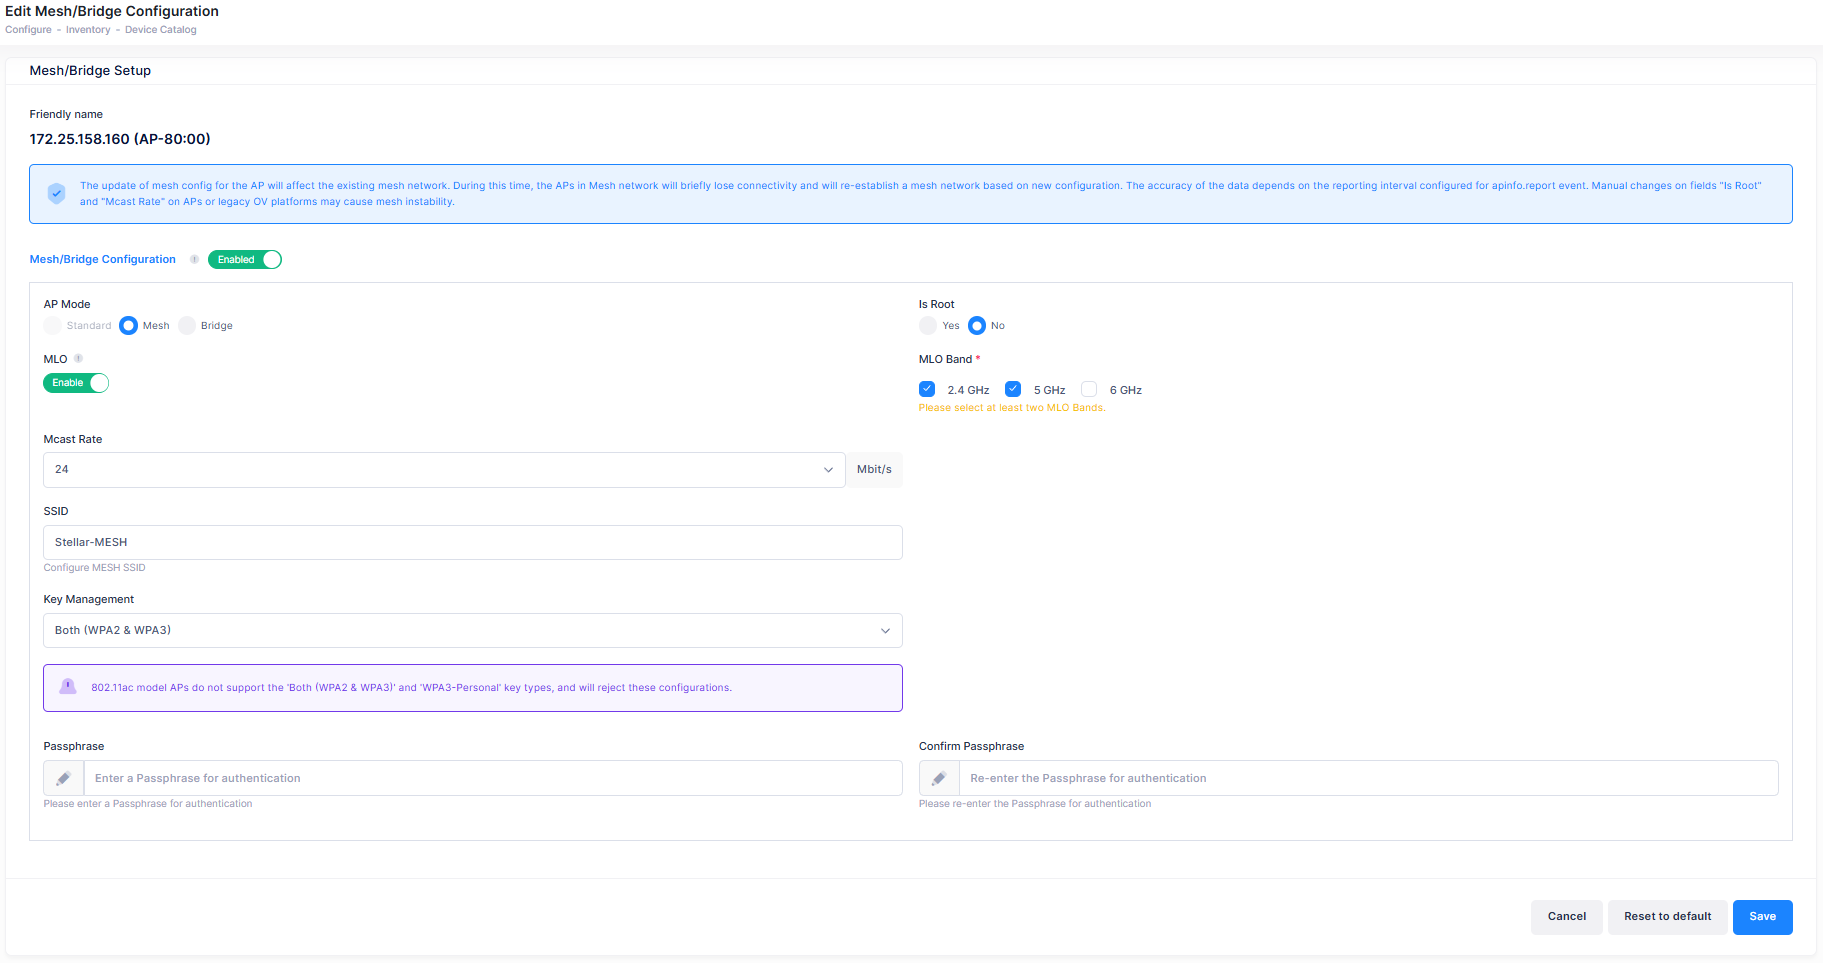
To configure the AP mode (mesh or bridge) for the device, enable the “Mesh/Bridge Configuration” option and complete the following fields:
The link for an AP bridge and AP mesh is the same; the difference is that the bridge cannot signal WLAN to a wireless client, while mesh mode can.
-
AP Mode - Select Mesh or Bridge for the AP mode.
-
Mesh APs provide network access for wireless clients and establishes a Mesh path to the Mesh root, which uses its wired interface to connect to the LAN network.
-
A Bridge AP is used to create a wireless bridge across two sites. It does not provide any network access directly for wireless clients.
-
-
Is Root - Specify whether the device will be the root of the mesh or bridge connection (Yes or No).
-
MLO - Enables/Disables MultiLink Operation (MLO) for the Mesh configuration. MLO allows Wi-Fi 7 capable APs (currently AP15xx series) to simultaneously send and receive data between different frequency bands and channels. This option only appears on the Edit Mesh Configuration Screen for Wi-Fi 7 capable APs. By default, MLO is disabled and only the radio band is displayed. When MLO is enabled, the "Band" field changes to "MLO Band". Note that the MLO function also relies on the radio status and the radio Extremely High Throughput (EHT) setting. Make sure the corresponding radio and the radio EHT are enabled to activate MLO.
-
MLO Band - If MLO is enabled, select at least two of the radio bands to use for Mesh MLO.
-
-
Band - If MLO is disabled, select the radio band for the Mesh network (2.4G, 5G, or 6G). Note that selecting the 6G option applies only to AP models that support 6GHz band.
-
Mcast Rate - The Multicast rate that is applied to "Multicast Video Stream" to help reduce jitters in a Mesh environment. Select the rate to apply to Multicast traffic from the drop-down menu (6, 12, 24, 36, 48, or 54, Default = 24).
-
SSID - Edit the name of the SSID for the Mesh network.
-
Key Management - Select the type of encryption to use for the connections between Mesh/Bridge APs from the drop-down list. Note that 11AC model APs do not support key type “Both(WPA2 & WPA3)”, “WPA3-personal” and will reject configuring these encryption key types.
-
Both(WPA & WPA2)
-
WPA2-Personal
-
Both(WPA2 & WPA3)
-
WPA3-Personal (Note that when 6G Band is selected, only this key type is available)
-
-
Passphrase - Enter the passphrase for the Mesh network.
-
Confirm passphrase - Re-enter the Mesh network passphrase.
When you are done configuring the Mesh/Bridge Configuration for the device, click Save. To reset the Mesh/Bridge Configuration back to the factory settings, click on Restore to Default.
Note that updating the mesh configuration for the AP will affect the existing mesh network. During this time, the APs in mesh network will briefly lose connectivity and will re-establish a mesh network based on the new configuration.
Configuring the Mesh configuration for an AP is particularly useful for an out-of-the-box Mesh configuration. Out-of-the- box Mesh is a feature that helps you quickly set up a Mesh network without configuring the out-of-the-box APs. The out-of-box APs will establish a Mesh network with hardcoded settings. You only need to specify the Mesh root, then other APs will establish a Mesh configuration automatically.
Displaying the Mesh Topology
The accuracy of the Mesh topology display depends on the reporting interval configured for the “apinfo.report” event in the OmniVista Cirrus Advanced Analytics engine profile.
To display the AP Mesh topology for the Organization, select an AP device from the Device List, then click on Mesh Topology in the Actions - View drop-down menu. The Mesh Topology List screen opens.
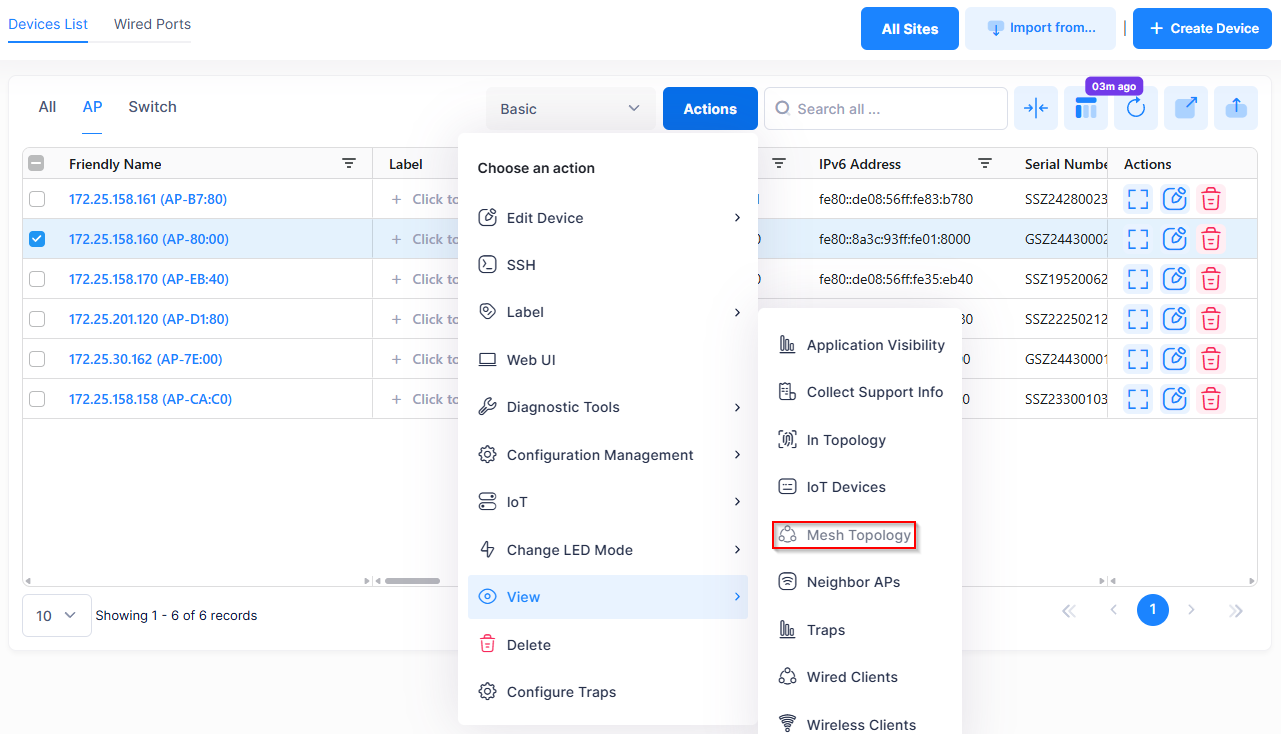

The Mesh Topology List displays all the AP devices participating in the Mesh configuration.
QoE Analytics also includes data on the Mesh Network. For example, an authorization failure message displays in the QoE Successful Connects classifier when Leaf APs in a Mesh Network exchange a four-way handshake.
Editing Common Mesh Parameters
You can also edit the mesh SSID, band, and passphrase (common to all APs in the mesh) from the Mesh Topology List screen. To edit the common Mesh configuration parameters for the topology, click on Edit Mesh Configuration in the Actions drop-down menu. The Edit Mesh Configuration screen opens.
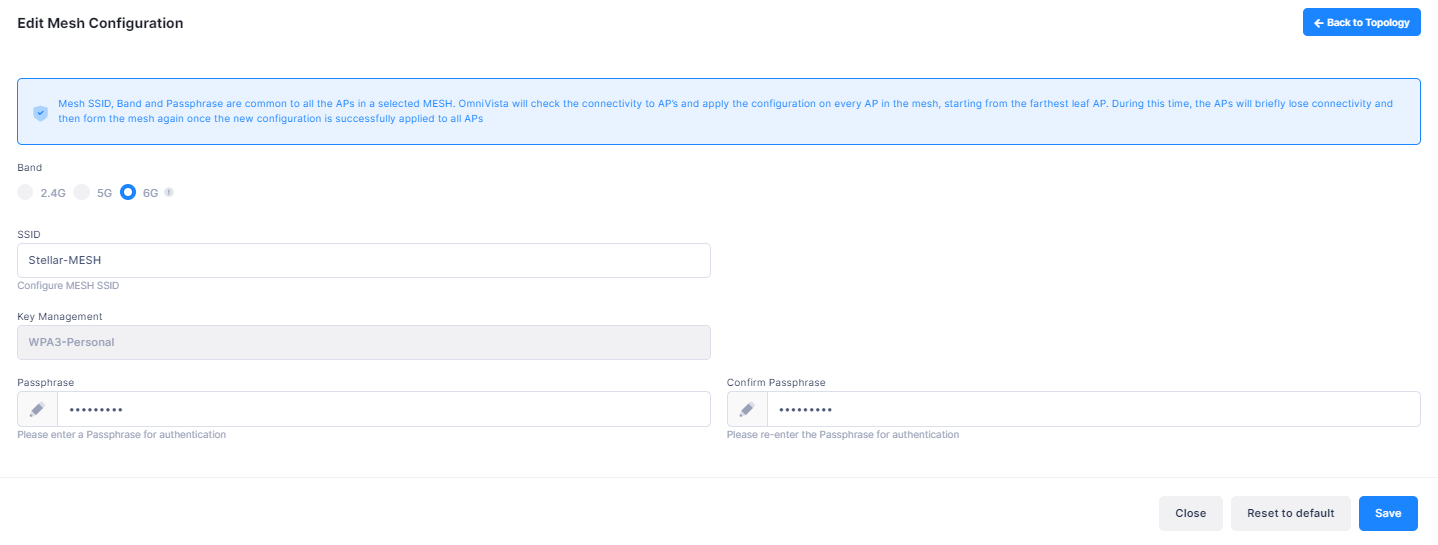
Modify the following common Mesh configuration parameters, as desired:
-
Band - Select the radio band for the Mesh network (2.4G, 5G, or 6G). When selecting the 6G option, make sure that all of the APs in the Mesh network support the 6GHz band.
-
SSID - Edit the name of the SSID for the Mesh network.
-
Mcast Rate - This parameter is not configurable from the Edit Mesh Configuration screen, even though it is a common Mesh parameter. Instead, one of the following values is used for the common Multicast rate:
-
The Mcast Rate value specified when configuring the Mesh configuration through OmniVista Cirrus.
-
The default Mcast Rate value of 24, if another value was not configured through OmniVista Cirrus.
-
-
Key Management - Select the type of encryption to use for the connections between Mesh/Bridge APs from the drop-down list. Note that 11AC model APs do not support key type “Both(WPA2 & WPA3)”, “WPA3-personal” and will reject configuring these encryption key types.
-
Both(WPA & WPA2)
-
WPA2-Personal
-
Both(WPA2 & WPA3)
-
WPA3-Personal (Note that when 6G Band is selected, only this key type is available)
-
-
Passphrase - Enter the passphrase for the Mesh network.
-
Confirm passphrase - Re-enter the Mesh network passphrase.
When you are done changing any of the common Mesh parameters, click Save. The changes are applied to all AP devices in the Mesh. To reset the common Mesh parameters back to the factory settings, click on Restore to Default.
The Mesh SSID, Band, and Passphrase are common to all the APs in a selected Mesh. OmniVista Cirrus will check the connectivity to each AP and apply the configuration on every AP in the Mesh, starting from the farthest leaf AP. During this time, the APs will briefly lose connectivity and then form the Mesh again once the new configuration is successfully applied to all of the APs.