The Access Point Groups screen displays information about configured Access Point (AP) Groups. The screen is also used to create, edit, and delete AP Groups. Stellar AP Series devices are managed by AP Group. OmniVista does not manage individual APs. You must first add APs to AP Groups. The attributes configured for the AP Group are applied to all APs in the group.
Once an AP(s) are assigned to a group, you configure the APs in OmniVista by applying the configuration to the AP Group. In OmniVista applications (e.g., Scheduled Upgrades, Provisioning), rather than presenting the user with individual APs when applying a configuration, OmniVista presents the user with the option of applying a configuration to AP Groups. Any configuration applied to an AP Group is applied to all APs in the group.
If an AP Group contains a mix of AP models and some models do not support certain features, OmniVista Cirrus will skip applying a configuration to the AP models that do not support the specific feature. For example, AP12XX models may not support all AWOS 5.0.1 features, so this model is skipped when OmniVista Cirrus applies any 5.0.1 features not supported on the AP12XX.
Verify the features that are supported for your AP models when assigning models to an AP Group.
To manage AP Groups, navigate to the Access Point Groups screen by clicking on Wireless > Profile > Access Point Groups under the “Configure” section of the OmniVista Cirrus Menu.

Creating an Access Point Group
An AP Group must be specified at the time an AP device is added to the Inventory Device Catalog. There is a pre-configured default AP Group (“default device group”) designated for each Site within an Organization. You can select the default group or create a new AP group. Note that an AP can belong to only one AP Group at a time.
Click on Create Access Point Group on the Access Point Groups List screen. The Create Access Point Group screen opens.

Complete the fields as described below to configure an AP Group. When you are finished, click on Create.
-
Access Point Group Name (Required) - Enter a unique name for the group (up to 64 characters).
-
Site (Required) - Select the Organization Site to which the AP Group will be assigned or click on Create Site to add a new Site to assign to the AP Group (see the Create a Site online help).
-
Provisioning Configuration (Required) - You can select the “Default Provisioning Config” or one of the other provisioning configurations presented from the drop-down menu. To create a new configuration, click on Create Provisioning Configuration (see the Provisioning Configuration online help).
-
Extended SSID Scale - Enable/Disable extending the number of SSIDs that can be assigned to the AP Group to 14. When enabled (On), only Stellar AP models that support up to 14 SSIDs can join the AP Group. When disabled (Off), any AP model can join the group, but the limit is 7 SSIDs per AP Group
-
Stellar AP models that support up to 14 SSIDs: AP1201, AP1321, AP 1322, AP1261, AP1361D, AP1362, AP1301H, AP1331, AP1351, AP1451, AP1411, AP1431, AP1201BG, AP1511, AP1521.
-
Note that the Extended SSID Scale status does not apply to 6GHz networks, which have a limit of 4 SSIDs per AP Group.
-
-
Description - Enter an optional description for the group.
Editing an Access Point Group
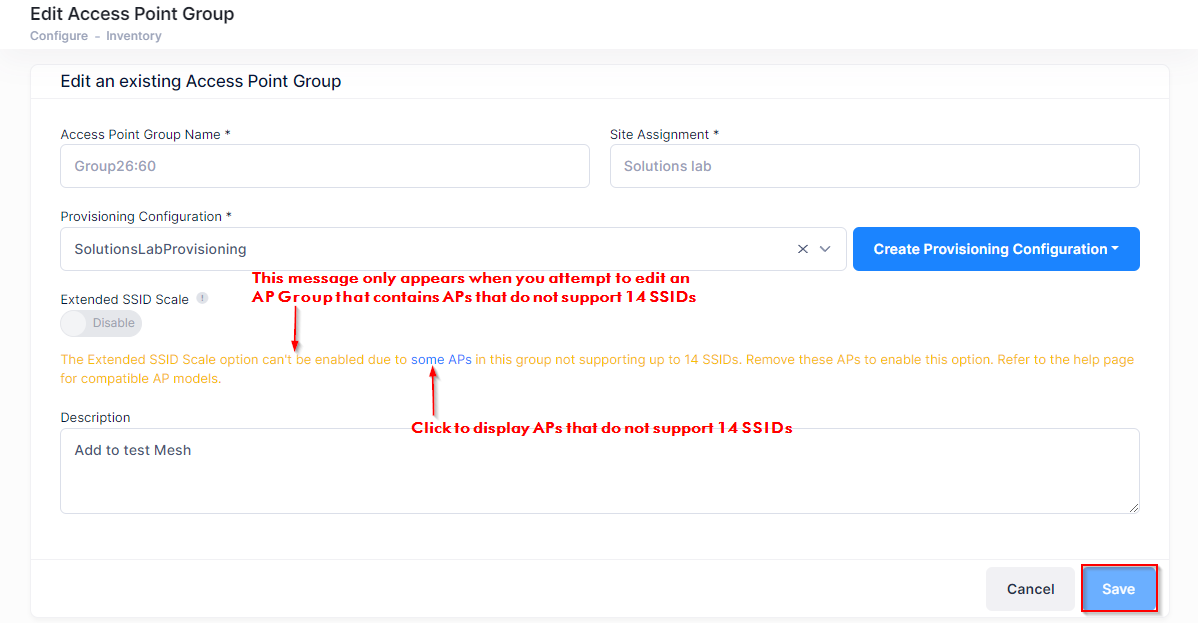
Select an AP Group in the AP Group List and click on the Edit icon under the “Actions” column or select Edit from the Actions drop-down menu to bring up the Edit Access Point Group screen. Edit the fields as described above and click on Save.
-
The “default device group” cannot be edited.
-
You cannot enable the Extended SSID Scale status for an AP Group that contains APs that do not support up to 14 SSIDs. Remove any such APs from the AP Group before enabling the Extended SSID Scale status.
Deleting an Access Point Group
Select an AP Group(s) in the AP Group List and click on the Delete icon under the “Actions” column or select Edit from the Actions drop-down menu. The following confirmation prompt appears:

Click on the “Select an Access Point Group” field to select the AP Group to which the APs that belong to the deleted group will be moved. This field defaults to “default device group”. Click on Delete to confirm removing the AP Group and moving associated APs to the selected group.
You cannot delete the Default AP Group (“default device group”).
Access Point Group List
The Access Point Group List displays the following information for each Access Point Group:
-
Access Point Group Name - The unique name assigned to the AP Group.
-
Site - The Organization Site to which the AP Group is assigned.
-
Description - The optional description for the AP Group.
-
Provisioning Configuration - The name of the Provisioning Configuration assigned to the AP Group.
-
Created At - The date and time the AP Group was created.
-
Updated At - The date and time the AP Group was last updated.
-
Extended SSID Scale - The Extended SSID Scale status for the AP Group (Enable or Disable).
-
Associated AP Count - The number of Access Points assigned to the AP Group.