A Provisioning Configuration contains the necessary settings an Access Point device requires to boot up and get a basic configuration. It is a site-level entity, meaning that two Provisioning Configurations for the same Site cannot have the same name. However, two different Sites can each have a Provisioning Configuration with the same name.
The Provisioning Configuration is applied to Access Points by assigning the configuration to an Access Point (AP) Group. All Access Point members of the AP Group will utilize the associated Provisioning Configuration.
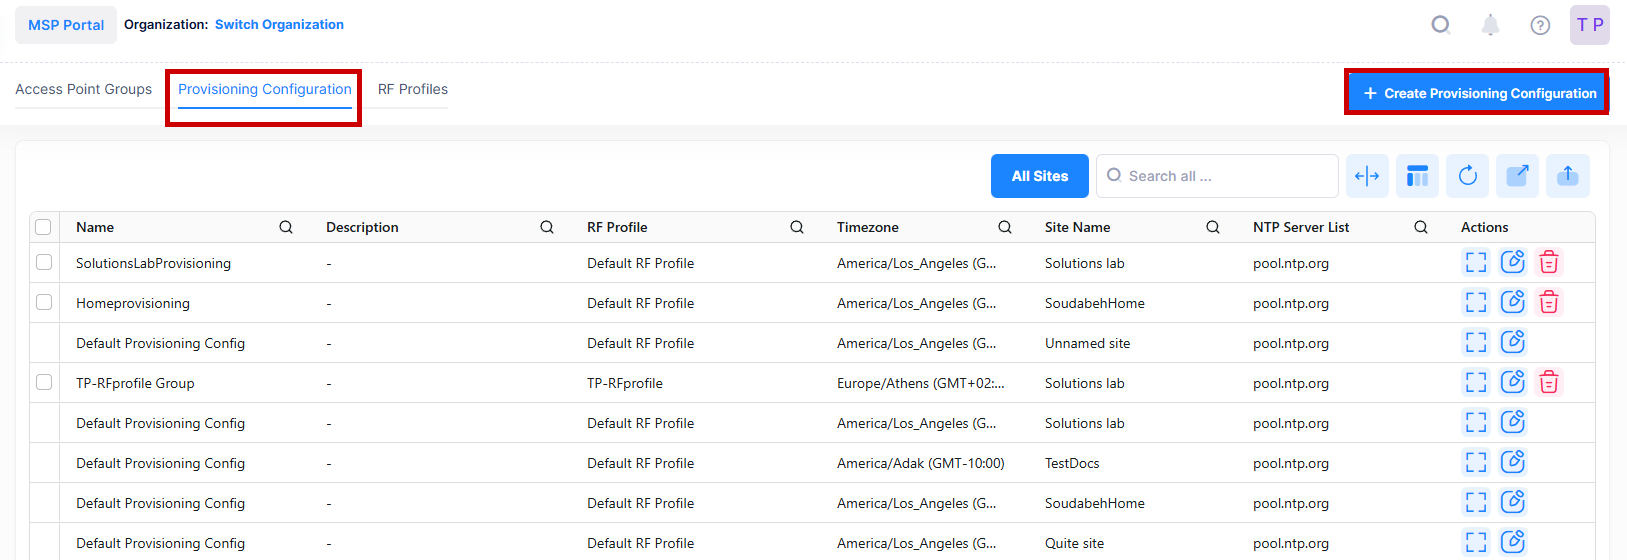
To manage Provisioning Configurations, navigate to the Provisioning Configuration List screen by clicking on Wireless > Profile > Provisioning Configuration under the “Configure” section of the OmniVista Cirrus Menu. This screen displays information about existing Provisioning Configurations and is also used to create, edit, and delete a Provisioning Configuration.
Creating a Provisioning Configuration
A Provisioning Configuration must be specified at the time an AP Group is created. There is a pre-configured default configuration (“Default Provisioning Config”) designated for each Site within an Organization. You can select the default configuration or create a new one.
Click on Create Provisioning Configuration to open the Create Provisioning Configuration screen. Complete the fields for each of the following sections of the screen as described below.
-
Basic Information - Configure identifying information for the Provisioning Configuration, such as name and description, as well as the Organization Site, associated Auto-Group VLANs, and an RF Profile.
-
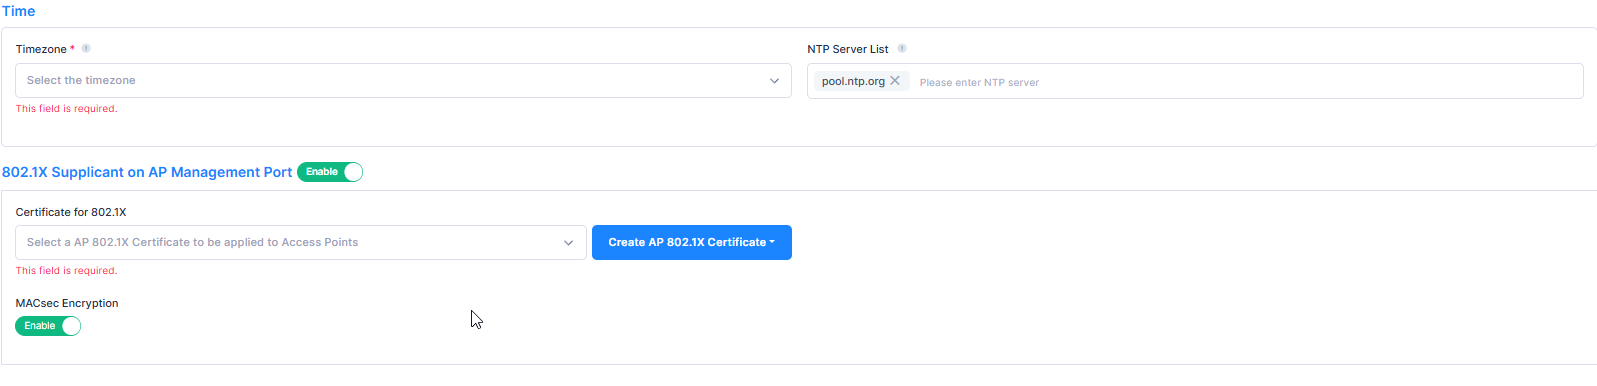
Time - Sets the timezone and defines an NTP server list.
-
802.1X Supplicant on AP Management Port - Specifies if AP Group member devices will act as 802.1X clients.
-
SSH and AP Web - Configure parameters for SSH login and web management.
-
Client Behavior Tracking - Configures parameters to upload a Client Behavior Log File to an FTP Server and to upload Client Behavior Syslog messages to a remote Syslog Server.
-
Certificate - Specify the certificates to establish secure communication with the AP.
-
Redirection Settings - Proxy port number and/or FQDN/IP address used for redirection to UPAM or CPPM servers.
-
SNMP Setting - Configure SNMP and Trap settings to allow third-party SNMP-based platforms to monitor APs in a Site using SNMP.
-
IoT Radio Configuration - Configures the IoT Radio Mode for the AP.
-
IoT/Location/Advanced Analytics Server - Set the external engine profile for the AP. If the location service is enabled, APs in the Site will report IoT/wireless scanning data/advanced analytics data to the selected servers.
-
Data VPN Settings - Select the VPN Server to use for the Data VPN Tunnel.
-
Event Configuration - Select the event configurations to send to OmniVista Cirrus
-
Miscellaneous - Configure miscellaneous settings, such as a Captive Portal virtual IP address, Called Station ID, IPv6 L3 Forwarding, and IGMP Snooping.
-
Syslog - Enable/disable logging of AP events to remote Syslog Servers.
-
Post Mortem Dump - Enable/disable Post Mortem Dump (PMD) of AP information.
When you are finished completing the necessary sections, click on Create.
Click on Create another checkbox to return to the Create Provisioning Configuration screen to complete for another configuration. If this box is not checked, the display returns to the Provisioning Configuration List screen.
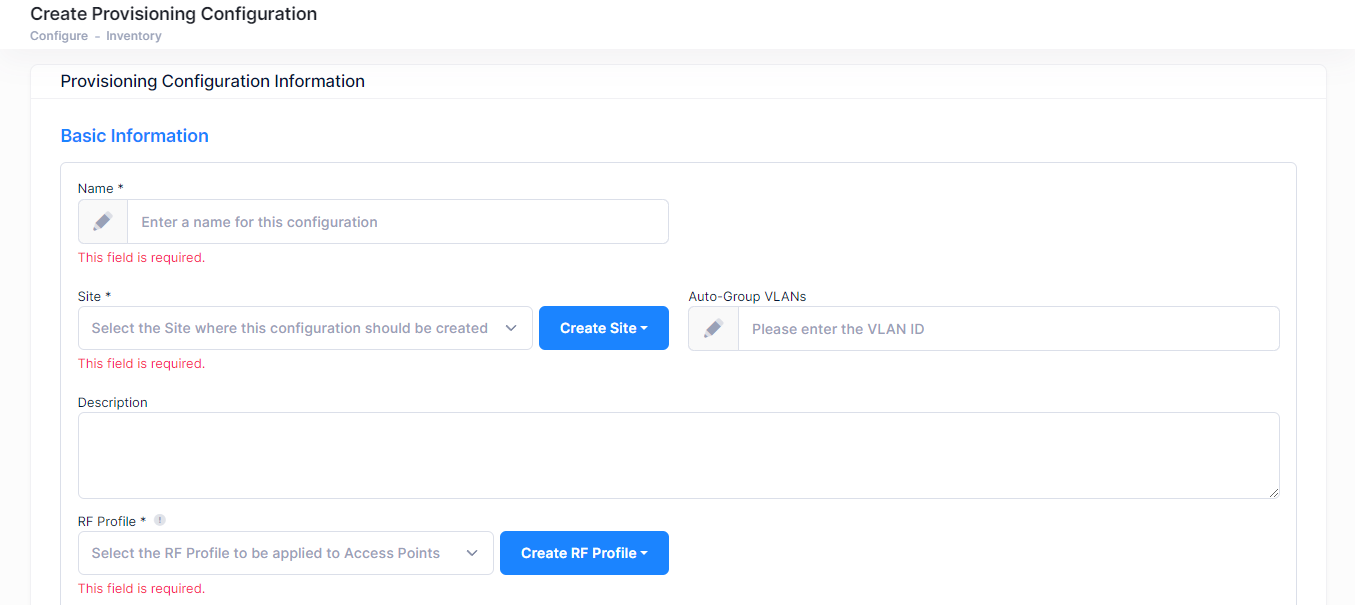
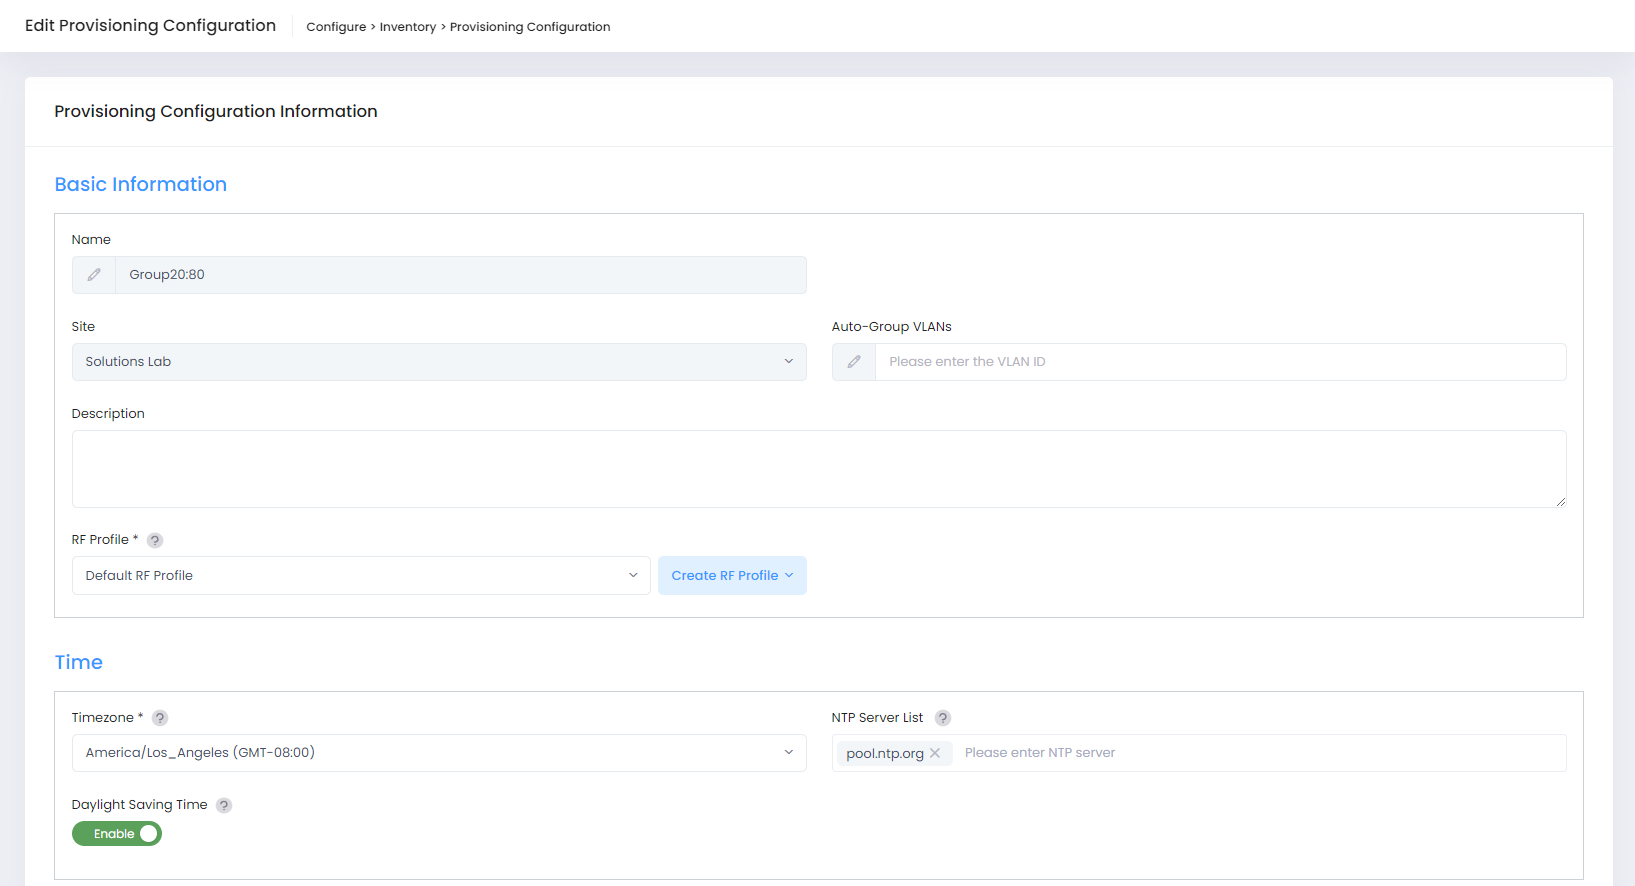
Basic Information
-
Name (Required) - Enter a unique name for the Provisioning Configuration (up to 64 characters).
-
Site (Required) - Select an existing Organization Site from the drop-down list or click on Create Site button to open the Create Site page and create a new Site (see the Create a Site online help) . The Provisioning Configuration is assigned to the specified Site.
-
Auto-Group VLANs - A list of VLAN IDs to allow automatic grouping of APs during initial registration. Separate each VLAN ID entry with a comma (for example, 10, 20, 25-30). Based on the AP management VLAN ID received by LLDP, the AP can automatically be assigned to the corresponding AP Group. This option is used when an AP device is added to the Device Catalog with the “Mgmt VLAN based automatic grouping” option selected for the Site AP Group.
-
Description - Enter an optional description for the Provisioning Configuration.
-
RF Profile (Required) - Select an existing RF Profile from the drop-down list or click on Create RF Profile button to open the Create RF Profile screen and create a new profile (see the RF Profiles online help) . The RF Profile contains the wireless attributes that are applied to all APs in the AP Group. When editing an existing Provision Configuration to change the specified RF profile, consider the following:
-
Changing the RF Profile is not allowed for a Provisioning Configuration that is associated with one or more APs when the current RF Profile country code is one of US/JP/ME but the new RF Profile country code does not match the current country code.
-
Changing the RF Profile is not allowed for a Provisioning Configuration that is associated with one or more APs when the country code for the new RF Profile is one of US/JP/ME but the current RF Profile country code does not match the new RF Profile country code.
-
An RF Profile assigned at the device level through the Device Catalog List takes precedence over the RF Profile assigned through the Provisioning Configuration.
-
-
Time
-
Timezone (Required) - The timezone to be set on the APs.
-
NTP Server List - Enter the NTP Server for this Site. This sets the server list for all APs in the AP Group.
-
-
802.1X Supplicant on AP Management Port - Enables/Disables APs in the AP Group to act as 802.1X clients (see AP Device as an 802.1X Client for more information). If enabled:
-
Certificate for 802.1X - Select the "Built-in Certificate" or a custom 802.1X client certificate from the drop-down list or click on Create AP 802.1X Certificate to open the Create AP 802.1X Certificate screen and create a new 802.1X certificate (see the Certificates online help).
-
-
MACsec Encryption - Enable/Disable MACsec encryption. MACsec encrypts Ethernet frames on a LAN link. Two devices (called SecY entities) exchange keys via MKA (MACsec Key Agreement, IEEE 802.1X/802.1AE) and then establish Secure Associations (SAs) to encrypt/decrypt traffic. Passive and Assertive encryption refers to how a MACsec-capable port behaves during link negotiation when the other side may or may not support MACsec.
-
Passive (Default): The port prefers MACsec but will allow the link to come up in plaintext mode if the peer does not support MACsec or key negotiation fails.
-
Assertive: If the peer doesn’t support MACsec or fails to complete key negotiation, the link will not pass traffic.
-
In AWOS 5.0.3 GA the MACsec functionality is supported on the AP1321 and AP1361 only.
Only specific OmniSwitch models and ports support MACsec. Ensure your AP is connected to a port that supports MACsec. Refer to the AOS documentation for the OmniSwitch model you are using for more details.
To configure an AP to establish a MACsec connection with an OmniSwitch follow the steps below:
-
Authenticate the AP as an 802.1X supplicant to the OmniSwitch without MACsec.
-
Enable MACsec on the AP.
-
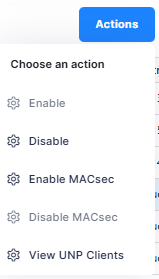
Enable MACsec with Dynamic RADIUS mode on the interface port of the OmniSwitch where the AP is connected by navigating to Device Catalog-> Wired Ports, select the switch and under Actions choose Enable MACsec.
MACsec with Dynamic RADIUS is not supported over Linkagg.
If a Stellar AP is acting as an 802.1x client to a switch port and MACsec is enabled on the switch port; the MACsec link does not work and the AP remains disconnected. Rebooting the AP after enabling MACsec fixes the issue.
For troubleshooting MACsec perform the following:
AP - If MACsec is not established successfully the AP may be out of the network.
-
Access the AP via the console port.
-
Check the /tmp/log/wpa.log for 802.1X Authentication and MACsec establishment process.
OmniSwitch:
-
Check the result of 802.1X authentication using the show unp user details command. A successful 802.1x authentication must be established for MACsec to work properly.
-
Checking the MACsec operational status using the show interfaces macsec dynamic command.
-
Restart the 802.1X authentication and MACsec using the interface c/s/p admin-state disable and interface c/s/p admin-state enable commands.
Note that out-of-the-box APs have a "Built-in Certificate" that is common to all APs. It is recommended that you use a custom 802.1X client certificate to improve network security. See AP Security Recommendations for more information.

SSH
-
SSH Login - Enables/Disables SSH login for APs in the AP Group. If enabled:
-
For Support Account - The SSH password used for an SSH connection to the AP.
-
Password - Enter a password that will be required to access an AP through SSH.
-
Confirm Password - Confirm the password.
-
-
For Root Account - Configuring a Root Account Password Seed adds a second layer of security for AP access. When you configure a Password Seed, the Root Password is derived from a character string composed of two parts: the Password Seed and the Fixed Root Password. The Password Seed can be changed on demand.
-
Password Seed - Enter a Root Account Password Seed for the APs in the AP Group.
-
Confirm Password Seed - Re-enter the Password Seed.
-
-
AP Web
-
AP Web - Enables/Disables web management of APs in the AP Group. If enabled:
-
Password - Enter a password that will be required to access an AP through the Web Management UI.
-
Confirm Password - Re-enter the password.
-
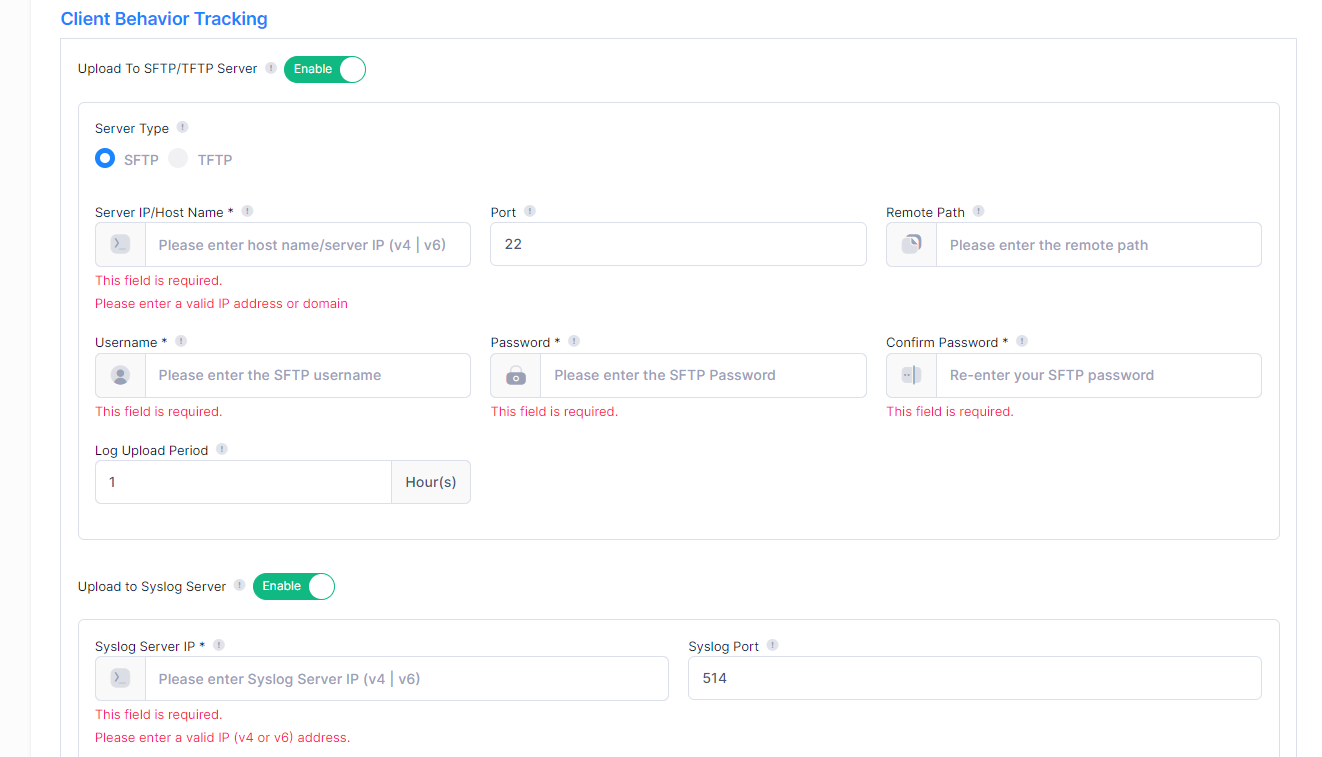
Client Behavior Tracking
-
Upload To SFTP/TFTP Server - Enables/Disables uploading of a Client Behavior Log File to an FTP Server. If enabled, enter:
-
Server Type - FTP Server type (SFTP/TFTP).
-
Sever IP/Host Name - IP address or Host name of the FTP Server.
-
Port - FTP port number.
-
Remote Path - File path on the FTP Server storing the Client Behavior Log.
-
Username (SFTP Server only) - User name used to access the SFTP Server.
-
Password (SFTP Server only) - Password used to access the SFTP Server.
-
Confirm Password (SFTP Server only) - Re-enter the password used to access the SFTP Server.
-
Log Upload Period - Frequency for uploading the Client Behavior Log to the FTP Server, in hours (Range = 1 - 24, Default = 1).
-
-
Upload to Syslog Server - Enables/Disables uploading of Client Behavior Syslog messages to a remote Syslog Server. If enabled, enter the following information:
-
Syslog Server IP - IP address of the Syslog Server.
-
Syslog Port - Syslog Port number.
-
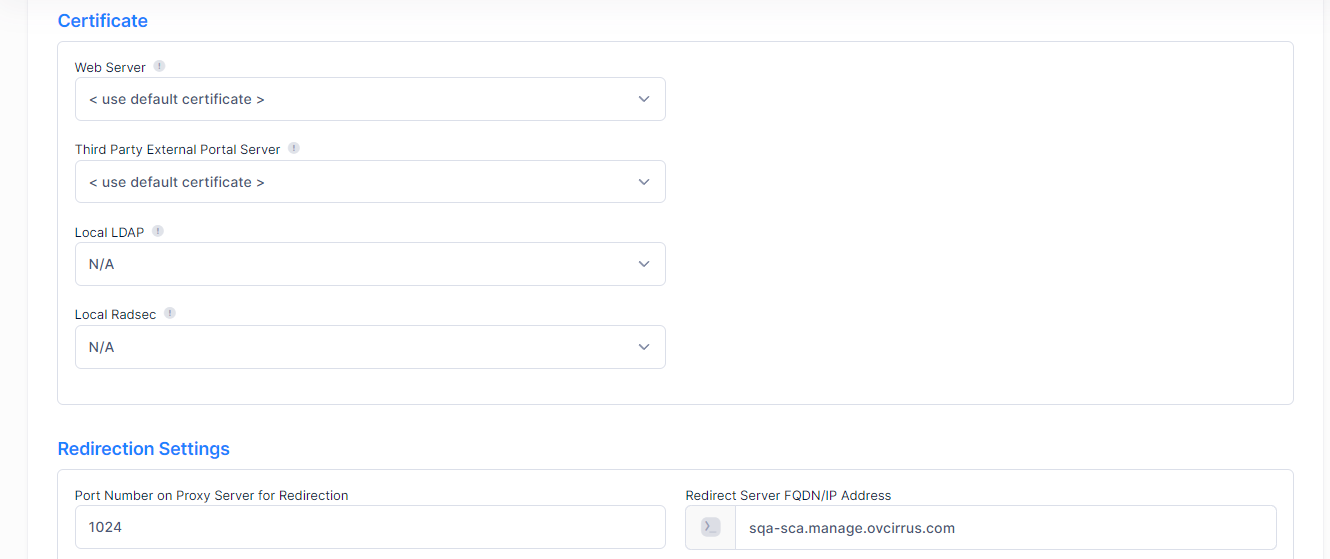
Certificate
-
Web Server - The Certificate used for communication between the AP Web Server and browser. Make sure your Web Server certificate's Common Name (CN) is 'mywifi.al-enterprise.com' and that the certificate is in Unix format.
-
Third Party External Portal Server - The Certificate used to communicate with a third-party portal server. Make sure your Web Server certificate's Common Name (CN) is NOT 'mywifi.al-enterprise.com' and that the certificate is in Unix format.
-
Local LDAP - The certificate used for secure communication between the AP and an LDAP Server if the user authentication source is the local LDAP Server.
-
Local RadSec - The Certificate used for secure communication between the AP and a local, third-party RADIUS Server that uses RadSec (RADIUS-over-TLS).
Redirection Settings
-
Port Number on Proxy Server for Redirection - The HTTP proxy port number to use for redirection to UPAM or the CPPM Server.
-
Redirect Server FQDN/IP Address - The FQDN/IP address used for redirection of HTTP traffic to UPAM or the CPPM Server. Specify the address that is associated with the dynamic URL returned from UPAM or the CPPM Server.
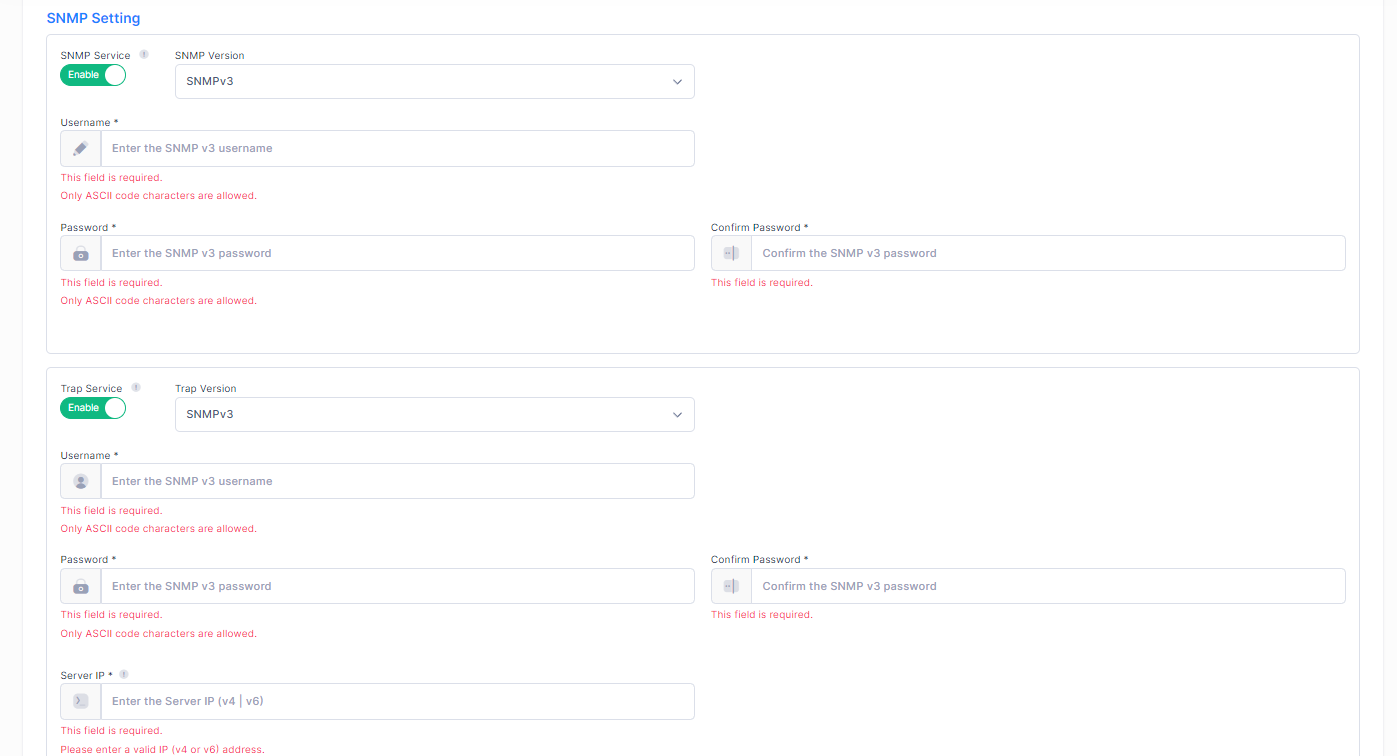
SNMP Setting
This option allows third-party SNMP-based platforms to monitor APs in a Site using SNMP. OmniVista Cirrus does not use SNMP to manage Stellar APs. With defined SNMP MIBs, an Administrator can monitor APs, configured services, and wireless clients and their traffic utilization.
When using SNMPv3, Stellar APs support only SHA authentication protocol and AES privacy protocol.
-
SNMP Service - Enables/Disables (On/Off) the SNMP Service on APs in the AP Group.
-
Version - The SNMP version. Select v3 or v2c. (Default = v3)
-
v3 - When SNMP v3 is selected, complete the following:
-
Username - The user account name.
-
Password - The password for the user account.
-
Confirm - Confirm the specified password.
-
-
v2c - When SNMP v2c is selected, complete the following field:
-
Read Community - The credential used for communication between the network management system and APs.
-
-
-
-
Trap Service - Enables/Disables (On/Off) SNMP Trap Service on APs in the AP Group.
-
Version - The SNMP version. Select v3 or v2c. (Default = v3)
-
v3 - When SNMP v3 is selected, complete the following fields:
-
Username - The user account name.
-
Password - The password for the user account.
-
Confirm - Confirm the specified password.
-
Server IP - The server to which AP trap messages are sent. This is the IP address of the network management server you are using. It is not recommended that you use the OmniVista Cirrus Server IP address to avoid the posting of duplicate traps in OmniVista.
-
-
v2c - When SNMP v2c is selected, complete the following fields:
-
Community - The credential used for communication between the network management system and APs.
-
Server IP - The server to which AP trap messages are sent. This is the IP address of the network management server you are using. It is not recommended that you use the OmniVista Server IP address to avoid the posting of duplicate traps in OmniVista.
-
-
-
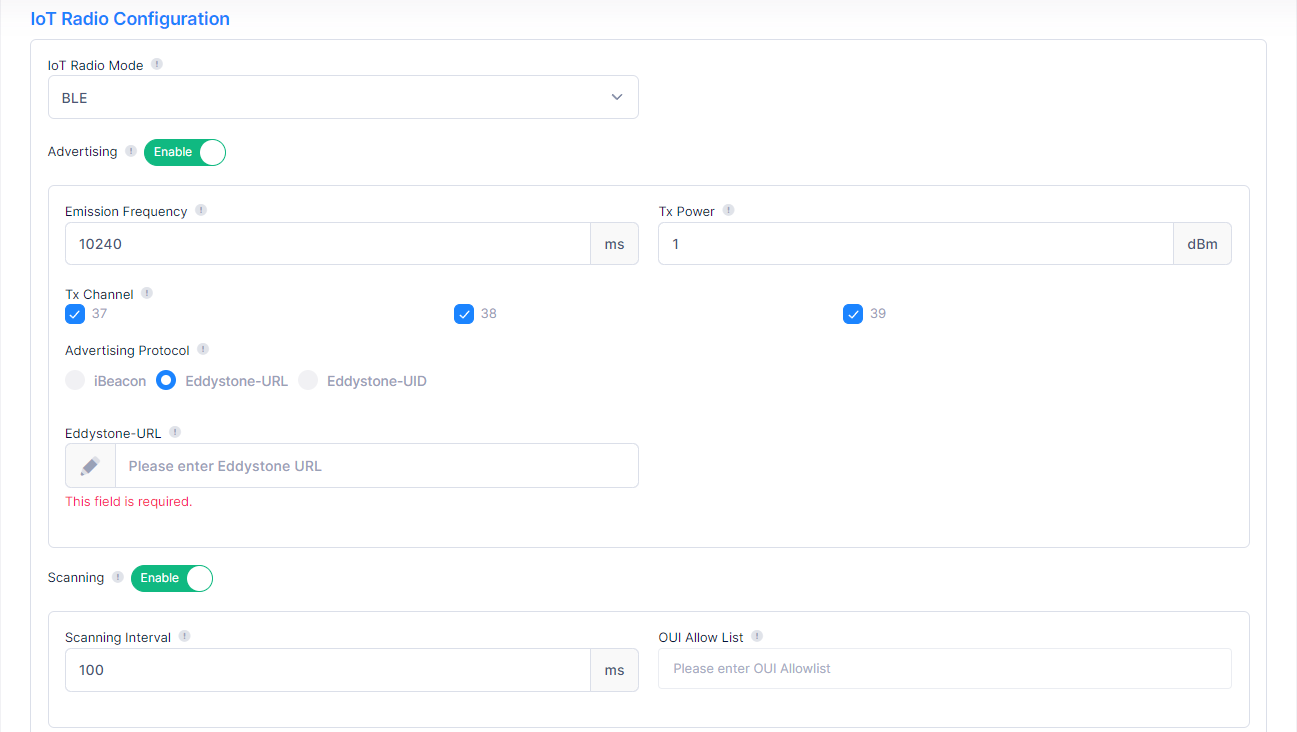
IoT Radio Configuration
-
IoT Radio Mode - Select BLE to configure the IoT Radio Mode. If an AP in the AP Group supports BLE Beaconing, the BLE configuration (below) will be applied to the AP(s).
BLE Configuration
This option is used to enable/disable BLE Beaconing for APs in the AP Group. BLE Beaconing is used by the Location Service to deliver location services like way-finding, geo-location, geo-notification, and geo-fencing.
-
Advertising - Enables/Disables the BLE advertising function for the AP. If Advertising is enabled, the AP will broadcast BLE packets. If disabled, the AP will detect surrounding BLE Tags/Beacons and will report information to the server for analysis. Note that BLE Advertising must be enabled for Stellar Asset Tracking.
-
Emission Frequency - The time circle during which the BLE packets will be broadcast, in milliseconds. (Range = 20 - 9,000,000, Default = 200)
-
Tx Power - The transmit power used to broadcast BLE packets, in dBm. (Range = -20 - 19, Default = 4)
-
Tx Channel - The transmit channel used to broadcast BLE packets. It is recommended that you use a different channel than the channel used for the WLAN.
-
Advertising Protocol - Specify the BLE protocol used to define the broadcasting BLE beacon format.
-
iBeacon - Apple iBeacon format. Note that you must select iBeacon for Stellar Asset Tracking.
-
Eddystone-URL - Google Eddystone format. A compressed URL that, once parsed and decompressed, is directly usable by the client.
-
Eddystone-UID - Google Eddystone format. A unique static ID with a 10-byte Namespace component and a 6-byte Instance component.
-
Namespace - 20 characters containing 0-9a-f.
-
-
-
-
Scanning - Enables/Disables the Bluetooth beacon scanning function for the AP. Note that BLE Scanning must be enabled for Stellar Asset Tracking.
-
Scanning Interval - The Bluetooth scanning interval for the AP, in milliseconds. (Range = 4 -10240, Default = 100)
-
OUI Allow List - Specify the MAC OUI allow list to filter devices for BLE beacon broadcasting. Only those beacons broadcasting from the devices within the OUI Allow List are valid and will be reported.
-

IoT/Location/Advanced Analytics Server
This option is used to set an IoT/Location/Advanced Analytics Server Profile for APs in the AP Group. If the location service is enabled, APs in the group will report IoT/wireless scanning data/advanced analytics data to the selected servers.
The option to set an IoT/Location/Advanced Analytics Server Profile applies only to Access Points running AWOS 4.0.6 or higher.
-
Wi-Fi RTLS Server Profile - Select a Wi-Fi RTLS Server Profile for APs. A default AeroScout Location profile with AeroScout engine type is provided or select a profile with the OmniVista Cirrus WiFi RTLS engine type. To create a new server profile, click Create Wi-Fi RTLS Server Profile to open the Create External Engine screen and add a new profile.
-
BLE LBS Profile - Select a BLE Location Based Server Profile. The BLE Location profile is a Stellar Location Engine used for OmniAccess Stellar Asset Tracking. To create a new server profile, click Create BLE LBS Profile to open the Create External Engine screen and add a new profile.
-
Advanced Analytics Server Profile - Select an advanced analytics profile with an OmniVista Cirrus Advanced Analytics engine type. A “Default Advanced Analytics” profile with OmniVista Cirrus Advanced Analytics engine type is provided to send advanced analytics data to OmniVista Cirrus R10 and above. To create a new server profile, click Create Advanced Analytics Server Profile to open the Create External Engine screen and add a new profile.
-
OmniVista Advanced Analytics - Enables/disables the OmniVista Advanced Analytics functionality.
OmniVista Advanced Analytics is enabled by default. Note that if you disable this functionality, the AP will not send QoE events to OmniVista Cirrus.
Data VPN Settings
-
Data VPN Server(s) - Select the VPN Server to use for the Data VPN Tunnel. The user traffic will be carried in the data VPN tunnel between the APs and selected VPN Server. To create a new Data VPN Server, click Create Data VPN Setting to open the Create Data VPN Setting screen and add a new VPN Server.
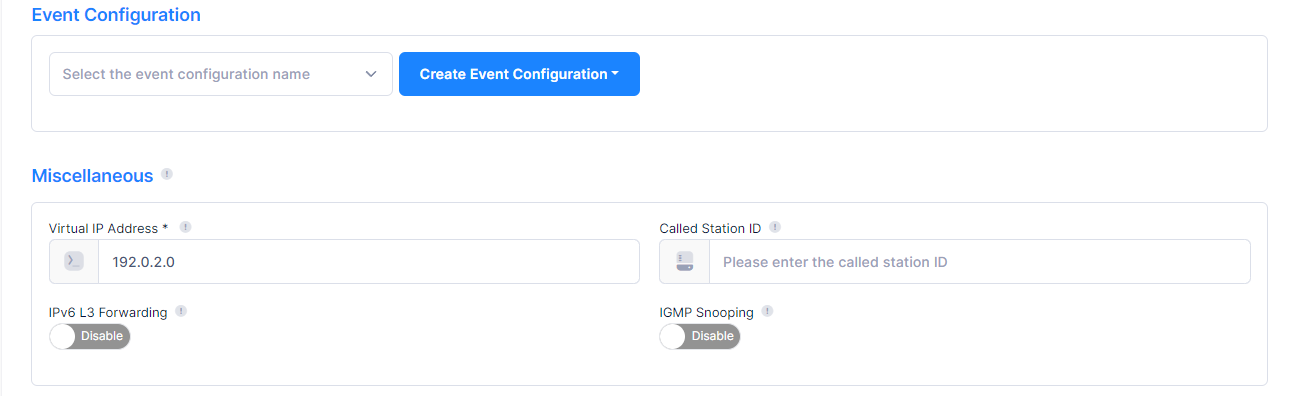
Event Configuration
-
Event Configuration Name - Select the event configurations that you want devices to send to OmniVista Cirrus. To create a new event configuration, click Create Event Configuration to open the Create Event Configuration screen and add a new event configuration.
Miscellaneous
-
Virtual IP Address - The virtual IP address used for Captive Portal redirection in the AP. You can customize the virtual IP address according to your network deployment to avoid exposing the AP management interface. Be careful not to specify an IP address that is already in use in your network.
-
Called Station ID - RADIUS attribute. Define what to pass in Called-Station-ID RADIUS attribute that is exchanged between the NAS client (Access Point) and RADIUS Server. By default, the format of Called Station ID" is: <AP-MAC-ADDRESS>:<SSID>. Example "00-10-A4-23-19-C0:guest". But in some special scenarios, administrators may need to change this default depending on how their RADIUS servers function. Note that, when UPAM is used as the RADIUS server and an Access Policy is configured with "SSID" attribute as the Mapping Condition, UPAM assumes the standard format of <AP-MAC-ADDRESS>:<SSID> to extract "SSID" value from this "Called-Station-ID" attribute . So, whenever this attribute is specified with a different value, UPAM Access Policy might need to be modified accordingly.
-
IPv6 L3 Forwarding - Enables/Disables the IPv6 service on APs. Once enabled, IPv6 packets received by APs will be handled at the application level and forwarded on Layer 3. By default, the IPv6 service is disabled.
-
IGMP Snooping - Enables/Disables the IGMP Snooping function on the APs.
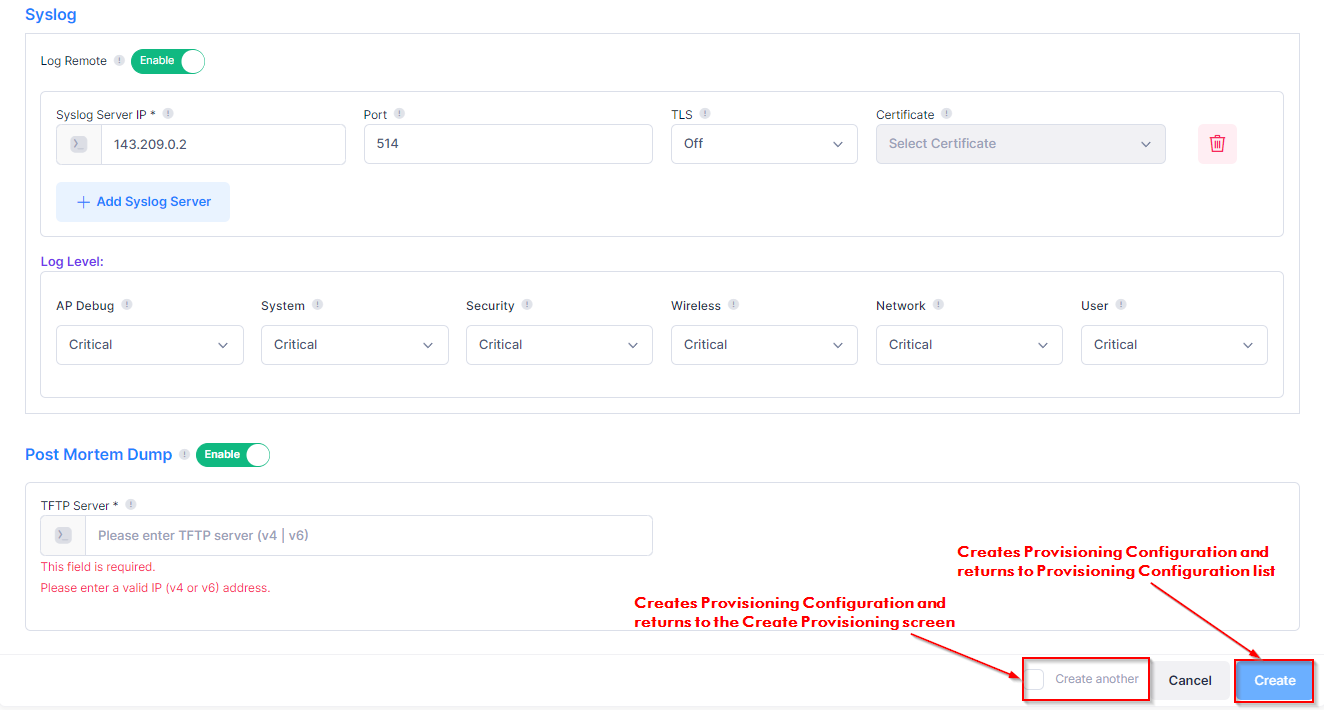
Syslog
Use this option to enable logging of AP events to remote Syslog Servers. Specify the Syslog Server IP address and Syslog port to which an AP device will send events. Syslog Server (IP 143.209.0.2, port 514) is provided by default. To add an additional server, click on the Add Syslog Server button. Note that you can specify up to four Syslog Servers.
-
Log Remote - Enable/Disable remote logging of AP events. When enabled, complete the following fields for each Syslog Server that will receive the AP events.
-
Syslog Server IP - The IP address of the remote Syslog Server.
-
Port - The port used to connect to the remote Syslog Server.
-
TLS - Enable/Disable (On/Off) the use of the Transport Layer Security encryption method for remote logging of AP events.
-
Certificate - If TLS is enabled (On), select a Syslog Over TLS Certificate.
-
-
-
Log Level - Select a log level for events. This sets the log level for all APs in the AP Group. Note that the AP Debug, System, Security, Wireless, Network, and User log levels must be equal to or higher than the AP Debug log level.
Post Mortem Dump
-
PMD - Enables/Disables Post Mortem Dump (PMD) of information for APs in the AP Group.
-
TFTP Server - The IP address of the TFTP Server used for PMD.
Editing a Provisioning Configuration
Select a Provisioning Configuration in the Provisioning Configuration List and click on the Edit icon under the “Actions” column or select Edit from the Actions drop-down menu to bring up the Edit Provisioning Configuration screen. Edit the fields as described above and click on Save.
You can edit the “Default Provisioning Config”, except for the “Name”, “Site”, “Auto-Group VLANs”, and “Description” fields.
Deleting a Provisioning Configuration
Select a Provisioning Configuration in the Provisioning Configuration List and click on the Delete icon under the “Actions” column or select Delete from the Actions drop-down menu. The following confirmation prompt appears:
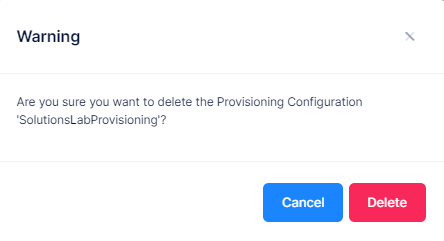
You cannot delete the ”Default Provisioning Config” or a Provisioning Configuration that is associated with an Access Point Group.
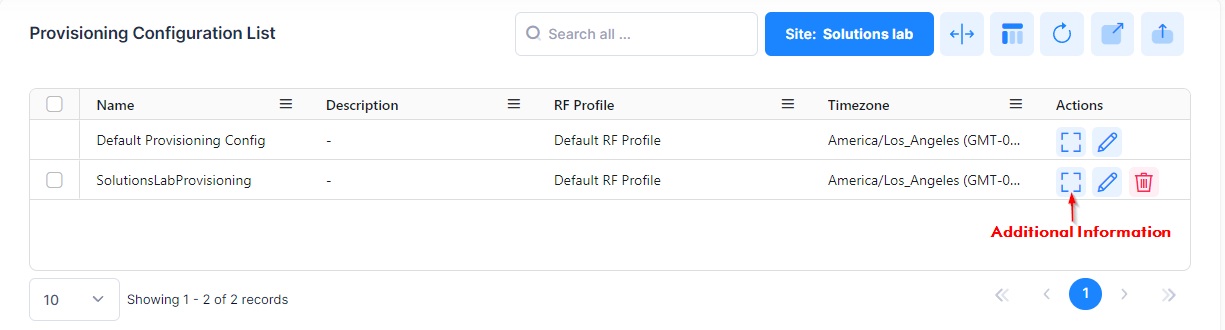
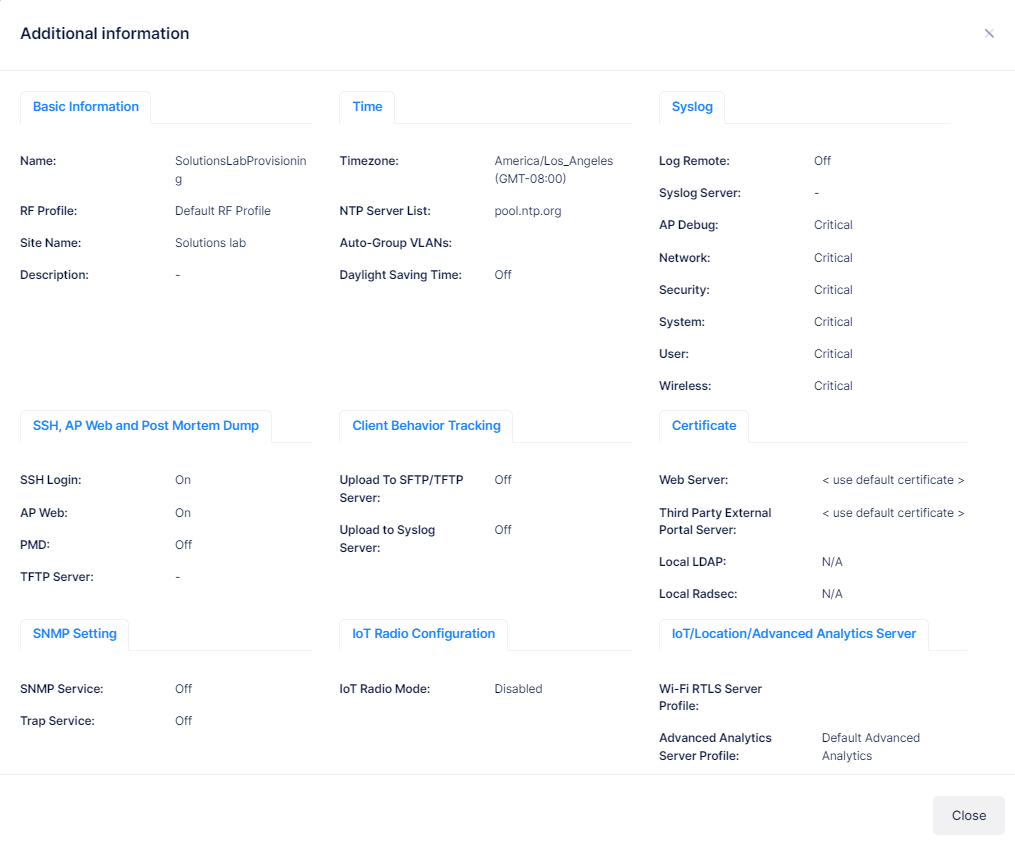
Display Additional Information
Click the icon in the “Actions” column next to the Provisioning Configuration List entry to display the Additional Information screen.