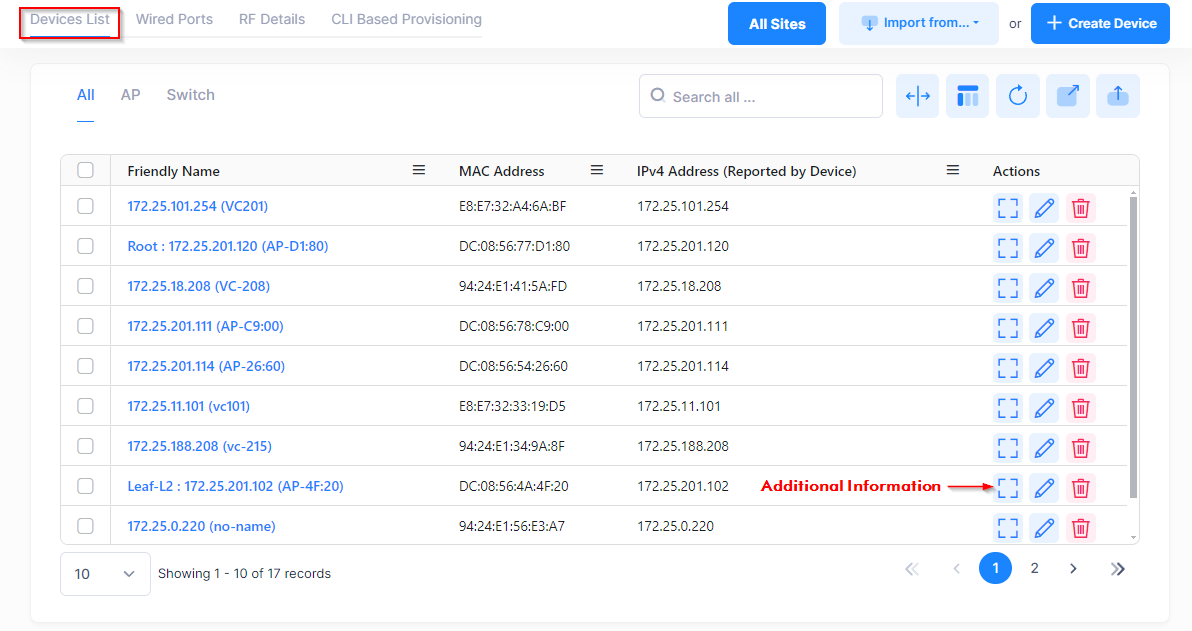
Using the Device List
The Device List tab on the Device Catalog screen displays a list of devices known to OmniVista Cirrus R10.
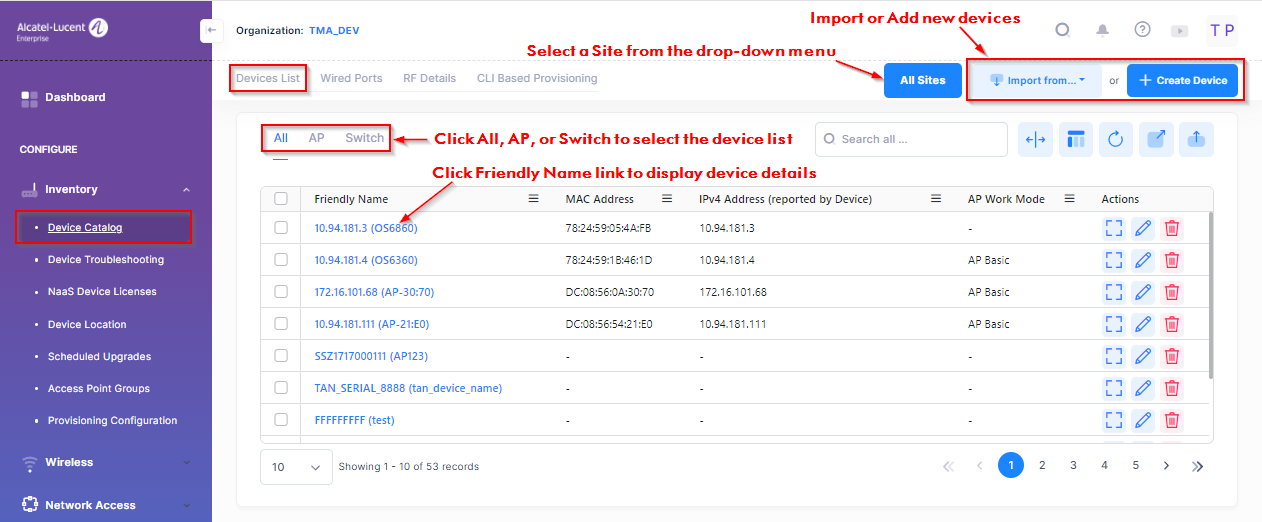
There are three device lists available to view from this screen:
All - Displays a list of all devices (Access Points and Switches).
AP - Displays a list of Access Points.
Switch - Displays a list of Switches.
By default, all devices are listed. Click on All, AP, or Switch to view the related device list.
From this screen, you can perform any of the following actions:
Display Device Information
Click the icon in the “Actions” column next to the Device List entry to display the Device Information screen. The information displayed on this screen is defined below.
The following is displayed for each device:
Basic Information, Location, and Initial Configuration Information
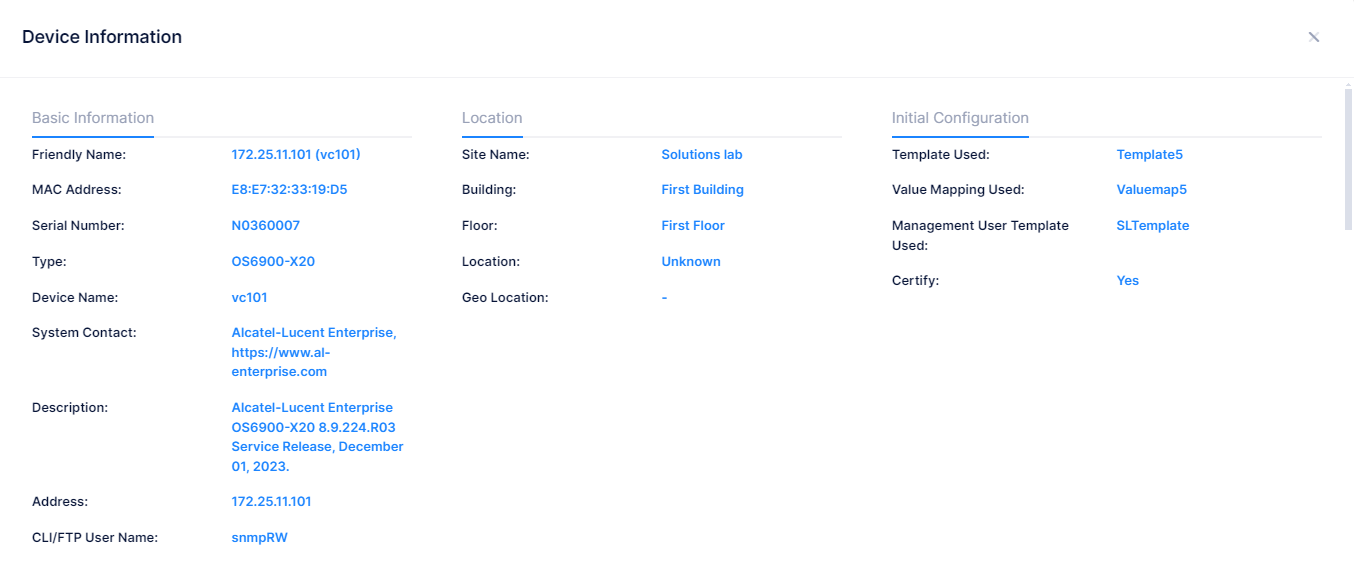
Basic Information
Friendly Name - The name assigned to the device is derived from the Preferred Device Naming convention specified in the user preference settings. By default, the Friendly Name is set to IP Address (System Name).
MAC Address - The device MAC address.
IPv4 Address (Reported By the Device) (AP only) - The IP v4 address of the AP device.
IPv6 Address (Reported By the Device) (AP only)) - The IP v6 address of the AP device.
Serial Number - The Serial Number for the device.
Type - The model number for the device.
Device Name - The user-configured device name.
System Contact - Contact information for the device.
Description - Optional description for the device.
Address (Switch only) - The IP address of the Switch.
CLI/FTP User Name (Switch only) - The user name that OmniVista will use to establish CLI/FTP sessions with the managed devices. The user name specified will be used to auto-login to devices when CLI sessions are established. It will also be used to perform FTP with the device when configuration files are saved and restored.
Access Point Group (AP only)- The name of the Access Point group to which the device belongs.
RF Profile (AP only) - The Radio Frequency (RF) Profile that defines a wireless RF configuration for the Access Point.
BLE MAC (AP only) - The MAC address for the AP beacon, if applicable.
Location
Site Name - The name of the site on which the device is declared.
Building - The name of the building in which the device is located.
Floor - The name of the floor on which the device is located.
Location - Where the device is physically located.
Geo-Location - GPS Coordinates of the localized device.
Initial Configuration (Switch only)
Template Used - The name of the CLI-Based Provisioning Template that was used to push a configuration to the Switch during the onboarding process.
Value Mapping Used - If the Provisioning Template contained variables, this field displays the name of the Value Mapping that is used to define the variables.
Management User Template Used - The name of the Management User Template that contains the login credentials that OmniVista Cirrus will use to connect with the Switch. The Default Management User Template credentials are used unless another template was specified.
Certify - Indicates if the configuration was saved to the Certify directory on the Switch (Yes or No).
Version, Status, License, Data VPN, and Other Information
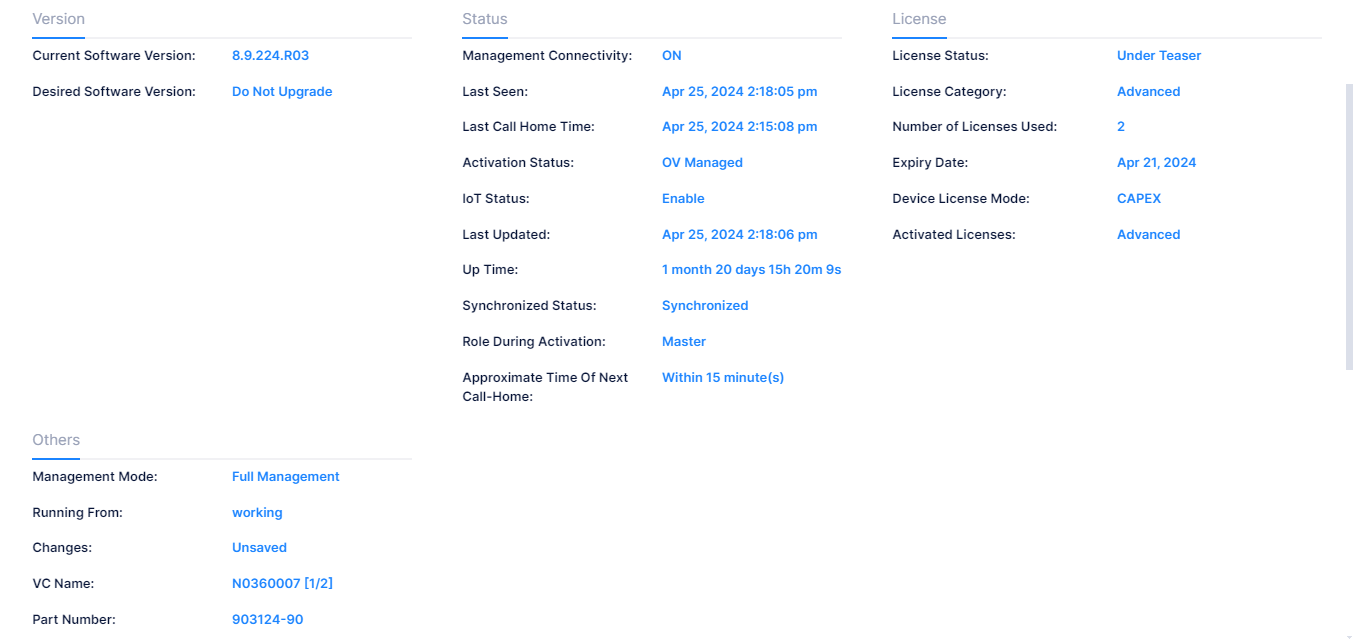
Version
Current Software Version - The current software version for the device.
Desired Software - The "Desired Software Version" version configured for the device. The field will display the software version configured or "Do Not Upgrade".
Status
Management Connectivity - The following management connectivity values indicate the various stages of device connectivity with OmniVista Cirrrus.
Blank - The device is in an initial state (not yet onboarded).
On - When a device is successfully provisioned or OmniVista Cirrus receives heartbeat from the device, management connectivity transitions to “On”.
Unknown - If OmniVista Cirrus does not receive any heartbeat, the management connectivity status transitions from “On” to “Unknown”.
Off - After a certain amount of time with no heartbeat, the management connectivity status transitions from “Unknown” to “Off”.
Last Seen - Date and time Access Point activity was last seen by the OmniVista cloud Infrastructure.
Last Call Home Time - The date and time the device last called home.
LACP Status (AP only) - Indicates whether or not the Access Points supports link aggregation (Supported/Unsupported).
Link Status (AP only) - The LACP link state (Up/Down).
Activation Status- The real-time device activation/provisioning status for the device, if applicable (for example, Waiting for Validation, Waiting for First Contact, OV Managed). Device Status error messages/failure states are detailed in the Troubleshooting section with explanations and possible solutions.
Waiting For First Contact - Device has been validated. OmniVista Cirrus R10 is waiting for the device to connect to it. Once the user connects the device to the network, the device will be ready for limited (unlicensed device) or full management (licensed device).
Obtaining Certificate - Device has contacted the OmniVista Cirrus R10 Server and the server is creating a digital certificate that is used in creating the secure VPN channel between your device and the OmniVista Cirrus R10 Server.
Certificate Previously Issued - A certificate was previously provided to this network device but it has contacted OmniVista Cirrus R10 without it.
Failed To Get Certificate - Device has contacted the OmniVista Cirrus R10 Server and the server attempted to create a certificate to achieve a more secure communication but the attempt has failed.
Registered - Device has successfully registered with OmniVista Cirrus R10 and is ready for limited management.
Upgrade - Device software version will be or is being upgraded.
Upgrading - Device is in the process of upgrading its software.
Upgrade Failed - Device software version upgrade failed.
Assigned - Device has contacted OmniVista Cirrus R10 and was found to be assigned to your account. The device is in the process of becoming fully managed.
VPN Configuring - Device is in the process of configuring a secure transport channel for connecting to OmniVista Cirrus R10.
Factory Reset Required - The VPN profile was changed/updated. A Factory Reset is required on the device.
Connected to OV - Device has connected to OmniVista Cirrus R10 over a secure transport channel and will proceed with provisioning, if required.
Provisioning - Device is in the process of receiving configuration information from the Provisioning application, before it is ready for full management.
Provisioning Failed - Device was unable to process the provisioning configuration sent by the Provisioning application, or OmniVista Cirrus R10 was unable to discover the device. See the Troubleshooting section for possible solutions to the problem.
OV Managed - Device is ready for full management.
Unsupported Device Model - OmniVista Cirrus R10 does not support the device.
PKI Update - Indicates there are new Public Key Infrastructure (PKI) parameters available for the device on the next call-home. This can include one or more of the following:
New Device Private Key
New Device Public Key
New Device CSR
New Device Certificate
Updated CA Signing Chain.
IoT Status - Indicates if IoT is enabled or disabled (the default) for the device. When enabled, OmniVista collects IoT information for endpoints connected to the device.
Last Updated - The date and time the device was last updated.
Up Time - The amount of time the device has been "Up" since the last time it was "Down" or rebooted.
Synchronized Status (Switch only) - Whether the Primary CMM's working directory is identical to the working directory on the other CMM module (if present).
Synchronized - The primary CMM's working directory is identical to the working directory on the secondary CMM. Note that if a switch is in Virtual Chassis (VC) mode, and it is VC of 1, the Synchronized Status is always "Synchronized".
Not Synchronized - The primary CMM's working directory is not identical to the working directory on the secondary CMM.
Not Applicable - Only one CMM module is installed.
Unknown - The synchronization state is unknown.
Role During Activation - The role of the device during activation (Master, Slave).
Approximate Time of Next Call-Home - The approximate amount of time until the next call home.
License
License Status - Indicates the license type applied to the device: Under Teaser (trial period license), Automatic Assigning (licensed is assigned when device calls home), or Unlicensed.
License Category - The type of license that is assigned to the device: Essential (APs and Essential switches) and Advanced (Advanced switches and Core switches). The License Category is determined when the device call home to OmniVista Cirrus.
Number of Licenses Used - The number of licenses used by the device.
Expiry Date - The date and time the license expires.
Device Licensed Mode - The Device License mode of operation for the switch (NaaS, CAPEX, CAPEX Undecided). See the NaaS Device Licenses online help for more information.
Data VPN Settings (AP only) - The name of the Data VPN Server Profile assigned to the AP. The Data VPN Server Profile defines VPN Server settings used by the AP to access remote functionality. The Data VPN Server Profile is assigned to a provisioning configuration, which provides configuration information for the AP Group to which the AP belongs.
Others
Management Mode - Is the device managed by OmniVista in Full Management or Analytics Only mode.
AP Mgmt Mode
OVNG - AP is managed by OmniVista Cirrus 10.
OVCLOUD - AP is managed by OmniVista Cirrus 4.
Cluster - AP was added to the Device Catalog, but is still in Cluster mode and is not being managed by OmniVista Cirrus 10. You can move the device to "Cloud" by licensing (if necessary) and restarting the activation process on the device.
LED Mode (AP only) - The LED Mode configured for the Access Point.
Normal Mode (Default) - The LED displays in normal mode (Red/Green/Blue).
Night Mode - The LED indicator is shut off.
Blink Mode - LED alternately blinks Red/Green/Blue so that you can visually locate the AP(s).
AP Work Mode - The Access Point work mode:
AP Basic - Access Point is serving wireless clients
Mesh Mode - Access Point is working as a wireless mesh node.
Bridge Mode - Access Point is working as a wireless bridge node.
Mesh Role (AP only) - The role of an Access Point that is operating in mesh mode (Root, Repeater).
Schedule Upgrade (AP only) - The name of the Scheduled Upgrade to which the device is assigned.
If a schedule is specified, the device is updated only during the time window of the schedule.
If this field is blank, the device is updated on the next call home.
Running From (Switch only) - Indicates whether the switch is running from the Certified directory or from the Working directory. The directory structure that stores the Switch image and configuration files in flash memory is divided into two parts:
The Certified directory contains files that have been certified by an authorized user as the default configuration files for the switch. When the switch reboots, it will automatically load its configuration files from the certified directory if the switch detects a difference between the certified directory and the working directory.
The Working directory contains files that may or may not have been altered from those in the certified directory. The working directory is a holding place for new files to be tested before committing the files to the certified directory. You can save configuration changes to the working directory. You cannot save configuration changes directly to the certified directory.
Changes (Switch only) - Indicates the state of changes made to the Switch configuration. This field can display the following values:
Certified - Changes have been saved to the working directory, and but the working directory has been copied to the certified directory. The working directory and the certified directory are thus identical.
Uncertified - Changes have been saved to the working directory, but the working directory has not been copied to the certified directory. The working directory and the certified directory are thus different.
Unsaved - Changes have been made to the running configuration of the device that have not been saved to the working directory.
Blank - When this field is blank, the implication is that OmniVista Cirrus knows of no unsaved configuration changes and assumes that the working and certified directories in flash memory are identical..
VC Name (Switch only) - If the Switch is participating in a Virtual Chassis (VC) configuration, this field displays the name of the VC configuration.
Part Number (Switch only) - The part number of the module or sub-module.
Switch Modules
The OmniVista Cirrus 10 polling interval is once an hour to collect switch module information. If some information appears out of date, wait until the next polling interval.
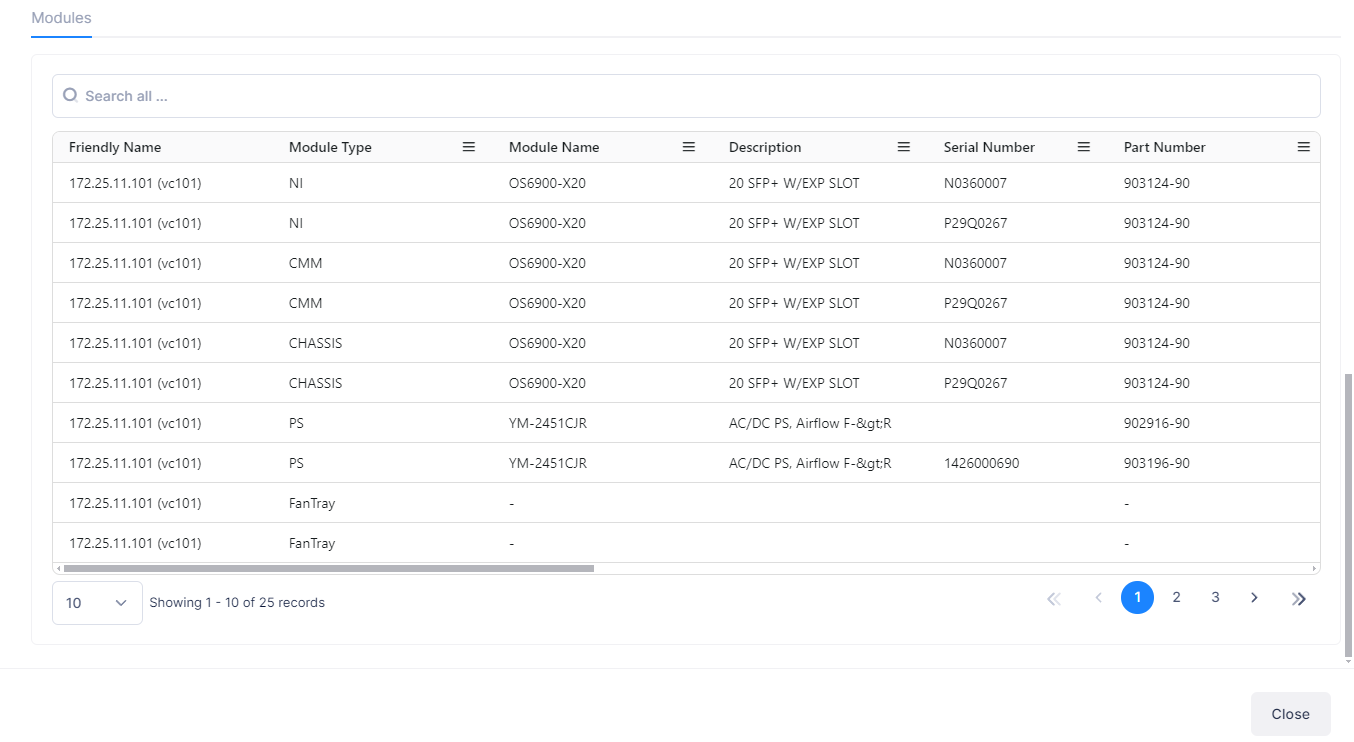
Modules (Switch only) - Provides the following detailed information about the switch modules:
Friendly Name - A user-definable name for the device. If no name was configured, the IP address of the device is displayed.
Module Type - The physical type of module or submodule in this physical location (e.g., Chassis, NI). Note that the value for this field displays as "Unknown" for a brief period while a newly-installed module or submodule is identified.
Module Name - The manufacturer's name for the module (e.g. OS6850--C48, OS6850-BPS-PS).
Description - The user-definable description of this particular module or submodule. The module description can be defined through SNMP.
Serial Number - The serial number of the module or sub-module.
Part Number - The part number of the module or sub-module.
MAC Address - The base MAC address for the module or submodule. If not applicable, the field will be blank.
OS Version - The OS version number running on the module. If not applicable, the field will be blank.
Uboot/Miniboot Version - The U-Boot version running on the module. If not applicable, the field will be blank.
HW Revision - The hardware revision number for the module. If not applicable, the field will be blank.
Firmware Version (FPGA) - The version/revision level of the module or submodule firmware. If not applicable (e.g., Power Supply), the field will be blank or displays “0.0”.
Manufacturer Name - The manufacturer of the module.
License - Additional licenses (other than the Core License) active on the module (e.g., Advanced), if applicable.
Slot - The slot in the chassis where the module resides. If not applicable, the field will be blank.