
OmniVista Terra supports safe, repeatable upgrades from one software version to another. The upgrade process is designed to:
-
Preserve your data, configuration, and settings across versions.
-
Minimize service disruption during the upgrade.
-
Provide clear visibility into upgrade progress and status.
-
Support both single-node and multi-node deployments.
Upgrades are performed by uploading a release file and initiating the installation through the web interface. The system handles the upgrade automatically, including infrastructure components, network services, and voice services as applicable.
The upgrade consists of two mandatory and sequential installations:
-
Core Release — upgrades the OVTX platform foundation, including k3s, system packages, and WebAdmin.
-
Network Release — upgrades OVTX network services and, where applicable, voice services.
Important: The Core Release must be completed successfully before starting the Network Release. Do not change the release order or repeat an installation without reviewing the task logs.
Consider the following before starting the upgrade to a new OmniVista Terra release:
-
If the current software running is 10.6.2, then you must do a fresh install of the 10.5.2 MR release first before upgrading to the 10.6.1 release. Upgrading to a new release is only supported from 10.5.2 MR to 10.6.1.
-
Make sure a current backup of OmniVista Terra data and configuration has been completed via Hypervisor.
-
Obtain the following required OmniVista Terra release packages:
|
Installation Stage |
Release Package |
Notes |
|---|---|---|
|
Core Release |
|
Filename includes |
|
Network Release |
|
Filename does not include |
-
Upgrades follow an N → N+1 path; the system prevents installing older versions than what is currently deployed.
The upgrade process is designed for offline (air-gapped) environments. No internet connection is required once you have the release file.
Installing the New Release
To install the Core Release first and then the Network Release, log into the OmniVista Admin Center and click Install under the “Configure” section of the left-hand navigation menu.
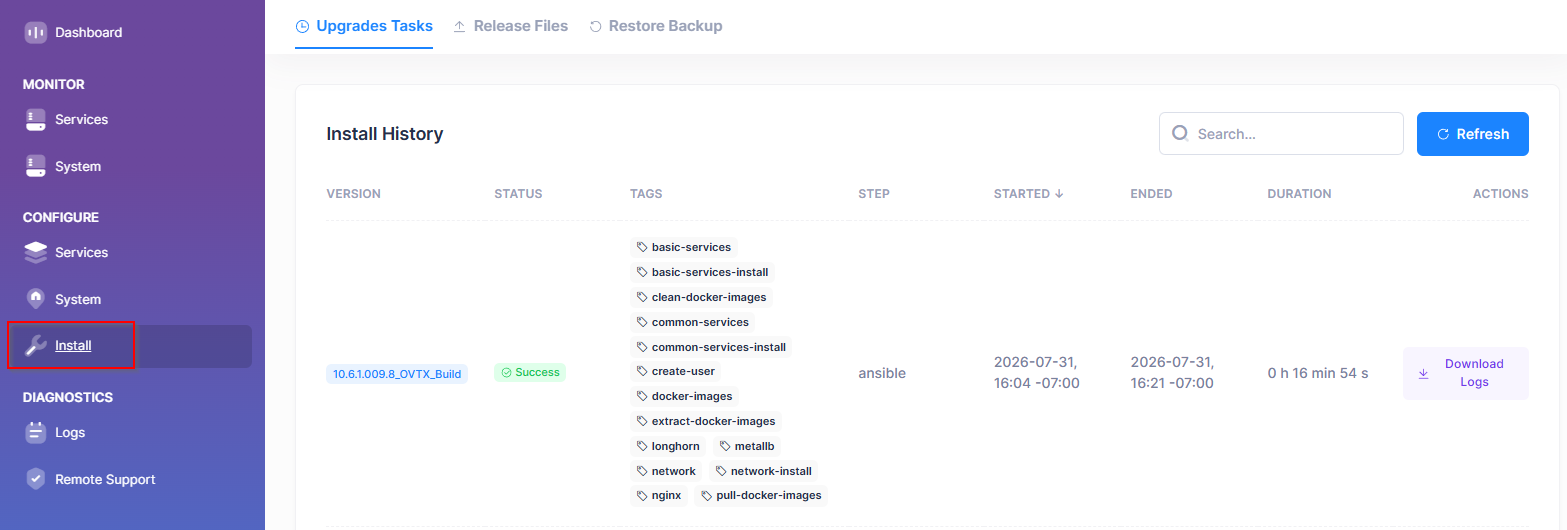
There are three tabs on the Install screen:
-
Upgrade Tasks - View ongoing installations and the installation history.
-
Release Files - Upload and manage release files, initiate installations.
-
Restore Backup - Restore the system from a previous backup.
Follow the procedures below for Stage 1 (Install the Core Release), then Stage 2 (Install the Network Release). To validate the installation, see Post-Upgrade Acceptance Checks.
Stage 1 - Installing the Core Release
Install the Core Release to update the OmniVista Terra platform components and Admin Center.
-
Select the Release Files tab on the Install screen.
-
Upload the following file:
<BUILD>_core_OVTX_Build.7z(See Uploading Release Packages) -
Wait until the upload process is complete.
-
Select the uploaded release package. (See Installing the Release Packages)
-
Select the
coretag only. -
Click Install.
-
Navigate to Upgrade Tasks and monitor the installation until its status is successful. (See Monitoring the Installation)
When the Core Release installation completes successfully with no failed tasks, access the OmniVista Admin Center using HTTPS:
https://<OVTX_IP>:3000
If the browser displays a certificate warning, review and accept the self-signed certificate in accordance with your organization's security policy.
Control Point: Proceed to Stage 2 only after the Core Release task has completed successfully.
Stage 2 - Installing the Network Release
This installation stage has two phases:
Preparation - Configure Trap Receiver
Before installing the Network Release, configure the Trap Receiver IP Address in the Admin Center over HTTPS. This configuration is mandatory when upgrading from OmniVista Terra 10.5.2 MR1.
The Trap Receiver IP Address is configured on the Network screen (Services > Network) in the Admin Center UI.
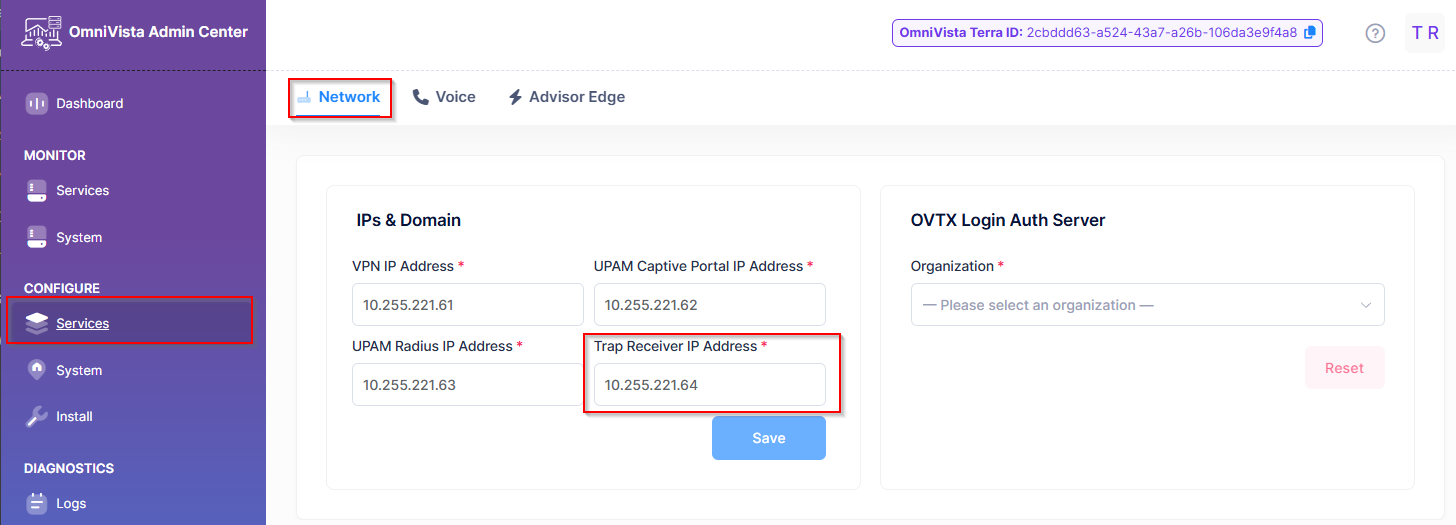
Enter a dedicated IP for the Trap Receiver service, then click Save.
If the Trap Receiver IP Address is not configured, the Network Release installation may fail during IP pool creation.
Control Point: Confirm that the Trap Receiver IP Address is configured before proceeding with the Network Release.
Install the Network Release
Install the OmniVista Terra network services release.
-
Select the Release Files tab on the Install screen.
-
Upload the following file:
<BUILD>_OVTX_Build.7z(See Uploading Release Packages) -
Wait until the upload process is complete.
-
Select the uploaded release package. (See Installing the Release Packages)
-
Click Install.
-
Navigate to Upgrade Tasks and monitor the installation until its status is successful. (See Monitoring the Installation)
The Network Release installation should complete successfully with no failed tasks.
Post-Upgrade Acceptance Checks
After the Core Release and Network Release installations are complete, perform the following validation checks in the Admin Center.
Platform Status
|
Validation Item |
Expected Result |
|---|---|
|
OVTX version |
|
|
Installation tasks |
No task is running or failed |
Infrastructure Health
On the Monitoring page, verify that:
-
Nodes are healthy.
-
Pods are healthy.
-
Services are healthy.
Uploading Release Packages
To upload a new release file, select the Release Files tab.
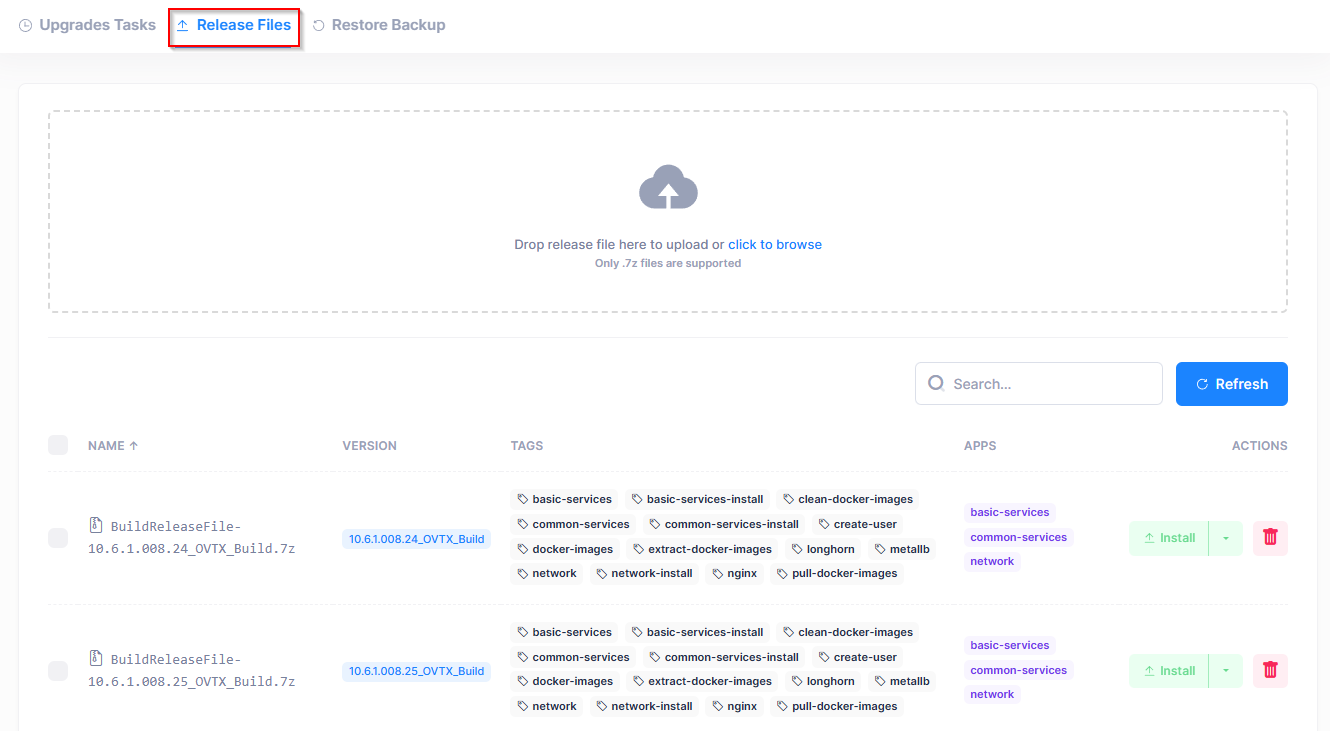
In the upload area, either:
-
Drag and drop your
.7zrelease file onto the upload area, or -
Click click to browse to select a file from your computer.
The upload begins automatically and displays:
-
File name and size
-
Upload progress percentage
-
Current upload speed
During the upload process, you can use the following controls:
-
Pause - Temporarily stop the upload
-
Resume - Continue a paused upload
-
Cancel - Stop and discard the upload
The upload supports resumable chunked transfer, so large files can be uploaded reliably even over slower connections. If the upload is interrupted, you can resume from where it stopped.
Only .7z files are accepted. Other file formats will be rejected.
Viewing Available Releases
After uploading, the release files appear as an entry in the table below the upload area with the following information:
Name - The release file name.
Version - The software version contained in the release.
Tags - Deployment components included (for example, network, voice, common-services).
Apps - Application types this release applies to.
Actions - Install, Advanced Install, and Delete options.
You can search and sort the table to find specific releases.
Version Protection
The system prevents installing a release with a version older than what has already been successfully installed. If you attempt to install an older version, the Install button will be disabled and a message explains that the version is older than the currently installed version.
Installing the Release Packages
To install a release, find it in the release files table and click Install in the “Actions” column.
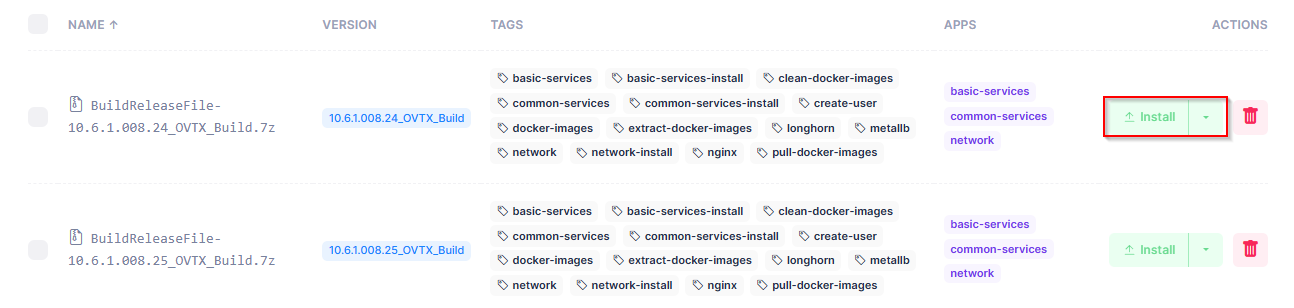
A confirmation dialog appears asking if you want to proceed. Click Yes to confirm and start the installation. The installation begins and you are automatically redirected to the Upgrade Tasks tab to monitor progress.
Queue Behavior
If an installation is already in progress, you can still initiate another installation. The new installation is added to a queue and will start automatically after the current installation completes. The confirmation dialog indicates that the release will be queued.
Using Advanced Installation Options
For more control over what is installed:
-
Click the down arrow on the “Install” action.
-
Click on Advanced Install to open the Advanced Installation screen.
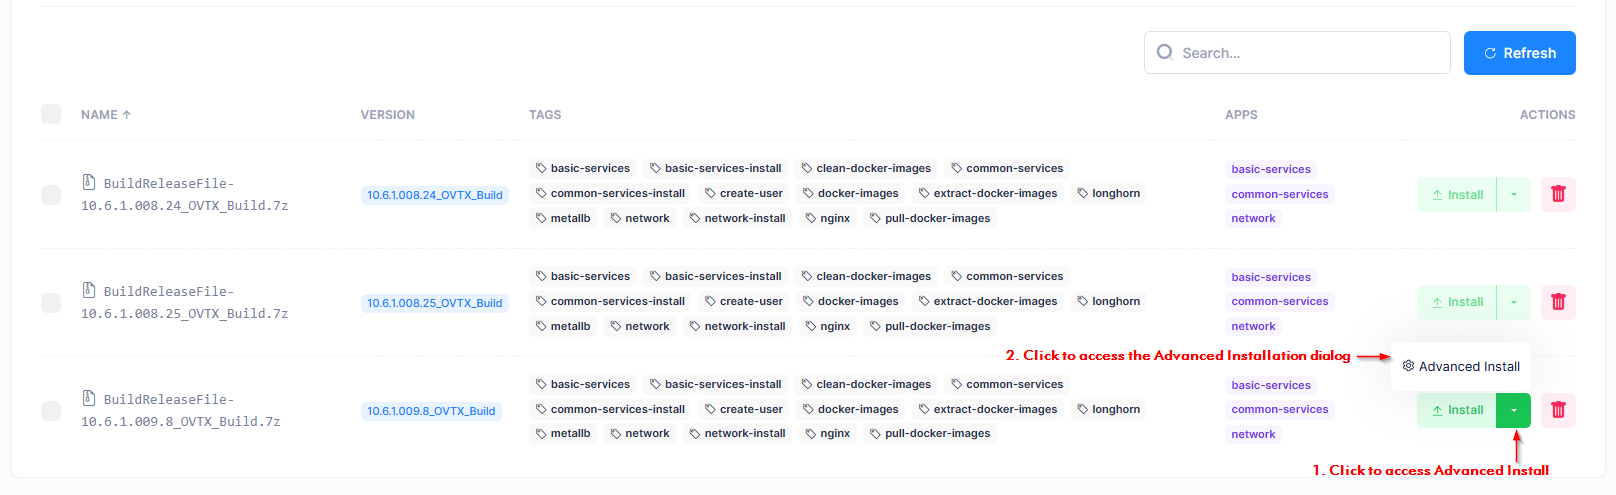
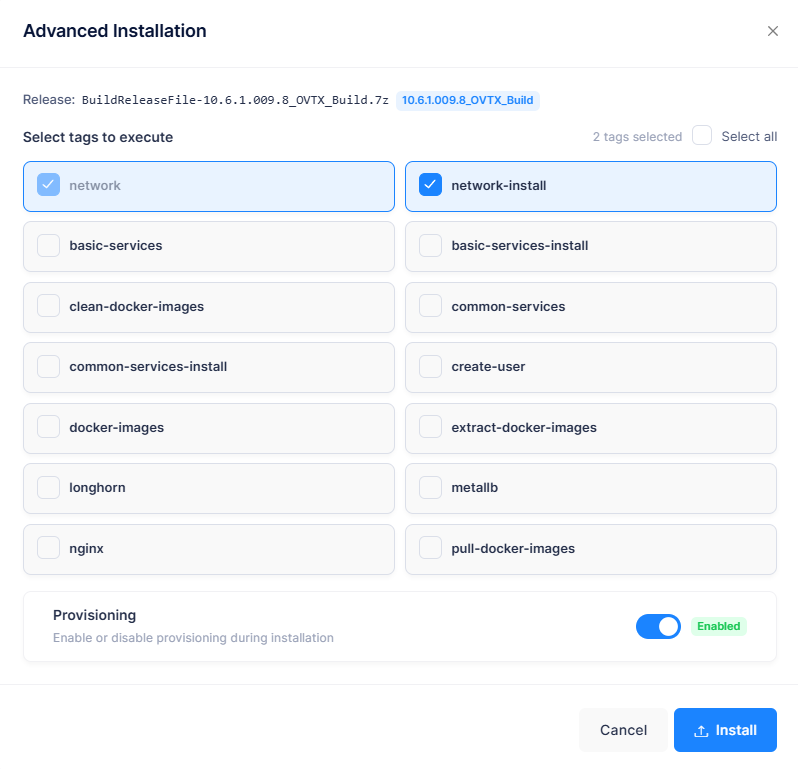
The Advanced Installation screen displays the following information:
-
Release - File name and version.
-
Tags Selected - Tags determine which components are deployed during installation. Available tags depend on the release file contents and may include:
-
network - Core network management components (mandatory).
-
network-install - Network service installation tasks.
-
metallb - Load balancer configuration
-
common-services - Infrastructure services (databases, messaging, etc.).
-
-
Click the checkbox for each tag you want to include. Note that checkboxes for mandatory tags are disabled, as these components are automatically included. To quickly select all available tags, click Select All.
-
Provisioning Toggle - Controls whether device provisioning runs during installation. Note that the Provisioning Toggle is only available if the “network-install” tag is selected; if this tag is not selected, the toggle is automatically disabled.
-
Enabled - Provisioning tasks execute as part of the installation.
-
Disabled - Provisioning tasks are skipped.
-
Quick Redeployment Mode
When accessing Advanced Install after a failed installation or when reapplying a configuration, the dialog opens in Quick Redeployment mode. In this mode:
-
Additional tags become mandatory (including
metallb). -
Provisioning defaults to disabled.
-
The dialog title indicates "Quick Redeployment".
Monitoring Installation Progress
When an installation is running, the Upgrade Tasks tab displays the following real-time progress information:
-
Ongoing Install Panel - Located at the top of the Upgrade Tasks screen, the following information is displayed:
-
Version - The version being installed.
-
Status - Current status (In Progress).
-
Tags - Components being installed.
-
Step - Current installation step.
-
Started - When the installation began.
-
Duration - The elapsed time since the installation started.
-
-
Live Logging Controls - Click View Logging to expand a real-time console displaying installation output. The console streams log messages as they occur, auto-scrolling to show the latest output. You can close the console by clicking Hide Logging.
-
Status Indicators - Installation status is shown using colored badges:
|
Status |
Color |
Meaning |
|---|---|---|
|
In Progress |
Yellow |
Installation is actively running |
|
Pending |
Gray |
Queued, waiting for current installation to complete |
|
Success |
Green |
Installation completed successfully |
|
Failed |
Red |
Installation encountered an error |
|
Cancelled |
Yellow |
Installation was stopped by user |
|
Aborted |
Red |
Queued installation was aborted |
Installation History
The Install History section on the Upgrade Tasks screen shows all past installation attempts. The table displays the following information:
|
Version |
Software version |
|
Status |
Final outcome (Success, Failed, Cancelled) |
|
Tags |
Components that were installed |
|
Step |
Final step reached |
|
Started |
Start timestamp |
|
Ended |
End timestamp |
|
Duration |
Total elapsed time |
|
Actions |
Download logs |
Searching and Sorting
-
Use the search bar to filter by version, status, or tags.
-
Click column headers to sort by that column.
-
Click Refresh to update the list.
Downloading Logs
To download installation logs for troubleshooting, find the installation entry in the Install History Table and click the download icon in the “Actions” column. You are prompted to specify where on your computer to download the log file.
Cancelling an Installation
To cancel a running installation, click Cancel Install on the Ongoing Install panel. When prompted, confirm the cancellation. When you cancel an installation:
-
All related processes (extraction, deployment scripts) are stopped.
-
Pending queued installations are cancelled.
-
The installation is recorded as "Cancelled" in the Install History.ℹ
Cancelling an installation may leave the system in an inconsistent state. Only cancel if necessary, and be prepared to re-run the installation or restore from backup.
Restoring From a Backup
If an upgrade fails or you need to revert to a previous state, you can restore from a backup. To view a list of available backups, select the Restore Backup tab on the Install screen.
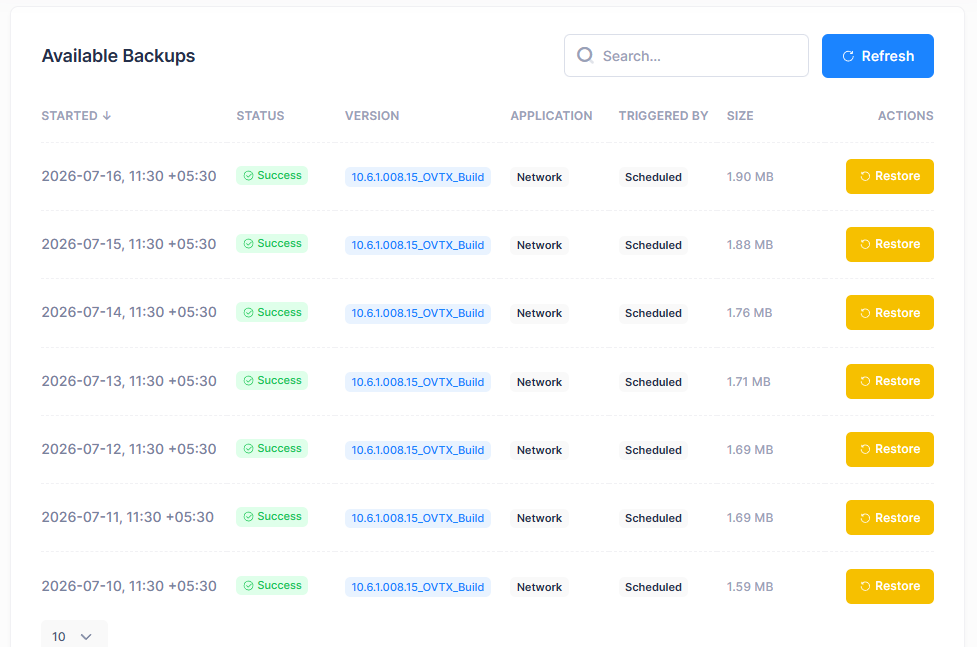
The Restore Backup screen provides the following information for each available backup:
-
Started - When the backup was created
-
Status - Backup status (Success, Partial)
-
Version - Software version at backup time
-
Application - Application type
-
Triggered By - What initiated the backup
-
Size - Total backup size
To restore an available backup, locate the backup that you want to restore and click Restore in the “Actions” column. A confirmation dialog shows the version, date, and time of the backup to be restored. Click Start Restore to confirm.
During the restore process, the following information is displayed:
-
Overall restore progress percentage.
-
Component status for:
-
MongoDB — Document database
-
TimescaleDB — Time-series database
-
Kafka — Message streaming
-
The status is shown for each component: Pending, Running, Success, Failed, or Skipped.
When the restore backup completes, the following is indicated:
-
Success - All components restored successfully.
-
Partial - Some components restored; check for warnings.
-
Failed - Restore encountered critical errors.
After a successful restore, verify your system configuration and services are operating correctly.