
The Admin Center Services screen is used to configure Network Services for your OmniVista Terra installation. To access the Services screen, click on Services under the “Configure” section of the OmniVista Admin Center menu.
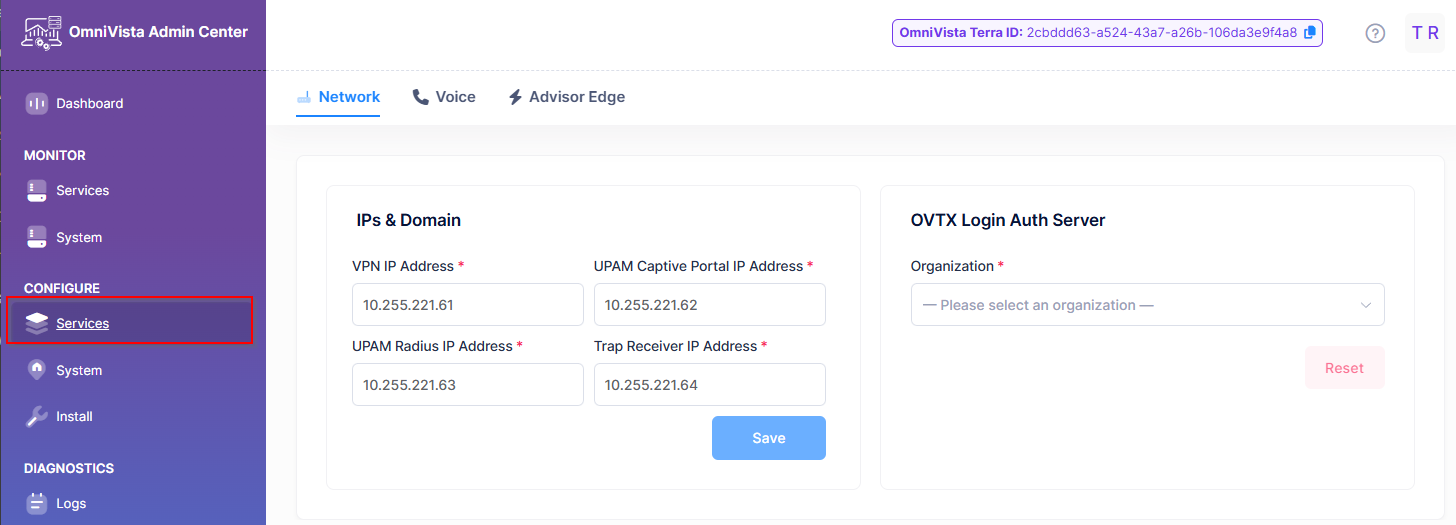
The following three tabs are available on this screen:
-
Network - Configures the IP information and Login Authentication Server for your OmniVista Terra network.
-
Voice - Not available in the current release.
-
Advisor Edge - An OmniVista Network Advisor appliance installed in Edge mode so OmniVista Cirrus or OmniVista Terra can manage it and declare it as an Advisor Edge instance in the OmniVista organization.
Network Service
The Network tab on the Services screen provides the following information:
-
IPs & Domain - The following IP address information displayed is taken from your current network configuration. You do not have to change this information, unless you want to install OmniVista Terra on a different network.
-
VPN IP Address - Dedicated IP for the VPN service.
-
UPAM Captive Portal IP Address - Dedicated IP for the UPAM Captive Portal service.
-
UPAM Radius IP Address - Dedicated IP for the UPAM Radius service.
-
Trap Receiver IP Address - Dedicated IP for the Trap Receiver service.
-
-
OVTX Login Auth Server - Reset the selected organization's authentication source to Local Database. The dropdown lists organizations configured with an external authentication server. Select an organization and click on Reset.
Advisor Edge Service
Advisor Edge brings OmniVista Network Advisor (OVNA) to your OmniVista Terra appliance—a network analytics and advisory solution that runs on-premise alongside OmniVista Terra, providing monitoring, alerting, and reporting capabilities for your network. Advisor Edge is always delivered,
-
as a release file: a
.7zarchive containing the software needed to run the service. -
together with the Basic Services app inside the same release file. Wherever installing an Advisor Edge release is mentioned, the Basic Services is installed alongside it as part of the same package—this is expected and not a separate step.
When installing the current release of the Advisor Edge service (aka OVNA Edge), note the following:
-
OVNA Edge is supported only on 1 VM.
-
If OVNA Edge is installed on 1 VM, installing Network Services on that same VM is not supported.
Deploying Advisor Edge for Your OmniVista Terra Appliance
Deploying a new OmniVista Terra appliance dedicated to Advisor Edge involves selecting Advisor Edge (and, implicitly, Basic Services) as the only service—Network and Voice are left disabled. Advisor Edge is configured and installed as part of the appliance's first-boot Setup Wizard.
Prerequisites
-
A new OmniVista Terra appliance (OVA/VM) that is deployed but not yet configured—that is, the virtual machine is powered on and you are about to go through its first-boot Setup Wizard. Deploying the OVA/VM itself (importing it into your hypervisor, sizing, etc.) is a separate step not covered in this section.
-
The Advisor Edge release file (a
.7zarchive), provided by your ALE contact, is ready to be uploaded during the wizard.
Step 1: Start the Setup Wizard
When you first access a freshly deployed OmniVista Terra appliance, the Setup Wizard walks you through the following steps, shown in a progress bar at the top of the screen:
-
System Network - "Configure the network settings for your system"
-
Services Configurations - "Network, Voice, Edge Services"
-
Nodes - "Nodes configuration"
-
General Settings - "SMTP, DNS, DHCP, Domain…"
-
Advanced Settings - "Additional configurations for your installation"
-
Deployment - "Get your instance up and running"
All six steps are always shown, regardless of which service you plan to deploy—the wizard does not skip steps for an Advisor Edge-only deployment. Use the Previous and Next buttons to move between steps (on the final step, Next is replaced by Install).
Step 2: Select Advisor Edge in Services Configurations
On the Services Configurations step, you'll find a tab for each service: Network, Voice (not supported), and Advisor Edge. Click on Advisor Edge to open the Advisor Edge tab.
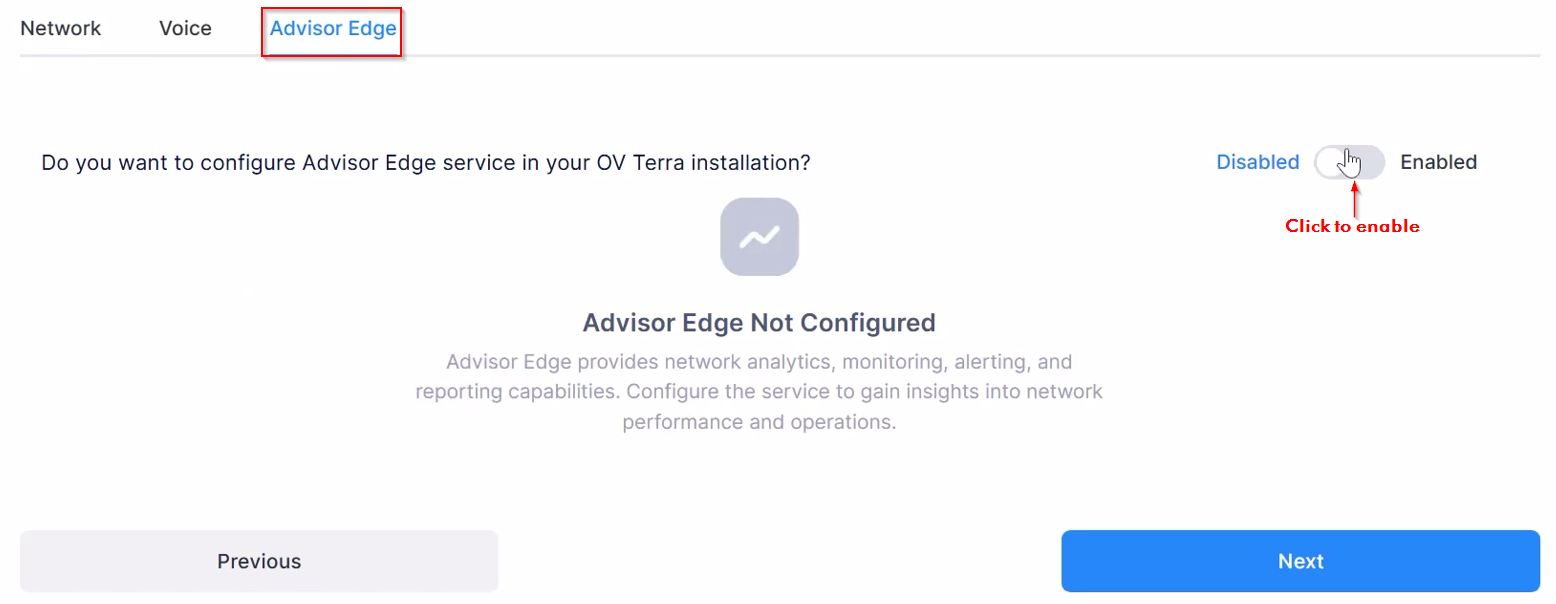
Click the toggle for "Do you want to configure Advisor Edge service in your OV Terra installation?".
You can enable Advisor Edge on its own, without enabling Network or Voice—the wizard only requires that at least one service be enabled to proceed; it does not require Network. If you leave Advisor Edge disabled, the tab shows a placeholder titled "Advisor Edge Not Configured".
Step 3: Configure Advisor Edge Settings and Upload the Advisor Edge Release File
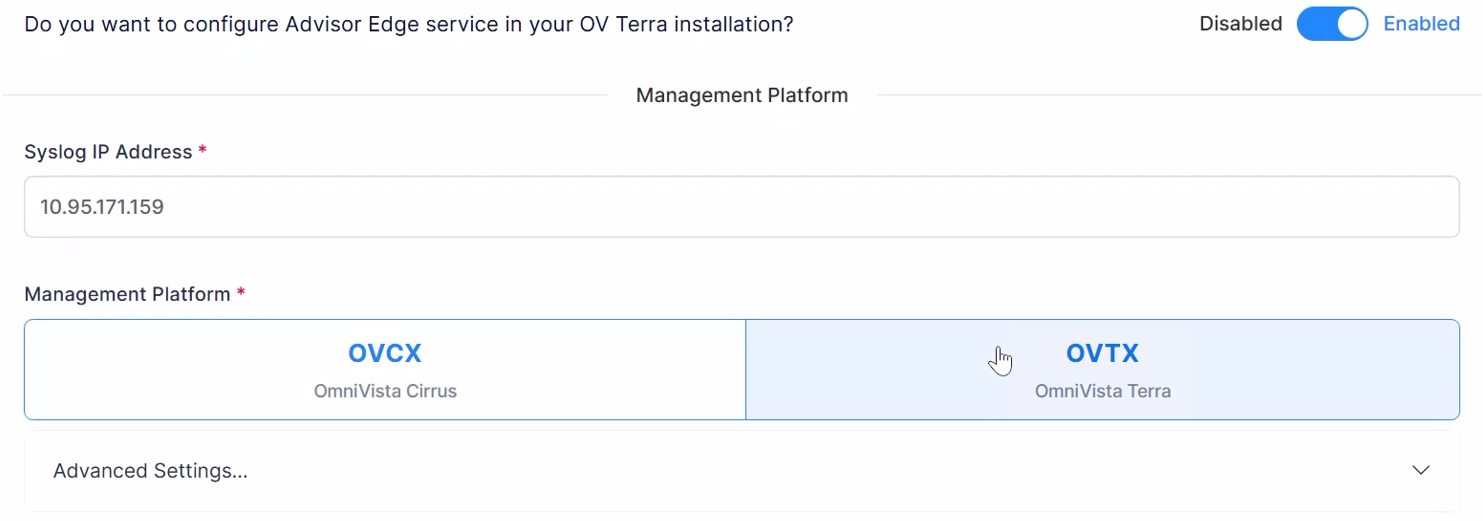
Once the Advisor Edge toggle is on, the tab shows a “Management Platform” section, then a “Release file import” section—the same underlying settings form used by the standalone Configure > Services > Advisor Edge screen.
-
Syslog IP Address (required) - The IP address that is used by the Advisor Edge syslog service, and to reach the Advisor Edge application itself.
-
Management Platform - Choose between two cards, OVCX (OmniVista Cirrus) and OVTX (OmniVista Terra). Selecting one automatically fills in the matching activation URL.
-
Advanced Settings - A section you can expand to review or edit the Activation Server URL.
Under “Release file import”, an information banner explains: You must import a release file to deploy the Advisor Edge service. This file contains the necessary software and configurations for the service to run properly.
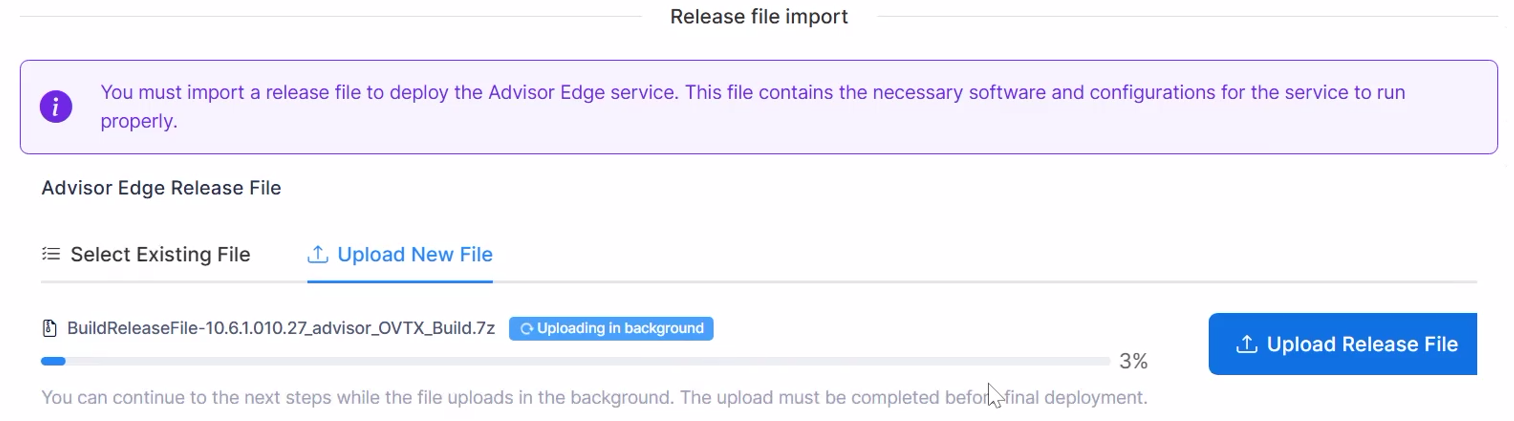
Use the “Advisor Edge Release File” upload area to upload your .7z file (only .7z files are accepted). The upload runs in the background, so you can continue the wizard while it progresses. The upload must finish before the final deployment step: the wizard will block progress past Services Configurations with a "Release Upload Required" message if the file hasn't finished uploading.
Step 4: Complete the Remaining Wizard Steps
Continue through Nodes, General Settings, and Advanced Settings. These steps are the same regardless of which service you're deploying and are not specific to Advisor Edge—for a single appliance, Advisor Edge-only deployment, the Nodes step typically only involves the current node.
Step 5: Review and Deploy
On the final deployment step, review your settings. If at least one service is enabled, a Release Files Status card shows the upload status of each service's release file (for Advisor Edge only, just the one row).
-
Click Install (the button on this last step reads “Install” instead of “Next”). If any selected service release file hasn’t finished uploading, you are blocked by a “Release Upload Required” message.
-
A confirmation dialog appears—"Confirm Deployment": "Are you sure you want to deploy the cluster with these settings?"—click Yes to proceed (or No to cancel).
Step 6: Track the Deployment Progress
After confirming the deployment, the wizard switches to a Deployment Progress view showing four stages:
-
Configure Ansible
-
Save Settings
-
Configure Cluster
-
Install Release
Alongside the stages, a live log console streams progress messages as the deployment proceeds. For example, messages such as "Starting configuration of the cluster", "Extracting OV release file...", and "Release installation has successfully started!" appear as each stage completes, along with a note that "The Ansible playbook will be executed as a background task from this point on."
The “Install Release” stage installs your Advisor Edge release file. It uses the same installation mechanism (uploading and installing a .7z release file), but the wizard runs it automatically instead of using the Configure > Install > Release Files screen. During initial setup, the wizard shows progress instead of the Upgrades Tasks tab because the full Admin Center interface isn’t available until setup completes.
-
If deployment completes successfully, the console logs "Completed" and a “Go to Dashboard” button becomes available, redirecting you to the OmniVista Terra dashboard.
-
If a stage fails, the console logs "Aborted" along with instructions to type retry into the console to try again.
Applying Changes
Once the wizard finishes successfully, your appliance is up and running with Advisor Edge deployed. This is reflected by:
-
The “Go to Dashboard” button is available and takes you into the running appliance.
-
The Advisor Edge tab under Configure > Services shows its read-only status view, confirming the service is deployed (deployment type, activation server, application UUID, serial number, and application version are all populated).
Make note of the application UUID and serial number of your deployed Advisor Edge service. This information is used to declare this service as an OVNA instance for OmniVista Cirrus or OmniVista Terra to manage. See Declaring an Advisor Edge Instance for more information.