The Guest Access Strategy screen displays information about configured Guest Access Strategies and is used to configure access attributes for guest users. The screen can be used to create, edit, and delete Guest Access Strategies.
To access the Guest Access Strategy screen, click on Network Access > UPAM-NAC > Guest Portal > Guest Access Strategy under the “Configure” section of the OmniVista Cirrus Menu.
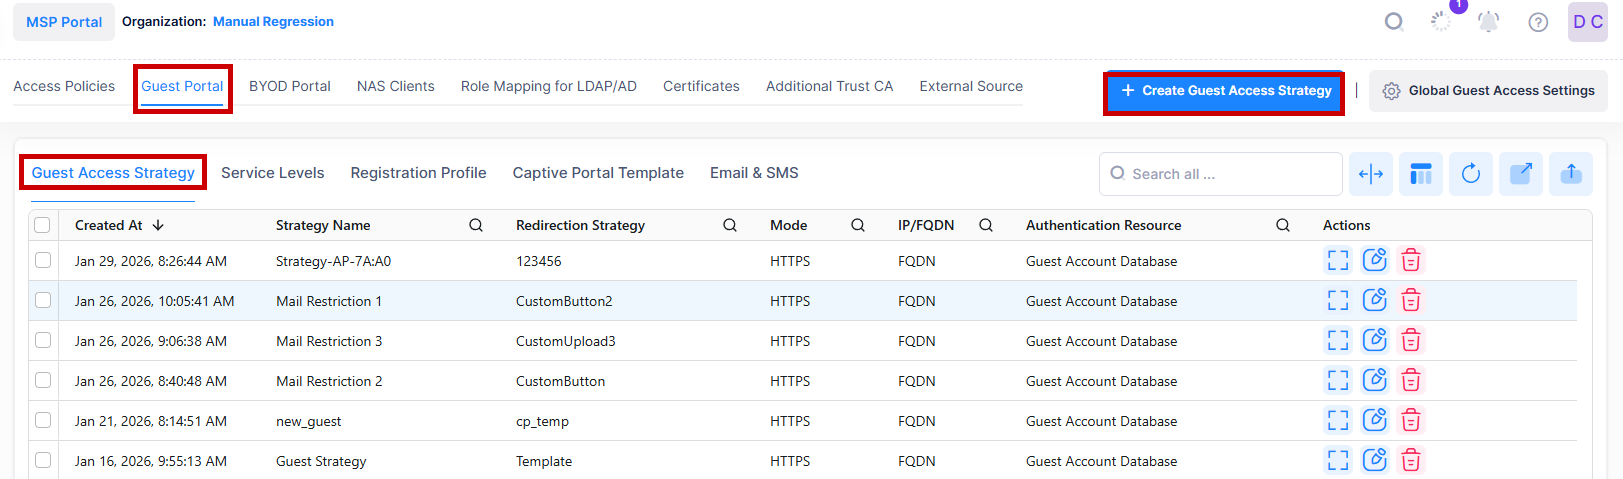
Creating a Guest Access Strategy
To add a Guest Access Strategy, click on Create Guest Access Strategy to open the Create Guest Access Strategy form. Complete the following sections of the form, then click Create Guest Access Strategy when you are finished.
-
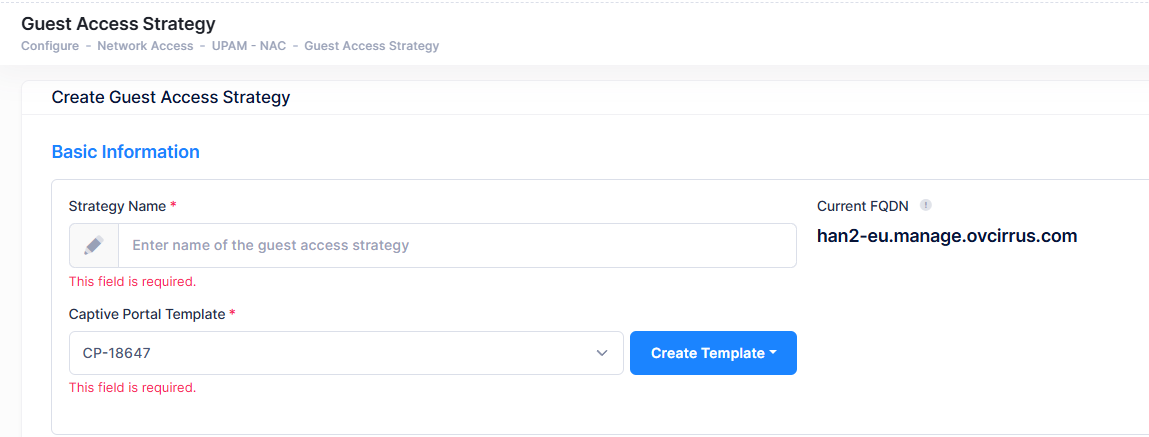
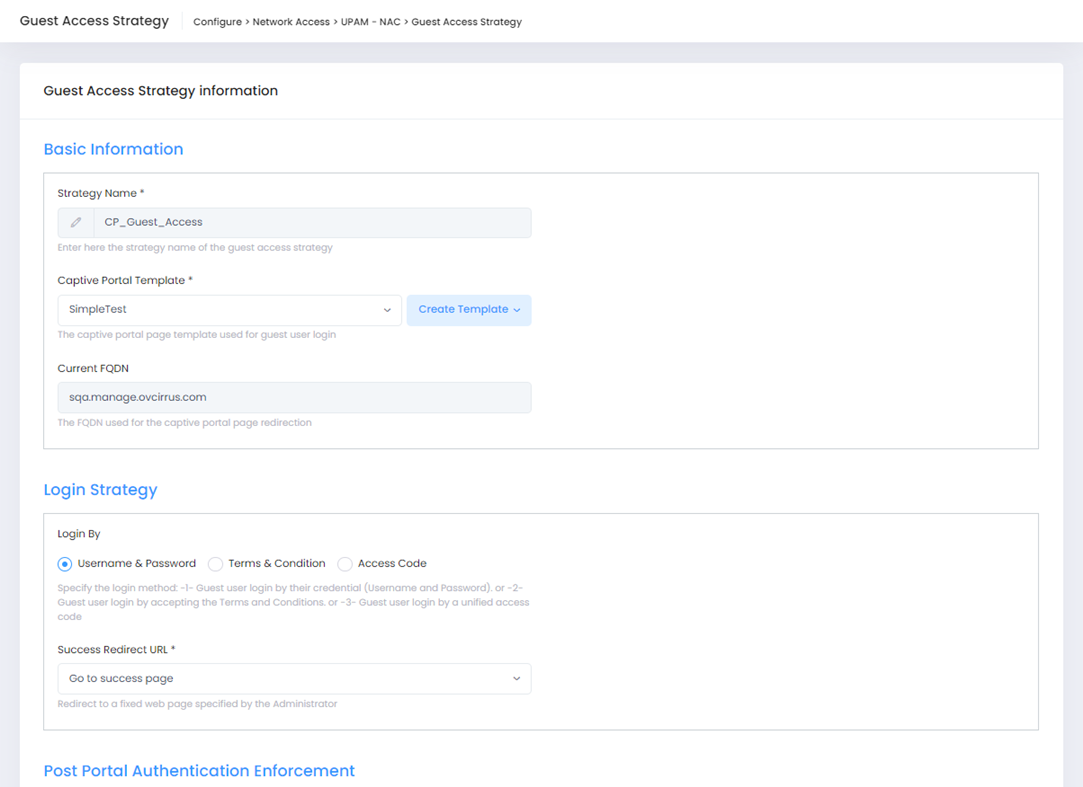
Basic Information - Configure the Guest Access Strategy name and authentication attributes (Captive Portal Template, current FQDN).
-
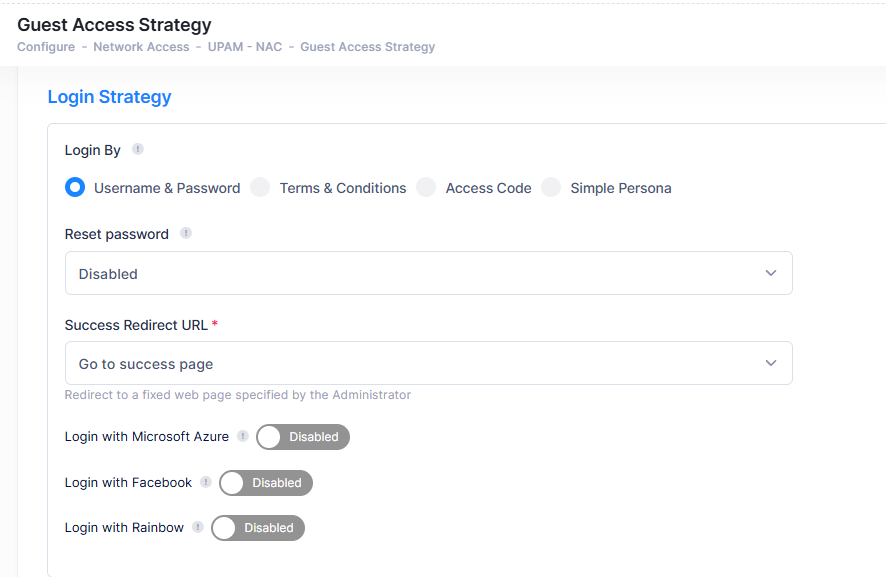
Login Strategy - Configure the guest user login strategy (for example, login by Username/Password, Terms & Conditions, Access Code, or Email address) and specify the success redirect URL.
-
Post Portal Authentication Enforcement - Configure post-authentication enforcement for guest users.
-
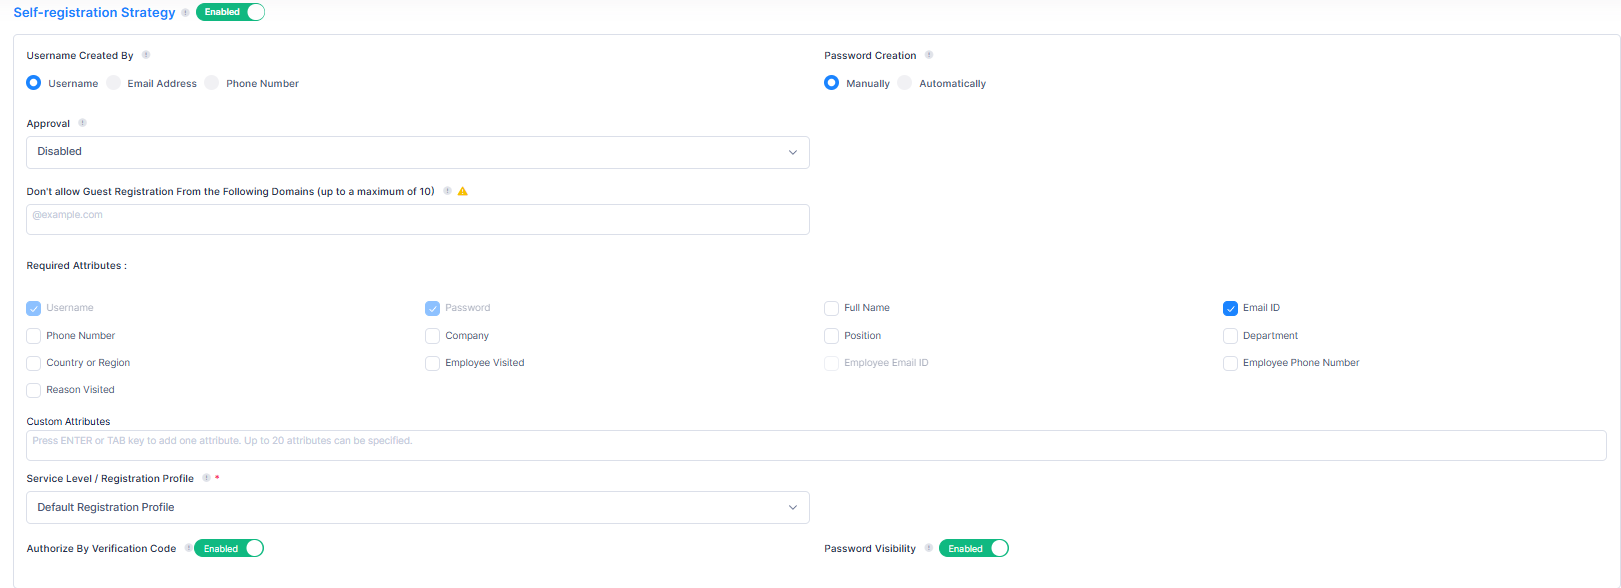
Self-Registration Strategy - Configure the self-registration attributes for guest user login when the guest user is required to perform self-registration and approval before accessing the network. In this case, the guest user account is automatically created and sent to the guest user through e-mail by UPAM. The self-registration strategy is only applicable when the login strategy is set to login by Username and Password.
Basic Information
-
Strategy Name - Enter the name to assign to the Guest Access Strategy.
-
Captive Portal Template - Select an existing Captive Portal page template to use for guest user login from the drop-down menu or click on Create Template to create a new template to use (see the Captive Portal Templates online help).
-
Current FQDN - The Fully Qualified Domain Name to use for the Captive Portal page redirection.
Login Strategy
-
Login By - Specify the login method:
-
Username & Password - Guest user login by their credential (Username and Password). When this login method is selected, you can then enable and configure the following social media login options:
-
Login with Microsoft Azure - Use Microsoft Azure account for guest user login.
-
Login with Facebook - Use Facebook account for guest user login.
-
Login with Rainbow - Use Rainbow account for guest user login.
-
-
Terms & Condition - Guest user login by accepting the Terms and Conditions.
-
Access Code - Guest user login by a unified access code.
-
Simple Persona - Guest user login by email address. When this login method is selected, you can then set Custom Attributes and Registration Profile information for Simple Persona Captive Portal login.
-
-
Reset Password - This option allows a guest user to change their login password without Administrator operation. When one of the following options is selected from the drop-down menu, the guest user will be able to click on the “Forget Password?” link on their account login screen to request a Verification Code to change their password:
-
By E-mail - The guest user receives the code through e-mail.
-
By E-mail/SMS - The guest user receives the code through e-mail and SMS.
-
By SMS - The guest user receives the code through SMS.
-
-
Success Redirect URL - Specify the redirect URL for the browser after the guest user passes captive portal authentication:
-
Go to fixed URL - Redirect to a fixed web page. When you select this option, a “Fixed URL” field is displayed in which you enter the URL to use.
-
Go to initial URL - Redirect to the guest-user-input URL after passing authentication.
-
Go to success page - No redirect URL. Remain on the “Success” login page configured by the Administrator.
-
-
Custom Attributes - Allow the Administrator to customize the attributes for guest user login to collect the guest user information. The Administrator can configure up to 20 attributes (max length 32 characters each). The configured attributes will be displayed on the Captive Portal page where the guest user can input 1 - 255 character(s) for each attribute. Note that this option is only visible for configuration when the selected login method is Terms & Conditions or Simple Persona. You can view the attribute values the user specifies during login on the Captive Portal Records screen after authentication.
Post Portal Authentication Enforcement

-
Fixed Access Role Profile - The Access Role Profile assigned to the guest user after passing authentication. Select a profile from the drop-down menu or click on Create Access Role Profile to add a new profile to use (see the Access Role Profile online help).
-
Fixed Unified Policy List - The Policy List assigned to the guest user after passing authentication. Select a list from the drop-down menu or click on Create Unified Policy List to add a new list to use (see the Unified Policies List online help).
-
Registration Profile - The Registration Profile assigned to the guest user after passing authentication. Select a list from the drop-down menu or click on Create Registration Profile to add a new list to use (see the Registration Profile online help).
-
Other Attributes - Select an attribute from the drop-down and enter a value. To add additional attributes, click on Add Attribute.
-
Session-Timeout - The Session Timeout Interval is the maximum number of consecutive seconds of connection allowed to the user before termination of the session or prompt. If not configured, the device’s default session timeout policy will take effect. (Range = 12000 - 86400, Default = 43200)
-
Acct-Interim-Interval - The Accounting Interim Interval for RADIUS accounting, in seconds. If not configured, the device’s default accounting policy will take effect. (Range = 60 - 1200, Default = 600)
-
WISPr-Bandwidth-Max-Up - The user upstream bandwidth, in kbit/s. By default, it is not limited.
-
WISPr-Bandwidth-Max-Down - The user downstream bandwidth, in kbit/s. By default, it is not limited.
-
Self-Registration Strategy
The self-registration strategy is only available if the login method is set to Username & Password.
-
Self-Registration Strategy - Enable or disable the self-registration feature. When enabled:
-
Username Created By - The field from which the guest user account is retrieved, the information is entered by the guest user in the self-registration login page:
-
Username - Login account for the guest user.
-
Email Address – Email address of the guest user.
-
Phone Number - Phone number of the guest user.
-
-
Password Creation - The method for creating a password:
-
Manually - Password for guest user account is set by guest user in the self-registration web page.
-
Automatically - Password for guest user account is automatically generated by UPAM and sent to guest user through E-mail.
-
-
Approval - Specify whether the guest registration request is required to be approved by a sponsor in the company or a guest operator. The employee sponsor could be an Administrator or employee the guest is going to visit.
-
Disabled - Approval by an employee or guest operator in not required.
-
Approved by Employee Sponsor - Approval by the employee specified in the Self-Registration Request Screen is required. When this option is selected, the following field appears:
-
Email Restriction - Select Suffix or Full Email.
-
Suffix - Enter the employee sponsor e-mail suffix(es). This is the e-mail suffix used by the company employee, which will be combined with a specific employee e- mail ID to form a full e-mail address. The registration request will be sent to this e-mail address.
-
Full Email - Enter the full employee e-mail address.
-
-
-
Approved by Guest Operator - Approval by a guest operator specified on the Guest Operator screen is required. When this option is selected the following field appears:
-
Location-Based Notification - Enables/Disables location-based notification. When enabled, send the guest request to guest operators for the specific location. When disabled, send the guest request to all operators.
-
-
-
Don’t allow Guest Registration From the Following Domains - Enter the email domains blocked from guest self-registration. You can add up to 10 email suffixes. Note that this field appears only when Email ID is selected in the “Required Attributes” section.
-
-
Required Attributes - Customize the information fields that the guest user is required to input during self-registration. Certain fields are required and pre-configured for employee sponsor or guest operator approval.
-
Username - Login user name for the guest user.
-
Password - Login password for the guest user. If the password creation method is set to “Automatically”, the guest user does not have to enter this field.
-
Full Name - Full name of the guest user.
-
Email ID- Email address of the guest user.
-
Phone Number - Phone number of the guest user.
-
Company - Name of the company the guest user is representing.
-
Position - Position of the guest user in their company.
-
Department – Department of the guest user in their company.
-
Country or Region - Country or region of the guest user’s company.
-
Employee Visited - The employee being visited by the guest user.
-
Employee Email ID - Email address of the employee being visited.
-
Employee Phone Number - Phone number of the employee being visited.
-
Reason Visited - The purpose of the guest user’s visit.
-
-
Custom Attributes - Allow the Administrator to customize the attributes for guest self-registration to collect the guest user information. The Administrator can configure up to 20 attributes (max length 32 characters each). The configured attributes will be displayed in the self-registration page where the guest user can input 1 - 255 character(s) for each attribute.
-
Service Level/Registration Profile - Select a Service Level or Registration Profile from the drop-down menu. A “Default Registration Profile” is selected by default. To display, create, edit, or delete a Service Level or Registration Profile, click Settings at the top-right of the Guest Access Strategy screen.
-
Authorize by Verification Code - If the e-mail or phone number is required, Enables/Disables whether to send a verification code to specified address to ensure the e-mail or phone number is correct.
-
Password Visibility - Enables/Disables whether to display account information such as name and password on the Registration Result Page.
WiFi4EU
WiFi4EU provides free access to public Wi-Fi in parks, schools, public buildings, and health centers throughout the Country.

-
WiFi4EU - Enables/Disables WiFi4EU. To use the WiFi4EU feature, the “Redirect Strategy“ must use the specified WiFi4EU template for the Captive Portal page. In addition, the validity period for Captive Portal authentication must be no more than 24 hours per the WiFi4EU requirement. This value can be changed in Registration Strategy from the Global Configuration screen.
-
Network Identifier - The Network Identifier received from the WiFi4EU portal as part of the Installation report.
-
Self Test Modus - The WiFi4EU portal self-test mode. (Default = Disabled).
Editing a Guest Access Strategy
Select a Guest Access Strategy in the Guest Access Strategy List and click on the Edit icon under the “Actions” column or click on the Actions button and select Edit from the drop-down menu. The Guest Access Strategy Information screen opens on which you can edit any of the strategy attributes, as described above. Note that you cannot change the Strategy Name.
After you have edited the Guest Access Strategy, click Save.
Deleting a Guest Access Strategy
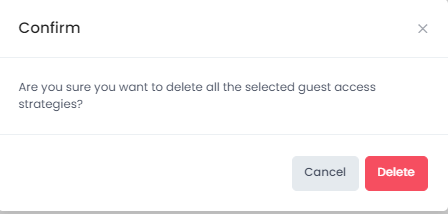
Select a Guest Access Strategy in the Guest Access Strategy List and click on the Delete icon under the “Actions” column or click on the Actions button and select Delete from the drop-down menu. When the following confirmation prompt appears, click on Delete to delete the profile.
Social Media Login Options
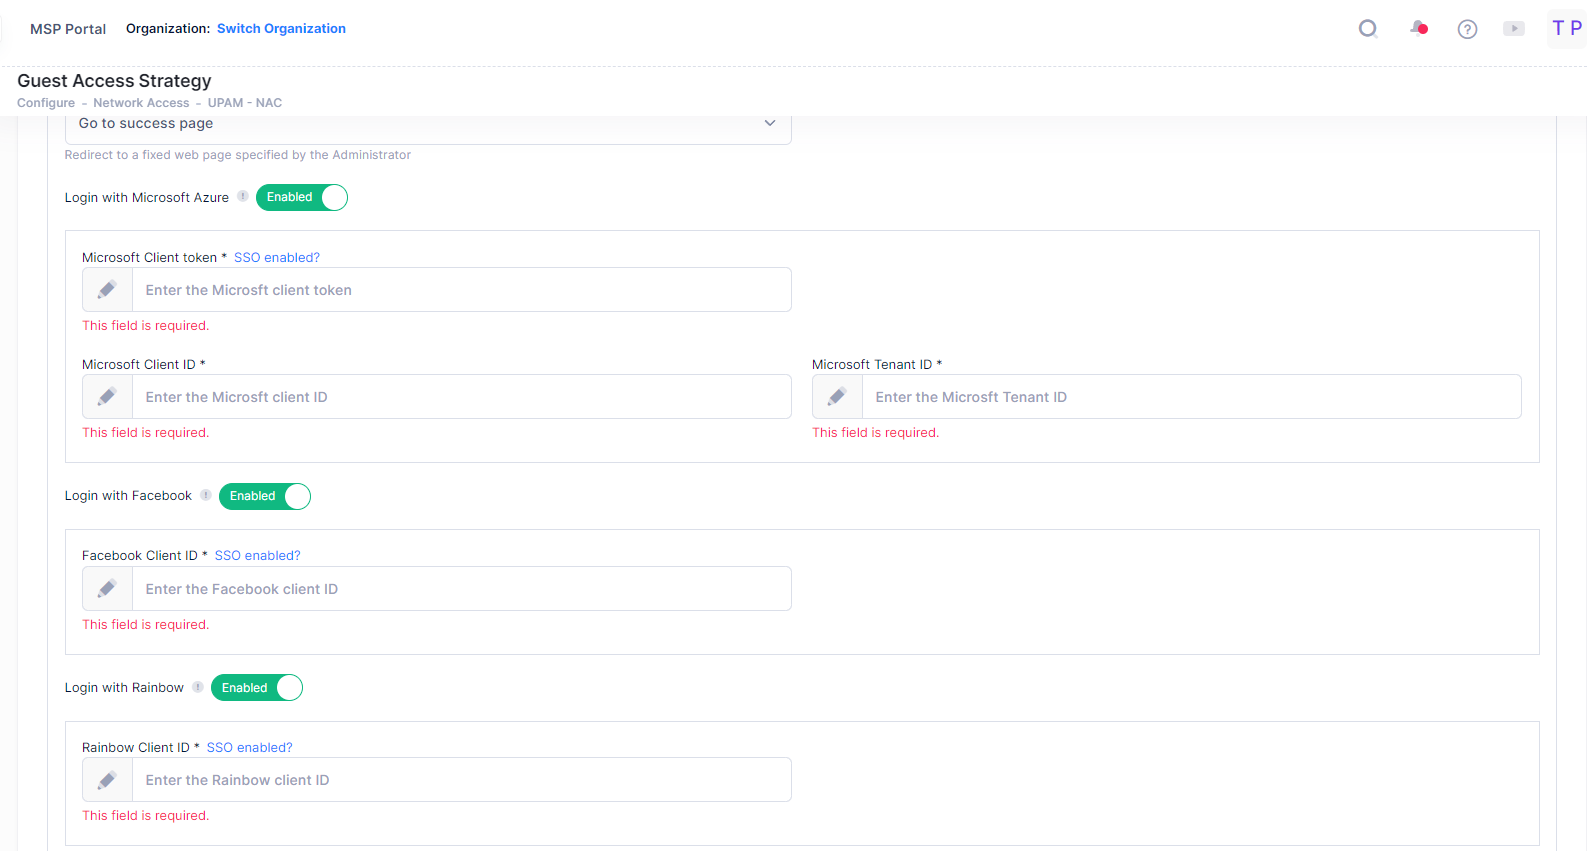
When you select the Username & Password login method, you can enable or disable (the default) using a Microsoft Azure, Facebook, and Rainbow accounts for guest user login. When you enable one or more of the social media login options, you are prompted to enter login information, as shown below.
Complete the fields below for social media login. Note that you must also configure the Wireless Client Social Login Vendor in an Access Role Profile for the applicable Social Media account (Microsoft Azure, Facebook, Rainbow).
-
Login with Microsoft Azure - Click to enable/disable this social media login option. When enabled, enter the following information for Microsoft OpenID Connect:
-
Microsoft Client Token - Enter the Microsoft Azure AD token.
-
Microsoft Client ID - Enter the Microsoft Azure AD client ID.
-
Microsoft Tenant ID - Enter the Microsoft Azure AD tenant ID.
-
-
Login with Facebook - Click to enable/disable this social media login option. When enabled, enter the following information for Facebook OICD login:
-
Facebook Client ID - Enter the OAuth Client ID provided by Facebook.
-
-
Login with Rainbow - Click to enable/disable this social media login option. When enabled, enter the following information for Rainbow login:
-
Rainbow Client ID - Enter the OAuth Client ID provided by Rainbow.
-
Note: If SSO integration is enabled, then add the SSO Provider Domain in the Allow List Domains of the Access Role Profile for the user.
Guest Access Strategy Settings
To display and configure global Guest Access settings, click Settings at the top-right corner of the Guest Access Strategy screen (as shown below).

When yo click on Settings, a drop-down menu displays the following options:
-
Global Guest Access Settings - Select this option to enable the Batch Creation feature on the Guest Accounts screen and configure the required Registration Strategy fields that are required when "Terms & Condition" is selected as the guest user login method.
-
Service Levels - Configure the different service levels for a guest account by binding various levels of Access Roles and Policies. You can configure a Service Level for different guests when creating an account on the Guest Accounts screen.
-
Registration Profile - Configure Data and Time Quota limits for user access, Device and Account Validity attributes, and Exhaustion Handling options (when Quota limits are reached). You can configure a Registration Profile for different guests when creating an account on the Guest Accounts screen.
The global Settings options are used to set global configurations for Guest Access Strategy and Guest Accounts. Note that any global configuration changes you make will only be applied to Guest Accounts created after the changes are made. The configurations of existing accounts will not change.