An Access Role Profile contains the various Unified Profile properties (such as QoS Policy List attached to the profile, Captive Portal Authentication) for users assigned to the profile. In a wireless-centric network, an Access Role Profile is considered as a user role with which every client in the wireless-centric network is associated.
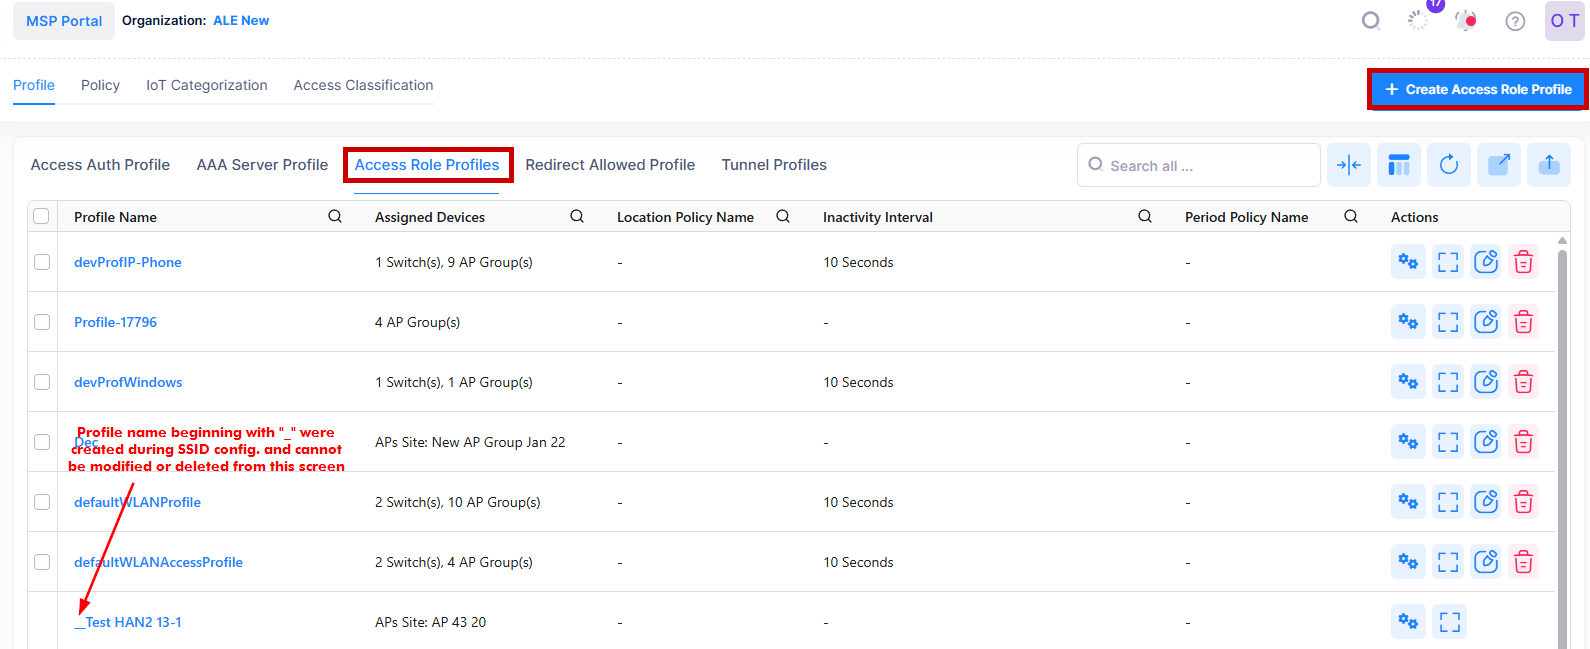
Use the Access Role Profiles screen to display information about all configured Access Role Profiles. This screen is also used to create, edit, and delete Access Role Profiles. To access the Access Role Profiles screen, click on Network Access > Unified Access > Access Role Profiles under the “Configure” section of the OmniVista Cirrus Menu.
Creating an Access Role Profile
The Create Access Role Profile screen is used to select profile settings, assign network devices, and configure the VLAN/tunnel mapping for the profile. To access this screen, click on Create Access Role Profile.
Consider the following when configuring Access Role Profile:
-
Each switch maps to the Access Role profile by only one VLAN ID.
-
The VLAN ID of the Switch must be an individual VLAN and in range of 1 to 4094.
-
The VLAN ID of the Access Point must be ‘Untagged VLAN’ or in the range of 2 to 4090. You can input an individual VLAN (5) or VLAN range (10-20).
-
You can select only AP Groups to apply the Access Role Profile.
-
You can select only Switch devices to apply the Access Role Profile.
-
You can select both AP Groups and Switch devices to apply Access Role Profile.
-
If you configure the Max Ingress Depth without specifying the Max Ingress Bandwidth (null), the Access Role profile will be updated but the configuration will not be applied to the switch. An alert will be sent to you.
-
If you configure the Max Egress Depth without specifying the Max Egress Bandwidth (null), the Access Role Profile will be updated but the configuration will not be applied to the switch. An alert will be sent to you.
-
Common rule for overriding child profiles:
-
When the child profile is an inline QoS profile, then the profile's latest configuration on the switch will be overridden.
-
When the child profile is an existing QoS profile, it is sent to the device for the first time. If the profile has been sent before, the system will check its configuration status on the device. If the status is "Success," there is no need to resend it. However, if the status indicates anything other than "Success," such as "Failed," the profile will be resent.
-
The Create Access Role Profile screen provides the following step-by-step process to create an Access Role Profile:
1. Access Role Profile Settings
-
Profile Name - Configures the Access Role Profile name.
-
Auth Flag - Enables/Disables authentication (not supported on Steller AP).
-
Mobile Tag Status - Enables/Disables classification of tagged packets received on mobile ports (not supported on Steller AP).
-
Redirect Status - Enables/Disables Captive Portal Redirect (not supported on wireless devices and ignored when applied to those devices).
-
QoS/ACL - Configures QoS policy rules that are used to filter device traffic assigned to the Access Role Profile.
-
Location Policy - Defines the location from which a device is allowed to access the network.
-
Period Policy - Defines the date and time during which a device is allowed to access the network.
-
Inactivity Interval - Defines the amount of time, in seconds, before an authenticated device is automatically logged out of the network due to inactivity (MAC address for the device has aged out).
-
Bandwidth Control - The ingress/egress bandwidth limit/depth applied to device traffic assigned to the Access Role Profile.
-
Walled Garden - Selects social media vendors through which a wireless client can authenticate.
-
Client Isolation - Defines the MAC Addresses of Allowed list of devices for an isolated Client.
-
Client Session Logging - Enables/Disables client session logging.
-
Captive Portal Attributes - Configures the type of Captive Portal authentication.
-
Others - Enables/disables the DHCP Option 82 feature.
2. Network Assignments
-
Select Sites and Groups - Select Access Point Groups or Switch devices from one or more Sites. The Access Role Profile is applied to the APs or Switch devices in the selected Sites/AP groups.
3. Profile Mappings
-
VLAN/Tunnel/Static Service Mapping - Map the Access Role Profile to a VLAN, Tunnel, or Static service. Traffic classified into the profile is forwarded on the selected VLAN, Tunnel, or Static service.
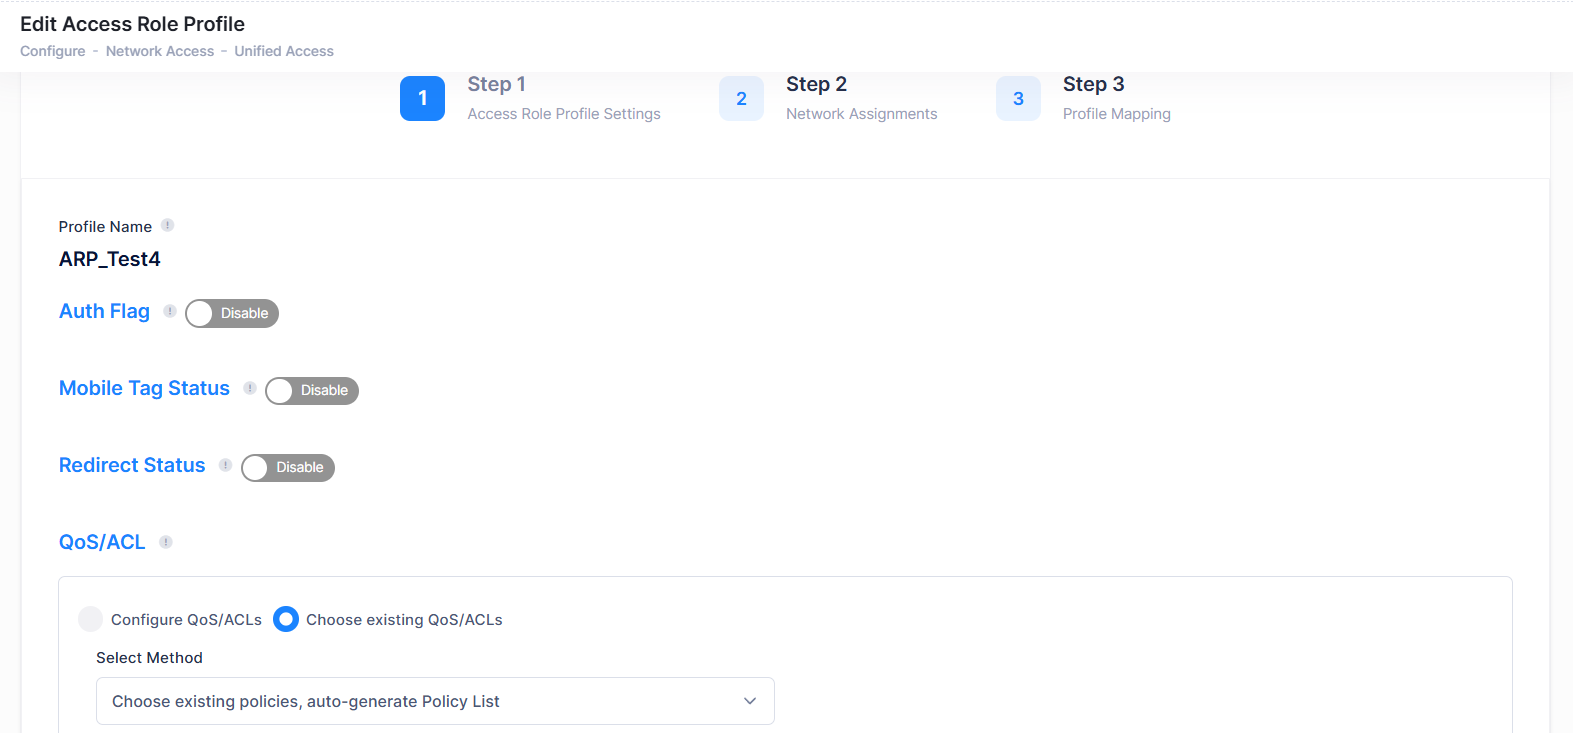
1. Access Role Profile Settings
Complete the fields for the sections on the Access Role Profile Settings tab as described below, then click Next to move to the next tab (Step 2).
Profile Name, Auth Flag, Mobile Tag Status, Redirect Status
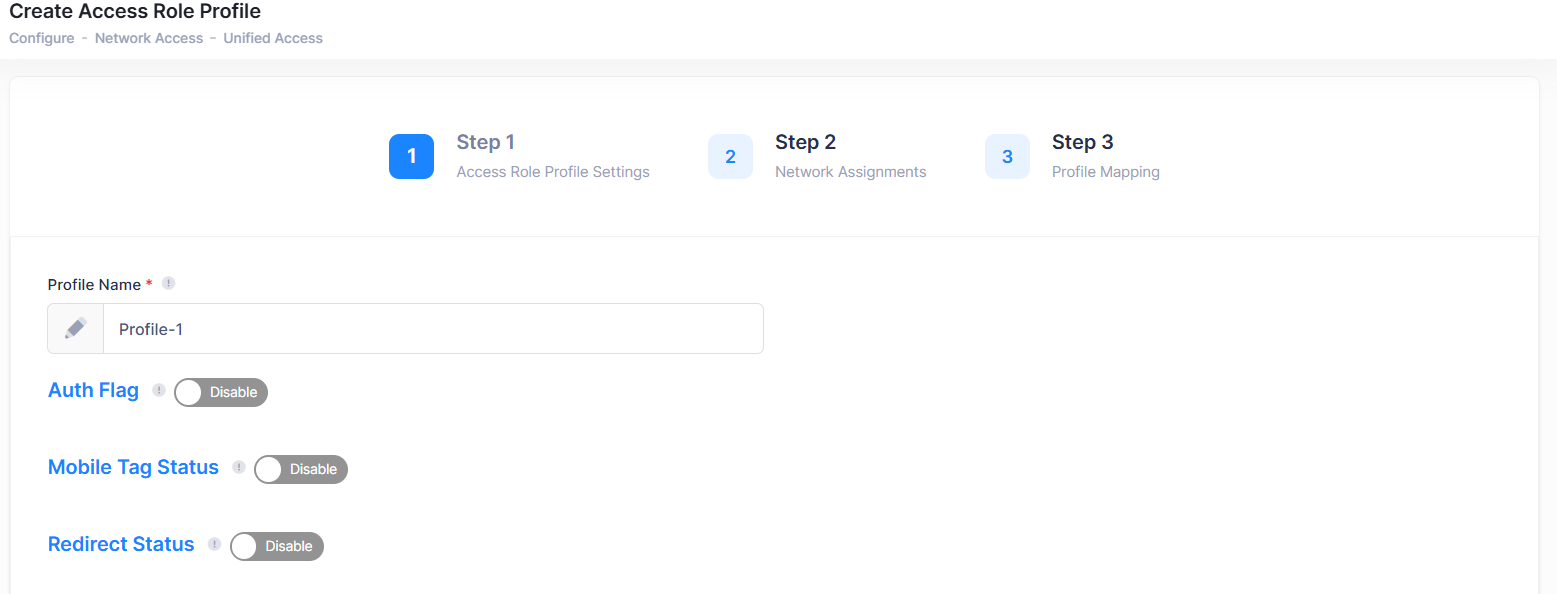
Complete the fields as described below to assign a name and QoS/ACLs to the profile:
-
Profile Name - A unique name to identify the Access Role Profile.
-
Auth Flag - Enables/Disables authentication (not supported on Steller AP).
-
Mobile Tag Status - Enables/Disables classification of tagged packets received on mobile ports (not supported on Steller AP).
-
Redirect Status - Enables/Disables Captive Portal Redirect (not supported on wireless devices and ignored when applied to those devices). Note that if Redirect Status is enabled, the Access Role Profile can only map to a VLAN when applying the profile to a device.
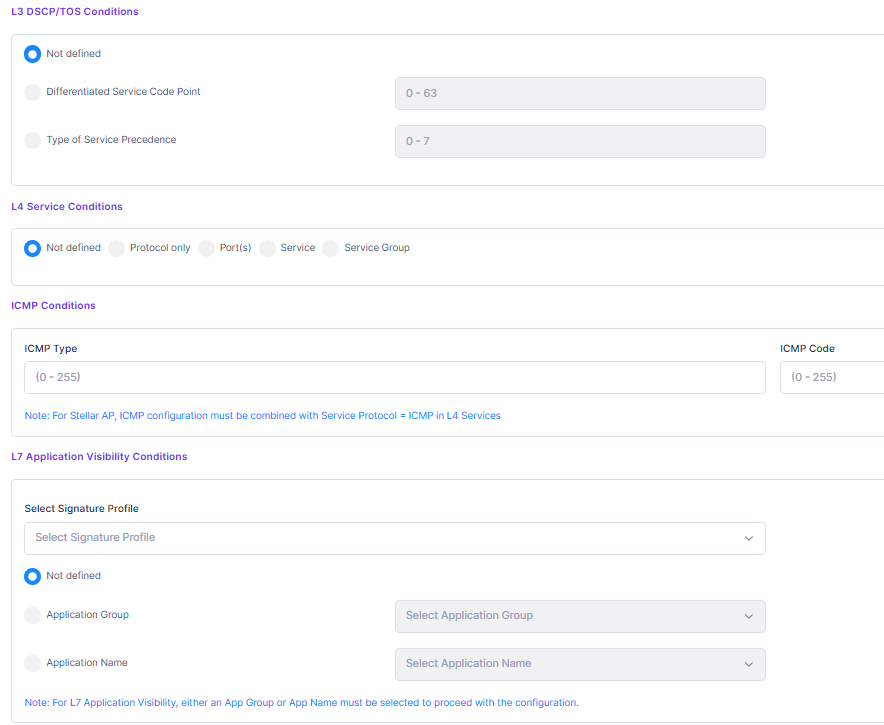
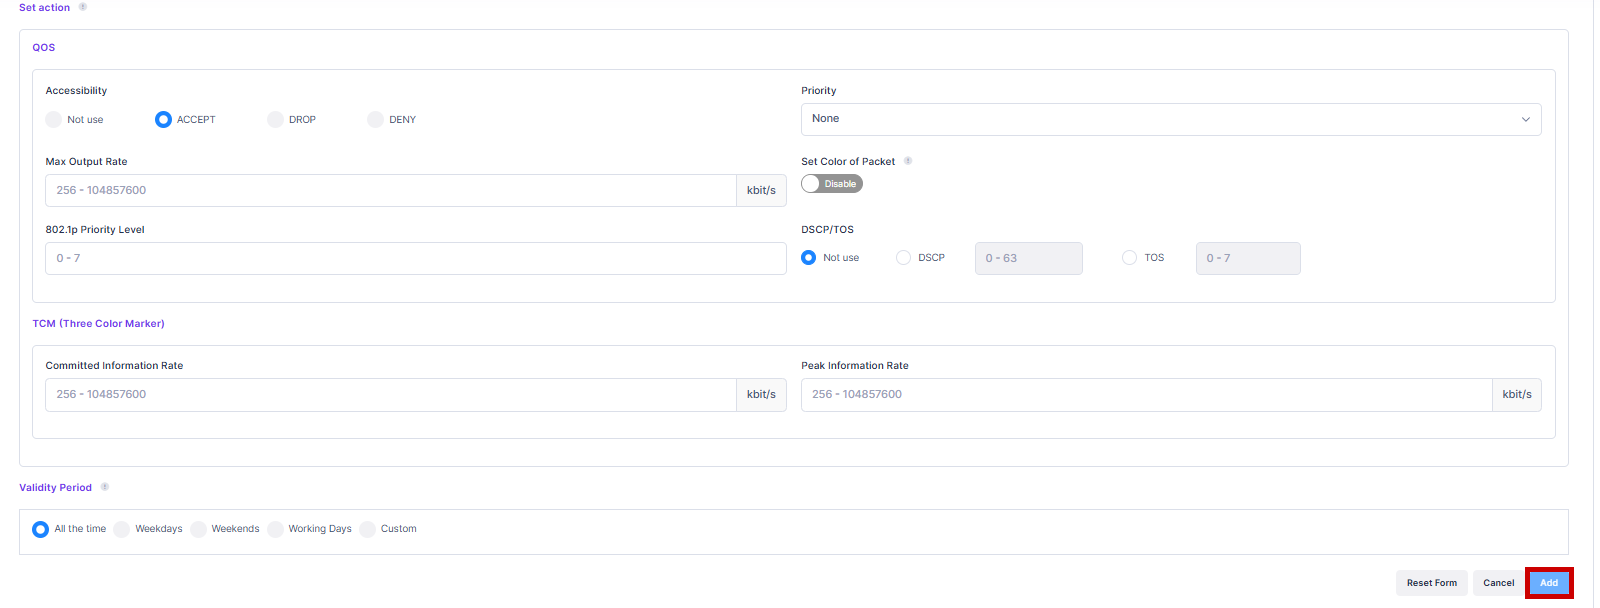
QoS/ACL
The QoS/ACLs are applied after you have joined the network. The QoS/ACLs have conditions to filter the traffic generated and actions taken on those generated traffics.
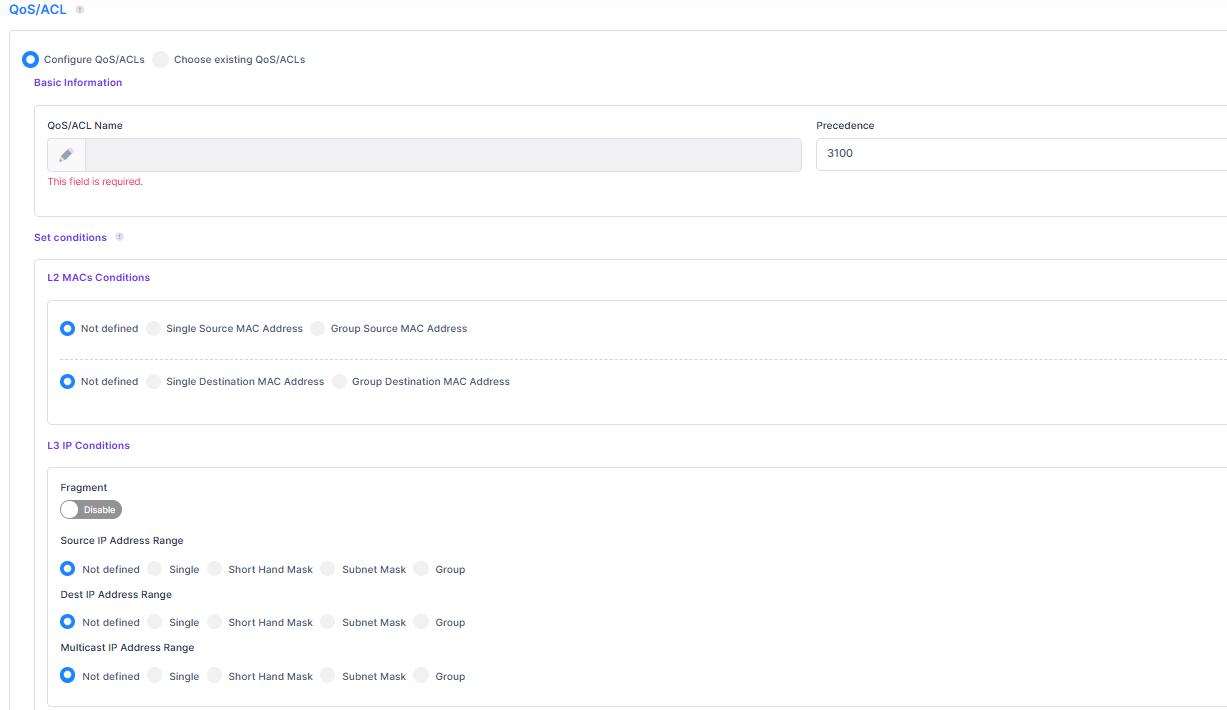
-
Configure QoS/ACLs - Select this option to define a QoS Policy for the Access Role Profile. You can then customize the policy settings to define conditions/actions for the QoS policy by clicking on Add more QoS/ACL tab. Define the basic information and then define at least one condition to assign a QoS policy list. For more information regarding defining the various conditions, visit Unified Policies Online help.
-
Choose existing QoS/ACLs - Select one of the following methods to assign a QoS policy list:
-
Choose existing policies, auto-generated policy list - Automatically generate a policy list by selecting existing policies for the list and/or click on Create Unified Policy to open the Create Unified Policy screen and create new QoS policies for the list. (Note: If the selected policies have already been successfully assigned to certain devices, their values will not be overridden on those devices. However, for the auto-generated policy list, the content will still be pushed to the assigned devices).
-
Choose existing policy list - Select an existing QoS policy list from the drop-down menu or click on Create Unified Policies List to open the Create Unified Policies List screen and create a new QoS policy list. You can also click on View details to view information about the selected list or click on Edit to open the Edit Unified Policies List screen to make changes to the selected list. (Note: If the selected policy list has been successfully assigned to certain devices, the values for those devices will not be overridden by that policy list).
-
Note: The ‘Redirect Status’ attribute value supports Switch devices only.
Note: To create a Quality of Service (QoS) policy for multiple applications, you can create a custom group within the Signature profile. By using the “Custom Application Group" feature, you can define a single policy that includes all applications in that group. This method is advantageous because any modifications to the applications within the custom group will not necessitate editing the policies or pushing updated policies to managed devices.
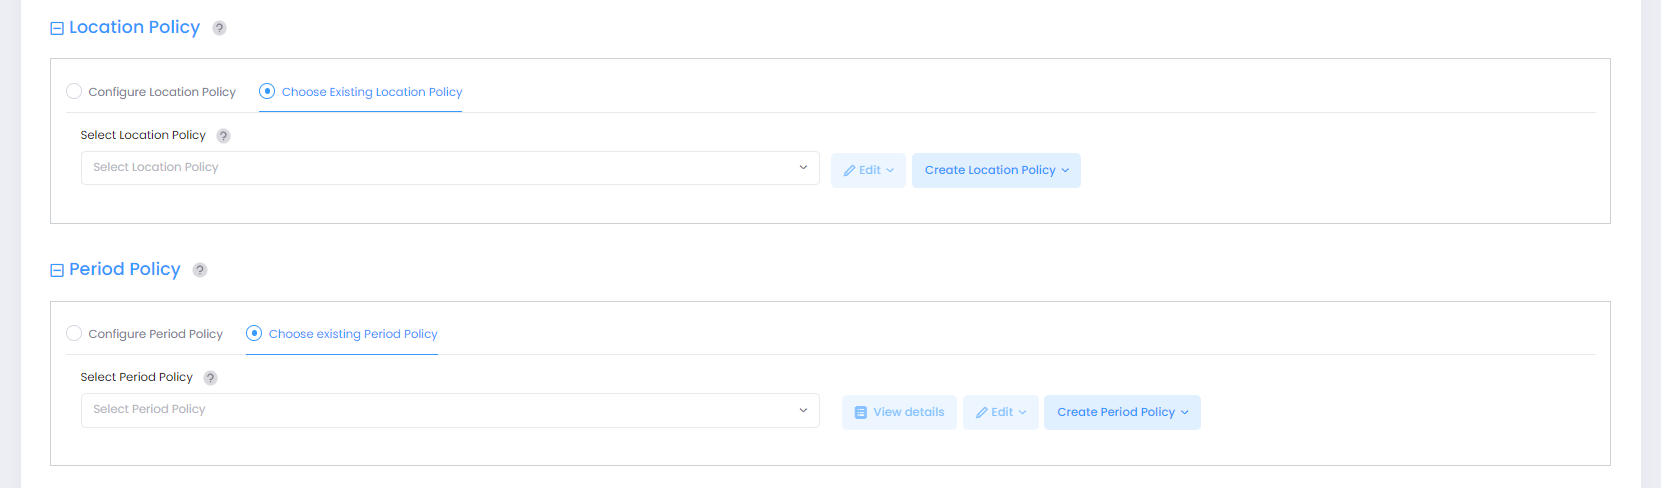
Location/Period Policy
-
Location Policy - Defines a specific location from which a device can access the network. The Location Policy is applied to traffic classified into the Access Role Profile.
-
Configure Location Policy - Select this option to define a Location Policy to assign to the Access Role Profile. When you select this option, a Location Policy is automatically created with the Access Role Profile name.
-
Save this as a distinct Location Policy, for reuse - Select this option if you want the automatically created Location Policy to be available for use after the associated Access Role Profile has been deleted.
-
-
Choose Existing Location Policy - Select an existing Location Policy from the drop-down menu or click on Create Location Policy to open the Create Location Policy screen and create a new Location Policy. You can also click on Edit to open the Edit Location Policy screen and make changes to the selected policy.
-
-
Period Policy - Specifies the days and times during which a device can access the network. The Period Policy is applied to traffic classified into the Access Role Profile.
-
Configure Period Policy - Select this option to define a Period Policy to assign to the Access Role Profile. When you select this option, a Period Policy is automatically created with the Access Role Profile name.
-
Save this as a distinct Period Policy, for reuse - Select this option if you want the automatically created Period Policy to be available for use after the associated Access Role Profile has been deleted.
-
-
Choose Existing Period Policy - Select an existing Period Policy from the drop-down menu or click on Create Period Policy to open the Create Period Policy screen and create a new Period Policy. You can also click on View Details to view information about the selected policy or click on Edit to open the Edit Period Policy screen and make changes to the selected policy.
-
Inactivity Interval

-
Inactivity Interval - Defines the amount of time, in seconds, before an authenticated device is automatically logged out of the network due to inactivity (MAC address for the device has aged out). This timer value applies only to devices learned in the profile.
Bandwidth Control

-
Upstream Bandwidth - The maximum bandwidth limit allocated for ingress traffic assigned to the profile. If the maximum ingress bandwidth value is set to zero, all ingress traffic is allowed.
-
Upstream Burst - The maximum ingress depth value that is applied to traffic assigned to the profile. This value determines how much the traffic can burst over the maximum ingress bandwidth rate. The maximum ingress depth value is configured in conjunction with the maximum ingress bandwidth parameter. When the ingress depth value is reached, the device starts to drop packets.
-
Downstream Bandwidth - The maximum bandwidth limit allocated for egress traffic assigned to the profile. If the maximum egress bandwidth value is set to zero, all egress traffic is allowed.
-
Downstream Burst - The maximum egress depth value that is applied to traffic assigned to profile. This value determines how much the traffic can burst over the maximum egress bandwidth rate. The maximum egress depth value is configured in conjunction with the maximum egress bandwidth parameter. When the egress depth value is reached, the device starts to drop packets.
Bandwidth Control is supported only on the Switch devices OS6860, OS6865, and OS6900.
Walled Garden

-
Wireless Client Social Login Vendor - Select a vendor(s) from the drop-down menu to allow a wireless client to authenticate through a social media vendor (Facebook, Rainbow, and Microsoft Azure are supported). OmniVista will automatically configure the Allow List Domains for the selected vendor(s). This will allow the user to connect over the Internet to the selected vendor(s) for authentication.
-
Allow List Domains - In addition to Facebook, Rainbow, and Microsoft Azure login, you can enter any domain name to allow a user to connect to sites over the Internet without authentication. For example, a hotel may want to allow a guest to connect to their website without authentication. Enter the domain name directly into the Allow List Domain field to allow access to the site. Repeat to add additional domains. Domains must be entered in Fully Qualified Domain Name (FQDN) format (for example, www.marriot.com, www.bbc.com). IP Addresses and HTTP/HTTPS prefixes should not be used.
Client Isolation

When Client Isolation is enabled for the client SSID or the Access Authentication Profile for the Switch port to which the AP is connected, traffic between clients on the same AP in the SSID is blocked; client traffic can only go toward the default gateway. To identify the devices a client is allowed to contact when Client Isolation is enabled, enter the MAC address for each device. You can manually specify or copy and paste the device MAC address using any of the following formats:
-
00:80:0f:33:33:24
-
00-80-0f-33-33-24
-
00800f333324
-
008.00f.333.324
-
00800f.333324
-
00:d0:95* (trailing wildcard character "*" specifies all MAC addresses beginning with 00:d0:95) This wildcard format is particularly useful for entering a vendor OUI only and not the full MAC address for all the vendor devices.
Client Session Logging

-
Client Session Logging - Enables/Disables client session logging. When enabled, select one of the following from the Client Connection Logging Level drop-down menu:
-
None - Log only client online/offline behavior, without session details.
-
Logging HTTP/HTTPs - Log only the HTTP/HTTPs web session of wireless clients.
-
Logging ALL - Log all sessions of wireless clients, including HTTP/HTTPs.
-
Captive Portal Attributes

-
Captive Portal Auth - Select the Captive Portal Authentication method from the drop-down menu:
-
None - No Captive Portal authentication.
-
External - Select this method to redirect device traffic to an external Captive Portal Server for authentication. Complete the following fields to provide the information needed to redirect traffic to the external server:
-
Portal Server - The FQDN/IP address of the external captive portal server.
-
Redirect URL - The redirect URL for the captive portal authentication.
-
HTTPS Redirection - Specify whether the redirect portal page is using HTTPS protocol.
-
AAA Server Profile - The AAA Server used for Captive Portal Authentication. Select an existing AAA Server Profile from the drop-down menu or click on Create AAA Server Profile to open the Create AAA Server Profile screen and create a new AAA Server Profile to use. You can also click on Edit to open the Edit AAA Server Profile screen and make changes to the selected profile. (See the AAA Server Profile online help for more information.)
-
Custom Profile - The External Captive Portal Configuration file used for communication between APs and the external Captive Portal Server. Select an existing External Captive Portal Configuration file from the drop-down menu or click on Create External Captive Portal Config File to open the New External Captive Portal Config File screen and create a custom external config file. You can also click on Edit to open the Edit External Captive Portal Config File screen and make changes to the selected config file. (See the External Captive Portal online help for more information.)
-
-
Others- DHCP Option 82

-
DHCP Option 82 - Enable/disable DHCP Option 82 for the Access Role Profile. By default, it is disabled. If enabled, you can click on Create tab, it redirects you to the config DHCP Option 82 screen for configuration.
2. Network Assignments
The Network Assignment tab is used to select the AP(s) or Switch devices from the available list of devices to which the Access Role Profile will be applied to devices within those groups. Complete the network assignment as described below, then click Next to to the the next tab (Step 3).
-
Device Assignment - Select the specific set of Devices from the available list to assign the profile.
-
Group Assignment - Select the specific group of Devices from the available list to assign the profile. The Access Role Profile is applied to the selected group of devices from the list.
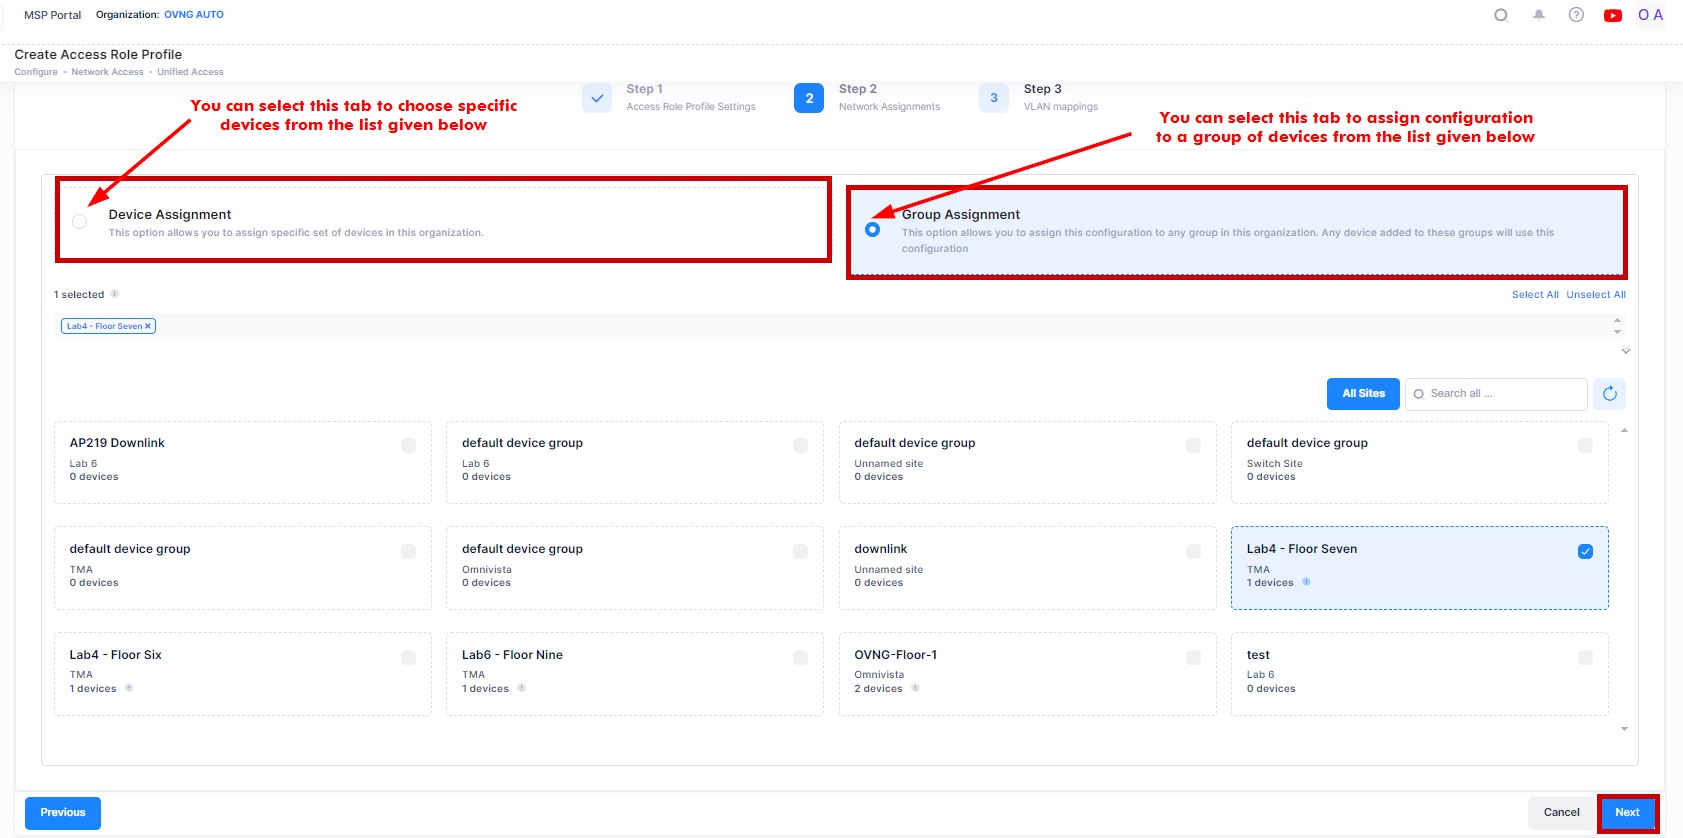
Note: In case of failing to apply an Access Role Profile to devices, if you want to re-apply the profile with no change in the configuration, click on the Profile name to navigate to the device configuration detailed view. Then, select the Device configuration entry you want to reapply, click on edit, and save the Profile without modifying any fields.
3. Profile Mapping
The Profile Mapping tab is used to map a VLAN, Tunnel, or Static service to the Access Role Profile. And VLAN and Tunnel mapping (support for the AP groups) to the ARP. Traffic classified into the profile will be forwarded on the mapped VLAN, Tunnel, or Static service. Note that you can only select one mapping method per Access Role Profile.
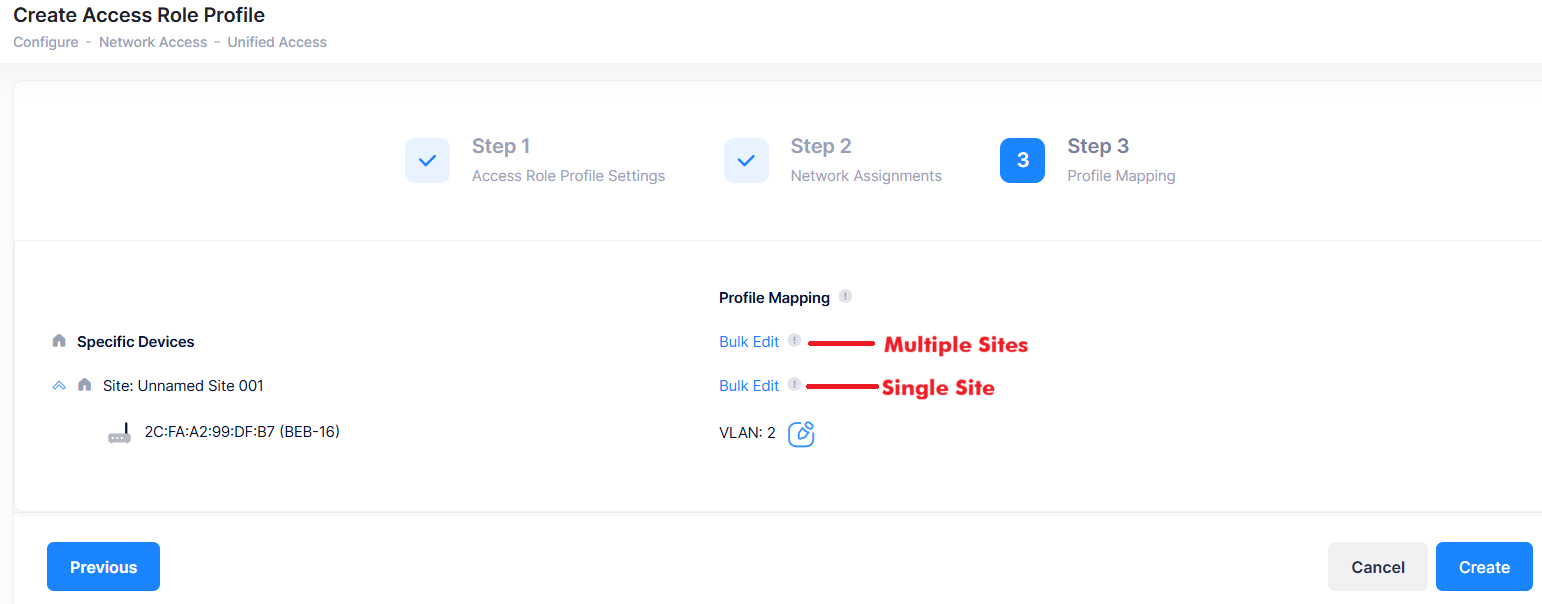
You can configure a VLAN/Tunnel/Static service mapping for all AP Groups or Network devices across all Sites in the Organization, for all AP Groups/devices associated with a specific Site, or for the selected AP Group or Network Devices using the Bulk Edit or Edit option.
The ability to bind up to 256 VLANs to a WLAN/SSID on the AP13xx/AP14xx models is supported. However, not every AP model can accommodate 256 VLANs for all the configured SSIDs. The limitations are outlined below:
-
AP1301H can support 256 VLANs on a maximum of 2 SSIDs, with a total of 512.
-
AP1311/AP1301/AP1431/AP1411 can support 256 VLANs on a maximum of 4 WLANs/SSIDs, with a total of 1024.
-
AP1320/AP1331/AP1351/AP1451 can accommodate 256 VLANs on a maximum of 7 WLANs/SSIDs, with a total of 1792.
When you click on the Bulk Edit option or the Edit option for an individual AP Group/device, Mapping Method screen opens:
There are three networking mapping options: Static Service, Tunnel, and VLAN. Choose the required mapping option from the drop-down menu, and enter the details as given below.
-
AOS supports VLAN, Tunnel, and Static service mappings.
-
AP groups support VLAN, Tunnel, and combined VLAN and Tunnel mappings.
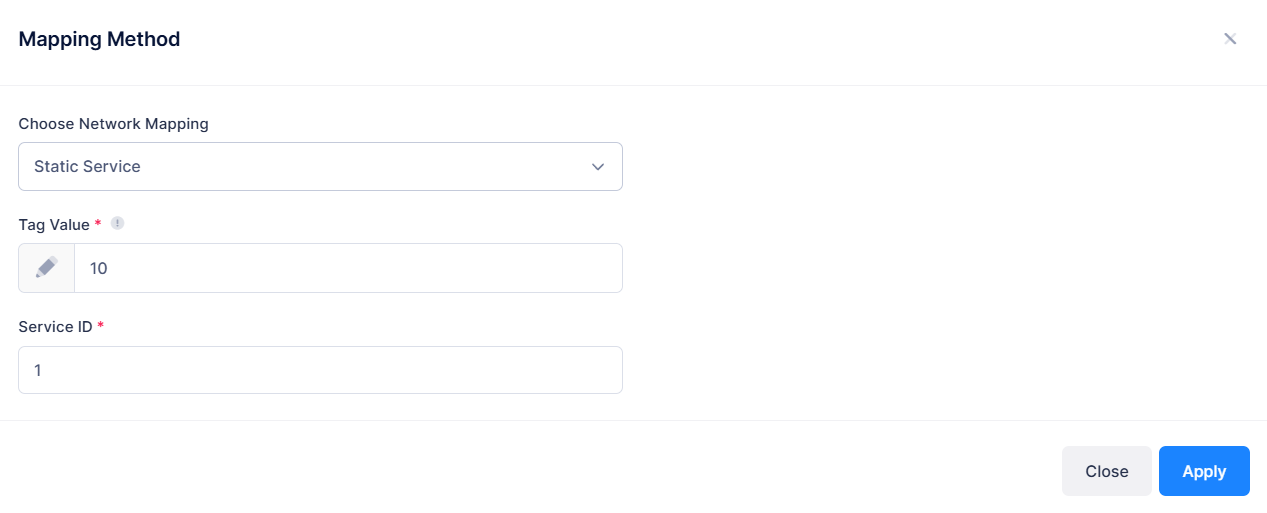
Network Mapping - Static Service
This option maps an existing service ID to the specified profile. This type of profile mapping is only valid if the specified service is already configured; the switch does not dynamically create the service. The specified service ID is then used to dynamically create a service access point (SAP) based on the specified tag value.
When you select the Static Service network mapping option, the following fields are displayed on the Mapping Method screen:
-
Tag Value - The VLAN tag information from classified traffic used to create the Service Access Point (SAP) for the traffic. If the traffic is untagged, the SAP is created with 0 as the encapsulation value (for example, 1/12:0).
-
Service ID - An existing (statically configured) numerical value that identifies a specific service. The valid service ID range is 1–32767.
Network Mapping - Tunnel
This option maps the profile to a Guest Tunnel. When you select the Tunnel network mapping option, the following fields are displayed on the Mapping Method screen:
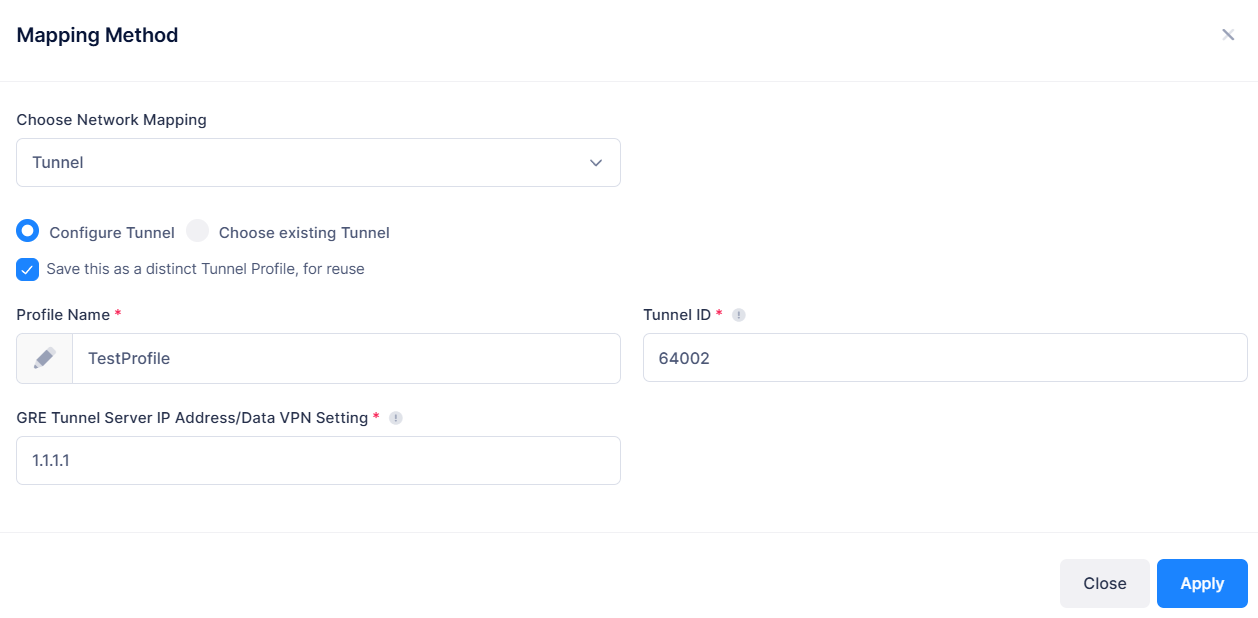
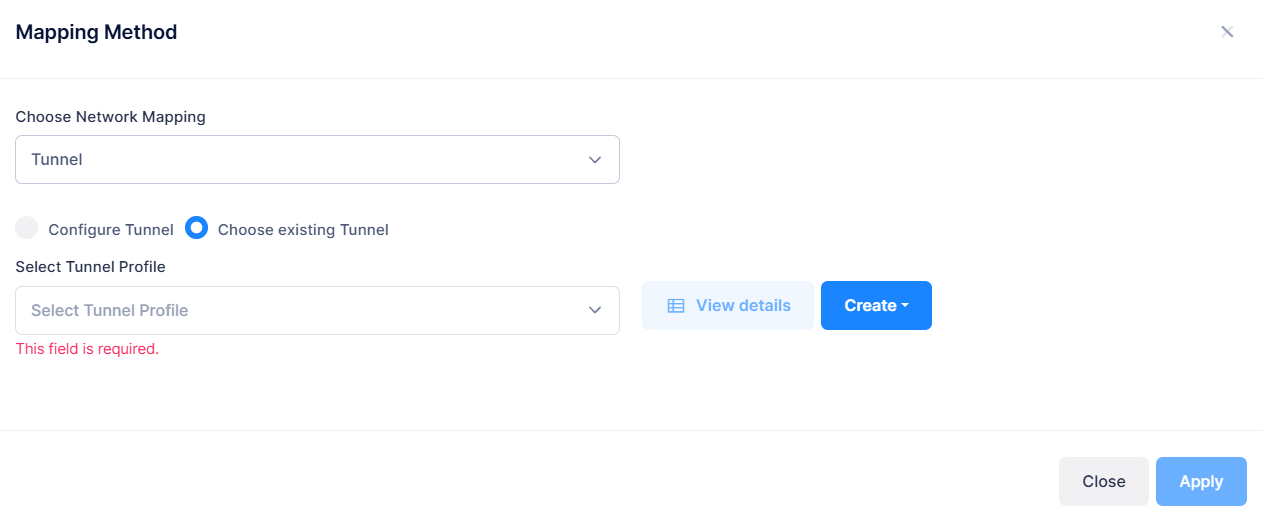
The screen allows you to choose two options: Configure Tunnel or Choose Existing Tunnel.
-
Configure Tunnel - Select this option to define a Guest Tunnel service to assign to the Access Role Profile. When you select this option, a Tunnel Profile is automatically created with the Access Role Profile name.
-
Save this as a distinct Tunnel Profile, for reuse - Select this option if you want the tunnel mapping to be available for use after the associated Access Role Profile has been deleted. When you click on this option, you will be prompted to enter a Tunnel Profile name.
-
Tunnel ID - Enter the tunnel ID.
-
GRE Tunnel Server IP Address/Data VPN Setting - Enter the GRE tunnel server IP address or the Data VPN setting.
-
-
Choose Existing Tunnel - Select an existing Guest Tunnel Profile from the drop-down menu or click on Create button to open the Create Tunnel Profile screen and create a new Guest Tunnel Profile. You can also click on View details to view information about the selected Tunnel Profile or click on Edit to open the Edit Tunnel Profile screen and make changes to the selected Tunnel Profile.
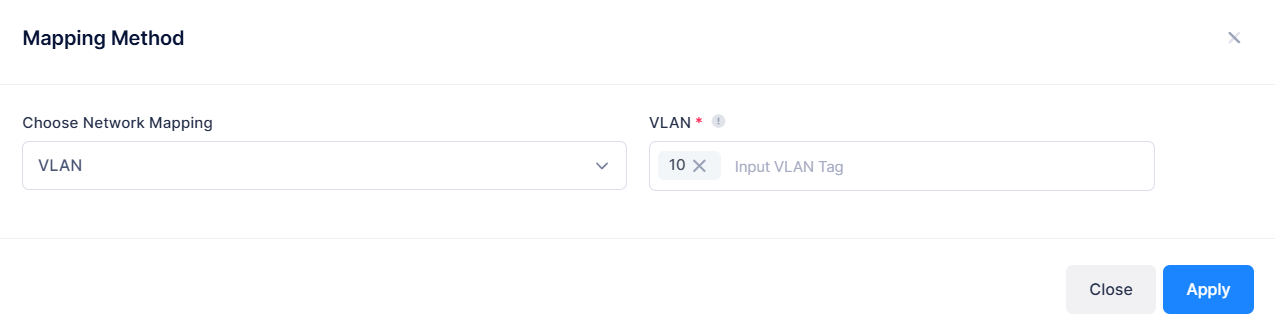
Network Mapping - VLAN
When you select the VLAN network mapping option, the following fields are displayed on the Mapping Method screen:
-
VLAN- Maps the profile to a specific VLAN ID tag on network devices.
-
For Access Point: You can enter multiple VLAN ID tags in this field by specifying an Untagged VLAN (0), a range of VLAN IDs (10-20), individual VLAN IDs (25), or both (10-20, 25). Note that after each VLAN ID entry, you must press the tab key before making the next entry. For example, enter “10-20” press tab key, then enter “21” press tab key, then enter “22” press tab key, and so on. You can also click outside of this field after each entry, instead of pressing the tab key. VLAN 1 is not supported.
-
For Switch: You can enter one VLAN ID within a range of 1 to 4094.
-
When you are done configuring the VLAN/Tunnel/Static Service mappings, click on Apply button. The selected profile mapping is displayed in the Profile Mapping tab.
Click on Create button. The Access Role Profile is created and applied to users assigned to the profile.
Editing an Access Role Profile
You can edit the Access Role Profile attributes by accessing the Edit Access Role Profile screen.
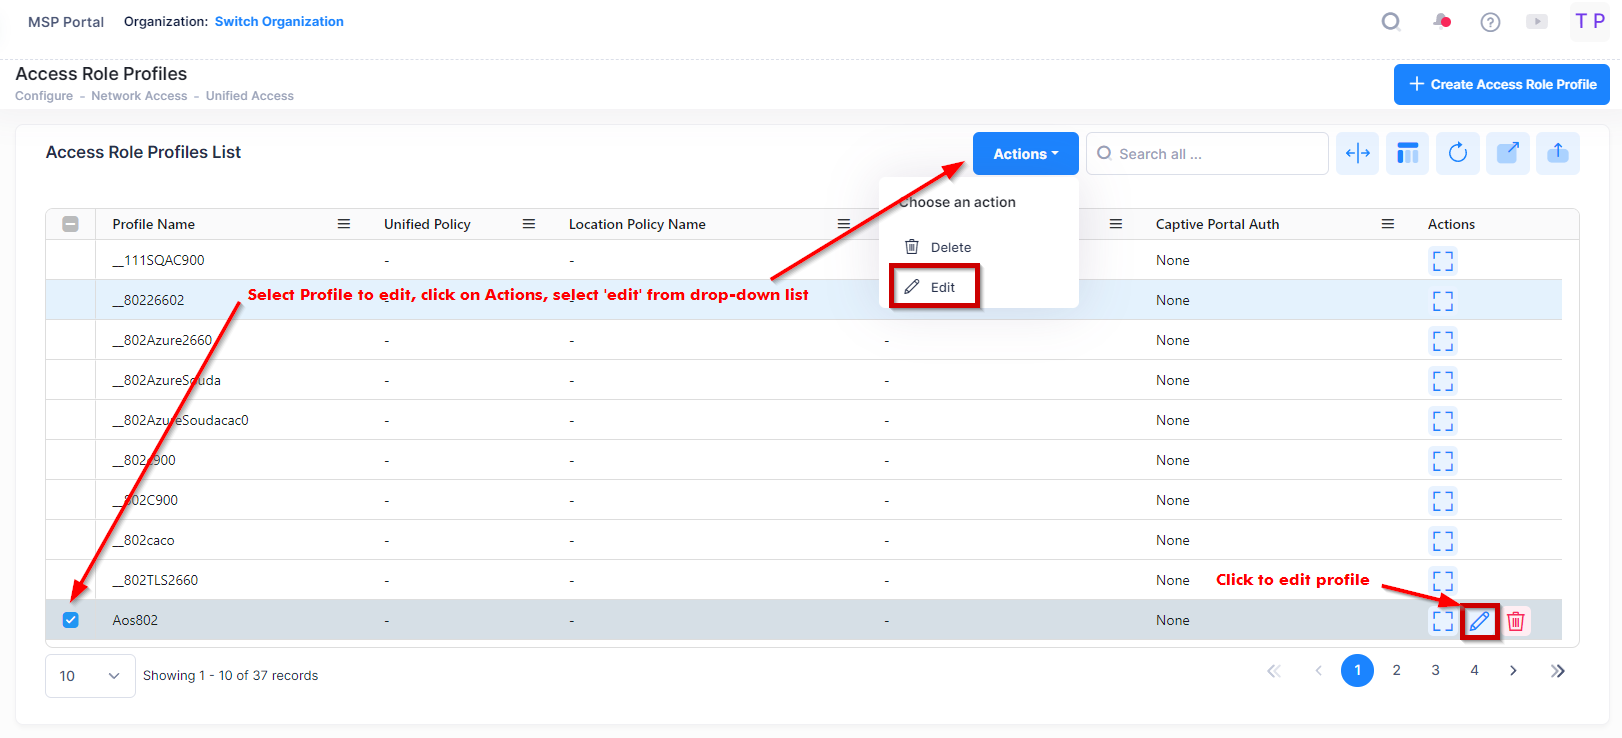
Use one of the following methods to access the Edit Access Role Profile screen (as shown above):
-
Select the profile to edit by clicking on the checkbox next to the profile, click on Actions, then select Edit from the drop-down menu.
-
Click on the pencil icon under the “Actions” column next to the profile that you want to edit.
The following Edit Access Role Profile screen displays. Edit the fields as described above, then click on Save.
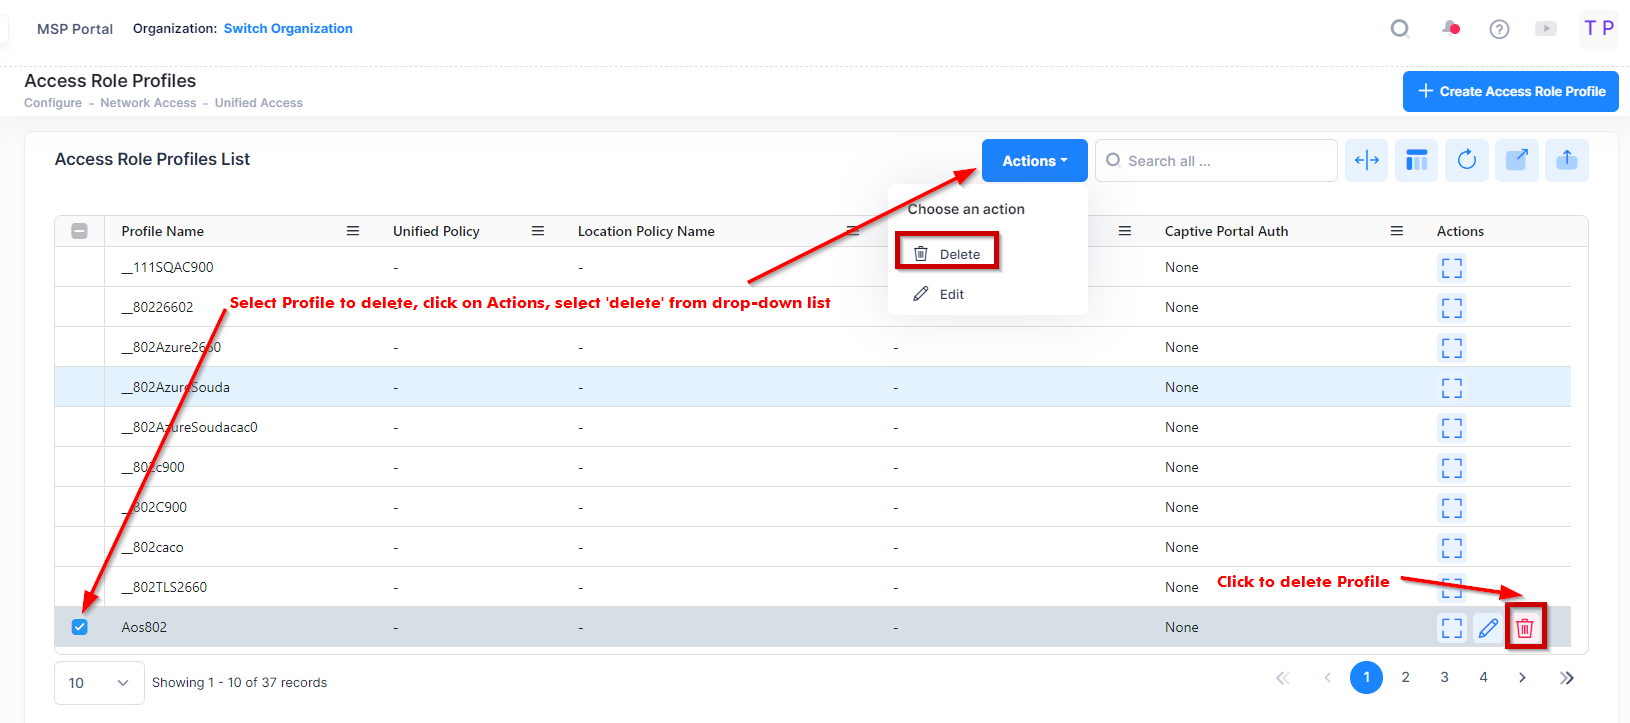
Deleting an Access Role Profile
To delete an Access Role Profile, use one of the following methods to select the profile you want to delete:
-
Select the profile to delete by clicking on the checkbox next to the profile, click on Actions, then select Delete from the drop-down menu.
-
Click on the trash can icon under the “Actions” column next to the profile that you want to delete.
When you select the profile you want to delete, the following confirmation prompt appears:
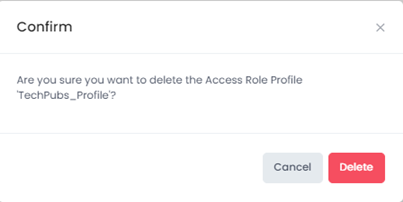
Click on Delete to confirm that you want to delete the Access Role Profile.
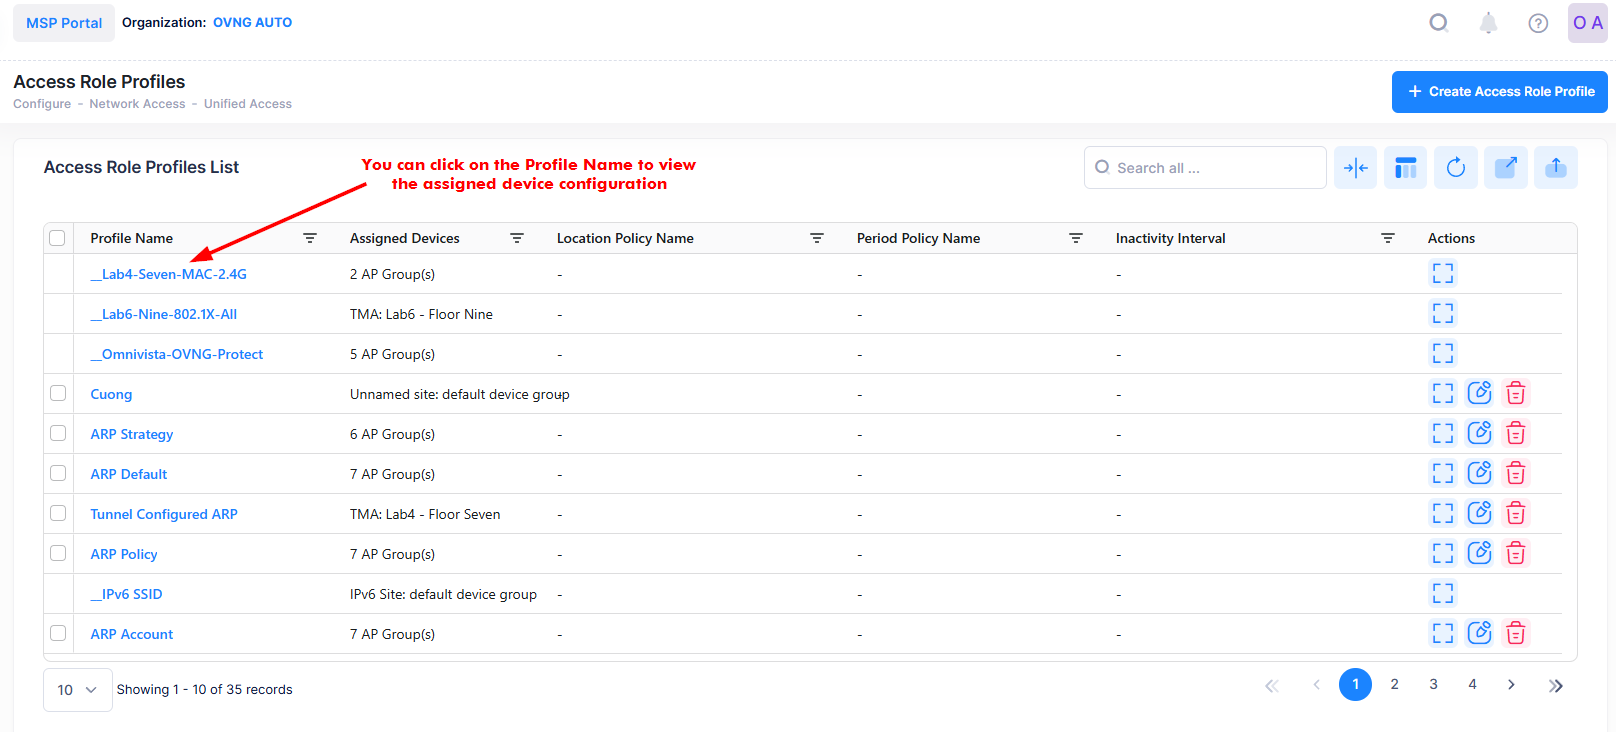
Display Assigned Switch Configuration Details
The Access Role Profile list displays information for the configured Access Role Profiles. You can click on the Profile Name to view the assigned Switch configuration details of a specific Profile as shown below.
The below screen appears:
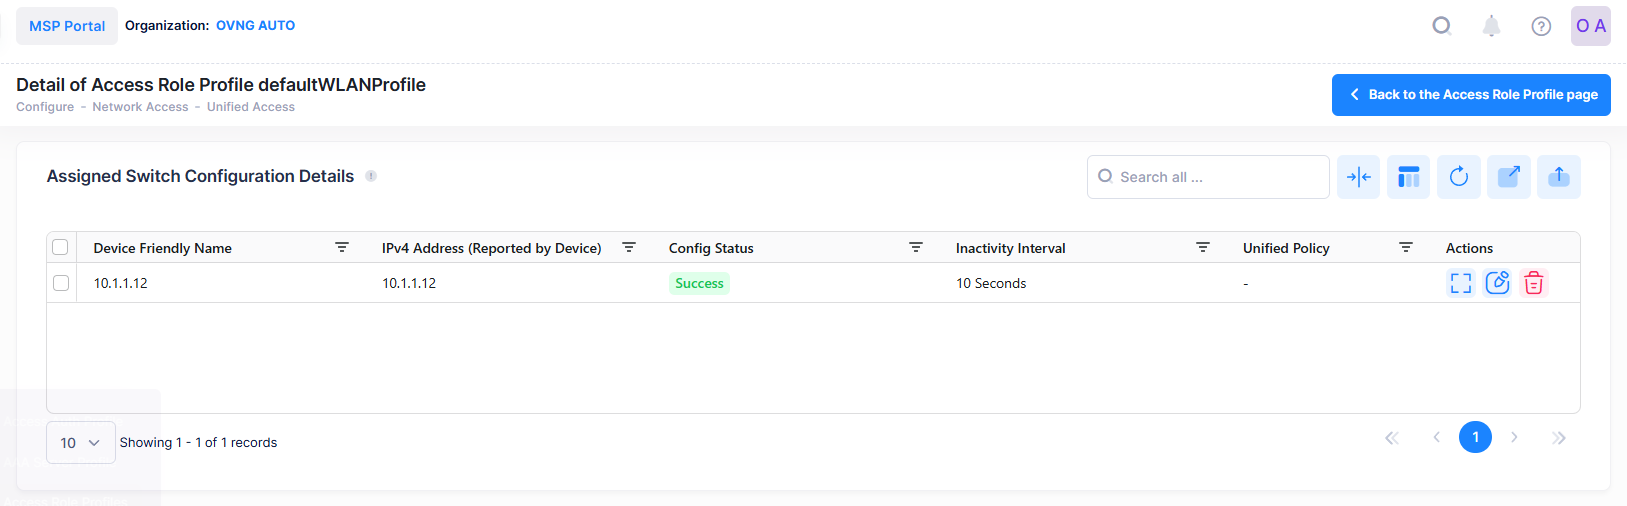
This screen also allows you to export, search and filter the data. You can click the back icon on the top right to navigate to the Access Role Profile List page.
The following Device Configuration of the selected Profile is displayed.
-
IPv4 Address - The IPv4 address of the device.
-
Device Friendly Name - The name assigned to the device is derived from the Preferred Device Naming convention specified in the user preference settings. By default, the Friendly Name is set to IP Address (System Name).
-
Config Status - The configuration status of the device. (Successful or Failed or Pending).
-
Pending - The configuration is being pushed to the device and is still not receiving a response from the device.
-
Failed - The configuration failed to apply to the device. Possible reasons include a timeout while applying the configuration due to the device being unreachable or a network issue, or the configuration being invalid and rejected by the device. Check alerts to identify the specific reason.
-
Successful - The configuration is pushed to the device successfully.
-
-
Inactivity Interval - Defines the amount of time, in seconds, before an authenticated device is automatically logged out of the network due to inactivity.
-
Upstream Bandwidth - The maximum bandwidth limit allocated for ingress traffic assigned to the profile. If the maximum ingress bandwidth value is set to zero, all ingress traffic is allowed.
-
Downstream Bandwidth - The maximum bandwidth limit allocated for egress traffic assigned to the profile. If the maximum egress bandwidth value is set to zero, all egress traffic is allowed.
-
Upstream Burst - The maximum ingress depth value that is applied to traffic assigned to the profile.
-
Downstream Burst - The maximum egress depth value that is applied to traffic assigned to profile.
-
Unified Policy - The name of the Policy List assigned to the profile.
-
Captive Portal Auth - The type of Captive Portal Authentication ( None, or External).
-
Redirect Status - Enables/Disables Captive Portal Redirect (not supported on wireless devices and ignored when applied to those devices).
-
Auth Flag - Enables/Disables authentication (not supported on Steller AP).
-
Mobile Tag Status - Enables/Disables classification of tagged packets received on mobile ports (not supported on Steller AP).
Editing an Assigned Switch Configuration Details
Consider the following when editing an assigned Switch Configuration details for Access Role Profile:
-
You can edit the configuration settings for one or multiple devices at the same time.
-
When you choose to edit a single device, the configuration screen will display the unique, current settings for that device.
-
If you opt to edit multiple devices simultaneously, the system will automatically fill the configuration fields with values from the original Access Role Profile template, establishing a common baseline for your bulk modifications.
-
If you select a child profile, such as a "policy list," and that specific configuration has a "Config Status" of "Success" on the device, the system will not overwrite the new value on the device. It helps to prevent conflicts or unnecessary overwrites.
You can remove the Access Role Profile device configuration from one or multiple devices. This action will send a notification message to the device to remove that specific Access Role Profile from its configuration.
You can view the current profile configuration for each switch assigned to an Access Role Profile. You can edit the configuration on one or more assigned devices directly. If a device's configuration differs from the profile, the mismatched attributes will be highlighted, and you will have the option to synchronize them.
Display Additional Access Role Profile Information
To display additional information about a specific profile, click on the Additional Information icon under the “Actions” column. The information displayed on this screen is defined below.
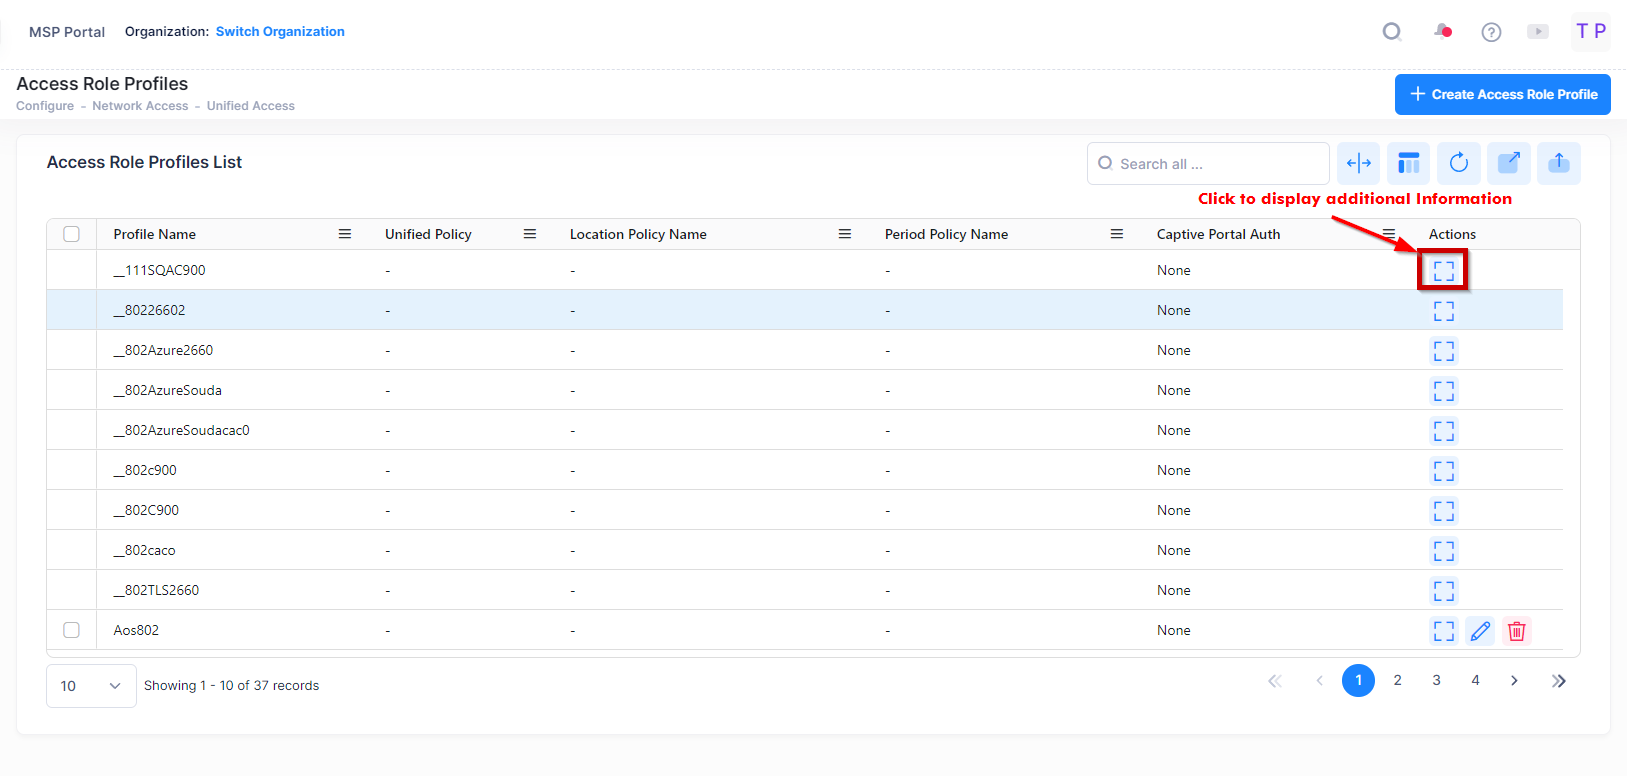
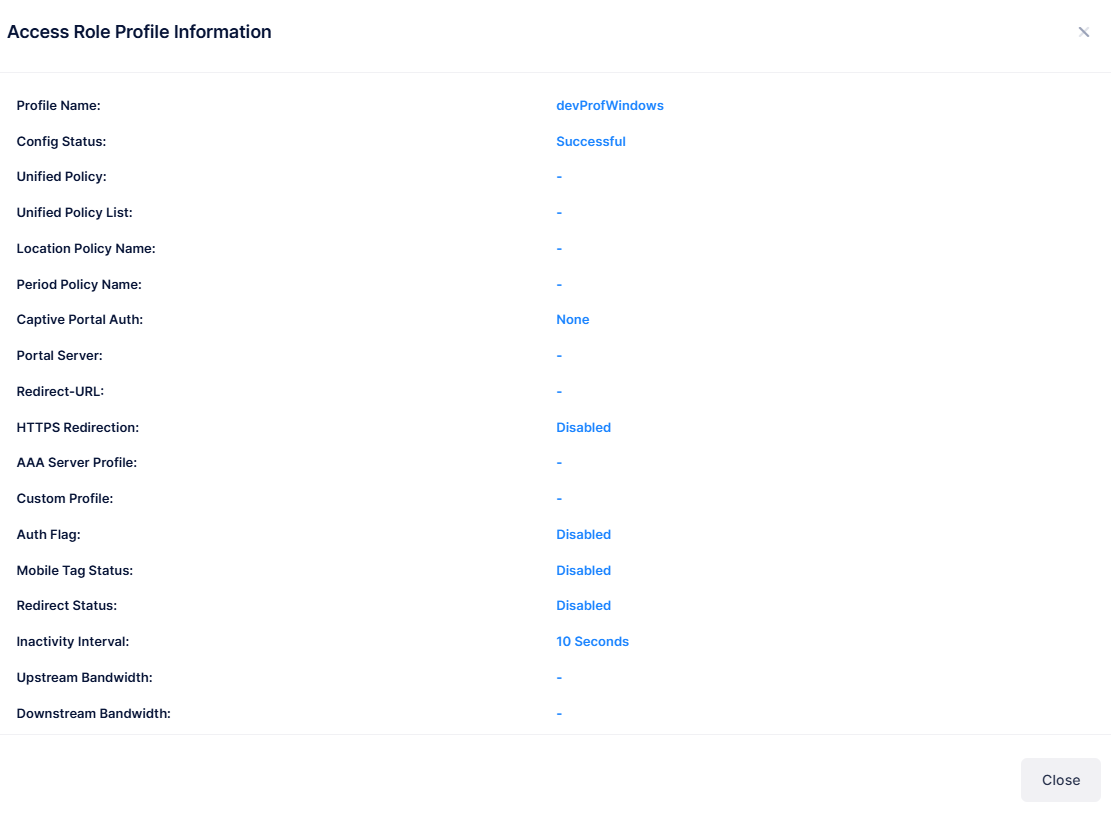
The following information is displayed for each Access Role Profile:
-
Profile Name - The name assigned to the Access Role Profile.
-
Config Status - The status of applying the profile to devices (Successful, Failed, Pending, or Partially Failed).
-
Pending - The configuration is being pushed to the devices and has still not received any response from any device.
-
Failed - The configuration failed to apply to all the selected devices. Possible reasons include a timeout while applying the configuration due to the device being unreachable or a network issue, or the configuration being invalid and rejected by the device. Check alerts to identify the specific reason.
-
Successful - The configuration is pushed to all the selected devices successfully.
-
Partially Failed - The configuration is pushed to some devices successfully, while to others it failed or remains in a pending state.
-
The table below displays the combinations of configuration status for all device configurations in the Profile template.
|
Device Configuration Status |
Template |
|---|---|
|
All Failed |
Failed |
|
All Successful |
Successful |
|
All Pending |
Pending |
|
Some failed, some successful |
Partially Failed |
|
Some pending, some successful |
Pending |
|
Some pending, some failed |
Partially Failed |
|
Some pending, some failed, some successful |
Partially Failed |
-
Unified Policy - The name of the Policy List assigned to the profile. The set of rules within the Policy List are applied to the traffic that passes though devices. Only one Policy List is allowed per profile, but multiple profiles may use the same Policy List.
-
Location Policy Name - The name of the Location Access Policy assigned to the profile.
-
Period Policy Name - The name of the Period Policy assigned to the profile..
-
Captive Portal Auth - The type of Captive Portal Authentication ( None, or External).
-
Portal Server - The FQDN/IP address of the external captive portal server.
-
Redirect URL - The redirect URL for the captive portal authentication.
-
HTTPS Redirection - Specify whether the redirect portal page is using HTTPS protocol.
-
AAA Server Profile - The AAA Server used for Captive Portal Authentication.
-
Custom Profile - The External Captive Portal Config File used for communication between APs and the External Portal Server.
-
Upstream Bandwidth - The maximum bandwidth limit allocated for ingress traffic assigned to the profile. If the maximum ingress bandwidth value is set to zero, all ingress traffic is allowed.
-
Downstream Bandwidth - The maximum bandwidth limit allocated for egress traffic assigned to the profile. If the maximum egress bandwidth value is set to zero, all egress traffic is allowed.
-
Upstream Burst - The maximum ingress depth value that is applied to traffic assigned to the profile. This value determines how much the traffic can burst over the maximum ingress bandwidth rate. The maximum ingress depth value is configured in conjunction with the maximum ingress bandwidth parameter. When the ingress depth value is reached, the device starts to drop packets.
-
Downstream Burst - The maximum egress depth value that is applied to traffic assigned to profile. This value determines how much the traffic can burst over the maximum egress bandwidth rate. The maximum egress depth value is configured in conjunction with the maximum egress bandwidth parameter. When the egress depth value is reached, the device starts to drop packets.
-
DHCP Option 82 - Enables/Disabled the DHCP Option 82 Feature.
-
Client Isolation - Defines the MAC Addresses of Allowed list of devices for an isolated Client
-
Client Session Logging - Enables/Disables client session logging.
-
Client Connection Logging Level:
-
Logging HTTP/HTTPs - Log only the HTTP/HTTPs web session of wireless clients.
-
Logging ALL - Log all sessions of wireless clients, including HTTP/HTTPs.
-
None - Log only client online/offline behavior, without session details.
-
-
Wireless Client Social Login Vendor - The vendor(s) selected to allow a wireless client to authenticate through a social media vendor (Facebook, Rainbow, and Microsoft Azure are supported). OmniVista automatically configures the Allow List Domains for the selected vendor(s). This allows the user to connect over the Internet to the selected vendor(s) for authentication.
-
Allow List Domains - Facebook, Rainbow, Microsoft Azure login, or any user-specified Allow List Domain that allows a user to connect to sites over the Internet without authentication. For example, a hotel may want to allow a guest to connect to their website without authentication. Domains must be in Fully Qualified Domain Name (FQDN) format (for example,, http://www.marriot.com , http://www.bbc.com). IP Addresses and HTTP/HTTPS prefixes should not be used.
-
Assigned Devices:
-
Assigned Devices - The AP Groups, Switches and associated Sites to which the Access Role Profile is applied.
-
Profile Mapping - The profile mapped to the UNP profile.
-
Config Status - The configuration status.
-