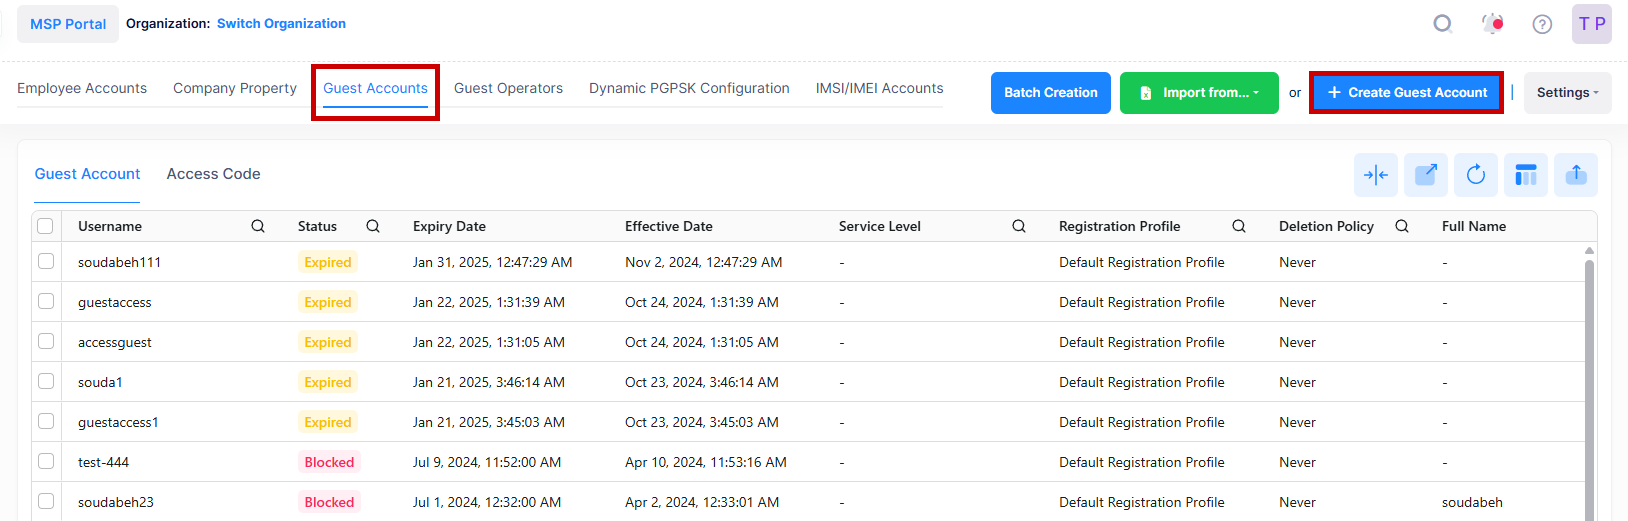
The Guest Accounts screen is used to create the login accounts for the Guest users in the UPAM network. The Guest accounts screen will display all configured Guest accounts under the UPAM network. If self-registration is not enabled, you can manually create a login account for a Guest User and relay the information to the Guest User.
Use the Guest Account list screen to display information about all of the configured Guest accounts in the UPAM database. This screen also allows you to create, edit, delete, extend, enable and disable accounts. To access the Guest Accounts screen, click on Network Access > Accounts > Guest Accounts under the “Configure” section of the OmniVista Cirrus Menu.
Data displayed in each widget can be exported into a CSV, PDF or Excel sheet format. You can also switch the widgets to full-screen mode for a better display.
Creating a Guest Account
There are three methods for creating Guest Accounts for a UPAM Network: Import an Excel XLSX file, Import a OmniVista CSV file or manually create a Guest Account.
Manually Create a Guest Account
To manually create a new Guest Account, click on Create Guest Account on the Guest Accounts List screen. The Create Guest Account screen opens as shown below.
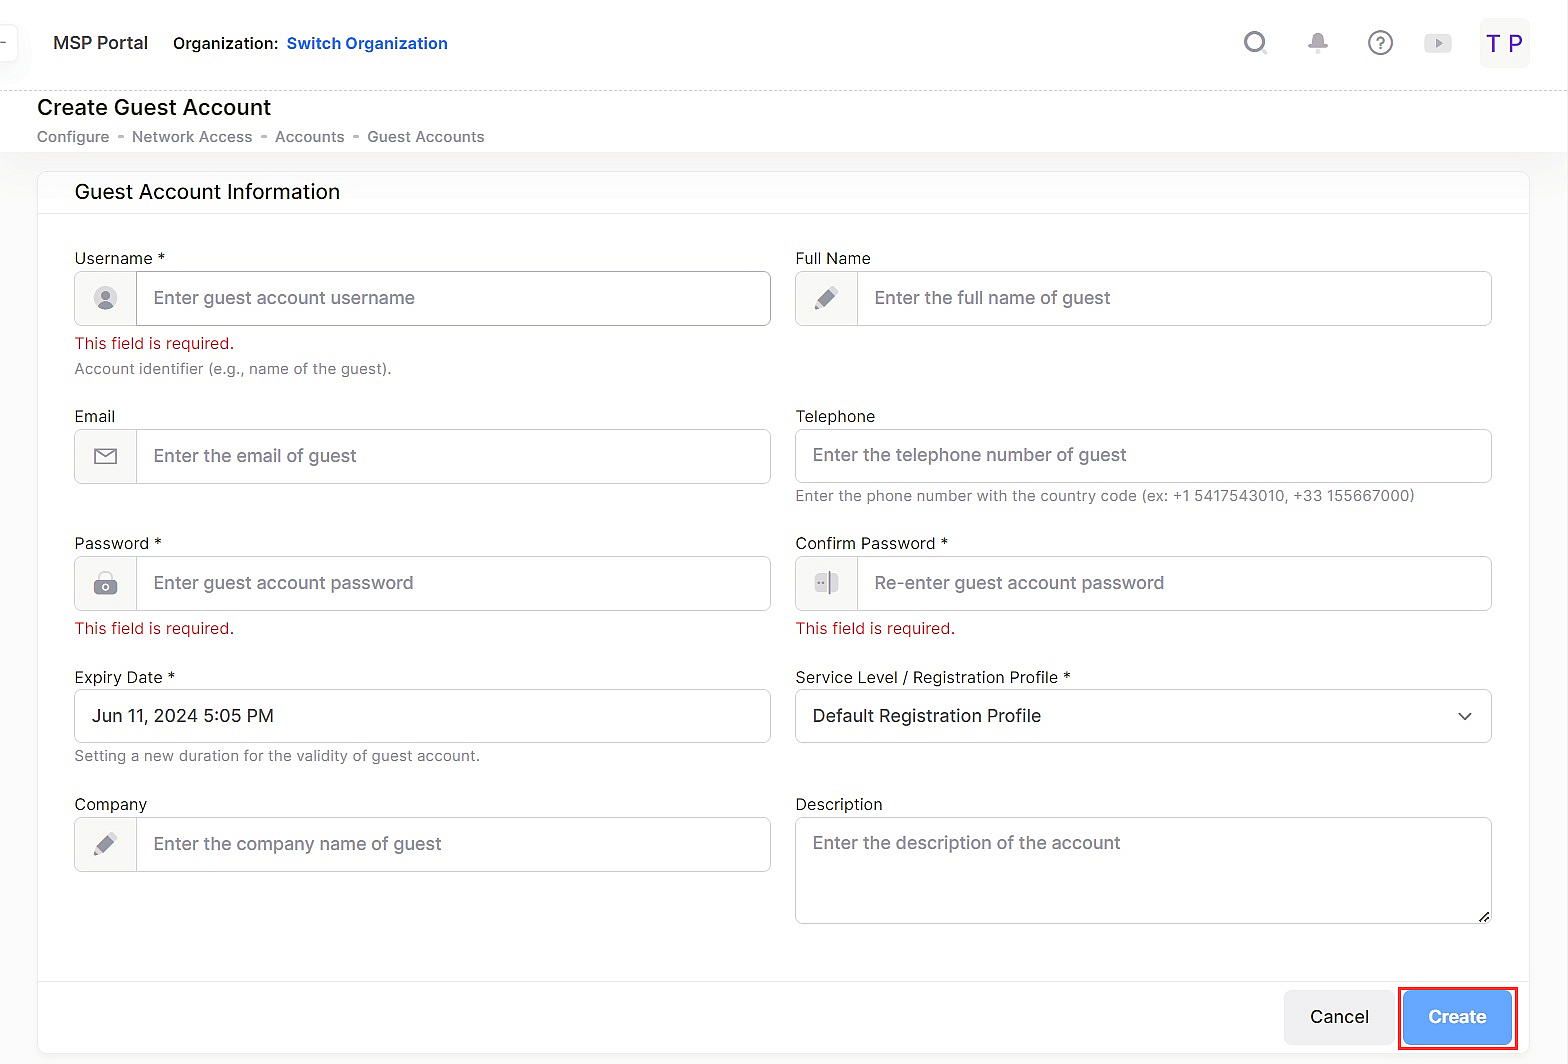
Complete the following fields as described:
-
User Name - Account identifier (e.g., name of the guest).
-
Full Name - Full name of the Guest User.
-
Password - Password for the account.
-
Confirm Password - Re-enter and confirm the Guest Account password.
-
Expiration Date - The length of time that the Guest Account is valid.
-
Service Level/ Registration Profile - Specify the service level or Registration Profile for the Guest Account.
-
Telephone - Telephone number of the Guest User.
-
Email - Email address of the Guest User.
-
Company - Company name of the Guest User.
-
Description - Optional description for the account.
After you have finished with the field values, click on the Create button to create the account.
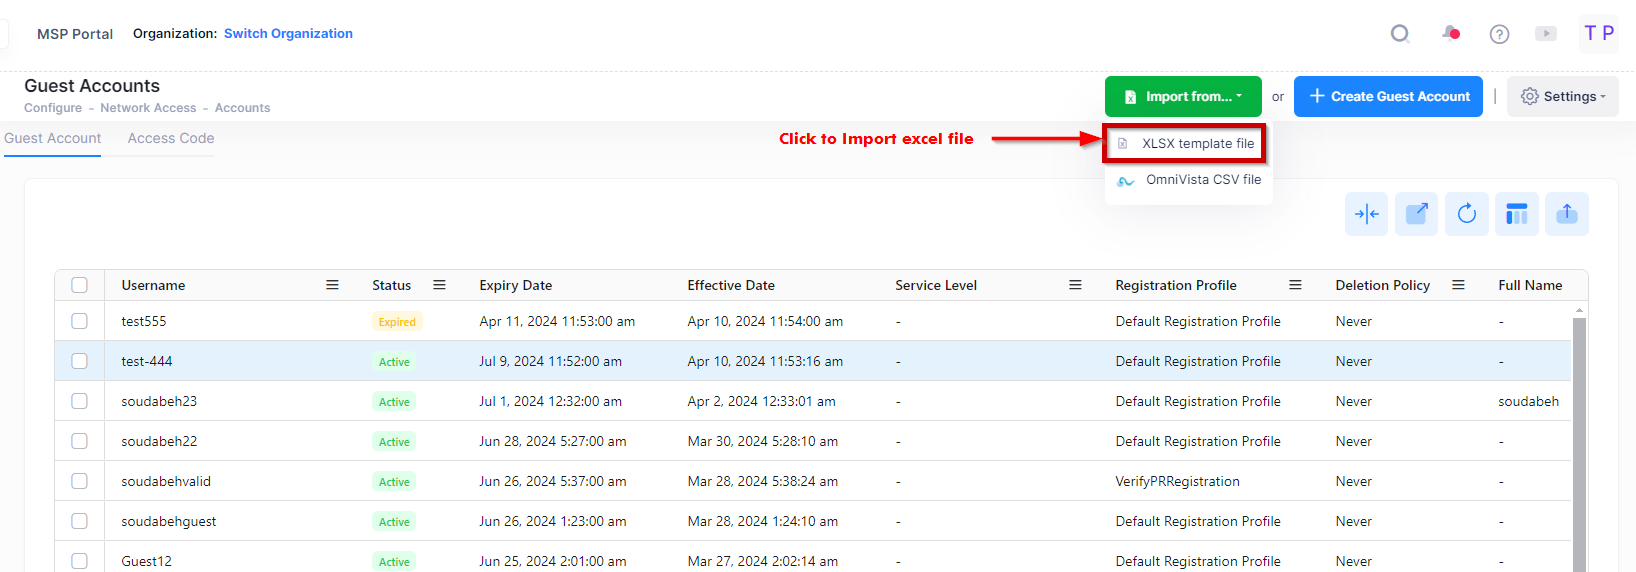
Import Multiple Guest Accounts from an Excel Sheet
To import multiple Guest Accounts from an existing Excel sheet (.xlxs), click on Import from… and select XLSX template file. You will then be prompted to download an XLSX template file that contains steps on how to define the Guest Accounts in the Excel file to create multiple accounts.
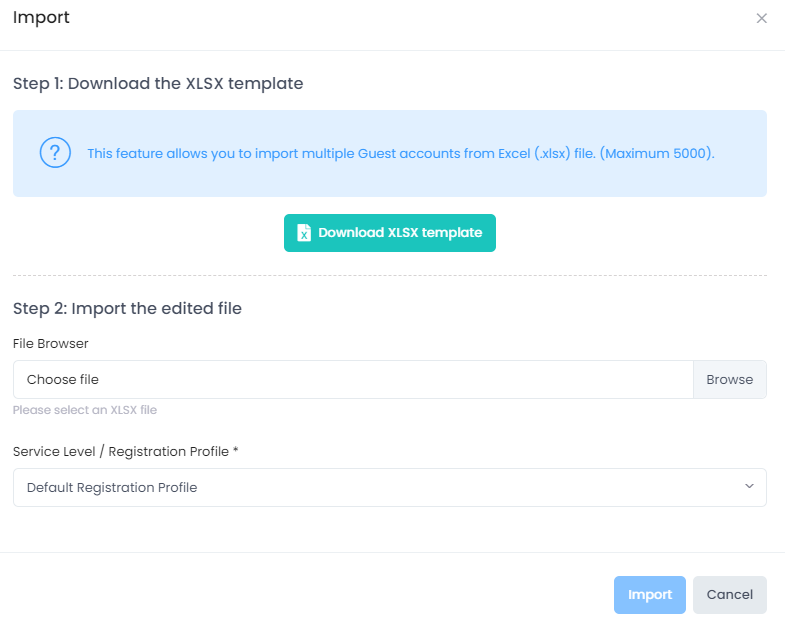
Step 1: Click on Download XLSX template and specify where you would like to save the template file. When you open the template file, instructions are provided about how to define the Guest Accounts to be added.
The following sample template file is an example of the template provided for adding Guest Accounts.
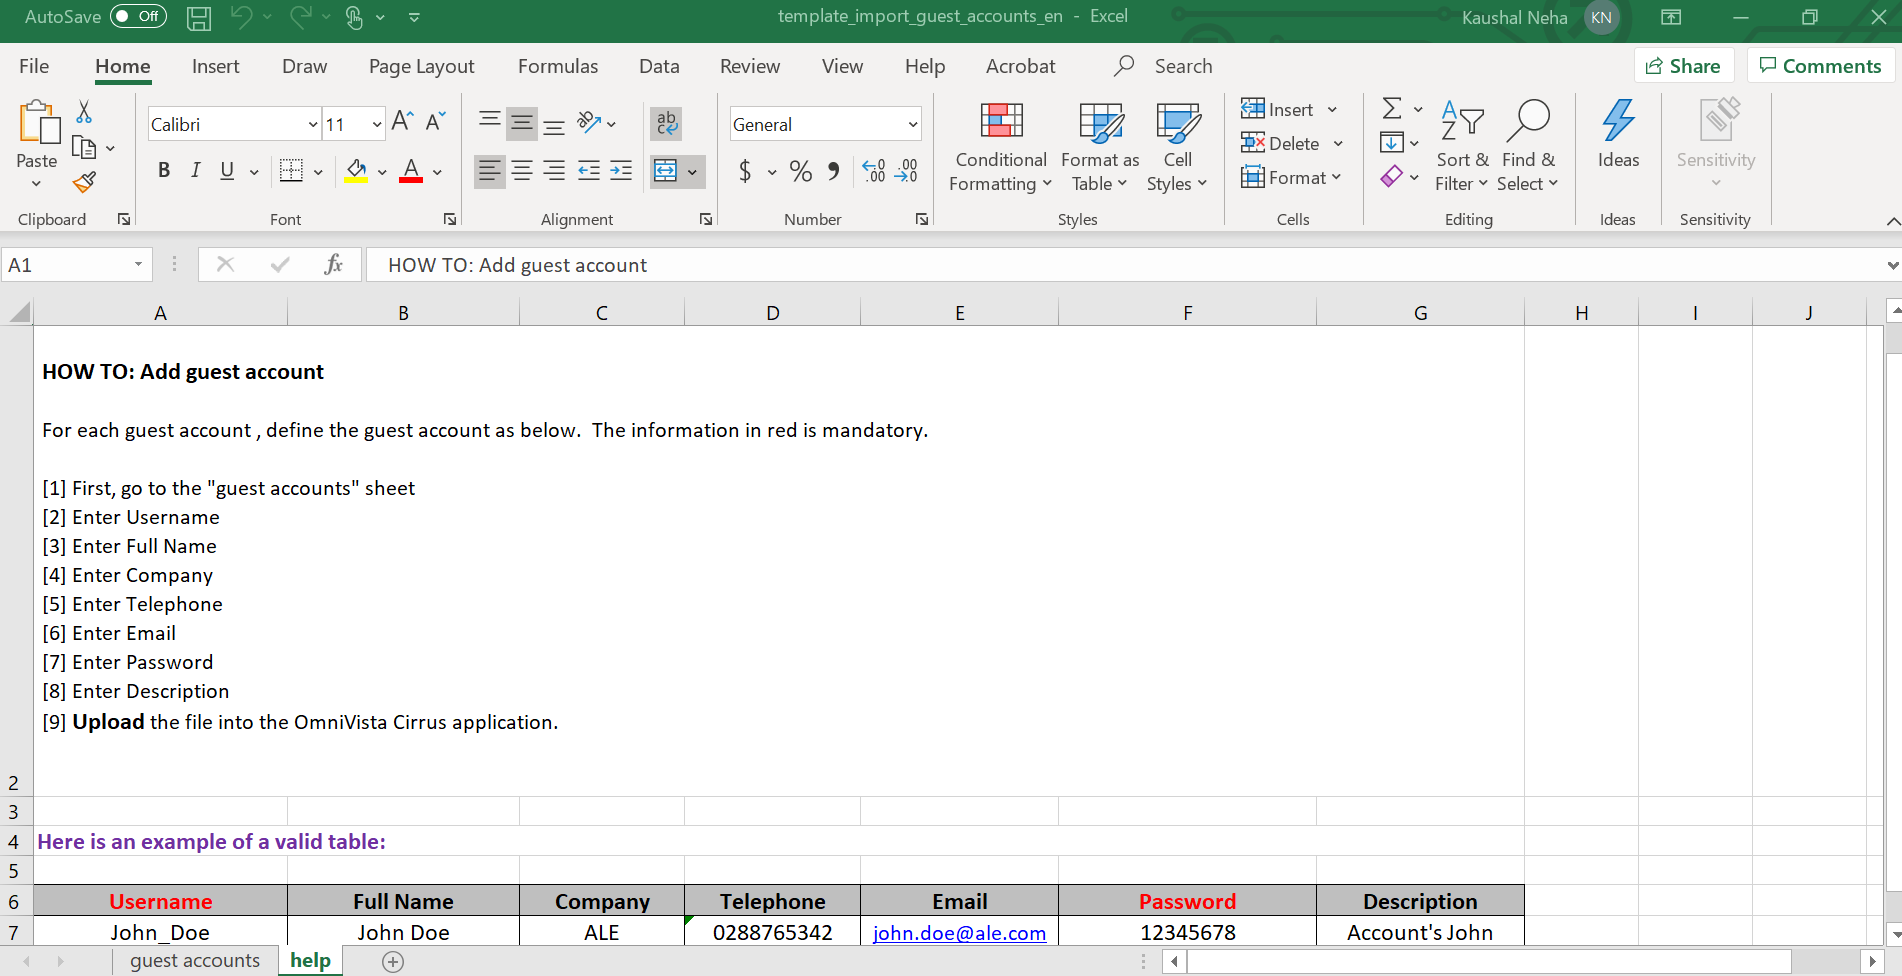
Fill out the template with information for each Guest Account that is to be imported.
Step 2: Import the edited file and select the site of attachment
-
File Browser - Click in this field to find and select the existing template file to import.
-
Service Level/ Registration Profile - Select a Registration Profile or Service Level that is linked to a Registration Profile that will be assigned to each account. By default, the “Default Registration Profile” is used. See the online Service Levels help and the online Registration Profiles help for more information.
Once the Import form is complete, click on Import. The Guest Account List is populated with the imported Guest Accounts.
Import the Guest Accounts from OmniVista Cirrus CSV File
To import multiple Guest Accounts from an existing .csv file, click on Import from… and select OmniVista CSV file. You will then be prompted to download the CSV template file that is used to define the Guest Account information to create multiple accounts.

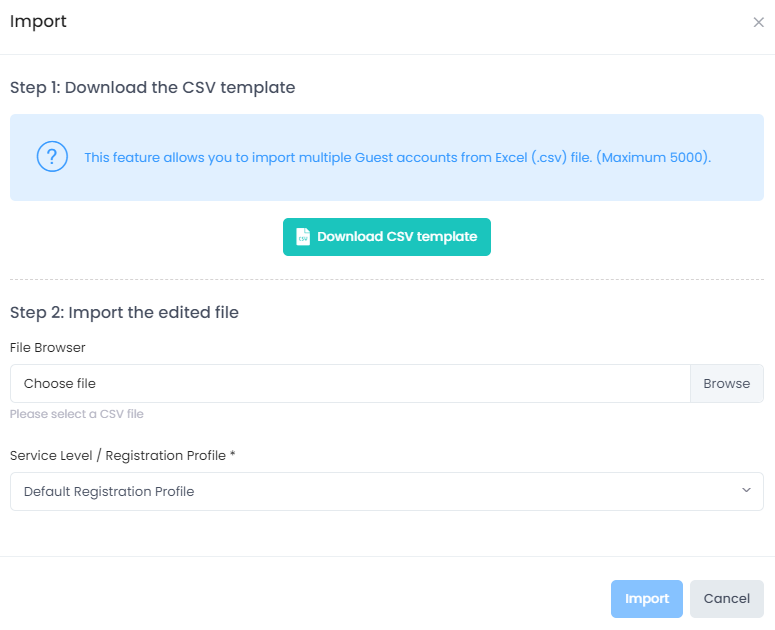
Step 1: Download the CSV template
Download the CSV template file and add Guest Account information based on the template instructions.
Step 2: Import the edited file
Complete the following fields as described to select and upload the CSV file.
-
File Browser - Click in this field to find and select the existing CSV file to import.
-
Service Level/ Registration Profile - Select a Registration Profile or Service Level that is linked to a Registration Profile that will be assigned to each account. By default, the “Default Registration Profile” is used. See the online Service Levels help and the online Registration Profiles help for more information.
Click on Import. The Guest Account List is populated with the imported Guest Accounts.
Creating a Guest Access Code Account
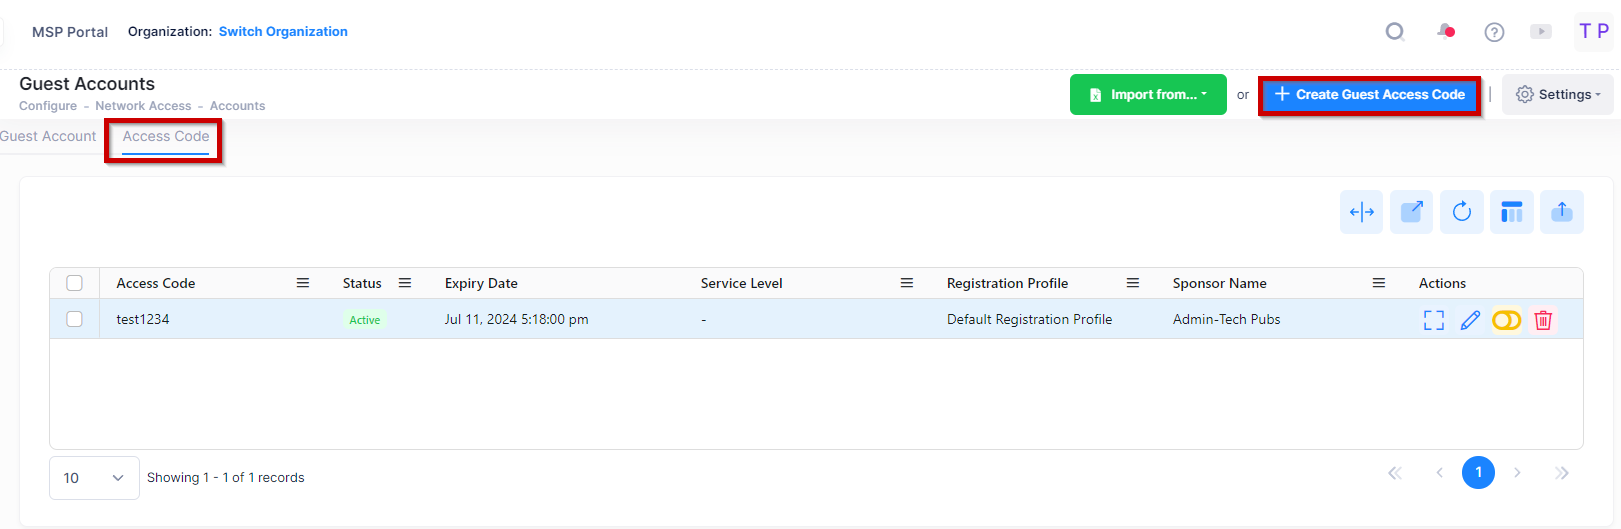
To create a new Guest Access Code Account, click on the “Access Code” tab on the Guest Accounts screen and click on Create Guest Access Code to access the Create Guest Access Code screen as shown below:
Complete the following fields as described below:
-
Access Code - The Access Code of the Guest Account.
-
Service Level/ Registration Profile - Specify the service level or Registration Profile for the Guest Account.
-
Account Validity Period - Setting a new duration for the validity of Guest Account.
-
Description - Optional description for the account.
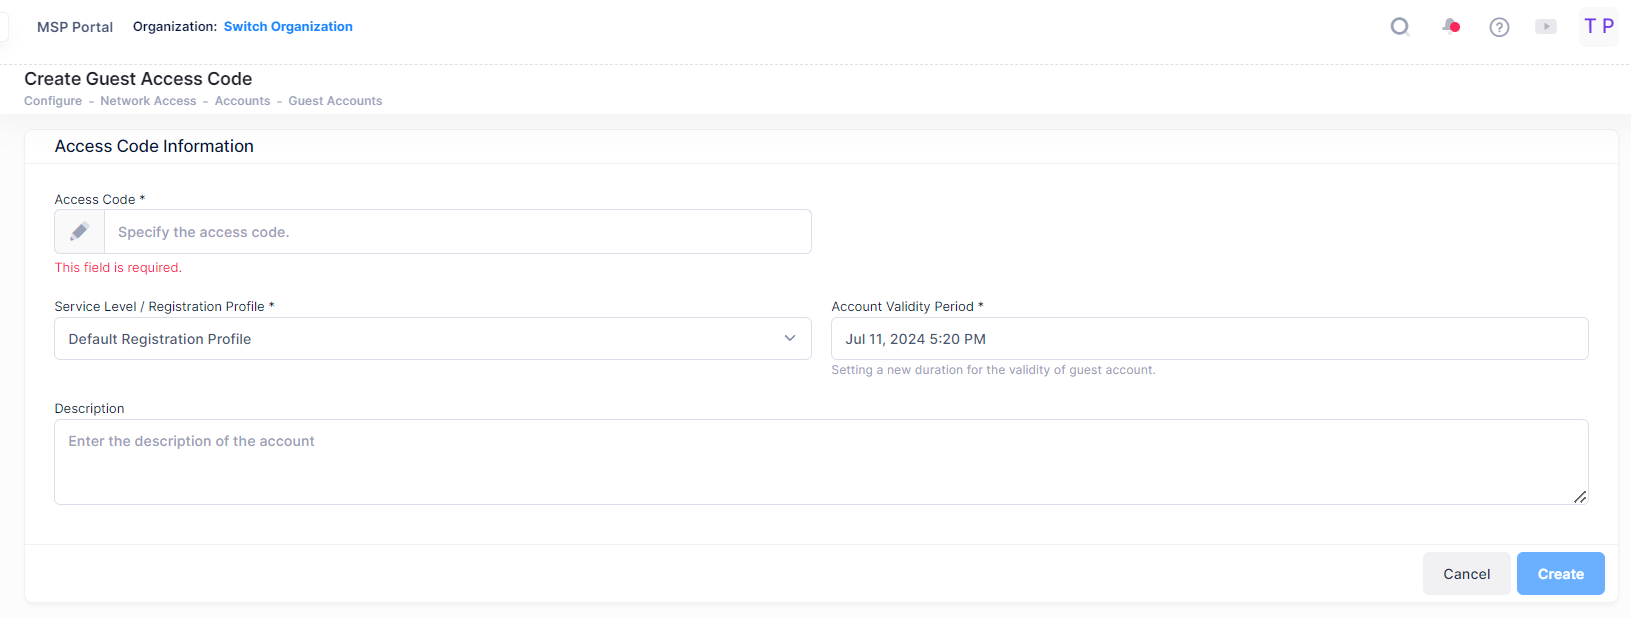
After you have finished with the field values, click on the Create button to create the Access Code for Guest Account.
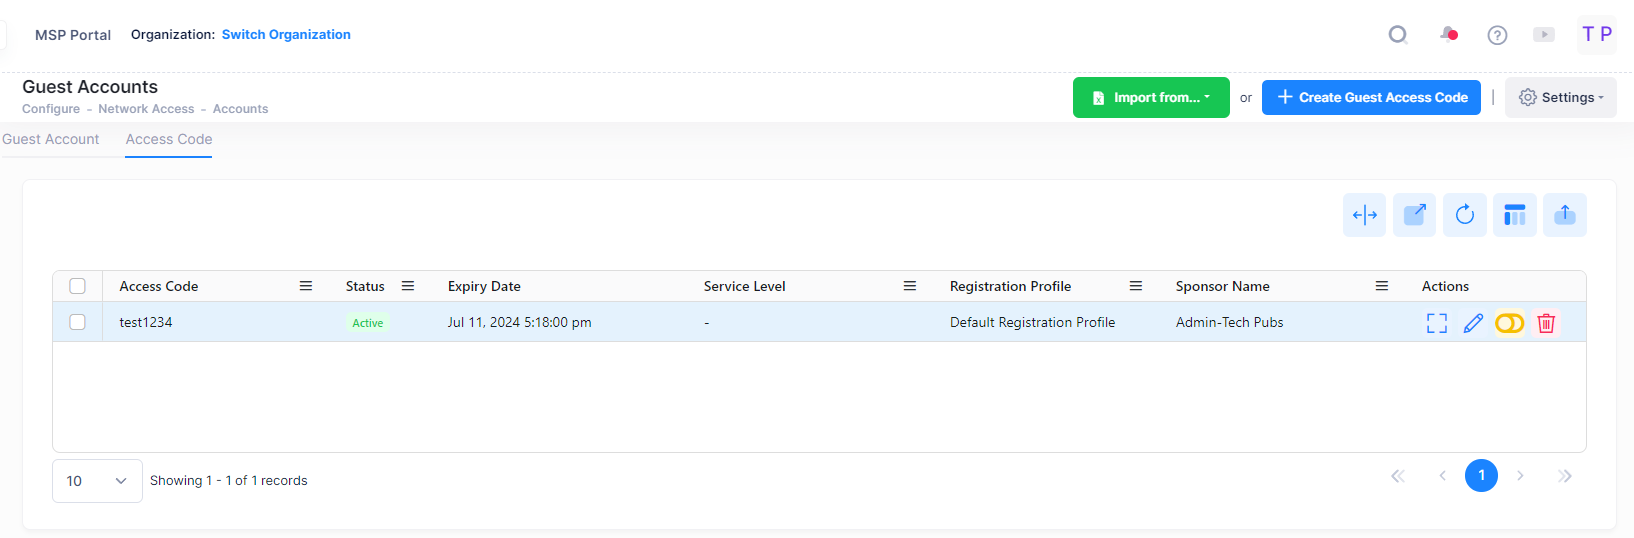
Display Access Code List
The Guest Account Access Code list displays information for the all configured Access Code the Guest User is using to log in into the Network. To display detailed information about a specific profile, click on the Additional Information icon under the “Actions” column. The information displayed on this screen is defined below.
Data displayed in each widget can be exported into a CSV, PDF or Excel sheet format. You can also switch the widgets to full-screen mode for a better display.
-
Access Code - The Access Code of the Guest User.
-
Service Level - The Service Level for the Guest Account, if configured.
-
Status - The administrative status of the account (Enabled/Expired/Disabled).
-
Expiration Date - The date and time the Guest Account expires.
-
Registration Profile - The registration profile for the Guest Account.
-
Sponsor Name - Sponsor who created the Guest Account or approved it for self-registration.
-
Admin-XXX - Indicates the sponsor belongs to the Administrator group; XXX indicates the account in the group.
-
EmployeeSponsor-YYY - Indicates the sponsor belongs to the Employee group; YYY indicates the employee account in the group.
-
GuestSponsor-ZZZ - Indicates the sponsor belongs to the Guest Operator group; ZZZ indicates the Guest Operator account in the group.
-
SelfRegister-AAA - Indicates no sponsor is involved and there is no need approval for the self-registration request; AAA indicates the login password is guest-user-defined (Manually) or UPAM-defined (Automatically).
-
-
Description - Optional description for the account.
-
Deletion Policy - The number of days after the Account Validity Period expires before Guest Accounts are automatically deleted:
-
Never - Guest Account will not be deleted at the end of the Account Validity Period (Default).
-
Immediately - Guest Account will be automatically deleted at the end of the Account Validity Period.
-
Number of Days - Guest Account will be automatically deleted on the configured number of days after the end of the Account Validity Period (Range = 1 - 90).
-
-
Effective Date - The first time the user logs in into the Guest Account.
-
Created At - The date and time the account was created.
Creating Multiple Guest Accounts
You can quickly create multiple Guest Accounts by clicking on the Batch Creation button at the top of the screen. If this button does not appear, the Batch Creation feature is not enabled. To enable this feature, click on the Settings button and select Global Guest Access Settings from the drop-down menu.
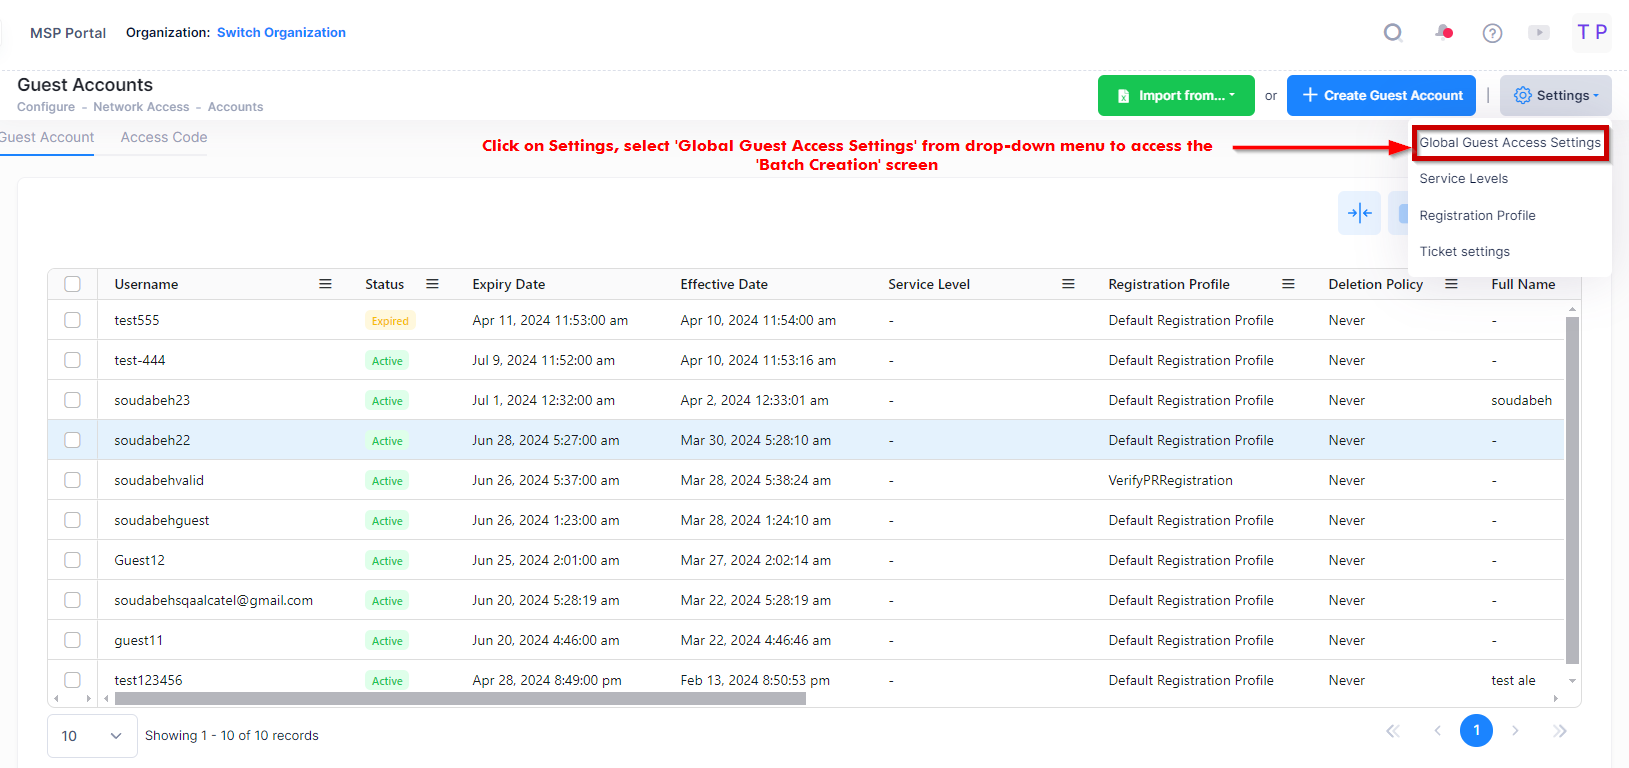
The Guest Access Settings screen opens. Refer to the Global Guest Access Settings online help for information about how to enable Batch Creation and configure the Registration Strategy for Guest Accounts..
Once you have enabled the Batch Creation feature, the Batch Creation button will appear at the top of the Guest Accounts screen.

Click on Batch Creation to open the Batch Account Creation screen. Based on whether the Guest Accounts List (“Account” tab) or the Access Code List (“Access Code” tab) is displayed, one of the following Batch Account Creation screens will open:
Batch Account Creation for Guest Accounts List
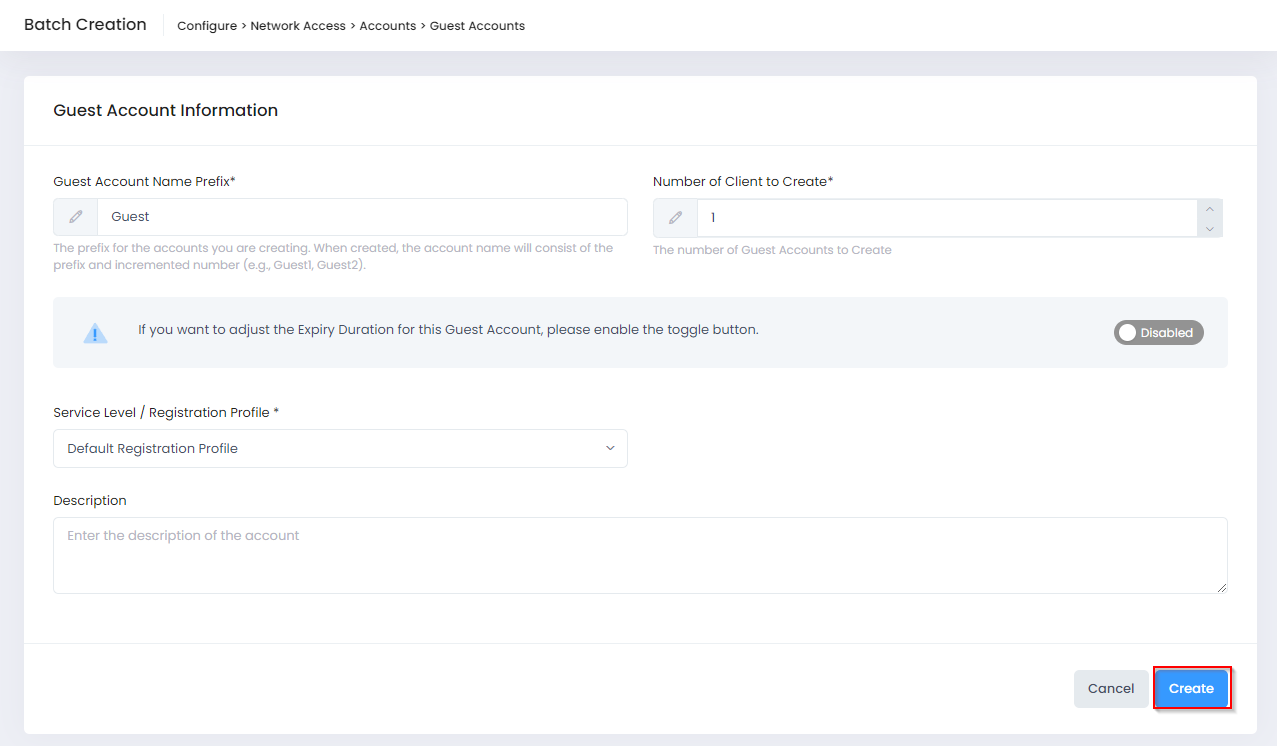
Complete the fields as described below, then click Create.
-
Guest Account Name Prefix - Enter a prefix for the accounts you are creating. When created, the account name will consist of the prefix and incremented number (for example, Guest1, Guest2).
-
Number of Clients to Create - Enter the number of Guest Accounts you want to create. (Range = 1 - 5000)
-
If you want to adjust the Expiry Duration for this Guest Account, please enable the toggle button - Enable/disable whether you want to adjust the Account Validity Period for the specified number of Guest Accounts that will be created. Disabled by default. When enabled, the following setting appears:
-
Account Validity Period - Set a new length of time, in days, that the Guest Account is valid. Make sure the value specified here does not exceed the value defined in the Global Guest Access Settings. For example, if you set the Global Account Validity Period to 180 days, the longest period you will be able to set here will be up to 180 days. (Range = 1 – 365, Default = 90).
-
-
Service Level / Registration Profile - Specify if a Registration Profile or Service Level that is linked to a Registration Profile is assigned to each account created. By default, the “Default Registration Profile” is used. See the online Service Levels help and the online Registration Profiles help for more information.
-
Description - Enter an optional description that will be used for each account created.
Batch Account Creation by Access Code
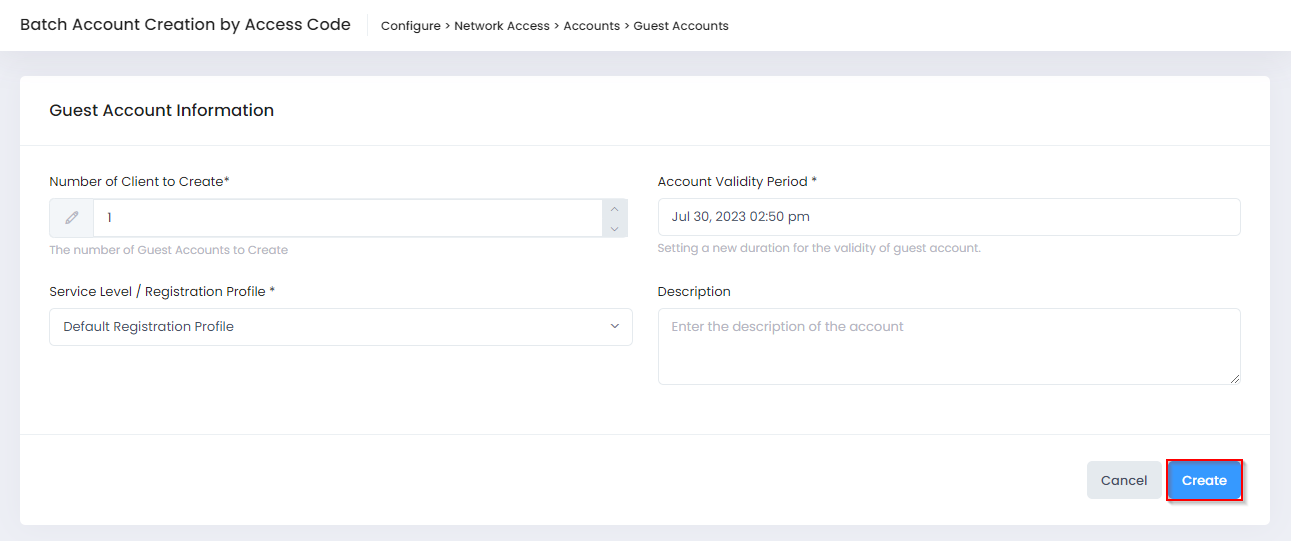
Complete the fields as described below, then click Create.
-
Number of Clients to Create - Enter the number of Guest Accounts you want to create. (Range = 1 - 5000)
-
Account Validity Period - Set a new length of time, in days, that the Guest Account is valid. Make sure the value specified here does not exceed the value defined in the Global Guest Access Settings. For example, if you set the Global Account Validity Period to 180 days, the longest period you will be able to set here will be up to 180 days. (Range = 1 – 365, Default = 90).
-
Service Level / Registration Profile - Specify if a Registration Profile or Service Level that is linked to a Registration Profile is assigned to each account created. By default, the “Default Registration Profile” is used. See the online Service Levels help and the online Registration Profiles help for more information.
-
Description - Enter an optional description that will be used for each account created.
Creating a Service Level
When a Guest Account is created or edited, an optional Service Level from the Service Levels List can be assigned to the account. The Service Level binds Access Roles and Policies to the Guest Account user.
To access the Service Levels screen, click Settings on the Guest Access Strategy screen or the “Guest Accounts” screen and select Service Levels from the drop-down menu. The Service Levels screen displays a list of configured Service Levels.
Use the Service Levels screen to display information about configured Service Levels that you can apply to different Guest users. This screen is also used to create, edit, and delete Service Levels.
Creating a Registration Profile
You can create a Registration Profile for Guest Accounts to customize the network access settings per the requirements of the Guest user. The Registration Profile determines Data and Time Quota limits for user access, Device and Account Validity attributes, and Exhaustion Handling (when Quota limits are reached).
When a Guest Account is created or edited, a Registration Profile (or optional Service Level linked to a Registration Profile) can be assigned to the account. To access the Registration Profile screen, click Settings on the Guest Access Strategy or “Guest Accounts” screen and select Registration Profile from the drop-down menu. The Registration Profile screen displays a list of configured Registration Profiles.
Use the Registration Profile screen to display information about configured Registration Profiles. This screen is also used to create, edit, and delete Registration Profiles.
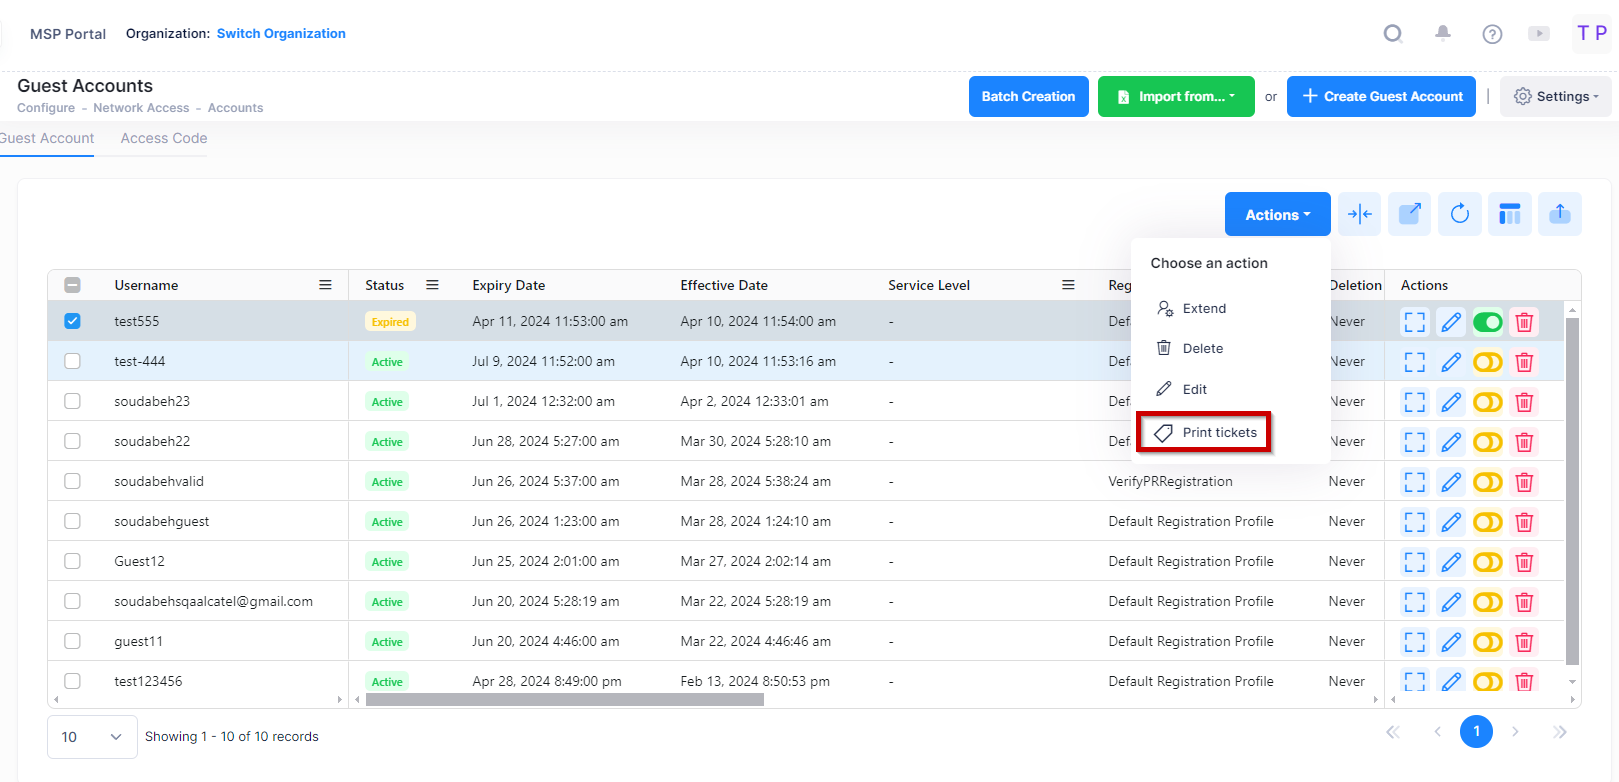
Print Tickets
You can print a ticket that contains Guest Account login information to send to the user. To print a login information ticket for a Guest Account, select the Guest Account(s) by clicking on the checkbox next to the Guest Accounts List entry, then click on Actions and select Print tickets from the drop-down menu list.
The following output will be generated in the form of PDF document containing the user login information for the Guest Account.

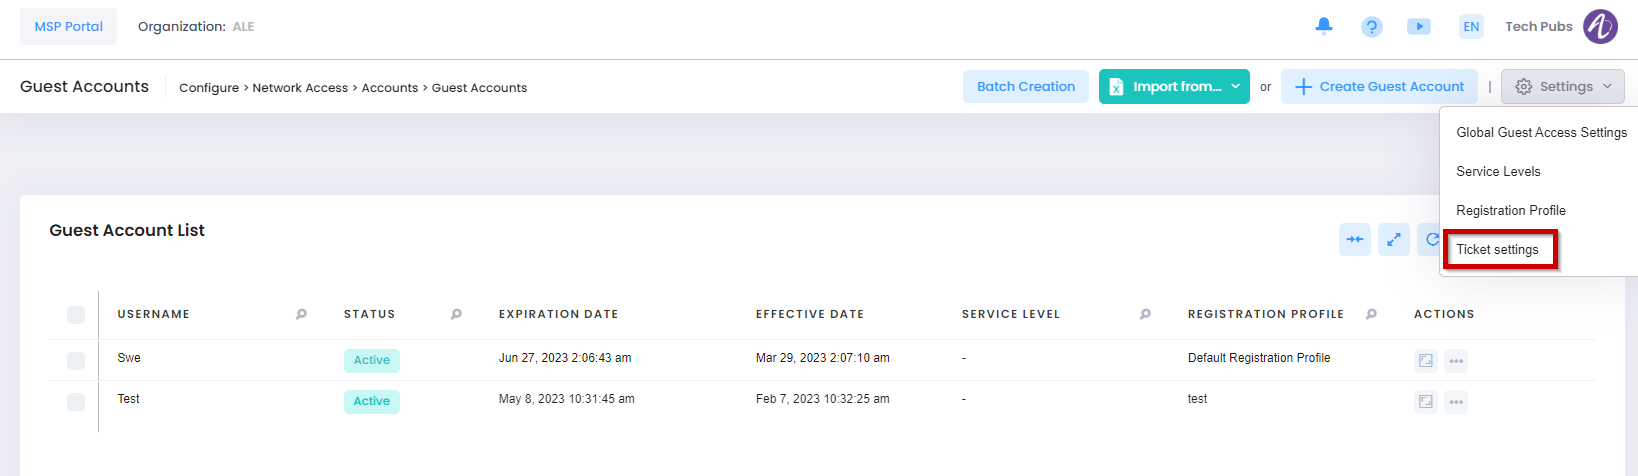
To customize the print tick PDF, click on Settings on the Guest Accounts screen and select Ticket Settings from the drop-down menu.
The following Ticket Settings screen appears. Enter the required fields and click on Save to save the settings.

-
Header - Enter the header to use in the PDF ticket.
-
Footer - Enter the footer to use in the PDF ticket.
-
Footer logo - Upload the logo for the footer (the file type can be in jpg, jpeg, jfif, pjpeg, pjp and png format).
-
Reset to default - Click on this button to automatically change all the custom ticket settings back to the default settings.
Editing a Guest Account
You can edit the parameter values for a guest account in the Guest Account List by accessing the Edit the Guest Account screen.
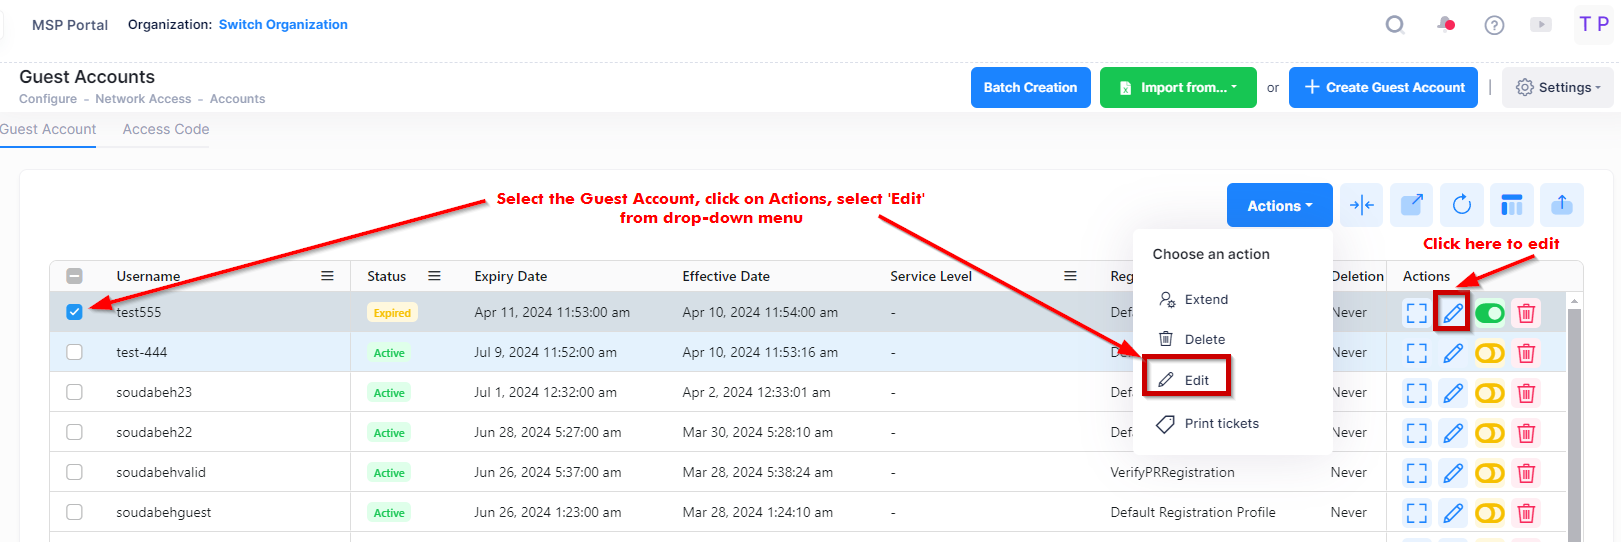
Use one of the following methods to access the Edit the Guest Account screen (as shown above):
-
Select the Guest Account to edit by clicking on the checkbox next to the Guest Account List, click on edit icon under the Actions column.
-
Select the Guest Account to edit and Click on the “Actions” button on the top of the screen and then select Edit from drop-down menu.
The following Edit the Guest Account screen displays. Edit the fields as described above, then click on Save.
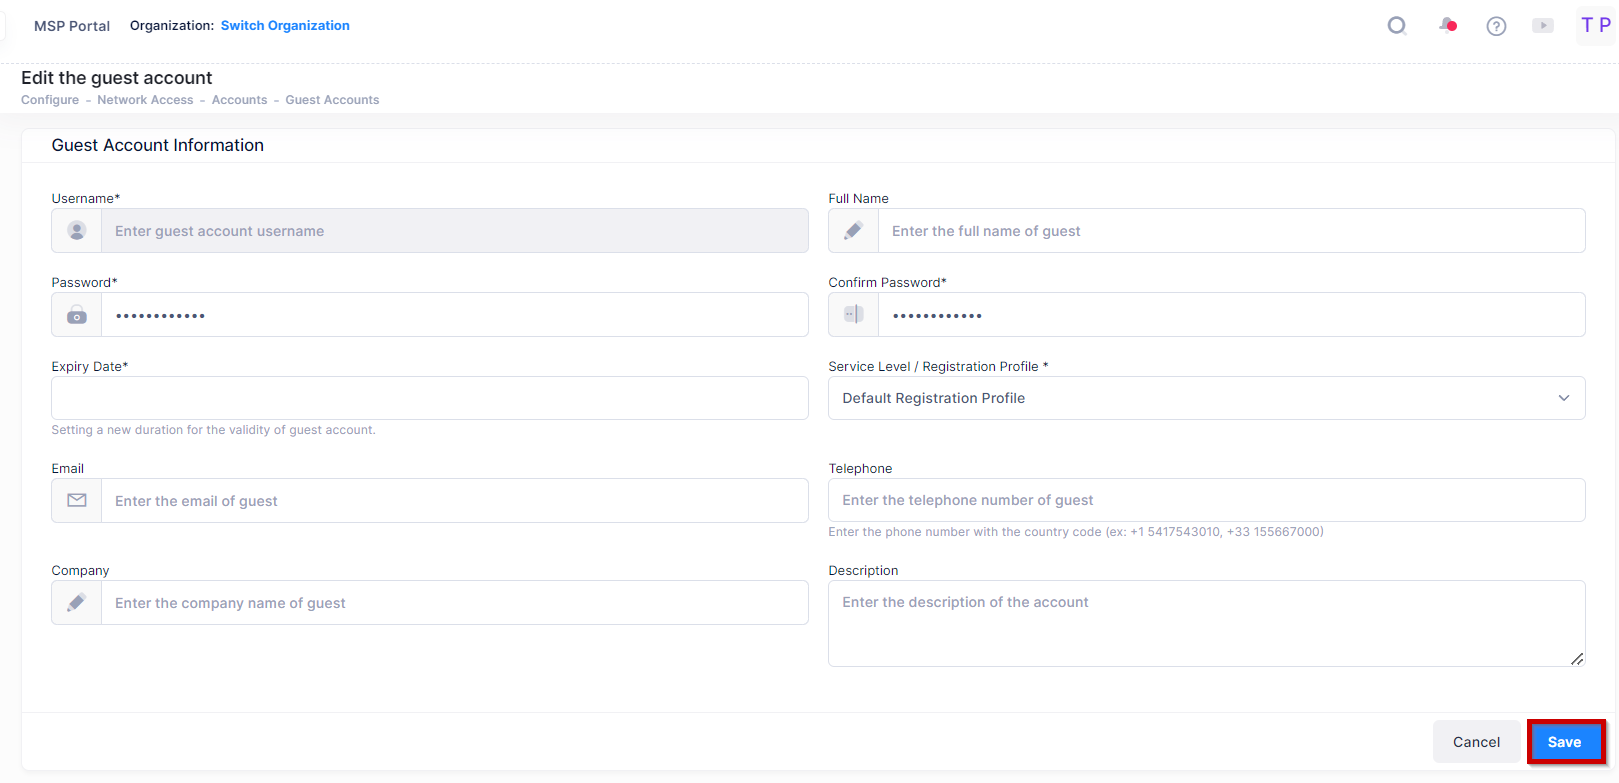
Note that you cannot edit an Account Name.
Deleting a Guest Account
Select a Guest from the Guest Account list and click on the Delete icon under the “Actions” column or click on the Actions button and select Delete from the drop-down menu. When the following confirmation prompt appears, click on Delete to delete the Guest Account.
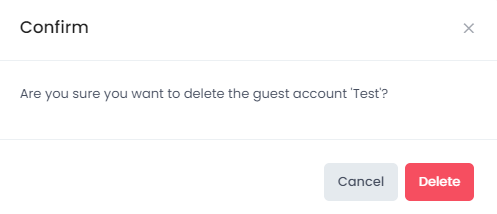
Click on Delete to confirm that you want to delete the Guest Account from the List .
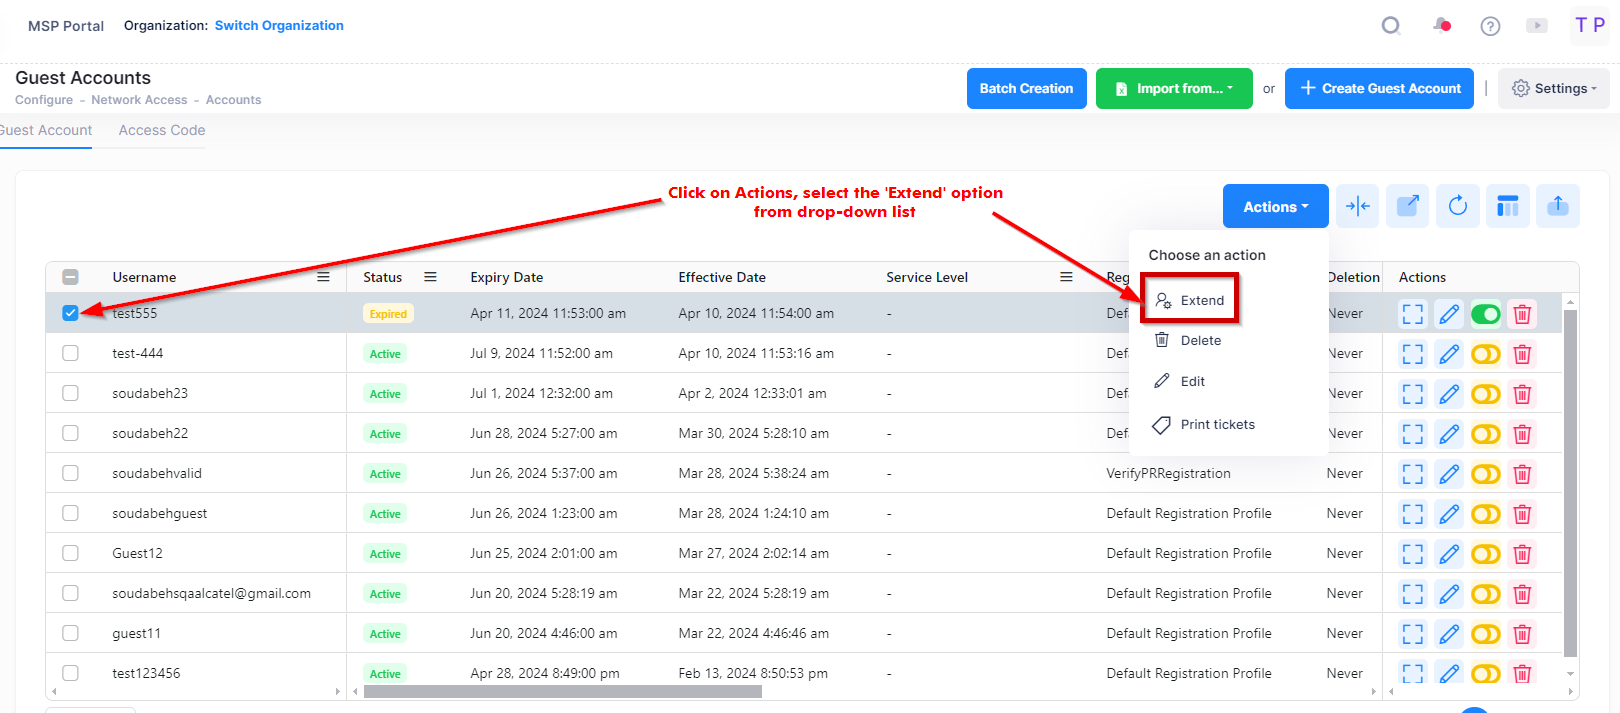
Extend a Guest Account
You can extend the expiration date for a guest account or guest access code account in the Guest Account List by accessing the Extend Guest Accounts screen.
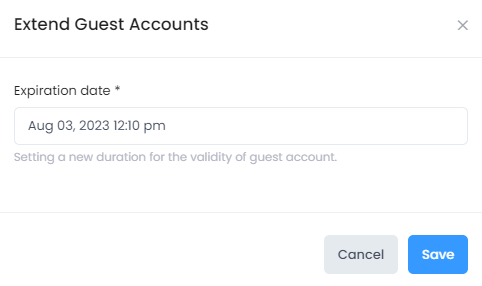
The following Extend the Guest Accounts screen displays. Select a new duration for the validity of the guest accounts or guest access code accounts ,then click on Save.
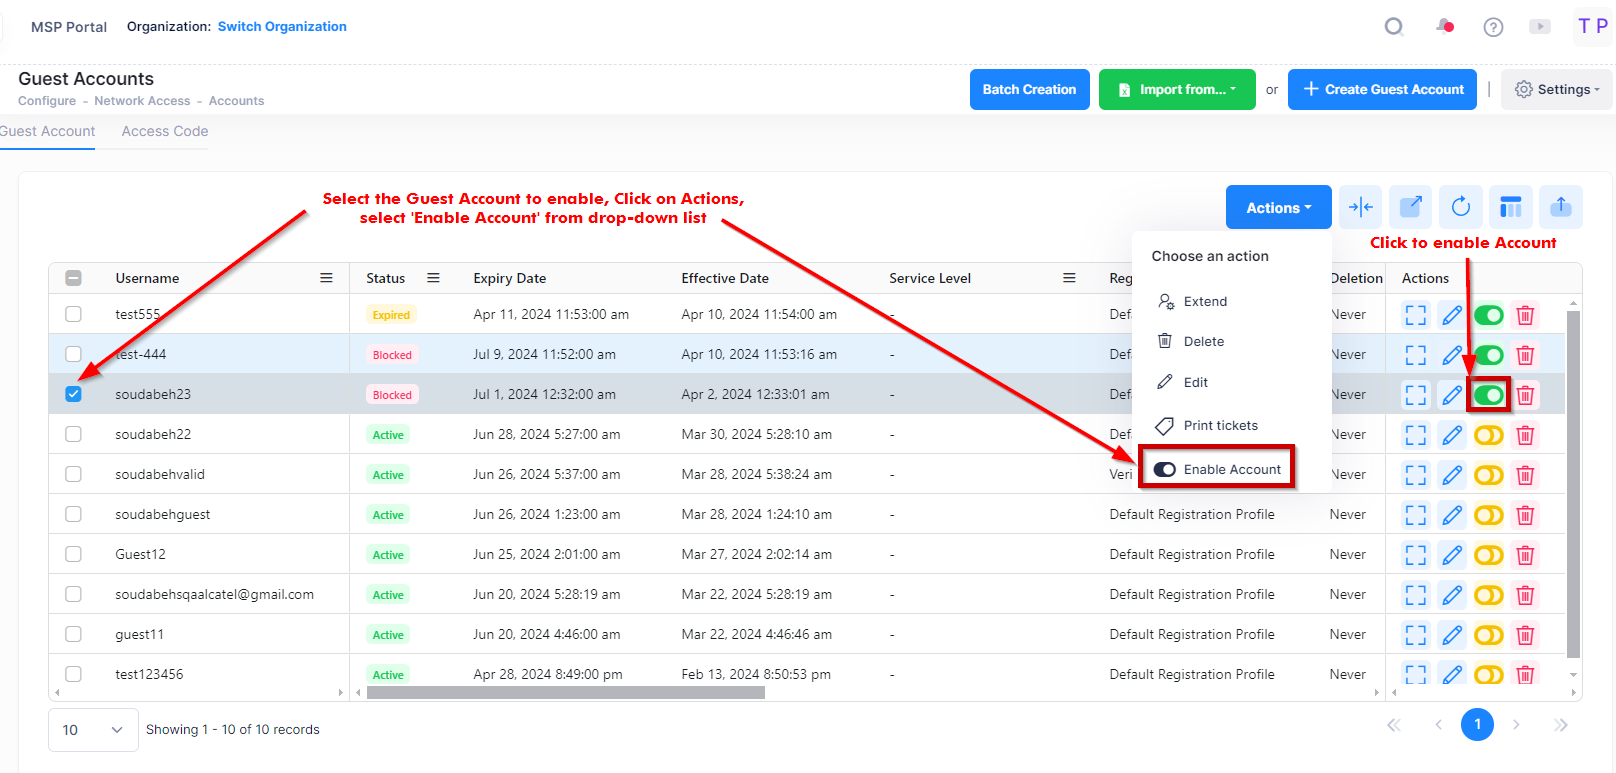
Enable a Guest Account
To enable a Guest Account, use one of the following methods for the guest accounts you want to activate:
-
Select a Guest Account by clicking on the checkbox next to the Guest Account List, click on Actions, then select Enable Account from the drop-down menu.
-
Click on the dot icon under the “Actions” column next to the Guest Account List, then select Enable Account from the drop-down menu.
When you select the Guest Account you want to enable, the following confirmation prompt appears:
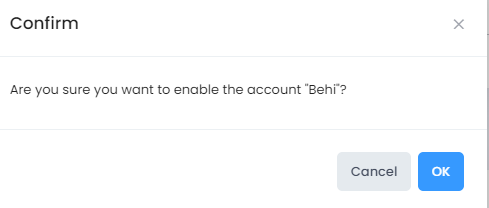
Click on OK to confirm that you want to enable the Guest Account(s) from the List .
Disable a Guest Account
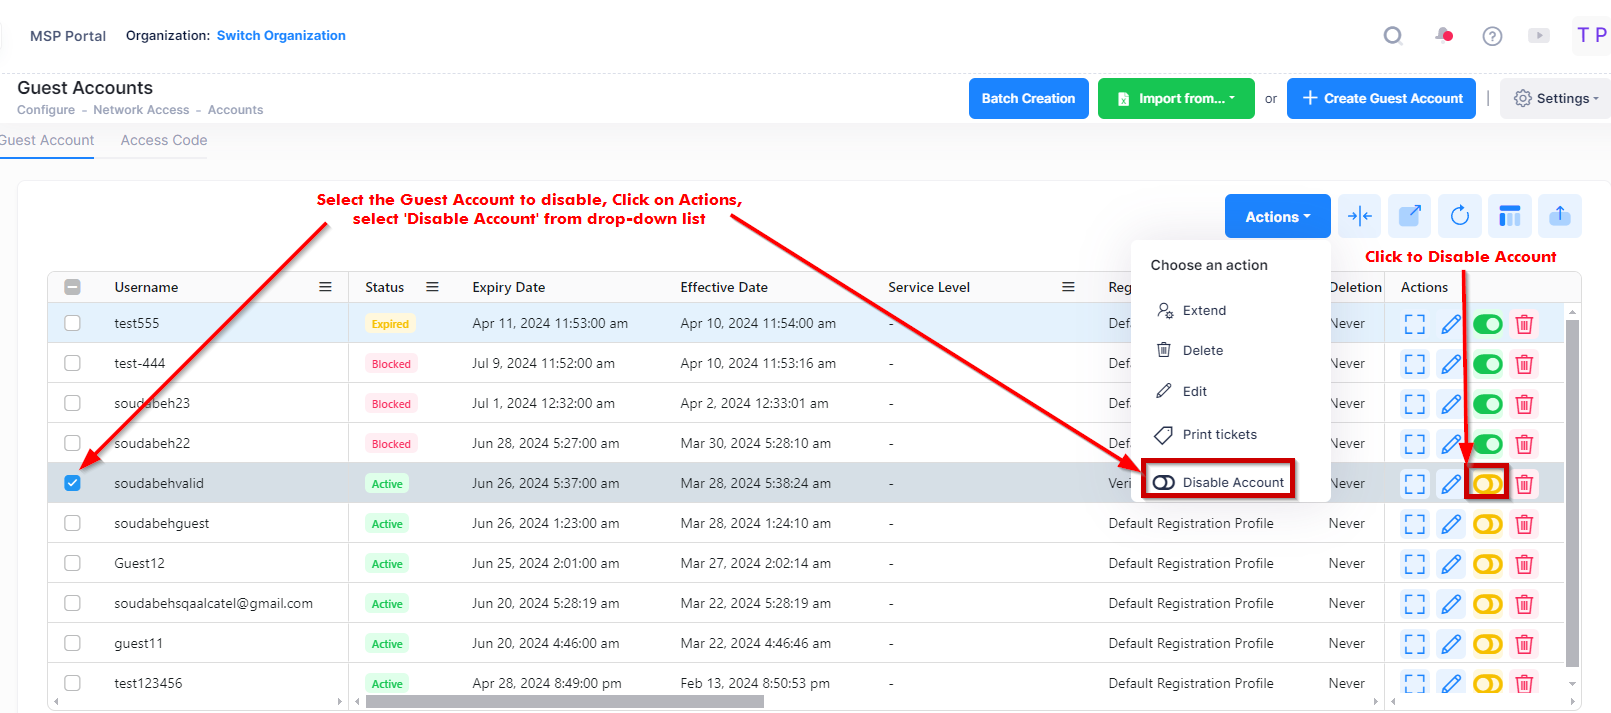
To disable a Guest Account, use one of the following methods for the guest accounts you want to block:
-
Select a Guest Account by clicking on the checkbox next to the Guest Account List, click on Actions, then select Disable Account from the drop-down menu.
-
Click on the dot icon under the “Actions” column next to the Guest Account List, then select Disable Account from the drop-down menu.
When you select the Guest Account you want to disable, the following confirmation prompt appears:
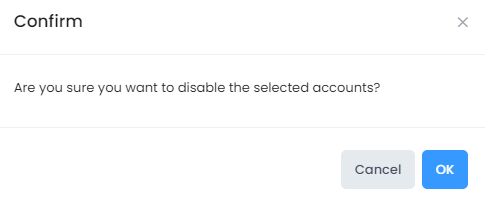
Click on OK to confirm that you want to disable the Guest Account(s) from the List .
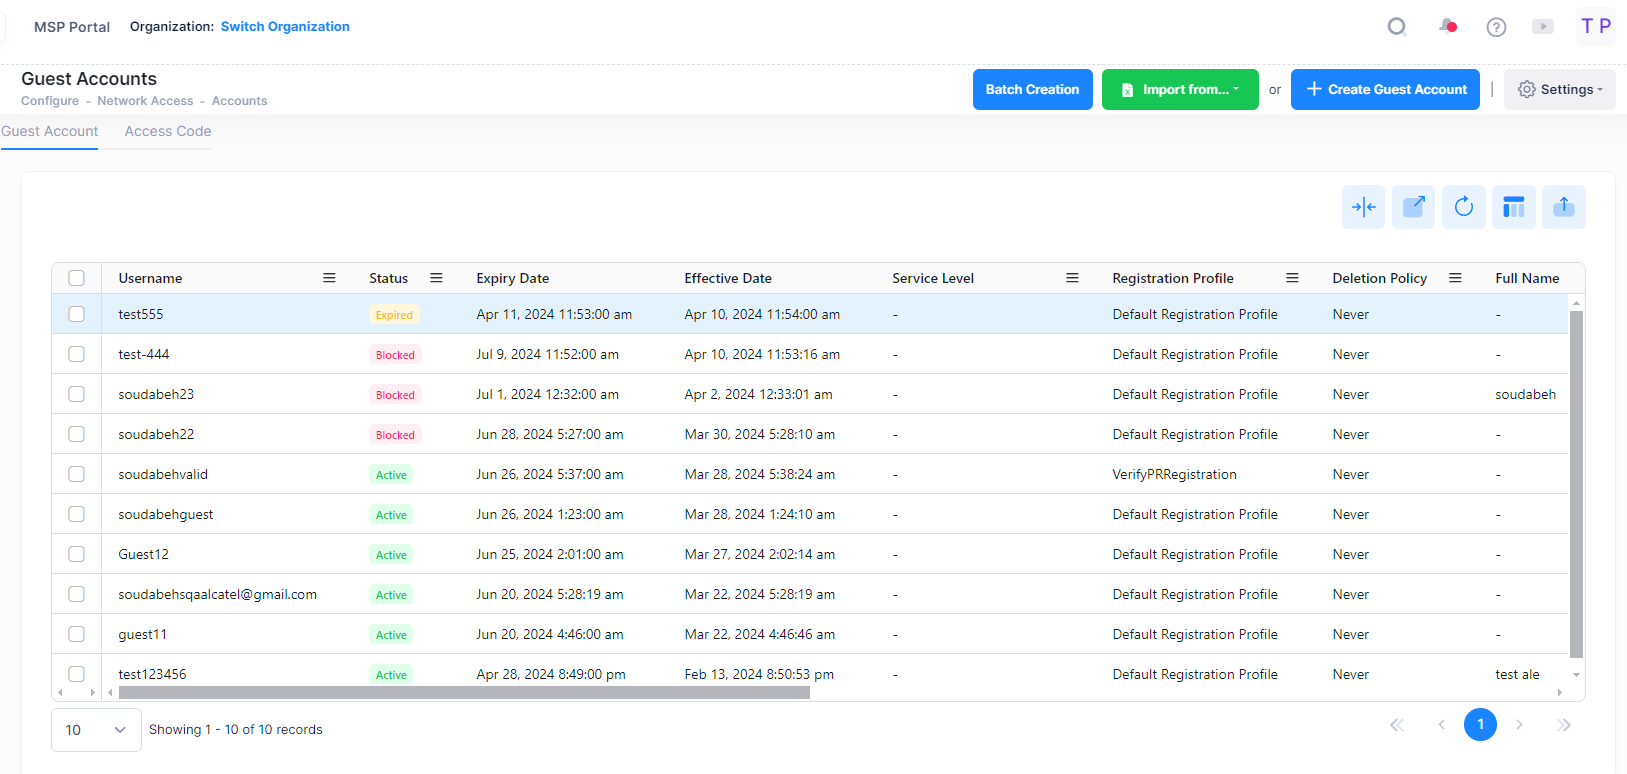
Display Guest Account List
The Guest Account list displays information for the all configured Guest Accounts. To display detailed information about a specific profile, click on the Additional Information icon under the “Actions” column. The information displayed on this screen is defined below.
-
User Name - Account identifier (e.g., name of the guest).
-
Service Level - The Service Level for the Guest Account, if configured.
-
Status - The administrative status of the account (Enabled/Expired/Disabled).
-
Effective Date - The date and time the account was created.
-
Expiration Date - The date and time the Guest Account expires.
-
Registration Profile - The registration profile for the Guest Account.
-
Full Name - Full name of the Guest User.
-
Company - Company name of the Guest User.
-
Telephone - Telephone number of the Guest User.
-
Email - Email address of the Guest User.
-
Sponsor Name - Sponsor who created the Guest Account or approved it for self-registration.
-
Admin-XXX - Indicates the sponsor belongs to the Administrator group; XXX indicates the account in the group.
-
EmployeeSponsor-YYY - Indicates the sponsor belongs to the Employee group; YYY indicates the employee account in the group.
-
GuestSponsor-ZZZ - Indicates the sponsor belongs to the Guest Operator group; ZZZ indicates the Guest Operator account in the group.
-
SelfRegister-AAA - Indicates no sponsor is involved and there is no need approval for the self-registration request; AAA indicates the login password is guest-user-defined (Manually) or UPAM-defined (Automatically).
-
-
Description - Optional description for the account.
-
Guest Account Deletion Policy - The number of days after the Account Validity Period expires before Guest Accounts are automatically deleted:
-
Never - Guest Account will not be deleted at the end of the Account Validity Period (Default).
-
Immediately - Guest Account will be automatically deleted at the end of the Account Validity Period.
-
Number of Days - Guest Account will be automatically deleted on the configured number of days after the end of the Account Validity Period (Range = 1 - 90).
-