
The Authentication Server allows an organization administrator to configure an external authentication source such as LDAP, Active Directory, or RADIUS — for user login on OmniVista Terra. When enabled, all user logins for the organization are authenticated against the configured external server instead of the local database. This provides centralized credential management for organizations that already maintain user directories. You must have the Organization Administrator role to configure the Authentication Server.
To configure Authentication Server settings, click on Settings > Authentication Server under “Organization” section to access the Authentication Server screen. This screen is also used to Configuring LDAP with with secure Connection (LDAPS), Configuring RADIUS with secure Connection (RadSec), Testing the Connection, Logging in as an External User, Resetting Authentication to Local. Refer to the troubleshooting section for solutions to your queries.
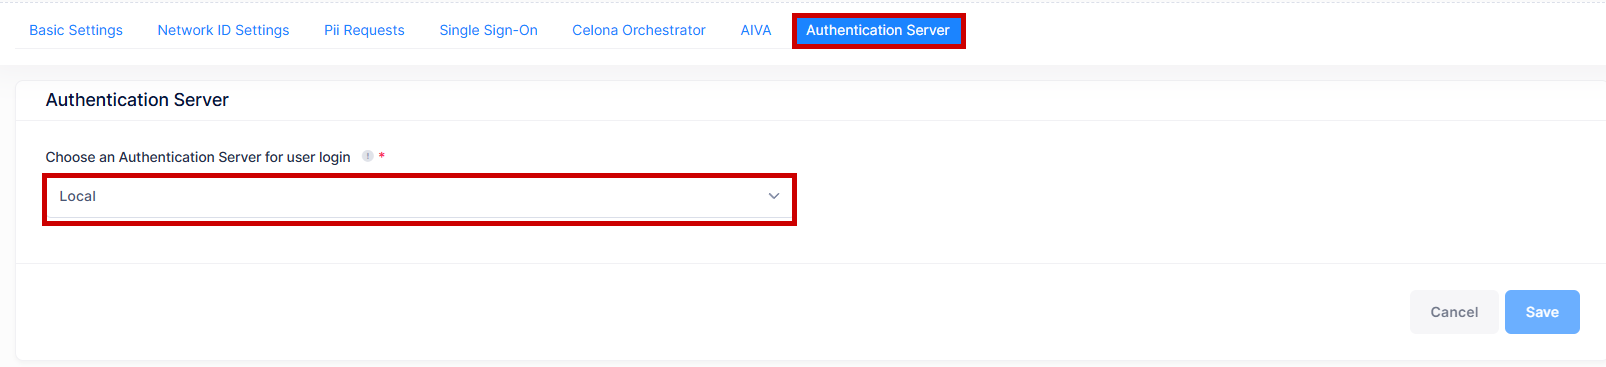
By default, the Local Authentication Server is selected. Choose either LDAP or RADIUS from the “Choose an Authentication Server for user login” drop-down list.
When an external authentication server (LDAP or RADIUS) is enabled, local OmniVista user logins are blocked for that organization. Only users authenticating through the external server can log in.
Configuring LDAP Authentication
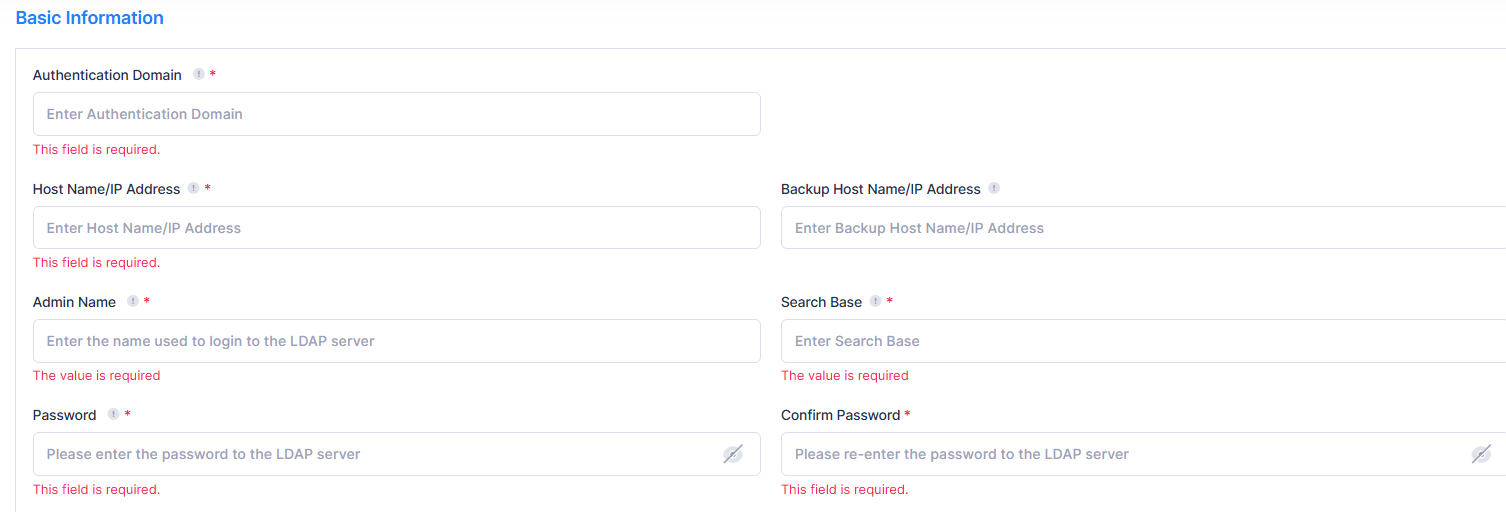
Select LDAP from the "Choose an Authentication Server for user login" dropdown menu list. The LDAP Basic Information section is displayed as shown below. Follow the step-by-step process below to configure LDAP Authentication for OmniVista Terra user login.
-
Basic Information:
-
Authentication Domain - Enter a unique domain name that users include when logging in. Users authenticate using the format DOMAIN\username. (Range - alphanumeric, maximum= 128 characters).
-
Host Name/IP Address - Enter the hostname or IP address of the LDAP server (e.g., 192.168.10.1).
-
Backup Host Name/IP Address -Enter the hostname or IP address of the LDAP backup server (e.g., 192.168.10.1).
-
Admin Name - Enter the administrator account used to bind and query the LDAP server. (Range = maximum 128 characters).
-
Search Base - Enter the location in the LDAP directory tree where authentication information can be found (e.g., o=alcatel.com).
-
Password - Enter the password for the LDAP admin account. (Range = maximum 128 characters).
-
Confirm Password - Re-enter the password to confirm.
-
-
Advanced Information: Configure the field information as described below and move to next step:

-
Retries - Enter the number of authentication retry attempts. (Range = 1–3, Default = 3).
-
Timeout - Enter the number of seconds before a request to the server times out. (Range = 1–30, Default = 2).
-
Port - Enter the port number used to connect to the LDAP server. (Range = 1–65535, Default = 389).
-
TLS/SSL Configuration - The TLS/SSL Configuration tab is disabled by default. Enable the toggle and configure the section as follows:

-
CA Certificate - Select a CA certificate file (.pem, .crt, .cer, or .der) used to verify the server's SSL/TLS certificate.
-
Client Authentication - Enable (mTLS) for mutual TLS to authenticate both the Client and the server. The mTLS certificate fields are displayed as shown below. Enter the required information and move to next step:
-
Client Certificate - Select a client certificate file (.pem, .crt, .cer, or .der) used for mTLS authentication.
-
Client Key - Select the client key file (.key) used for mTLS authentication.
-
Private key password - Enter the password to protect the private key used for mTLS authentication. (Range = maximum 128 characters).
-
Confirm private key password - Re-enter the private key password to confirm.
-
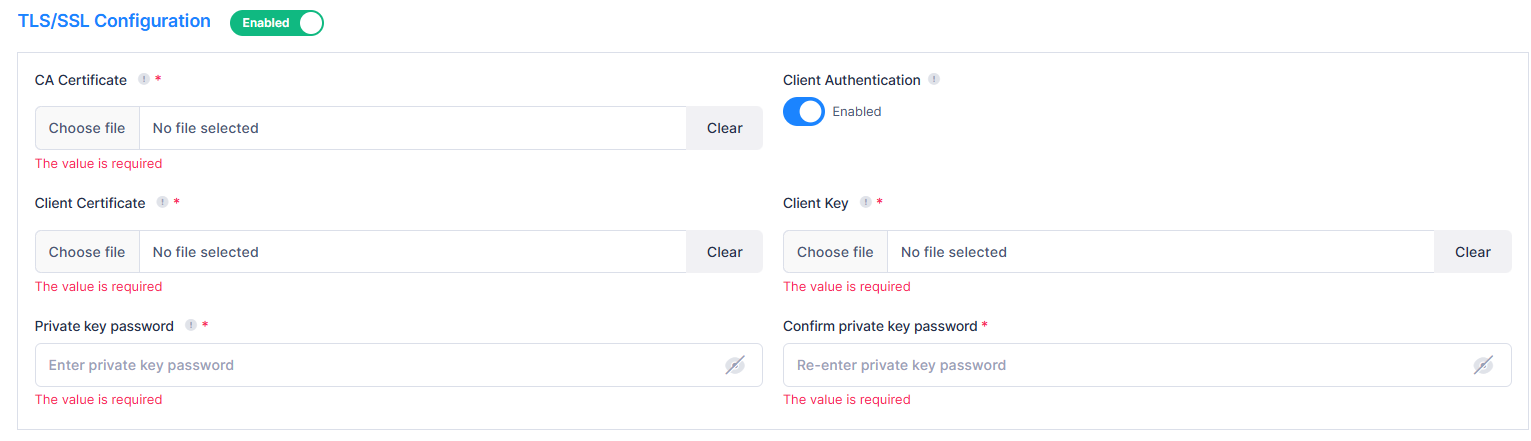
When TLS is enabled for LDAP, the port changes to 636, and the "Host Name/IP Address" field requires a domain name (FQDN). IP addresses are not accepted with TLS enabled.
-
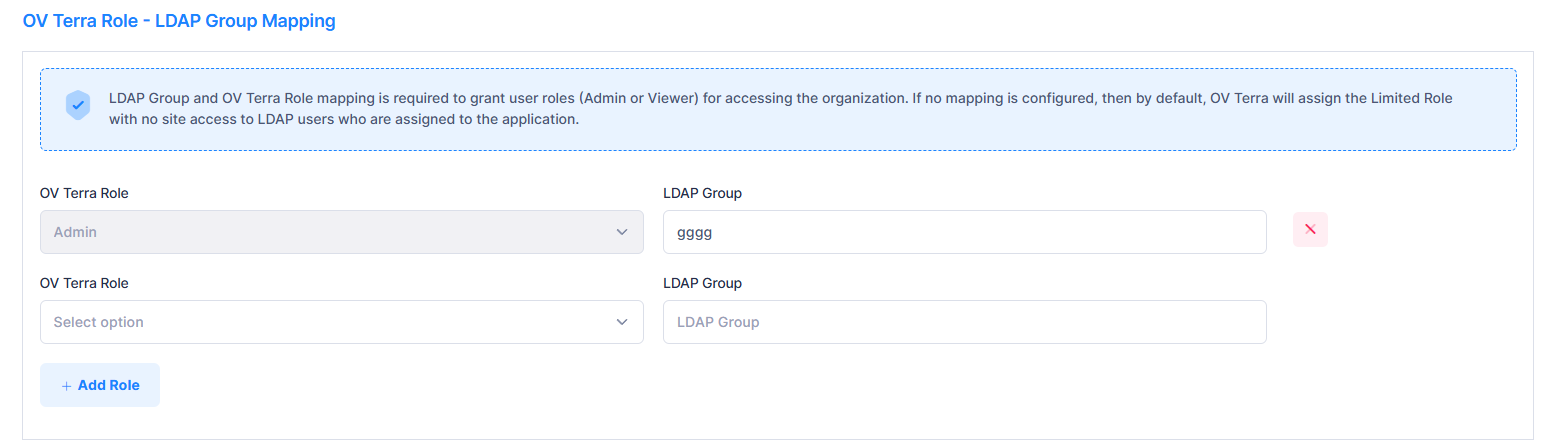
OV Terra Role - LDAP Group Mapping - Map roles in OmniVista Terra to groups on your external server. This mapping sets the access level for external users at login.
Group and OV Terra role mapping is required to grant user roles (Admin or Viewer) for accessing the organization. If no role mapping matches the user's group, login will fail with a "missing role" error and the user will be denied access.
-
OV Terra Role - Select the OV Terra Role from the drop-down list. (Admin or Viewer).
-
LDAP Group - Enter the group name as defined on your external server.
To add another Role mapping, click on Add Role button and click the cross icon to delete a assigned mapping. Click on Test Connection button to verify the connectivity. After a successful test, click on Save button to save the configuration. For more details, see Testing the Connection section.
Configuring RADIUS Authentication
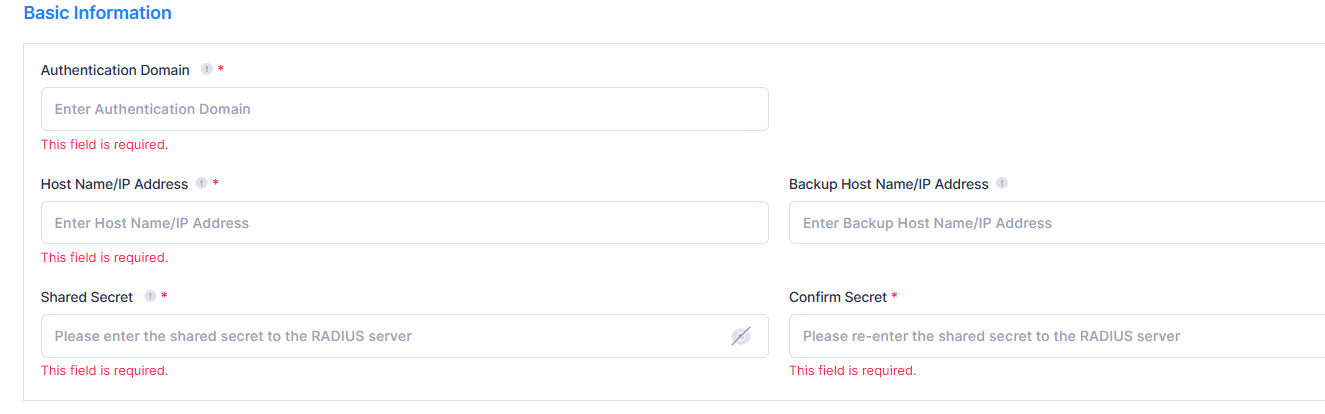
Select RADIUS from the "Choose an Authentication Server for user login" dropdown menu list. The RADIUS Basic Information section is displayed as shown below. Follow the step-by-step process below to configure RADIUS Authentication for OmniVista Terra user login.
-
Basic Information:
-
Authentication Domain - Enter a unique domain name that users include when logging in. Users authenticate using the format DOMAIN\username. (Range - alphanumeric, maximum= 128 characters).
-
Host Name/IP Address - Enter the hostname or IP address of the RADIUS server.
-
Backup Host Name/IP Address - Enter the hostname or IP address of a backup RADIUS server.
-
Shared Secret - Enter the shared secret used to authenticate communication between OmniVista Terra and the RADIUS server. (Range = maximum 256 characters).
-
Confirm Shared Secret - Re-enter the shared secret to confirm.
-
-
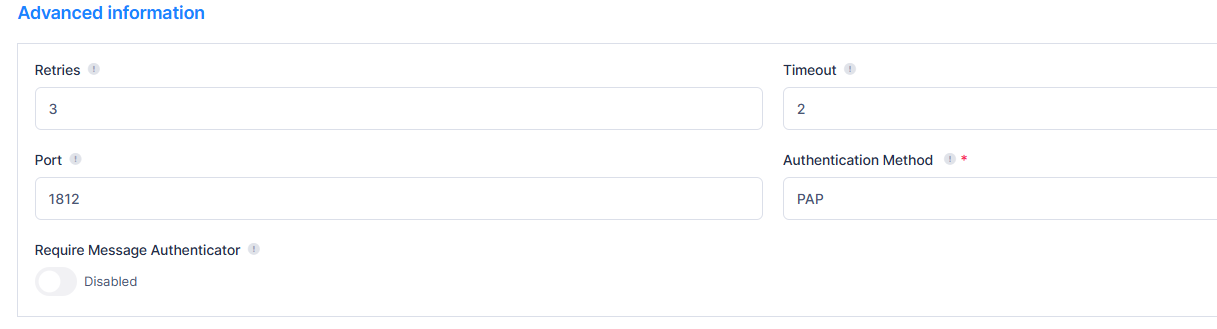
Advanced Information - Configure the field information as described below and move to next step:
-
Retries - Enter the number of authentication retry attempts. (Range = 1–3, Default = 3)
-
Timeout - Enter the number of seconds before a request to the server times out. (Range = 1–30, Default = 2)
-
Port - Enter the port number used to connect to the RADIUS server. (Range = 1–65535, Default = 1812)
-
Authentication Method - Select the method used to authenticate users against the RADIUS server. (PAP, CHAP, MSCHAP, MSCHAPv2, or EAP-MSCHAPv2).
-
Require Message Authenticator - When enabled, the server response must include a valid Message-Authenticator attribute. Responses without it or with an invalid signature are rejected. When disabled, the server does not validate the Message-Authenticator in the response, even if present. The Message-Authenticator is always included in outgoing requests regardless of this setting. (By default, this option is disabled and only available when TLS is not enabled.)
-
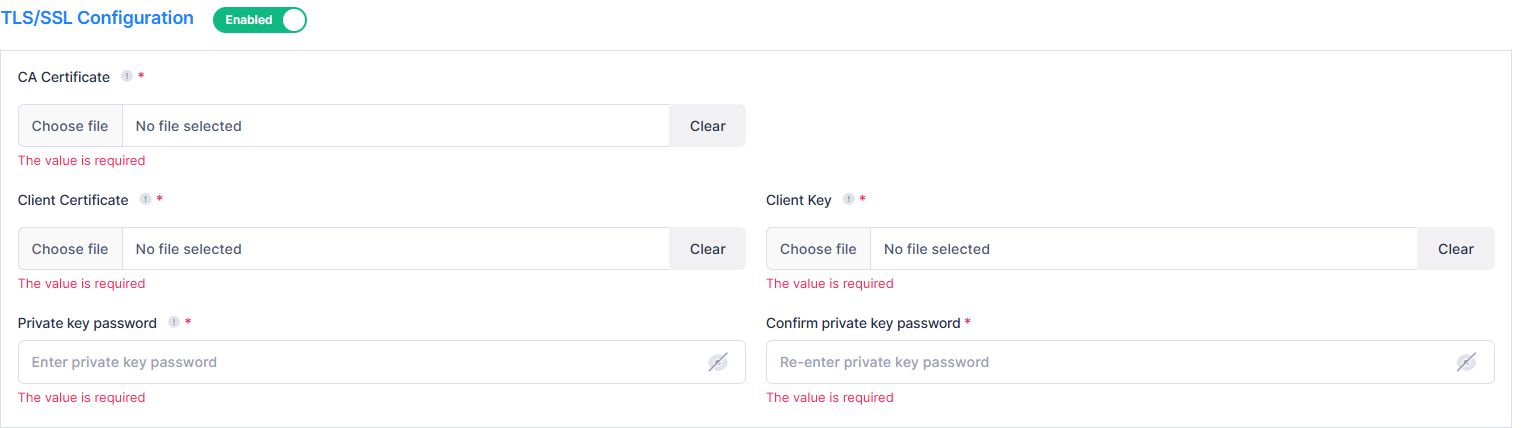
TLS/SSL Configuration - The TLS/SSL Configuration tab is disabled by default. Enable the toggle and configure the section as follows:
-
CA Certificate - Select a CA certificate file (.pem, .crt, .cer, or .der) used to verify the server's TLS certificate.
-
Client Certificate - Select a client certificate file (.pem, .crt, .cer, or .der) used for mTLS authentication.
-
Client Key - Select the client key file (.key) used for mTLS authentication. (Required)
-
Private key password - Enter the password that protects the private key used for mTLS authentication. (Range = maximum 128 characters).
-
Confirm private key password - Re-enter the private key password to confirm.
When TLS is enabled for RADIUS, the port switches to 2083 and client authentication (mTLS) activates automatically. OmniVista Terra supports mTLS only for RadSec. The "Require Message Authenticator" option hides when TLS is enabled.
-
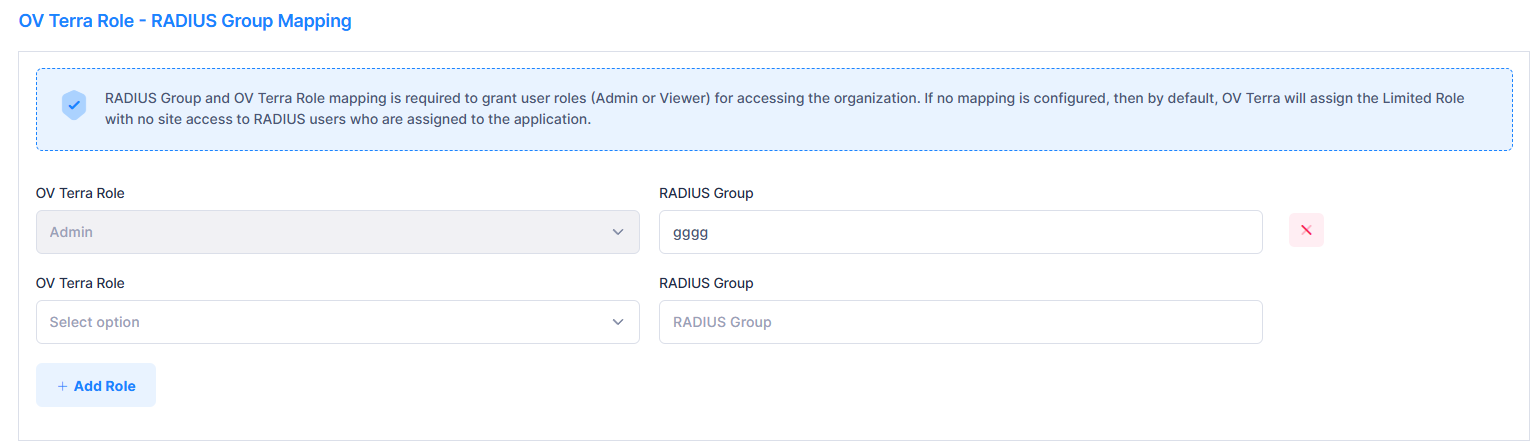
OV Terra - Role RADIUS Group Mapping - Map roles in OmniVista Terra to groups on your external server. This mapping sets the access level for external users at login.
-
OV Terra Role - Select the OV Terra Role from the drop-down list. (Admin or Viewer).
-
RADIUS Group - Enter the group name as defined on your external server.
To add another Role mapping, click on Add Role button and click the cross icon to delete a assigned mapping. Click on Test Connection button to verify the connectivity. After a successful test, click on Save button to save the configuration. For more details, see Testing the Connection section.
Testing the Connection
After configuring the authentication server, test the connection before saving.

Click on Test Connection button. The Test Connection screen appears as shown below:
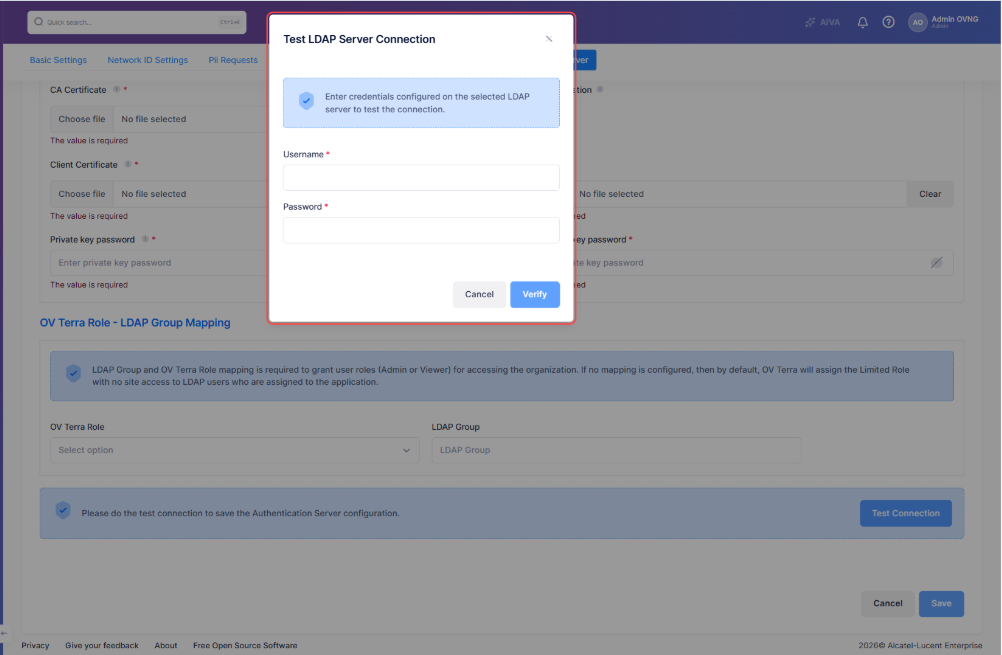
Enter a valid Username and Password from the external server (LDAP or RADIUS) and Click on Verify. If the connection is successful, a "Connection Successful" message is displayed. After a successful test, click on Save button to save the configuration.
The Save button becomes active only after the connection test succeeds.
If the connection fails, verify the server address, port, credentials (Admin Name/Password for LDAP and Shared Secret for RADIUS), and certificate configuration if TLS is enabled.
Logging in as an External User
Once an Organization administrator has configured an external authentication server, users can log in using their external credentials.
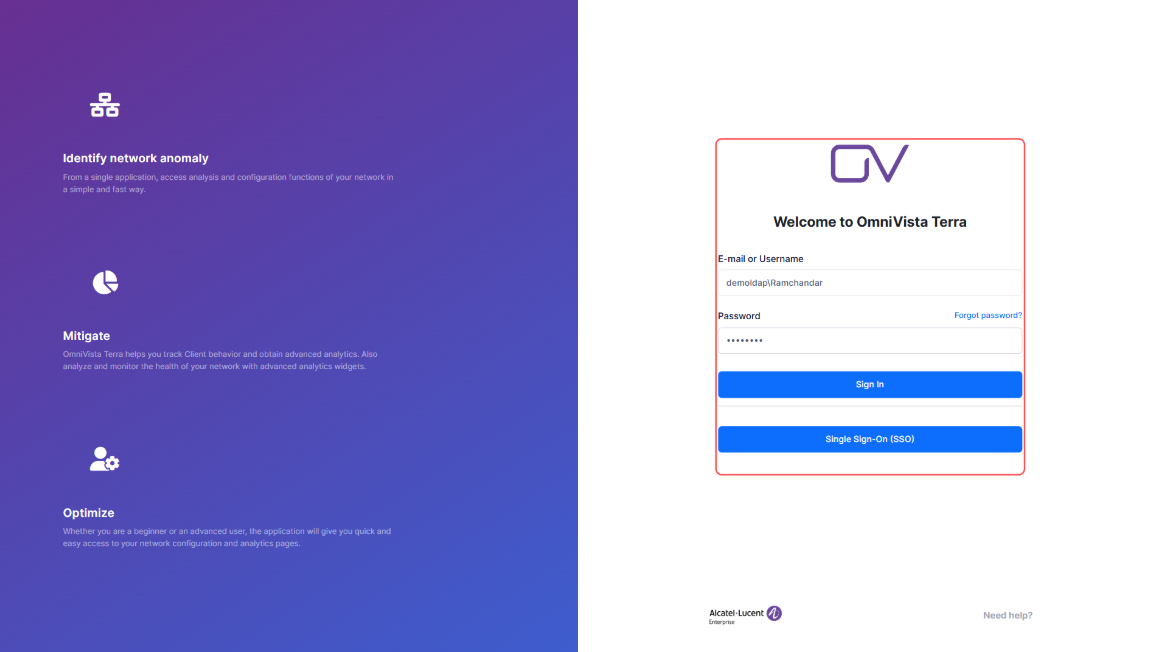
Follow the below steps to login as an external user.
-
Go to the OmniVista Terra Sign In screen as shown above.
-
In the E-mail or Username field, enter your credentials in DOMAIN\username format.
-
Enter the password for your external (LDAP or RADIUS) account.
-
Click on Sign In button.
-
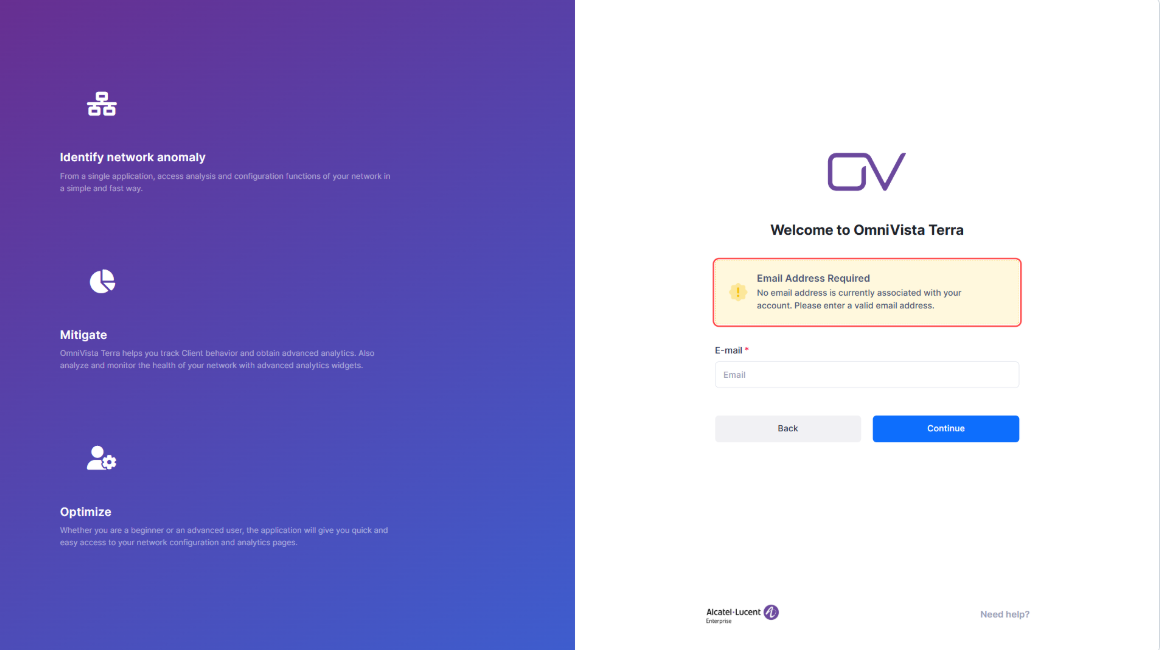
If your external account lacks a valid email address, an "Email Address Required" notification prompt appears as shown below. Enter a valid email and click Continue. This prompt appears only on your first login; later logins use the email you provided.
-
After successful authentication and login, you are directed to the Organization dashboard screen.
If the external account lacks a first or last name, the system uses the username for both during account creation.
Resetting Authentication to Local
If the external authentication server is unreachable and users cannot log in, an administrator can reset the authentication method to local.
Use one of the following methods to reset the Authentication to ‘Local’:
-
Log in to the OmniVista Terra web admin interface using the super admin user account. Reset the authentication server for the affected organization back to Local.
-
Go to the Authentication Server Screen, select Local from the "Choose an Authentication Server for user login" drop-down list, and click Update. A confirmation message warns that disabling the external authentication server will delete all external user information and settings.
Resetting to local authentication deletes all information and settings related to external users, including audit logs, login attempts, login history, and user settings.
Troubleshooting/FAQs
The Test connection fails with message ‘Connection failed’.
Verify the following use cases for successful Test connection:
-
The "Host Name/IP Address" is correct and the server is reachable from the OmniVista Terra network.
-
The port number matches the one configured on the external server.
-
The "Admin Name" and "Password" entered should be correct, and the "Search Base" is valid for the LDAP Authentication server type.
-
The "Shared Secret" matches the one configured on the RADIUS server.
-
If TLS is enabled, ensure the uploaded certificates are valid and not expired.
When TLS is enabled for LDAP, the Host Name/IP Address field shows an error.
When TLS is enabled for LDAP, you must enter a fully qualified domain name (FQDN) in the “Host Name/IP Address” field. IP addresses (IPv4 or IPv6) are not accepted.
An "Email Address Required" prompt appears during login.
If the external user account does not have a valid email address configured on the LDAP or RADIUS server, OmniVista Terra prompts the user to enter one. Enter a valid email address and click on the Continue tab to complete the login.
Users cannot log in after the external server becomes unreachable.
If the configured authentication server is down or unreachable, all user logins are blocked. An administrator must reset the authentication method to local using the web admin tool (see the section, Resetting Authentication to Local).
Save button remains disabled after completing all fields.
The Save button requires a successful test connection before it becomes active. Click Test Connection, enter valid credentials from the external server, and click Verify. The Save button becomes active after the connection test succeeds.
The Backup Host Name/IP Address field shows an error.
The backup server address must differ from the primary "Host Name/IP Address." Enter a different hostname or IP address for the backup server.