Collect Support Information
The Collect Support Information application allows you to collect log information from network devices that you can send to the Alcatel-Lucent Enterprise (ALE) team to troubleshoot problems. The log files can be downloaded to a compressed file (tar.gz for Access Point devices and Switches).
To access the Collect Support Information screen, click on Diagnostic Tools > Collect Support Info under the “Monitor” section of the OmniVista Cirrus Menu.

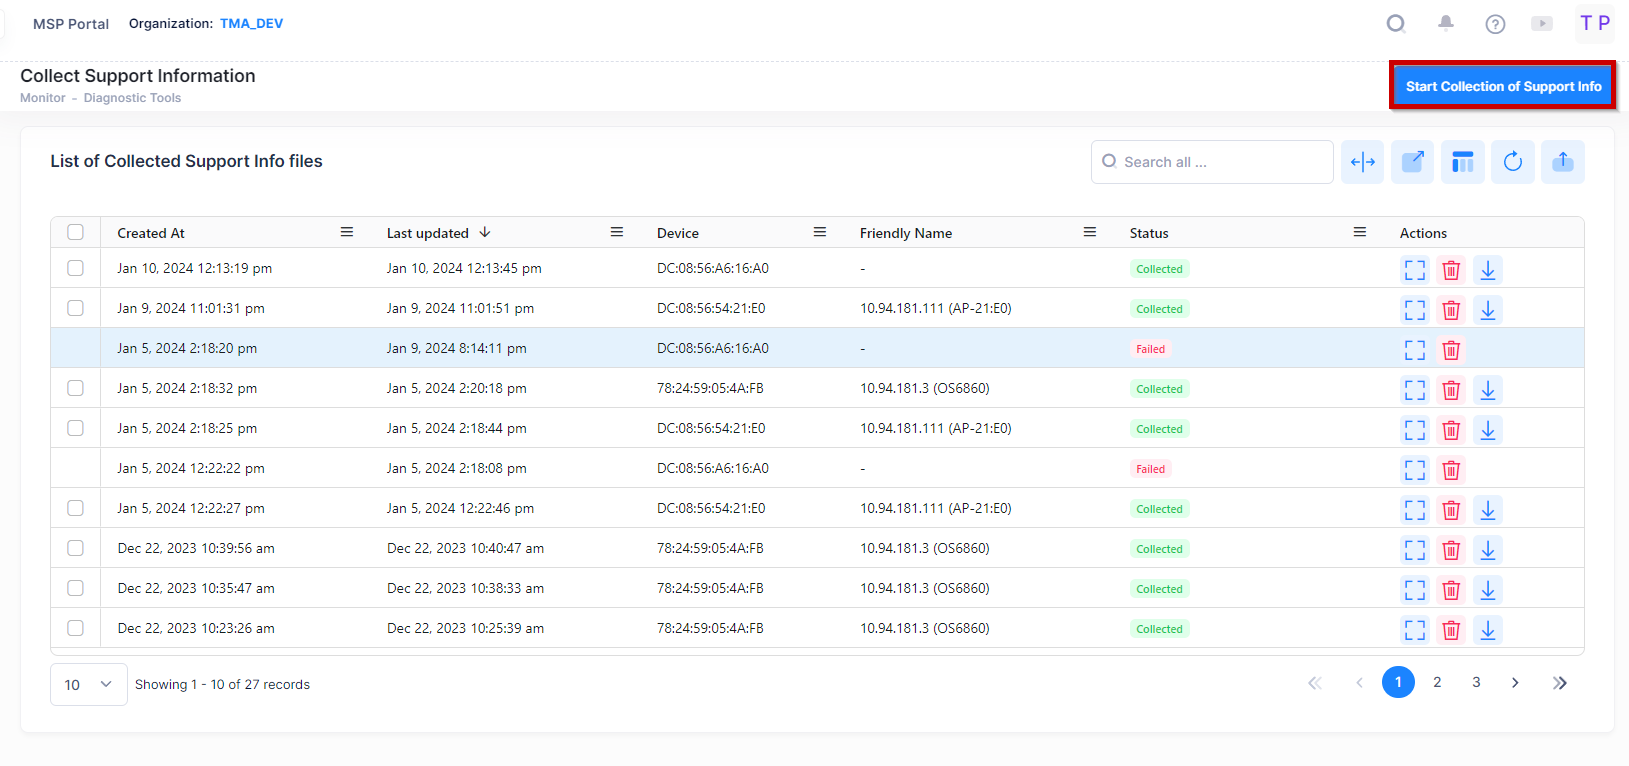
The Collect Support Information screen displays a list of requests to collect log files from devices and is used to initiate log file collection and download collected log files.
The following information is provided for each log file request entry:
Created At - The date and time the request to collect log information was initiated.
Last Updated - The date and time the log collection finished.
Device - The MAC address of the device from which the log information was collected.
Friendly Name - The user-specified friendly name for the device from which log information was collected.
Status - The log file collection status:
Collecting - OmniVista is in the process of collecting the log file information from the device.
Collected - The log file information was successfully collected from the device and is ready to download.
Failed - OmniVista was unable to retrieve the log file information from the device.
Uploading File - The log file is created and it is uploading to the network Cloud.
File Name - The name of the compressed log file to download. Displays only when the request is successfully completed (Status is “Collected”).
To remove a log file request entry, click on the delete icon under the “Actions” column.
Collecting Log Files for Access Point Devices
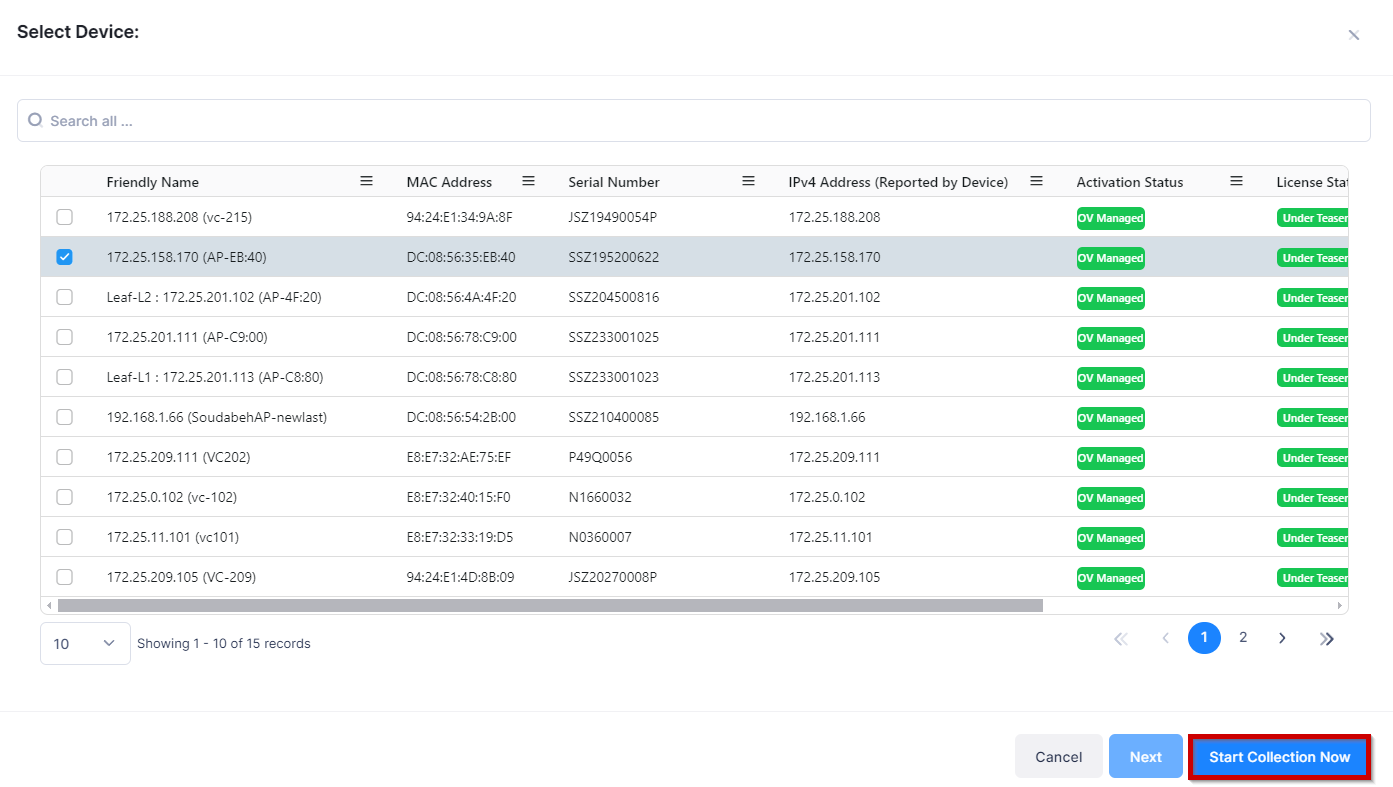
To initiate a log file collection for a specific device, click on Start Collection of Support Info. The Select Device screen opens and displays only devices that are fully managed (“Management Connectivity” set to “On” or “Off”) and the “Activation Status” is set to “OV Managed”. Collecting log file information is not supported on Analytics Only devices or on Full Management devices that are not “OV Managed”.

On the Select Device screen, click on the checkbox next to the device from which you want to collect log file information. After selecting the device, click on Start Collection Now. Note that you can only collect log files from one device at a time. Repeat this process to collect logs for additional devices.
The List of Collected Support Files screen displays and shows the request that you just initiated in the list with a status of “Collecting”. At this stage, OmniVista has sent a request to the device to collect all logs.

When the AP provides the log file (in tar.gz format) to OmniVista, the request status changes to “Collected” and a download icon appears next to the request under the “Actions” column. The user needs to click on the Refresh button to get the updated data in the table after applying any changes to view the latest status of the files. You can now click on the download icon to the save the log file to a local folder.
Note: If the request status of collecting the log file information is more than 15 minutes of duration, the request will be automatically rejected and the status will change to “Failed”.
Collecting Log Files for Switches
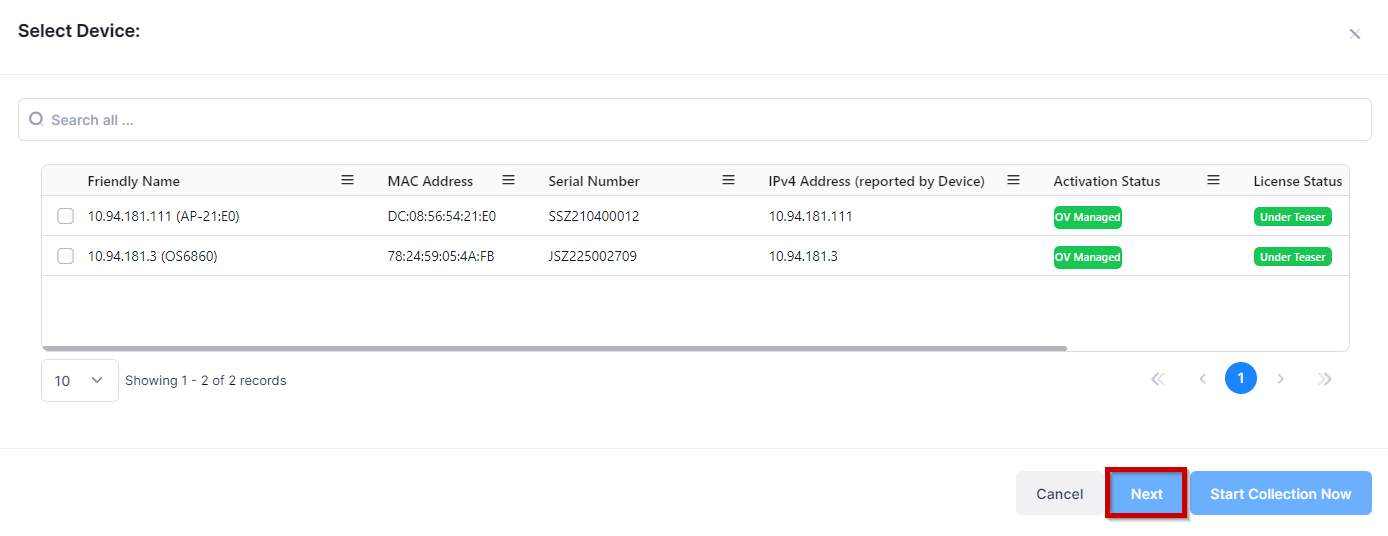
To initiate a log file collection for a specific switch, click on Start Collection of Support Info. The Select Device screen opens and displays only switches that are fully managed (“Management Connectivity” set to “On” or “Off”) and the “Activation Status” is set to “OV Managed”. Collecting log file information is not supported on Analytics Only devices or on Full Management devices that are not “OV Managed”.

On the Select Device screen, click on the checkbox next to the device from which you want to collect log file information. After selecting the Switch, click on Next. Note that you can only collect log files from one device at a time. Repeat this process to collect logs for additional devices.
The following screen appears:

Select the information to be collected as described below, then click on the Start Collection Now button to download the specified log files.
Collect swlog Files - Enable to collect all switch log files (Default = On).
Collect cfg Files - Enable to collect configuration files (e.g., boot.cfg, vcboot.cfg) from the Certified and Working Directories (Default = On).
Select Tech Support Collection Level - Select the types of Tech Support log files you want to download. By default, all file types are selected, however, you can select one or more specific type of files.
Tech Support - It includes all Configuration, Switch Log Files and Tech Support log file information like device hardware and firmware information.
Tech Support Layer 2 - It includes all Configuration, Switch Log Files and Layer 2 log file information such as Layer 2 interface information.
Tech Support Layer 3 - It includes all Configuration, Switch Log Files and Layer 3 log file information such as Layer 3 IP information.
Tech Support Engineering Complete - It includes all Configuration, Switch Log Files and Engineering log file information (Virtual Chassis information).
The List of Collected Support Files screen displays and shows the request that you just initiated in the list with a status of “Collecting”. At this stage, OmniVista has sent a request to the switch to collect all logs.

When the Switch provides the log file (in tar.gz format) to OmniVista, the request status changes to “Collected” and a download icon appears next to the request under the “Actions” column. The user needs to click on the Refresh button to get the updated data in the table after applying any changes to view the latest status of the files. You can now click on the download icon to the save the log file to a local folder.
