
The “Live Wireless Clients” section of the Monitor Clients Dashboard displays a list of the unique online wireless clients associated with the managed Devices.
The Network Analytics Summary at the top of the dashboard displays the total number of Access Points, Access Points Up, Down Count, number of Live Wireless and Wired Clients, total number of Switches, Switches Up and Down Count in the Network.
Data displayed can be exported into a CSV, PDF or Excel sheet format. You can also switch to full-screen mode for a better display.
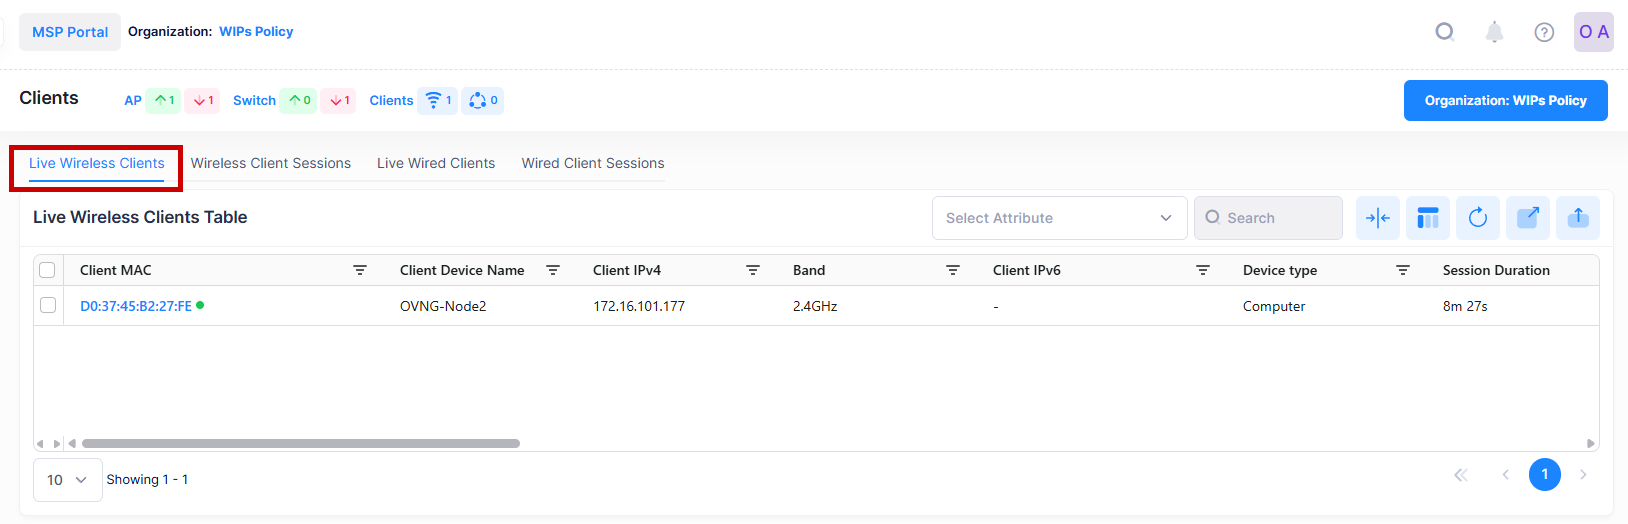
For each client in the list, the following attribute values are provided:
-
Client Device Name - The Name of the Device (Or device hostname as determined by the Access Point).
-
Client IPV4 - The IPv4 address of the client, if applicable.
-
Client MAC - The MAC Address of the client. (Please note: most mobile devices use random MAC Address for each new connection to avoid tracking).
-
Client IPV6 - The IPv6 address of the client, if applicable.
-
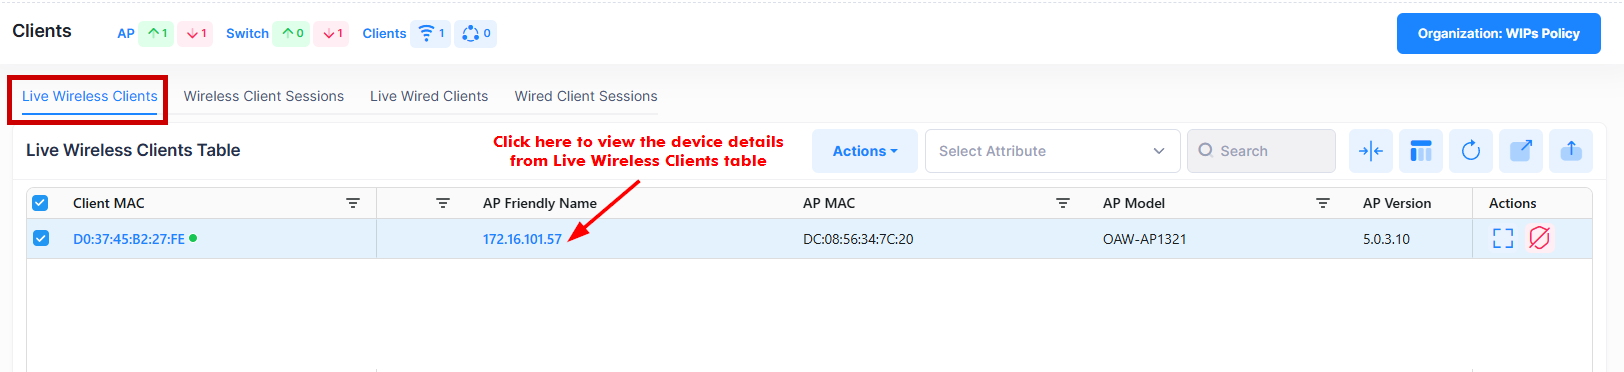
AP Friendly Name - The name assigned to the device is derived from the Preferred Device Naming convention specified in the user preference settings. By default, the Friendly Name is set to IP Address (System Name).
-
Device Type - If determined, the Device Type of the client. (e.g: Mobile, Computer, ...). It is not always available.
-
Session Duration - The length of time during which the Session was active.
-
Session Start Time - The date and time on which the Session was started.
-
Device OS - If determined, the Operating System of the client’s device.
-
AP IP Address - The current (or last) IP address of the Access Point to which the client is associated.
-
AP MAC - The MAC address of the Access Point to which the client is associated.
-
AP Model - The model type of the Access Point (e.g., OAW-AP1221, OAW-AP1251, …).
-
AP Name - The name of the Access Point.
-
AP Version - The Version set in the Edit Device page of the Access Point.
-
Site Name - The Site Name.
-
AP Location - The physical location of the Access Point connected to the client.
-
Portal Username - The username used to connect to the portal.
-
802.1X Username - The 802.1X username configured for the client, if applicable.
-
Auth Type - The authentication type used by the client (e.g., WPA2_WPA, PSK, …)
-
Band - The radio band through which the client attached to the AP (2.4GHz or 5GHz).
-
Channel - The working channel of the client.
-
RSSI - The Received Signal Strength Indicator of the client (Range = 0 - 99).
-
Rx Total - The total number of packets received by the client.
-
Tx Total - The total number of packets sent by the client.
-
PHY Rx Rate - The physical receive rate of the client.
-
PHY Tx Rate - The physical sending rate of the client.
-
MLO - Displays whether the client is operating in MultiLink Operation (MLO) mode or not (Yes/No). When in MLO mode, the following information is displayed:
-
Channel, Attached Band, RSSI, and Working Mode correspond to the highest link used by the client.
-
Connection rate (Rx and Tx) reflects the total cumulative speed of all links.
-
The client detail page shows 2.4G, 5G, and 6G link configuration information. For example, if the client uses 5G and 6G links, the detail page includes "5G Configuration" and "6G Configuration".
-
Sometimes, for short sessions (lasting less than five minutes), some information may be missing because it could not be determined.
Note: The Device Type value is determined on the basis of User-Agent field that is reported in the HTTP header from the client. However, this may not accurately represent the type of device always. This happens when websites accessed by the client device use different value of User-Agent. Some websites set User-Agent to a different value for content optimization, compatibility or other reasons.
View Device Information from Live Wireless Clients Table
To view the Device Information from the Live Wireless Clients Table, click on the ‘AP Friendly Name’ in the table as shown below:
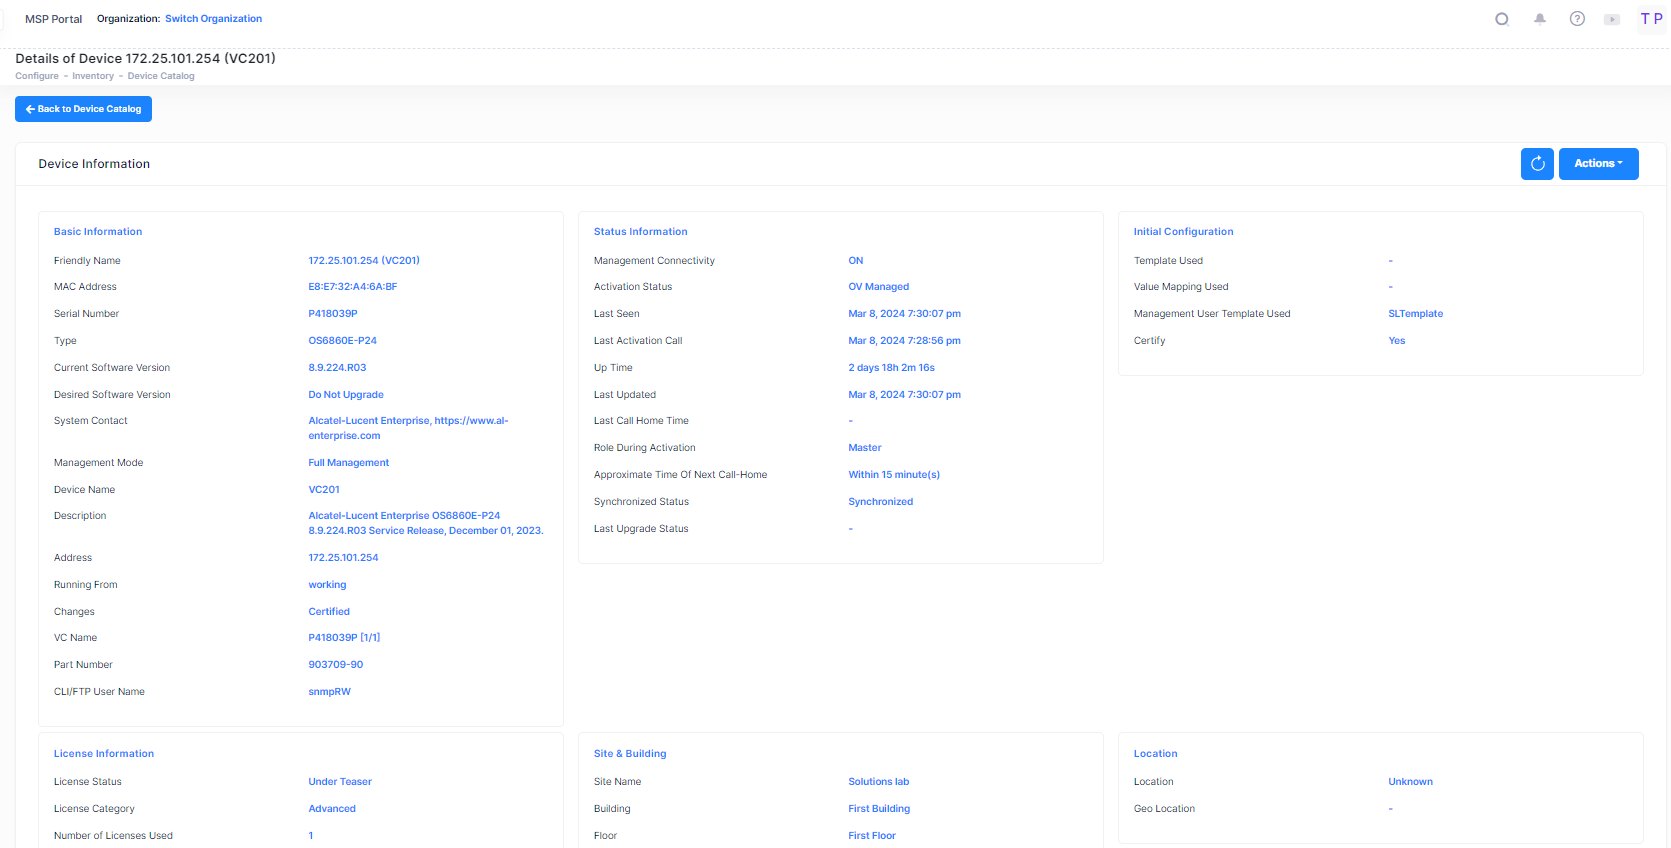
It will redirect you to the ‘Device Catalog’ screen displaying the Device Information of the selected device. See the Device Catalog online help for more information.
Search Live Wireless Client by an Attribute Value
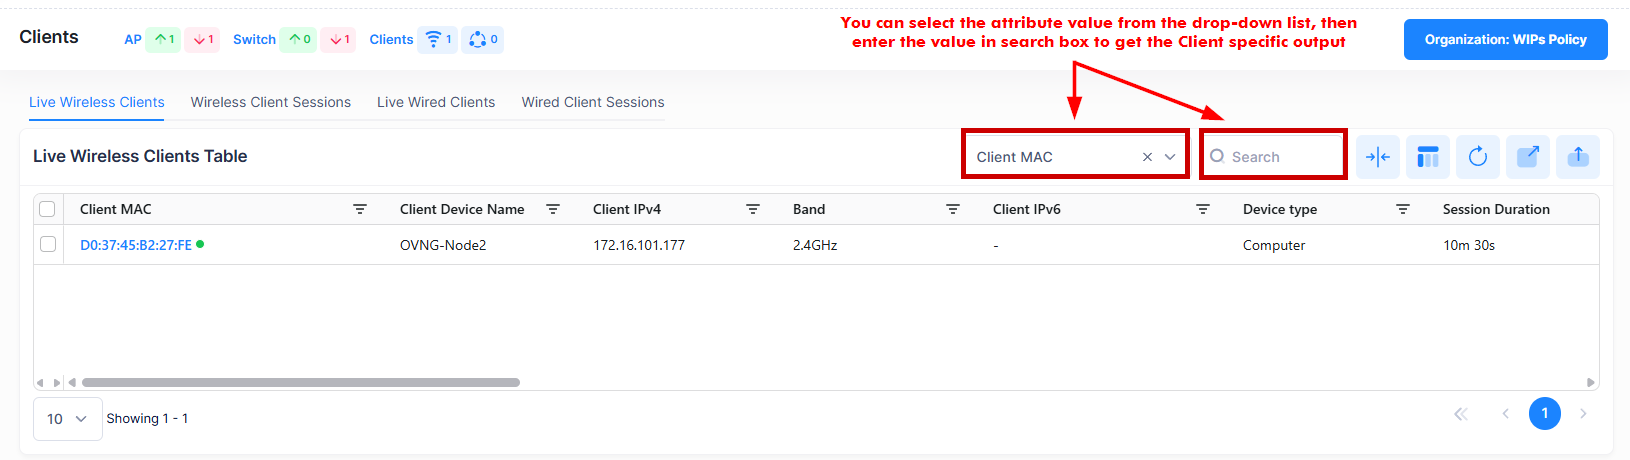
You can search for Wireless Clients that are live in the network by using the Select Attribute and Search box option. The search results are refined based on the attribute value selected from the available drop-down list (802.1X Username/Client IPv4/Client MAC or Portal Username). Only those Wireless Clients that contain the matching searched values are displayed in the results.
View Wireless Client Session History
If you want to see more details of the Client activity and Client session history for a particular device, then follow the steps as shown below:
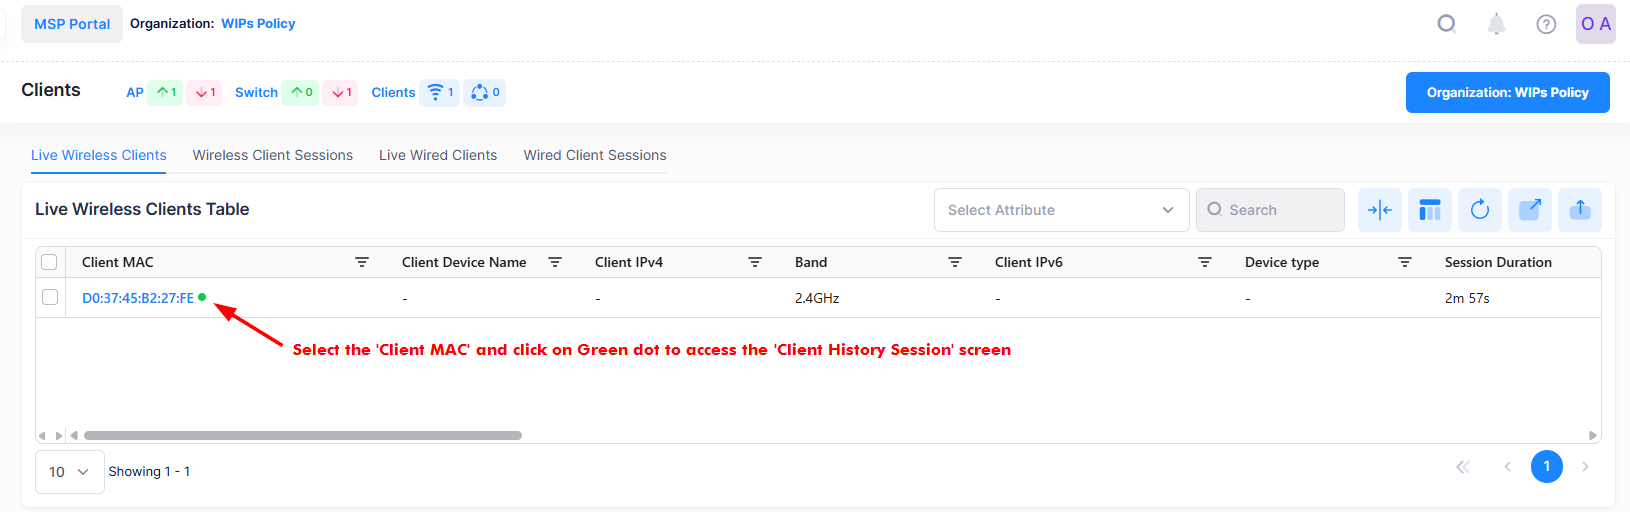
When you click on the MAC address of the selected Client, a new window opens dedicated to displaying information for the selected client. As shown below, this new window displays a summary of activities and session timelines for the individual client. You can also view the device configuration details from this screen by clicking on View Configuration Data tab.
There are two display modes to monitor Clients sessions history: Table and Timeline.
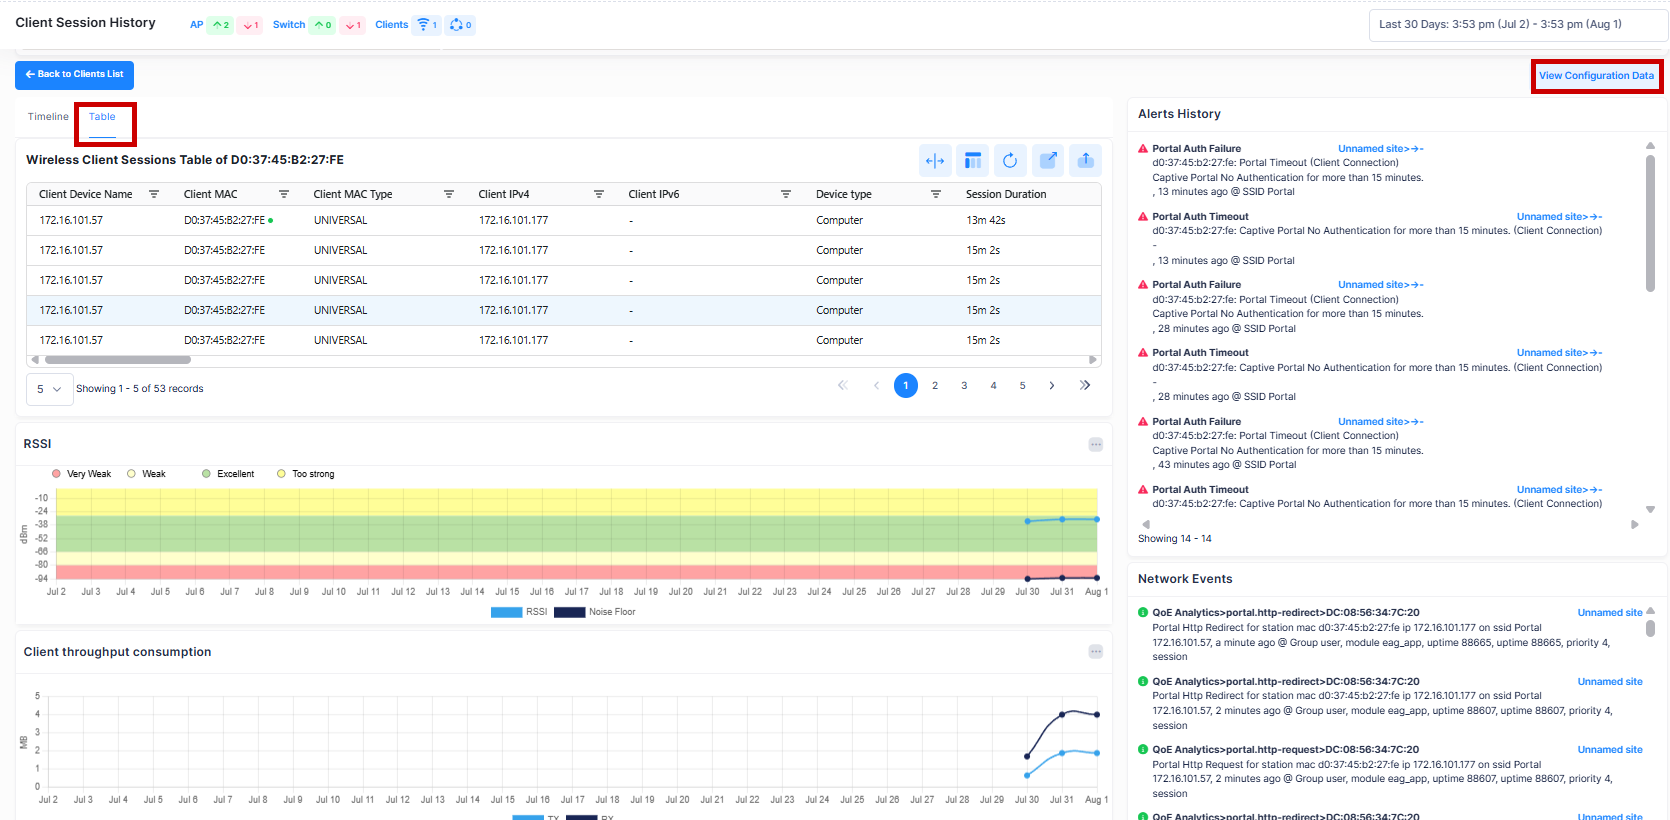
The geo coordinates displayed in the background reflects the latest Access Point of the currently connected client for the selected time period. Additionally, it displays the graphical information such as RSSI, number of Alerts received, Network Events List, total session duration, Physical Rates for the Client, data usage etc.
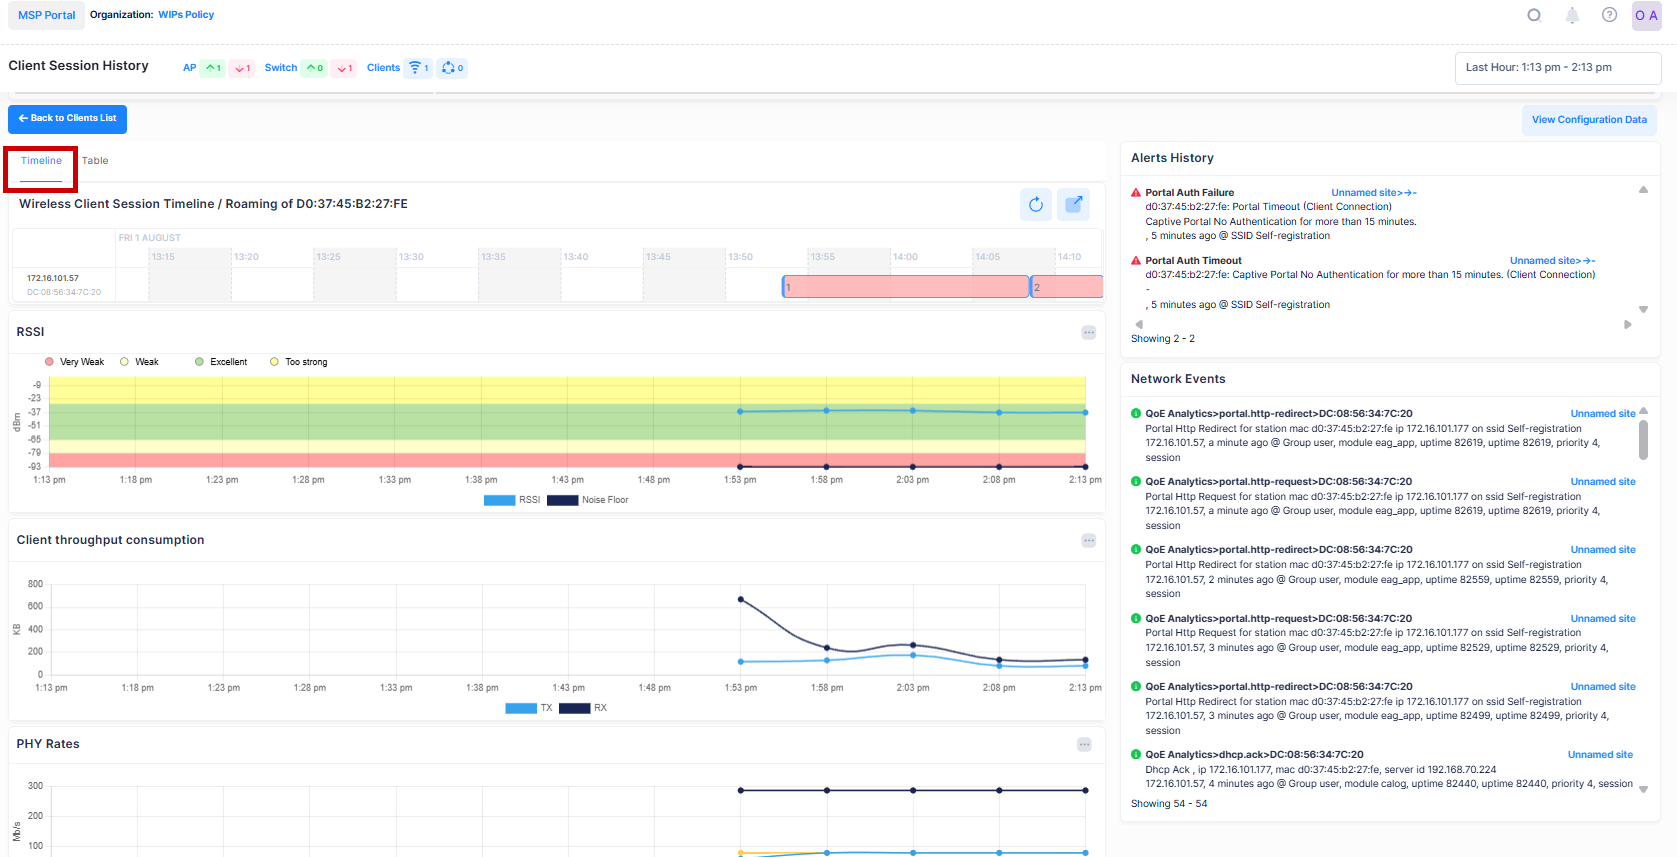
The timeline mode displays a chart of the individual client sessions with the unique roaming ID to monitor the various Access Point sessions based on the selected time period duration. See the Monitor Wireless Client Sessions online help for more information.
-
The above Client pages are not accessible from Clients screen; they are only accessible when the user clicks on a specific client in the Clients Table.
-
Client Sessions data is retained for 400 days.
Kick Off Clients
To kick a Wireless Live Client off the network, use one of the following methods to select the Clients you want to log off the network:
-
Select the Client MAC on the checkbox next to the Clients Table, click on Actions, then select Kick Off from the drop-down menu.
-
Click on the “X” icon under the “Actions” column next to the table entry for the client that you want to Kick Off.
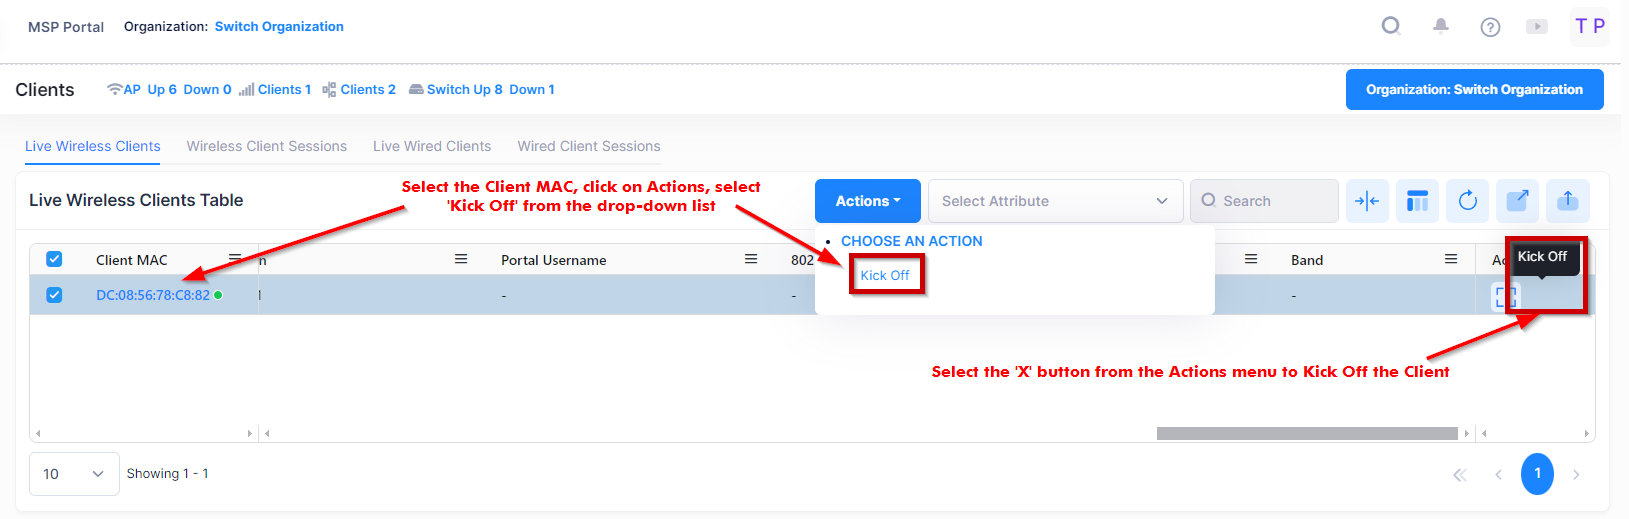
When you select the Client(s) you want to Kick off, the following confirmation prompt appears:
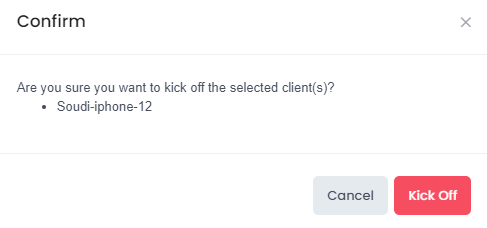
Click on Kick Off to confirm that you want to Kick Off the Client(s).
Note: The Kick-Off operation sends a disconnect action to the Client device, causing it to disconnect. However, if the Client's behavior is to initiate reconnection, then the Client will once again appear on the network. This behavior varies depending on the Client devices and is considered as normal in OmniVista Cirrus 10.
Trigger CoA Clients
The RADIUS Change of Authorization (CoA) lets you update a live wireless client's access policy while connected, without disconnecting it. Use the Trigger CoA Client action to change the client's Access Role Profile, Policy List, or session timeout in real time.
To Trigger a Change of Authorization for a Live Wireless Client of the network, select the Client MAC on the checkbox next to the Clients Table, click on Actions, then select Trigger CoA from the drop-down menu.
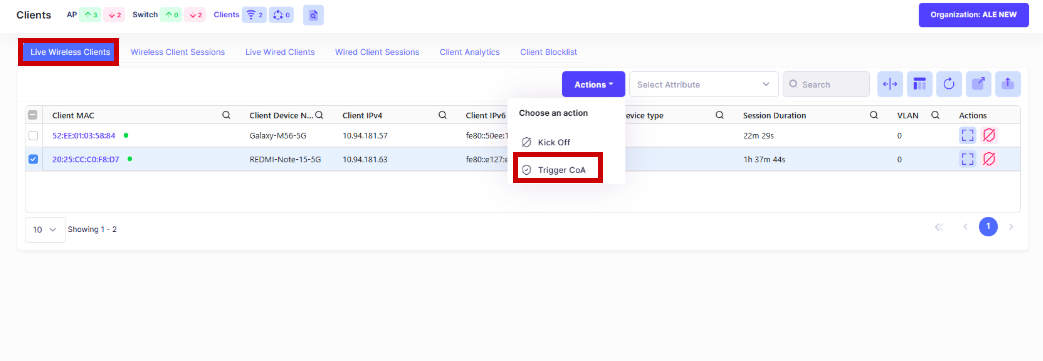
The below Trigger RADIUS CoA screen appears:
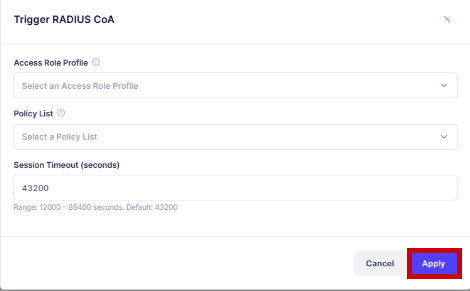
Enter the field values as described below:
-
Access Role Profile - Select an Access Role profile from the drop-down menu listing the organization's Access Role Profiles. Choosing a profile updates the client's assigned role. (Note: The selected Access Role Profile must be present on the Access Point before being applied).
-
Policy List - Select a policy from the drop-down menu listing the Policy Lists that exist in the organization. Selecting a policy list updates the client's assigned policy. (Note: The selected Policy List must be present on the Access Point before being applied).
-
Session Timeout (in seconds) -Enter the time in seconds to set how long the client's session remains valid before requiring reauthentication. (Range = 12000 - 86400 seconds, Default = 43200).
Click on Apply tab to save changes. If the request is accepted, the window closes and a success notification appears. When you select multiple clients to trigger Change of Authorization, the same Access Role Profile, Policy List, and Session Timeout values apply to all selected clients. Only the filled-in field values are sent; empty fields remain unchanged.
-
The Trigger CoA option only appears when at least one selected client is authenticated using MAC Authentication, Captive Portal, or 802.1X Authentication. If none of the selected clients use one of these authentication methods, the option does not appear under the Actions menu.
-
Only users with administrative rights can select the Trigger CoA option under the Actions menu.
-
The wireless client must currently be live on which you are applying CoA and connected using MAC Authentication, Captive Portal, or 802.1X authentication.
-
The Access Role Profile or Policy List you plan to apply must exist in the organization and be configured on the Access Point serving the client.
Troubleshooting/FAQs
The Session Timeout field shows an error and I cannot click on Apply tab.
The Session Timeout value must be between 12000 and 86400 seconds. Enter a value within this range, or leave the field empty.
When I am using Trigger CoA action, getting notification that at least one parameter must be specified.
Enter a value in at least one of the three fields described under Trigger CoA section before clicking on Apply tab.
The client I selected does not show a Trigger CoA option in the Actions menu.
The Trigger CoA option appears only for clients authenticated via MAC Authentication, Captive Portal, or 802.1X. If the client uses another method, this option is unavailable. Also, ensure you are signed in with the Organization Admin role, as the Actions menu is hidden from other roles.
I get a notification that the Change of Authorization request failed.
The Trigger RADIUS CoA screen opens and displays an error if the request fails. Confirm the client is online and the Access Point serving it is reachable, then click Apply to retry. If the issue persists, verify the selected Access Role Profile or Policy List is configured on the Access Point.