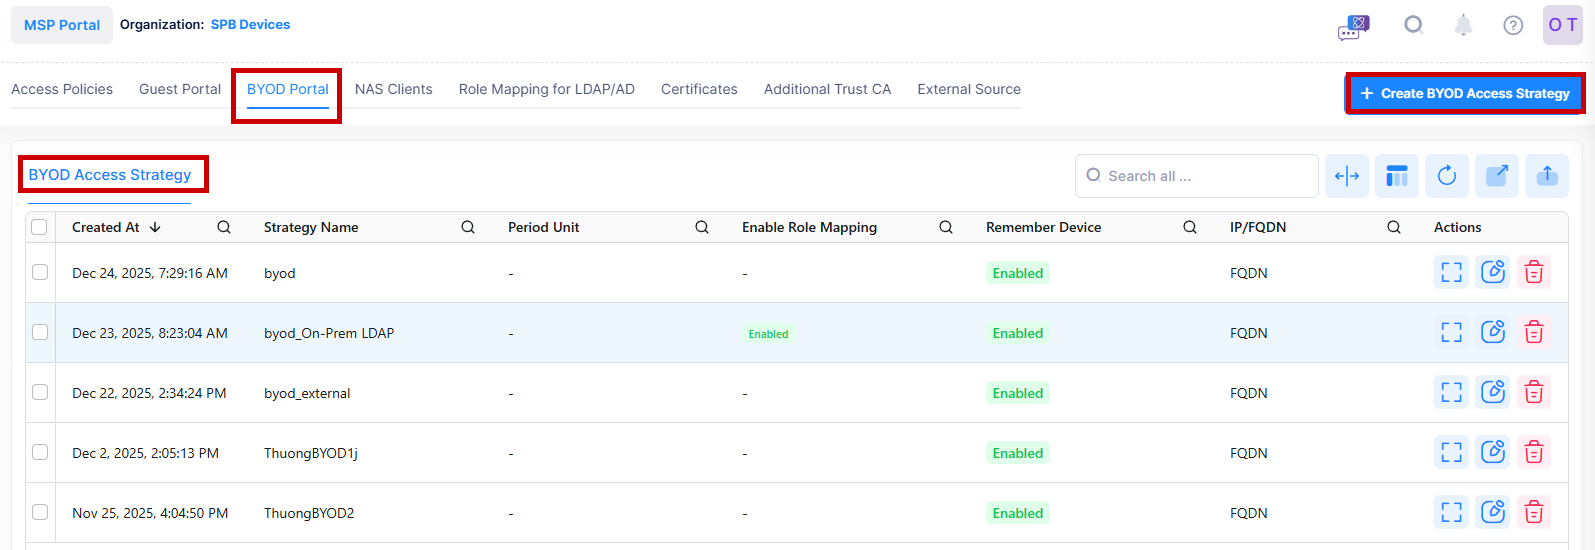
The BYOD Access Strategy screen is used to configure access attributes for BYOD users. The screen displays information about configured strategies and can be used to create, edit, and delete BYOD Access Strategies. There is a pre-configured Default BYOD Access Strategy that you can edit, or you can create new BYOD Access Strategies (up to a maximum of 32).
To access the BYOD Access Strategy screen, click on Network Access > UPAM-NAC > BYOD Portal > BYOD Access Strategy under the “Configure” section of the OmniVista Cirrus Menu.
Creating a BYOD Access Strategy
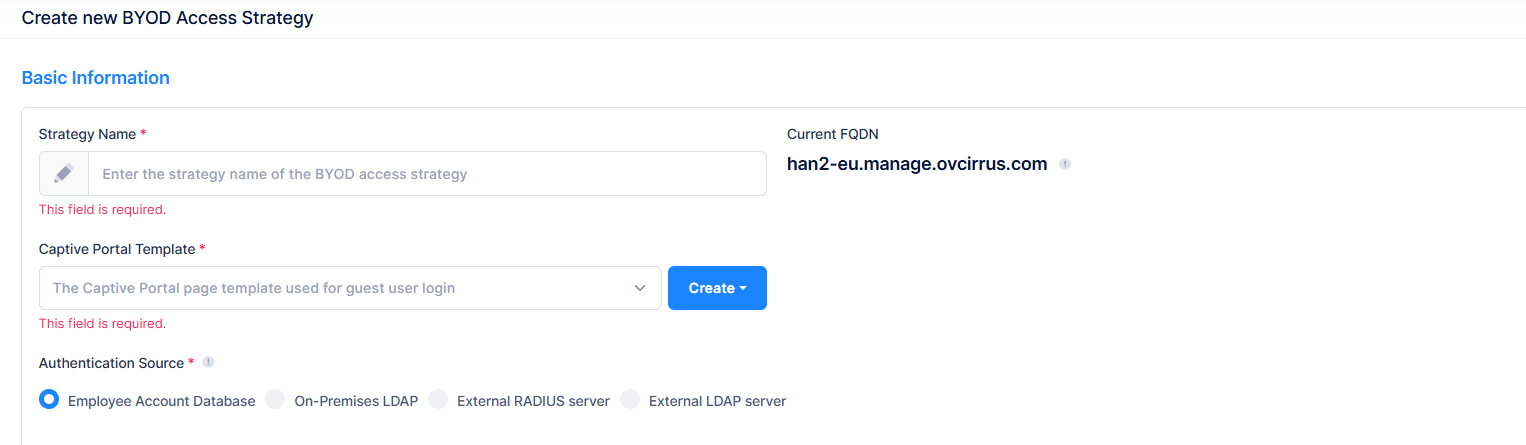
To add a BYOD Access Strategy, click on Create BYOD Access Strategy to open the Create BYOD Access Strategy form. Complete the following sections of the form, then click on Create when you are finished.
-
Basic Information - Configure the BYOD Access Strategy name and authentication attributes (Captive Portal Template, current FQDN, Authentication Source).
-
Registration Strategy - Specify whether to remember the device MAC address and make it valid after authentication success (Enabled/Disabled). If the remembered device is valid, the MAC address check will be performed first and the device is allowed access without re-authentication.
-
Login Strategy - Specify the success redirect URL for the BYOD user login strategy.
-
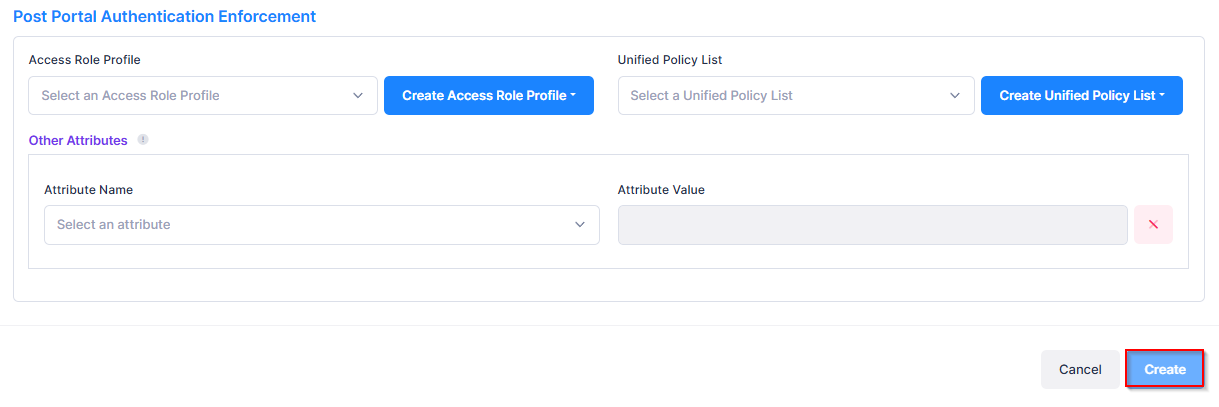
Post Portal Authentication Enforcement - Configure post-authentication enforcement for guest users.
Basic Information
-
Strategy Name - Enter the name to assign to the BYOD access strategy.
-
Captive Portal Template - Select an existing Captive Portal page template to use for guest user login from the drop-down menu or click on Create Template to create a new template to use (see the Captive Portal Templates online help).
-
Current FQDN - The Fully Qualified Domain Name to use for the Captive Portal page redirection.
-
Authentication Source - Specify the source of the user profile (Account/Password).
-
Employee Account Database - The employee account utilized for BYOD service is stored in the local database of UPAM.
-
On-Premises LDAP - The employee account utilized for BYOD service is stored in an on-premises LDAP Server. If selected, a private LDAP Server is used instead of one in cloud for AP authentication. In this scenario, user authentication requests are communicated directly between an AP and the LADP Server, and are not exposed in the public network.
Note: Certified LDAP Server versions: OpenLDAP Server version is 2.4 Standalone and Microsoft Window Server 2022. -
External Radius Server - The employee account utilized for BYOD service is stored in the database of an external RADIUS Server.
-
External LDAP Server - The employee account utilized for BYOD service is stored in the database of an external LDAP Server.
-
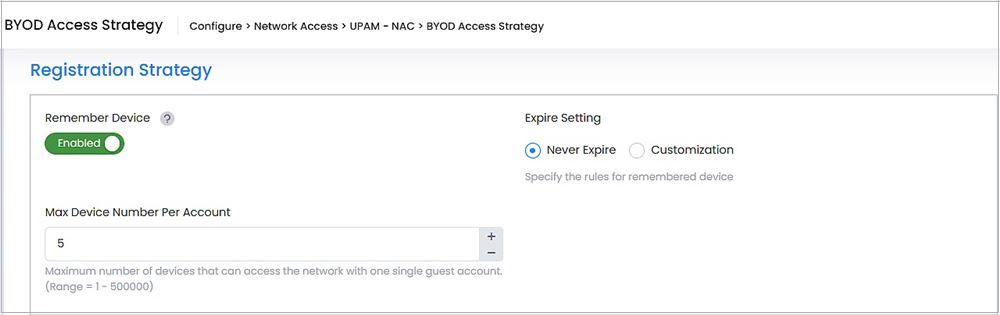
Registration Strategy
-
Enable Role Mapping - When the On-Premise LDAP option is selected as the authentication source for the BYOD Strategy, an Enable Role Mapping option will appear in this section. Enable this option to apply Role Mapping for On-Premise LDAP (Default = Disabled). This option does not appear in this section for other authentication sources.
-
Remember Device - Specify whether to remember the device MAC address and make it valid after authentication success (Enabled/Disabled). If the remembered device is valid, the MAC address check will be performed first and the device is allowed access without re-authentication.
-
Expire Setting - Specify the rules for remembered device.
-
Never Expire - User remembered device will always be valid after authentication success.
-
Customization - Customize the valid period for the remembered devices.
-
Period Unit - Select whether the validity period will be applied in days, hours, or minutes.
-
Device Validity Period - Length of time that the guest user device is valid. Ranges and default values are shown below. (Range = 1 – 365, Default = 90, -1 = never expires)
-
-
-
Max Device Number Per Account - Maximum number of devices that can access the network with one single guest account. (Range = 1 – 10, Default = 5)
By default, Registration Strategy is enabled.
Login Strategy
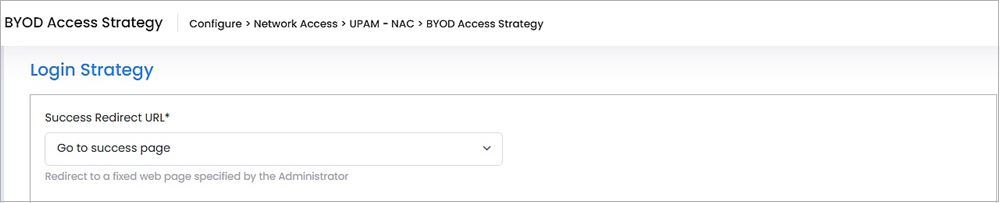
Specify the URL to which a BYOD user is redirected after a successful login.
-
Success Redirect URL:
-
Go to Fixed URL - Redirect the user to the specified fixed URL.
-
Go to Initial URL - Redirect to the guest-user-input URL after passing authentication
-
Go to success page - Redirect to a success webpage specified by the Administrator.
-
Post Portal Authentication
-
Access Role Profile - The Access Role Profile assigned to the guest user after passing authentication. Select a profile from the drop-down menu or click on Create Access Role Profile to add a new profile to use (see the Access Role Profile online help).
-
Unified Policy List - The Policy List assigned to the guest user after passing authentication. Select a list from the drop-down menu or click on Create Unified Policy List to add a new list to use (see the Unified Policies List online help).
-
Other Attributes - Select an attribute from the drop-down menu and enter a value. To add additional attributes, click on Add Attribute.
-
Session-Timeout - The Session Timeout Interval is the maximum number of consecutive seconds of connection allowed to the user before termination of the session or prompt. If not configured, the device’s default session timeout policy will take effect. (Range = 12000 - 86400, Default = 43200)
-
Acct-Interim-Interval - The Accounting Interim Interval for RADIUS accounting, in seconds. If not configured, the device’s default accounting policy will take effect. (Range = 60 - 1200, Default = 600)
-
WISPr-Bandwidth-Max-Up - The user upstream bandwidth, in kbit/s. By default, it is not limited.
-
WISPr-Bandwidth-Max-Down - The user downstream bandwidth, in kbit/s. By default, it is not limited.
-
Display BYOD Access Strategy Additional Information
Select the BYOD Access Strategy name in the list and click on the Additional Information icon to view additional information about the BYOD Access Strategy.
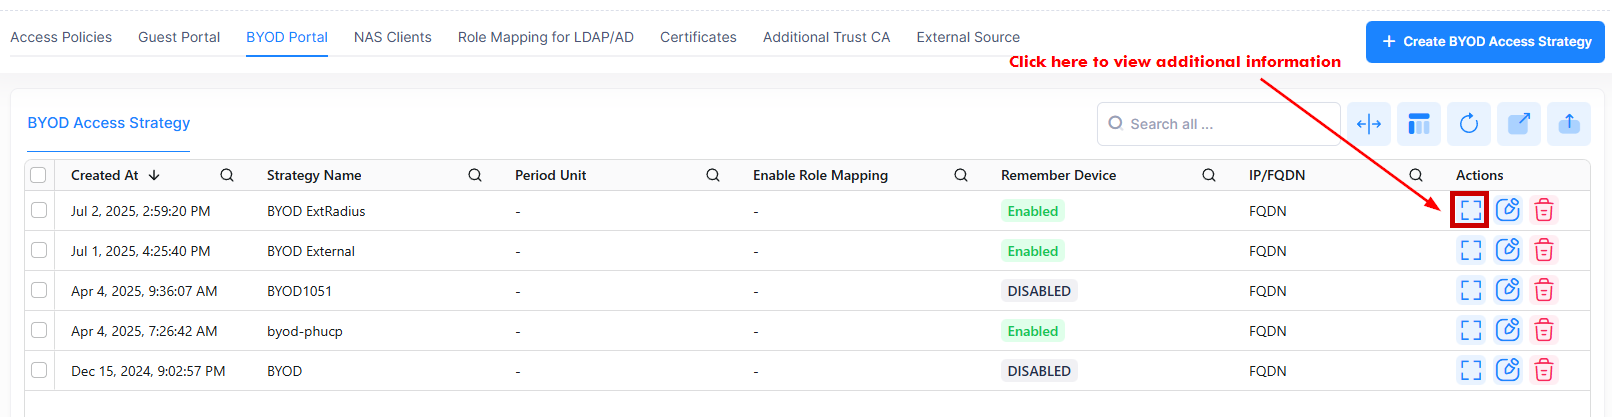

The following information will be displayed:
-
Strategy Name - Specifies the name to assign to the BYOD access strategy.
-
Created At - The date and time at which the BYOD access strategy is created.
-
Current FQDN - The Fully Qualified Domain Name to use for the Captive Portal page redirection.
-
Authentication Source - Indicates the authentication source of the user profile.
-
Enable Role Mapping - Indicates the Role Mapping is enabled or disabled.
-
Remember Device - Indicates to remember the device MAC address and make it valid after authentication success (Enabled/Disabled). If the remembered device is valid, the MAC address check will be performed first and the device is allowed access without re-authentication.
-
Expire Setting - Specify the rules for remembered device.
-
Device Validity Period - Specifies the length of time that the guest user device is valid.
-
Max Device Number Per Account - Specifies maximum number of devices that can access the network with one single guest account. (Range = 1 – 10, Default = 5)
-
Period Unit - Indicates whether the validity period will be applied in days, hours, or minutes.
-
Redirection Strategy - Specify the captive portal page template to be used for BYOD service.
-
Mode - The http protocol used to redirect the captive portal page (https/http).
-
Fixed Access Role Profile - Specifies the Access Role Profile assigned to the BYOD device after it is authorized.
-
Server Name - Specifies the name of the server used for external authentication.
-
Success Redirect URL - Redirect URL returned to the BYOD device by UPAM.
-
Fixed URL - The fixed webpage specified by the Administrator.
-
Fixed Policy List - The Policy List assigned to the BYOD device after it is authorized.
-
Portal URL - The Portal URL specified by the Administrator.
-
BYOD Self Service - The BYOD self service URL for securely accessing the BYOD devices.
-
Session Timeout Interval - Indicates the Session Timeout Interval in seconds. (Range = 12000 - 86400, Default = 43200)
-
Accounting Interim Interval - Indicates the Accounting Interim Interval for RADIUS accounting, in seconds. If not configured, the device’s default accounting policy will take effect. (Range = 60 - 1200, Default = 600).
-
Upstream Bandwidth - Indicates the user upstream bandwidth, in kbit/s.
-
Downstream Bandwidth - Indicates the user downstream bandwidth, in kbit/s.
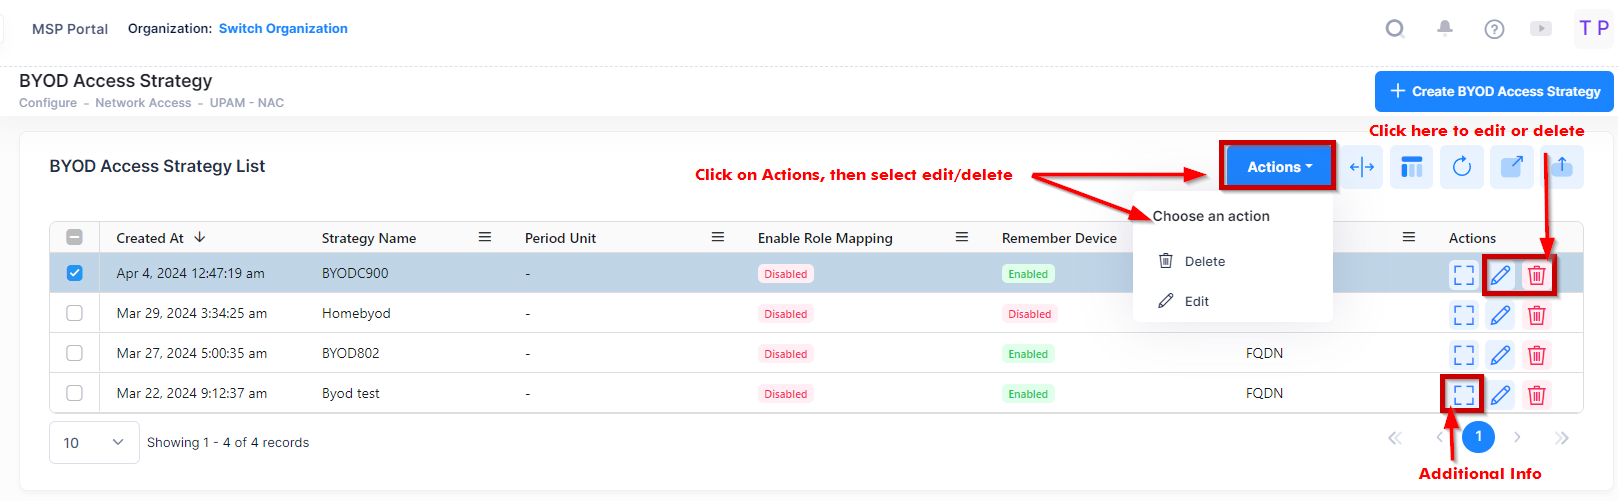
Editing a BYOD Access Strategy List
Select a BYOD Access Strategy name, then click on Actions and select Edit, or you can click on the Edit icon under the “Actions” column.
Edit the field(s) as described above, then click on Save.
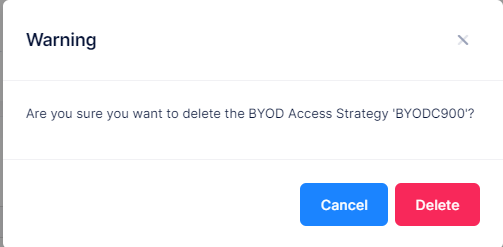
Deleting a BYOD Access Strategy List
Select a BYOD Access Strategy name, then click on Actions and select Delete, or you can click on the Delete icon under the “Actions” column. Click Delete at the Confirmation Prompt.