Lightweight Directory Access Protocol (LDAP) is a standard directory server protocol. The protocol was developed as a way to use directory services over TCP/IP and to simplify the Directory Access Protocol (DAP) defined as part of the Open Systems Interconnection (OSI) effort. Originally, LDAP was a front-end for X.500 DAP.
The LDAP protocol synchronizes and governs the communications between the LDAP Client and the LDAP Server. The protocol also dictates how database information, which is normally stored in hierarchical form, is searched from the root directory down to distinct entries. In addition, LDAP has its own format that permits LDAP-enabled Web browsers to perform directory searches over TCP/IP.
The OmniVista Cirrus LDAP Server is automatically installed in OmniVista Cirrus. You cannot modify or delete it. However, if you want to use a different LDAP V3 server, you must add it to OmniVista Cirrus. OmniVista Cirrus only manages the built-in LDAP Server, other authentication servers must be managed outside of OmniVista. You can assign devices to such servers, but the Authentication Servers application does not allow you to add, modify, or delete users and user privileges in the LDAP database of such servers. This is because an LDAP Server's database must be configured for the specific schema used to manage users and there is no public API for configuring LDAP schemas.
-
LDAP Server Management supports both Switch and wireless devices; however, certain attributes may not be supported on wireless devices. See the configuration fields below for more information.
-
OmniVista Cirrus converts an IPv6 address to its compressed form before saving the address to the database.
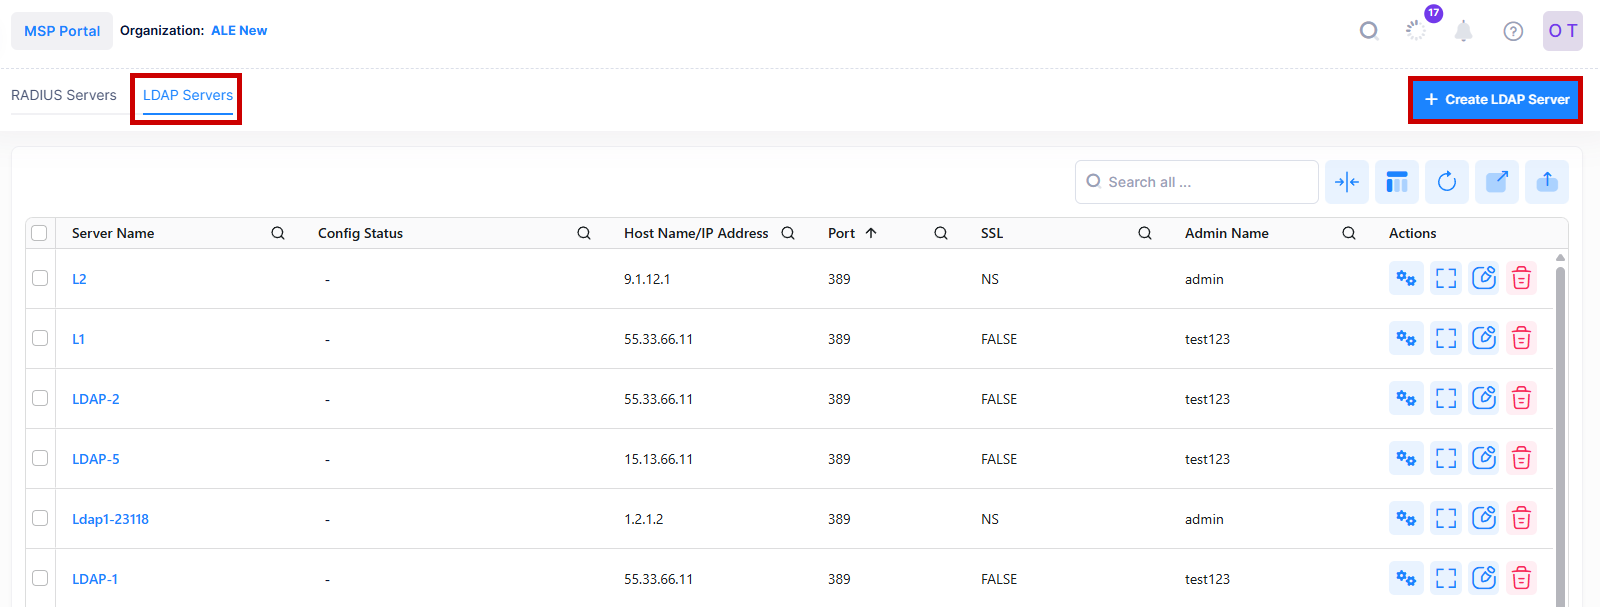
The LDAP Servers Management screen displays all LDAP Authentication Servers known to OmniVista. It also enables you to add, modify, and delete LDAP Servers from the list of LDAP Servers.
To access the LDAP Servers Management screen, click on Network Access > Auth Servers > LDAP Servers under the “Configure” section of the OmniVista Cirrus Menu. The LDAP Servers Management screen displays.
Adding an LDAP Server
The OmniVista Cirrus LDAP Server is automatically installed in OmniVista Cirrus and known to OmniVista Cirrus. However, if you have configured a new LDAP Server, you must add it to the list of LDAP Servers known to OmniVista Cirrus.
To add a new LDAP Server, click on Create LDAP Server and complete the fields as described below. When you are finished, click on Create to add the new LDAP Server.
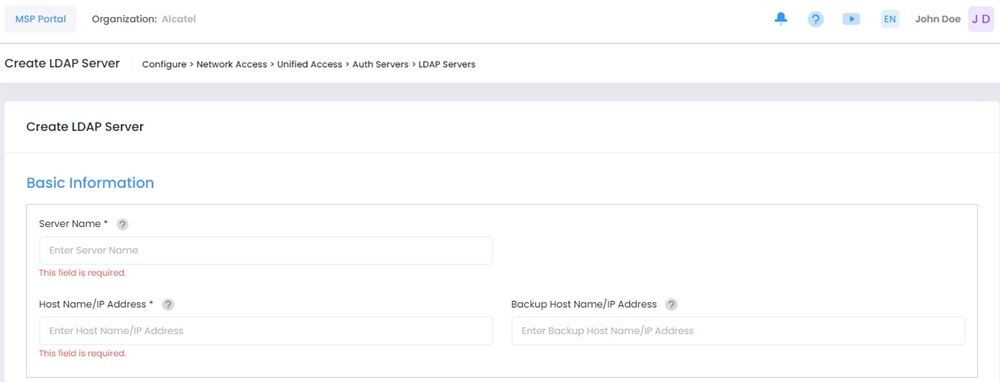
Basic Information
-
Server Name - A unique name for the LDAP Authentication Server. This name will be used by OmniVista and the device to identify the server.
-
Host Name/IP Address - The name of the computer where the server is located OR the IP address of the computer where the server is located.
-
Backup Host Name/IP Address - Each LDAP Server may optionally have a backup server. If you wish to define a backup server that will be used if this server is unavailable, enter the name of the computer where the backup server is located OR enter the IP address of the computer where the backup server is located.
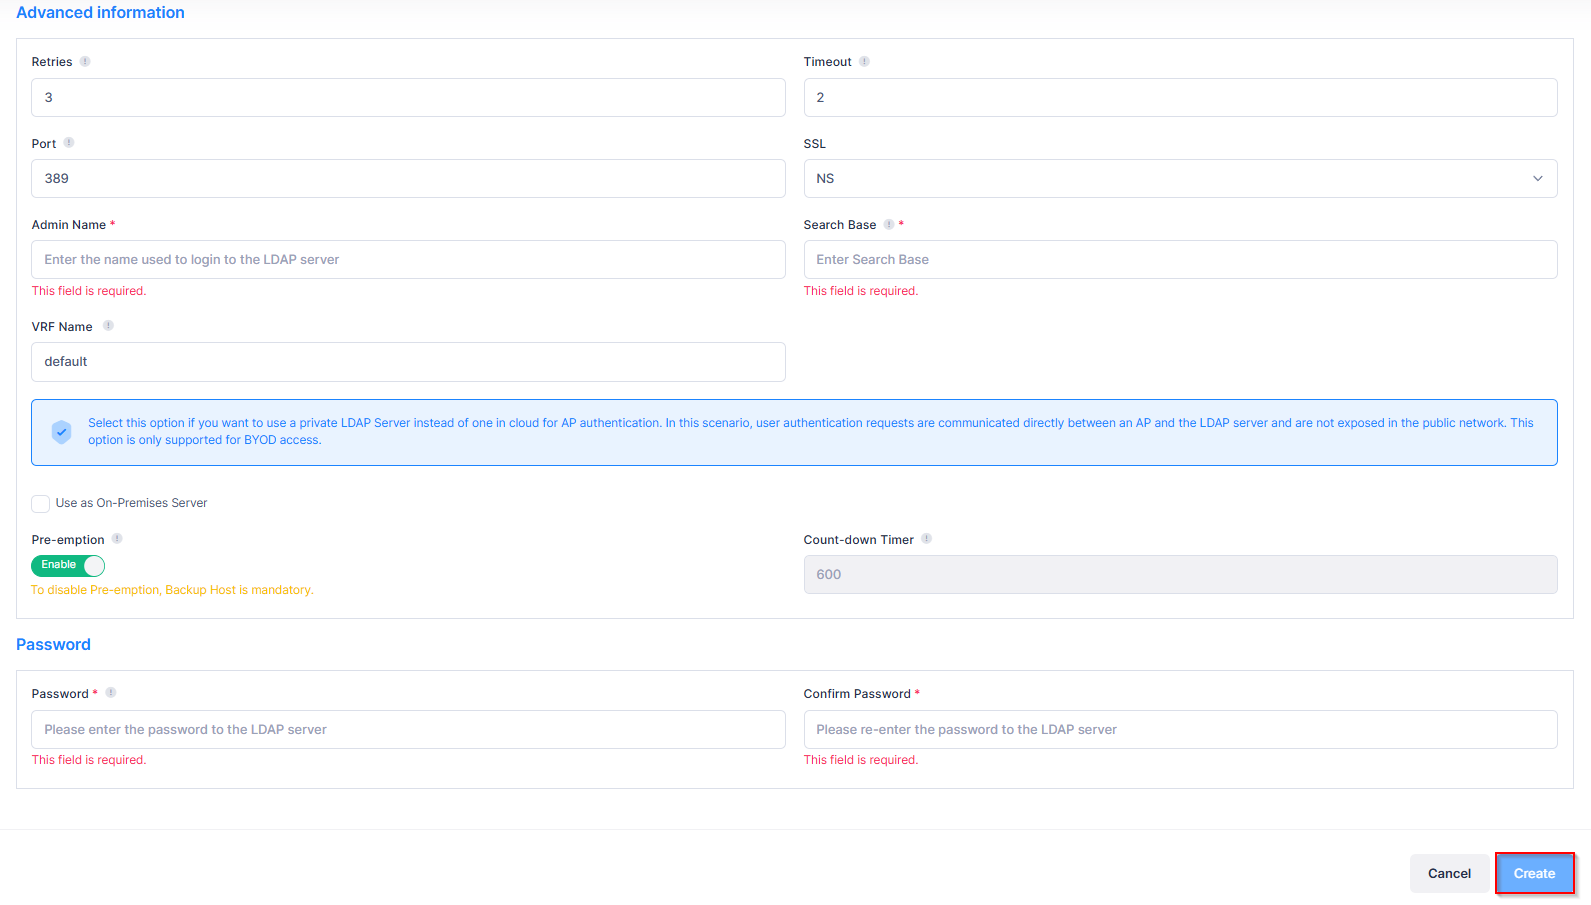
Advanced Information
-
Retries - The number of retries that you want the device to attempt when trying to contact the LDAP Server (AP Range = 1-3, Switch Range = 1-32, Default = 3).
-
Timeout - The number of seconds that you want the device to wait before a request to the LDAP authentication server is timed out (Range = 1 - 30, Default = 2).
-
Port - The port number used as the LDAP port address. This is the port at which the LDAP Server "listens". By default, the port number is 389. However, note that the switch automatically sets the port number to 636 when SSL is enabled. (Port number 636 is typically used on LDAP Servers for SSL.) The port number on the switch must match the port number configured on the server.
-
SSL - Set this field to True or False to inform the device whether SSL (Secure Socket Layer) is enabled or disabled on the LDAP authentication server. SSL can be set up on the server for additional security. (This usually involves adding digital certificates to the server.) When SSL is enabled, the server's identity will be authenticated. Refer to "Managing Authentication Servers" in your Network Configuration Guide and to the instructions provided by the LDAP Server's vendor for further information on setting up SSL on the LDAP Server.
Note: An AP supports SSL connection to an LDAP Server only when the “Use As an On-Premise Server” option is selected to use a private LDAP Server. -
Admin Name - The Administrator’s name used to login to the LDAP Server.
-
Search Base - The search base in the LDAP Server where authentication information can be found (e.g., o=alcatel.com).
-
VRF Name - The Virtual Forwarding Instance associated with the LDAP Server, if applicable. An LDAP Server can be configured on any VRF instance including the default VRF instance. However, all of the servers (for example, all the LDAP servers) must reside on the same VRF instance. Default value is "default". Note that VRF Name is not supported on wireless devices and will be ignored when applied to those devices.
-
Use As an On-Premise Server - Select this option if you want to use a private LDAP Server instead of one in the cloud for AP authentication. In this scenario, user authentication requests are communicated directly between an AP and the LDAP server, and are not exposed in the public network. This option is only supported for BYOD authentication (see the BYOD Access Strategy online help for certified LDAP Server versions).
Note: Only one On-Premise Server is permitted per organization. To configure a new server, please edit the existing server and uncheck the “Use as On-Premises Server” option. -
Pre-emption - Enable or Disable Pre-emption to configure whether the AP should move back to the primary LDAP Server, after it has switched to a secondary LDAP Server. By default Pre-emption is Enabled. (Applies only to Access Point configuration.)
-
Count-down Timer - Enter the number of seconds for the AP to adhere with the secondary server before moving back to primary server (Range=600 seconds, (5 minutes) to 3600 seconds (60 minutes), Default = 600 seconds). (Applies only to Access Point configuration.)
-
Password - Password used to login to the LDAP Server (AP Range = 1-128 characters, Switch Range = 1-31 characters). (Note: The exclamation point '!' is not a valid password character. Some special characters like '$' must be escaped. To use '$' in a password (e.g., test$1234), enter it as 'test\$1234').
-
Confirm Password - Re-enter the LDAP Server password.
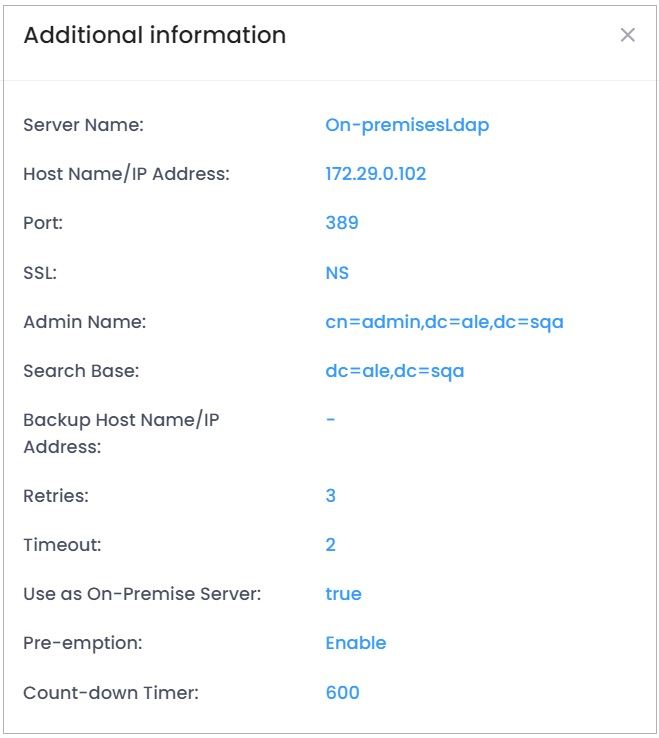
View Additional LDAP Server Information
Select the LDAP Server in the list and click on the Additional Information icon to view additional information about the LDAP Server.
Editing an LDAP Server
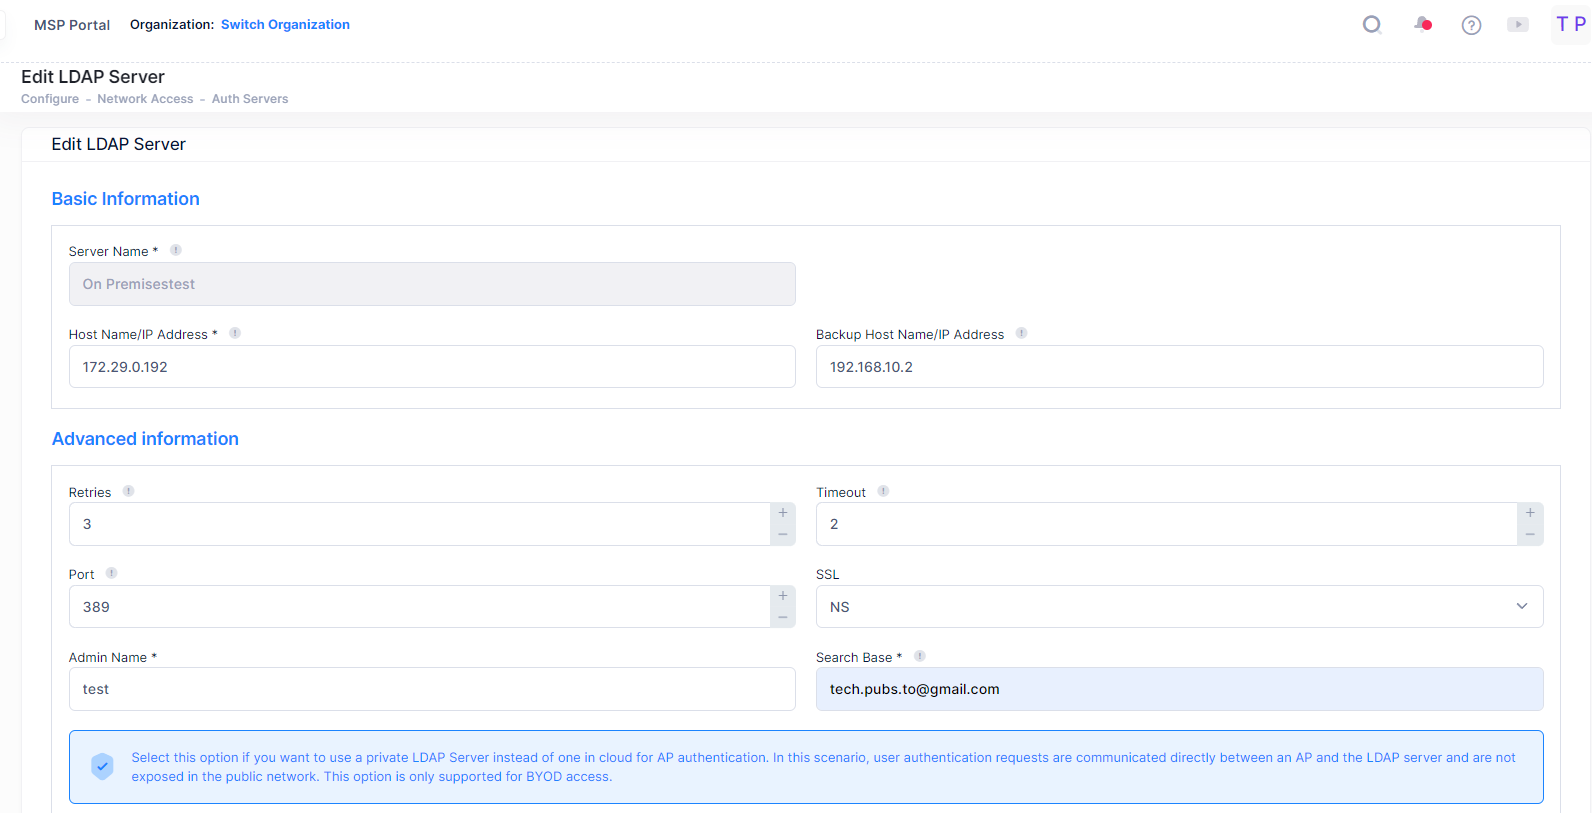
Select an LDAP Server in the list and click on the Edit icon. It is important to note that you cannot modify values indiscriminately. The values must match those of the actual LDAP Server. For example, if you want to change the LDAP port address, you must first use the tools provided by your LDAP Server's vendor to change the port on the LDAP Server itself. You can then inform OmniVista Cirrus that the port number has changed by modifying the Port field. Also note that you cannot edit an LDAP Server's name. You must delete it and create a new one.
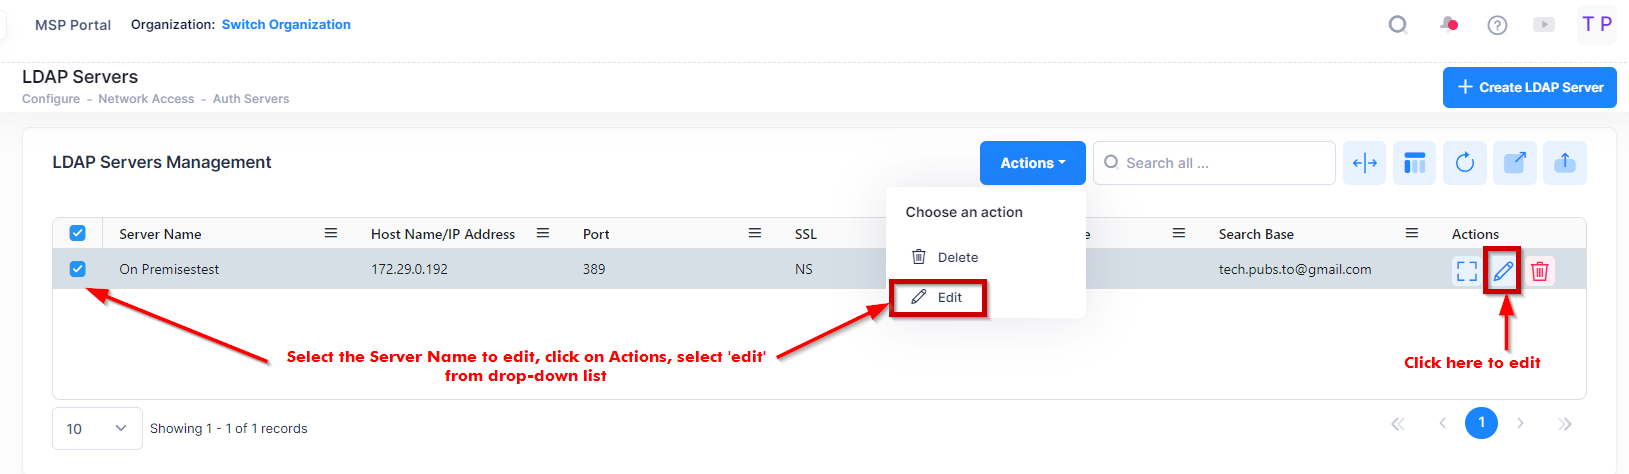
Use one of the following methods to access the Edit LDAP Servers screen (as shown above):
-
Select the server to edit by clicking on the checkbox next to the server name, click on Actions, then select Edit from the drop-down menu.
-
Click on the pencil icon under the “Actions” column next to the server name that you want to edit.
The following Edit LDAP Server screen displays. Edit the fields as described above, then click on Save.
You cannot delete an LDAP Server that is currently being used by OmniVista.
Deleting an LDAP Server
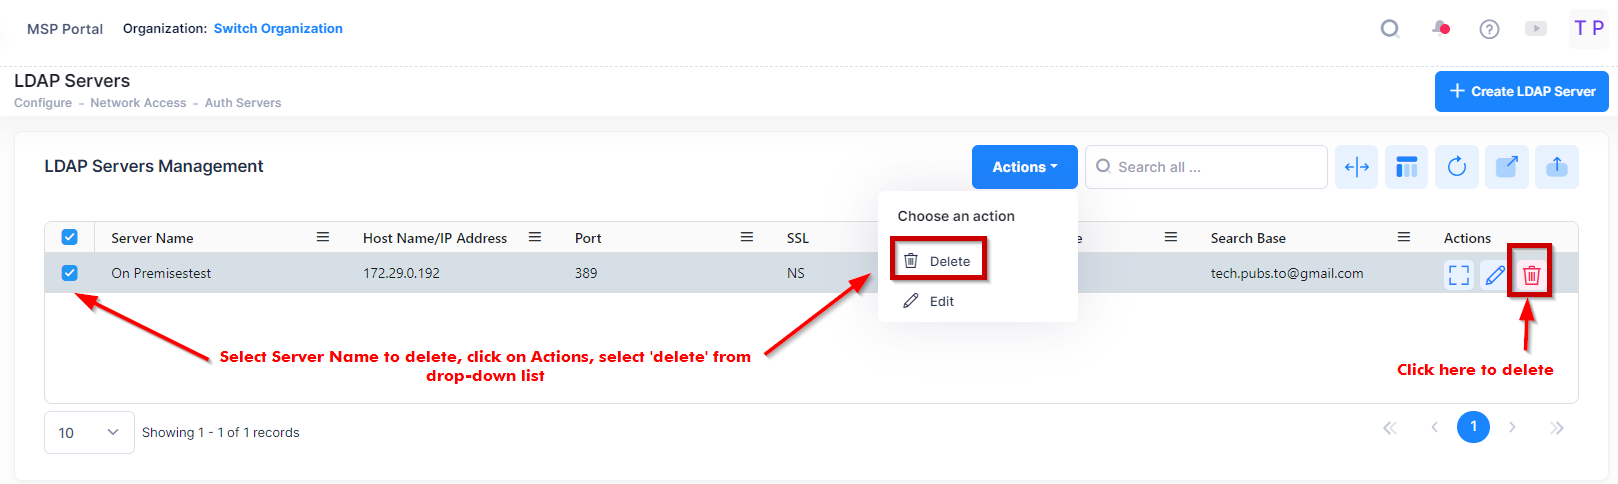
To delete a LDAP Server, use one of the following methods to select the Server Name you want to delete:
-
Select the LDAP Server to delete by clicking on the checkbox next to the server name, click on Actions, then select Delete from the drop-down menu.
-
Click on the trash can icon under the “Actions” column next to the server name that you want to delete.
Note that when deleting an LDAP Server, known to OmniVista Cirrus, it will send a delete alert message to the Switch if it is not been used in another profile.
When you select the server you want to delete, the following confirmation prompt appears:
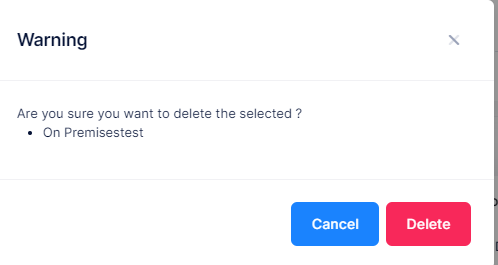
Click on Delete to confirm that you want to delete the LDAP Server.