After a new RAP Organization is created, the next step is to define the Management VPN Tunnel settings for the Organization. The Mgmt VPN Settings screen is used to define settings for a Management VPN Tunnel that Stellar Access Points will communicate with to remotely access an OmniVista 2500 NMS server. When you add a remote Access Point to manage, you will be asked to assign the Access Point to a Management VPN Tunnel.
Use the Mgmt VPN Settings screen to display information about configured Management VPN Settings. This screen is also used to create, edit, delete, and export Management VPN Settings. To access the Management VPN Settings screen, click on Wireless > Mgmt VPN Settings under the “Configure” section of the RAP Organization Menu. The Mgmt VPN Settings screen displays.
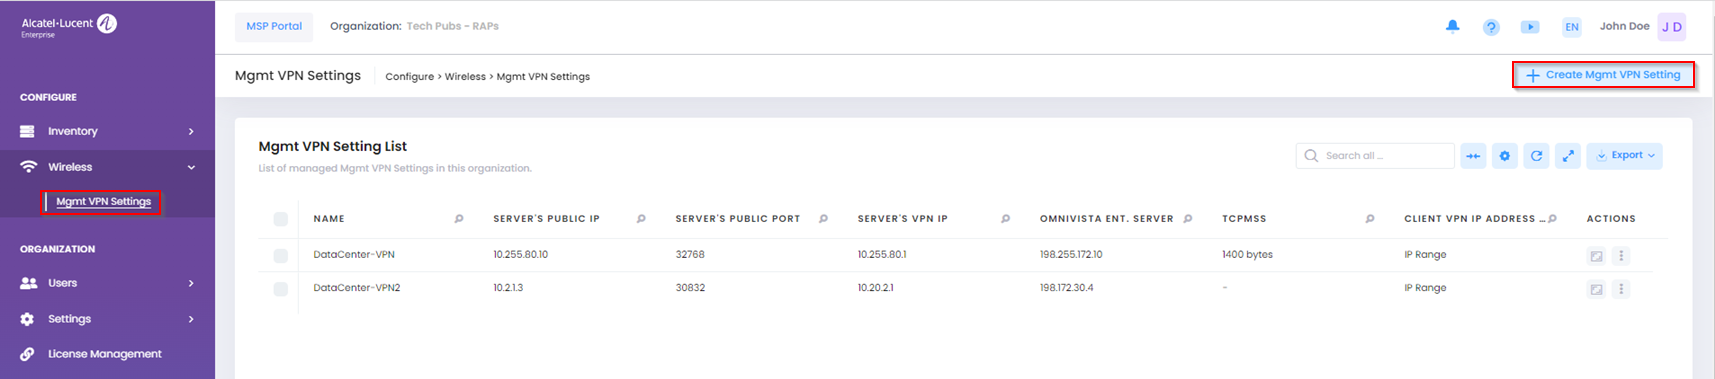
Creating a Management VPN Tunnel
The Create Mgmt VPN Setting screen is used to define settings for a Management VPN Tunnel. To access this screen, click on Create Mgmt VPN Setting.
Complete the following sections of the Create Mgmt VPN Setting screen to define the settings for a Management VPN Tunnel:
-
Basic Information - Configures identifying information for the Management VPN Tunnel (for example, profile name, the public and VPN IP address for the VPN Server, and the OmniVista 2500 NMS server IP address).
-
Client VPN IP Address Pool - Creates an IP pool that is used to assign IP addresses to Remote Access Points connecting to the VPN tunnel.
Basic Information
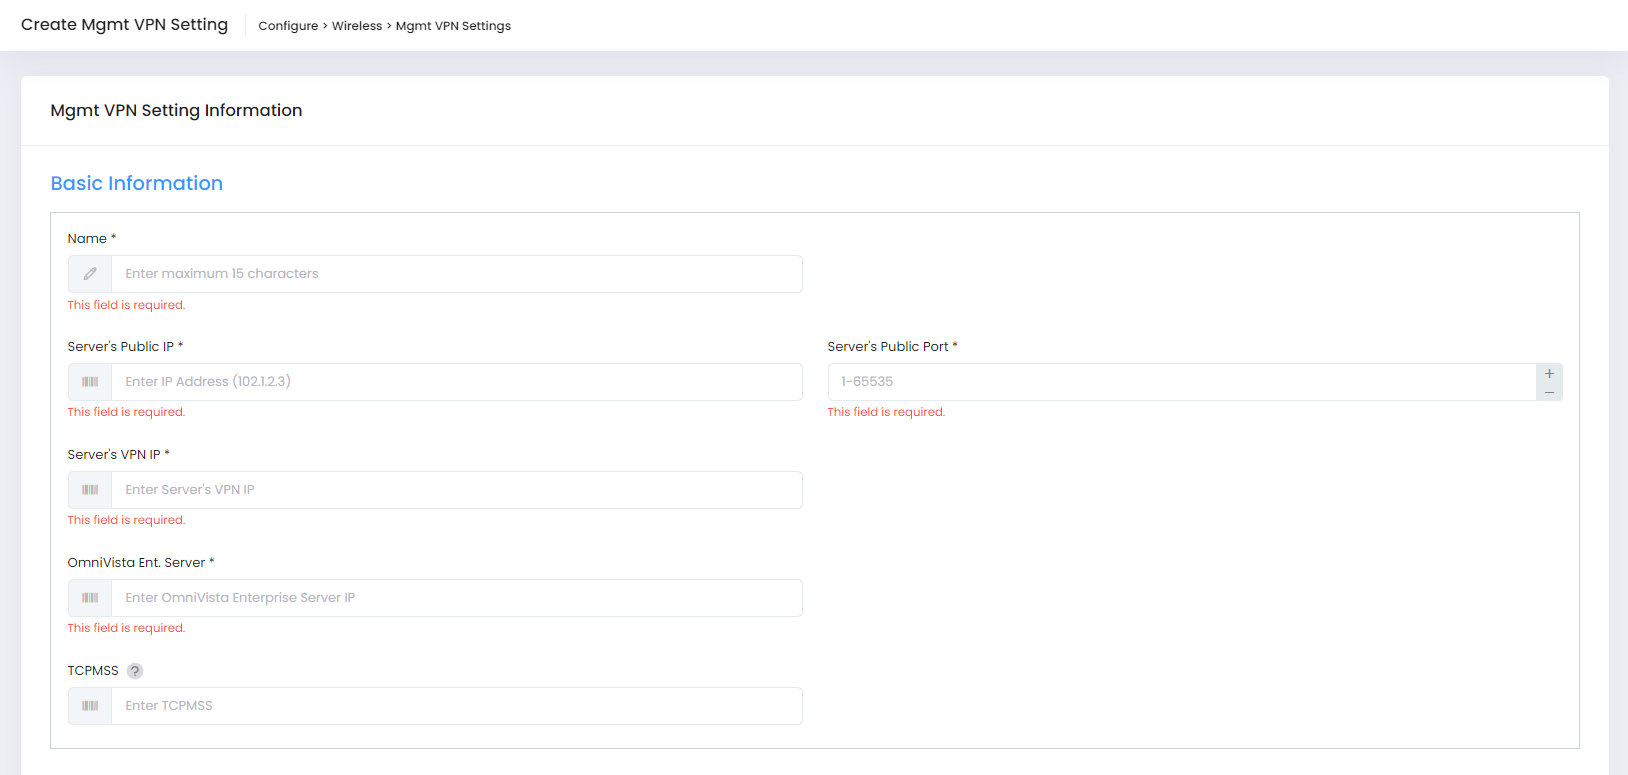
Complete the fields as described below to define the basic information settings for the Management VPN Server Profile:
-
Name - A unique, user-defined name to assign to the Data VPN Server Profile. (1 - 64 characters)
Note that the name setting only allows lowercase, uppercase, numeral, special characters(_ -), and cannot start with “-” or contain a space between words (for example, entering “Data_Center_VPN” is allowed, but “Data Center VPN” is not). -
Server's Public IP - The public IP address of the Management VPN Server.
-
Server's Public Port - The network port of the Management VPN Server. (Range = 1 - 65535)
-
Server's VPN IP - The VPN IP address of the Management VPN Server. The IP address must be within the specified client IP address pool.
-
OmniVista Ent. Server - The IP address of OmniVista 2500 NMS server that will manage the remote APs.
-
TCPMSS - This TCPMSS attribute can be used to control the maximum size of packets going out through a connection. Specifically, it will cause the AP and VPN Server to choose a smaller TCP window and frame size to avoid fragmentation as much as possible. This is especially useful for Dual-stack Lite(DS-Lite) ISP connections.
Client VPN IP Address Pool
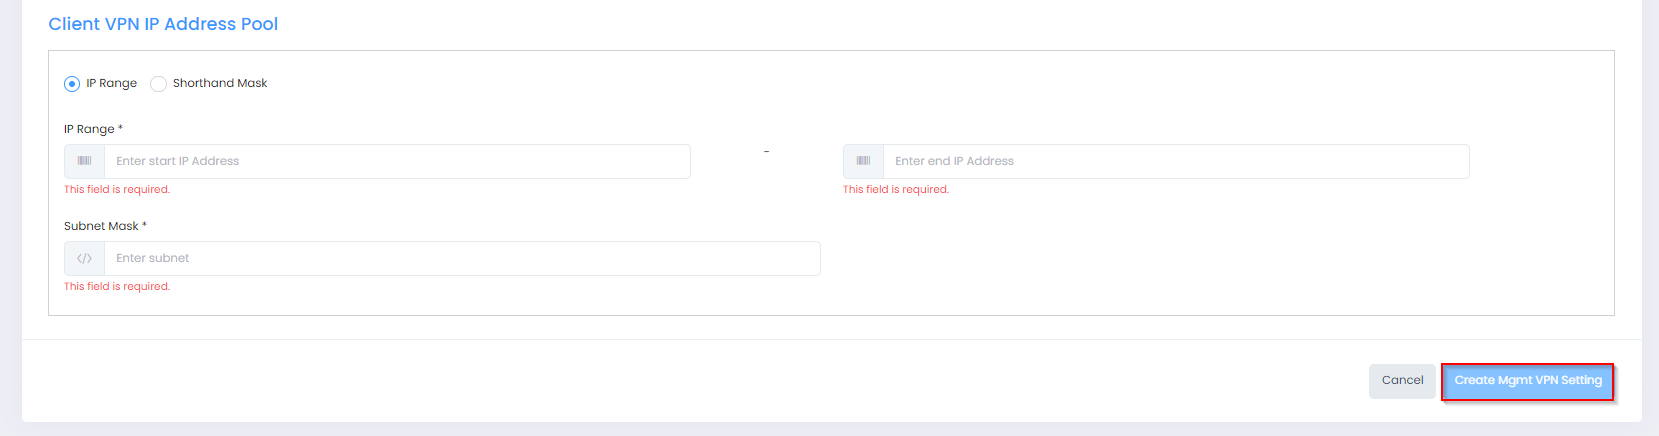
Select the IP Range or Shorthand Mask radio button and complete the fields as described below to create the IP pool from which IP addresses will be assigned to clients connecting to the VPN tunnel.
-
IP Range
-
Enter the Starting and Ending IP Address in the range and Subnet Mask (for example., Starting IP Address = 192.168.1.1, Ending IP Address = 192.168.1.254 with subnet mask = 255.255.255.0).
-
-
Shorthand Mask
-
Network IP Address - Enter the network address and shorthand mask for the IP pool (for example, 192.168.1.0/24).
-
When you are done completing the Basic Information and Client VPN IP Pool sections, click on Create Mgmt VPN Setting at the bottom-right of the screen.
Editing a Management VPN Tunnel
Select the Management VPN Tunnel settings that you want to edit from the Mgmt VPN Settings List, then click on Edit from the “Actions” drop-down menu.

The Edit Mgmt VPN Settings screen opens.
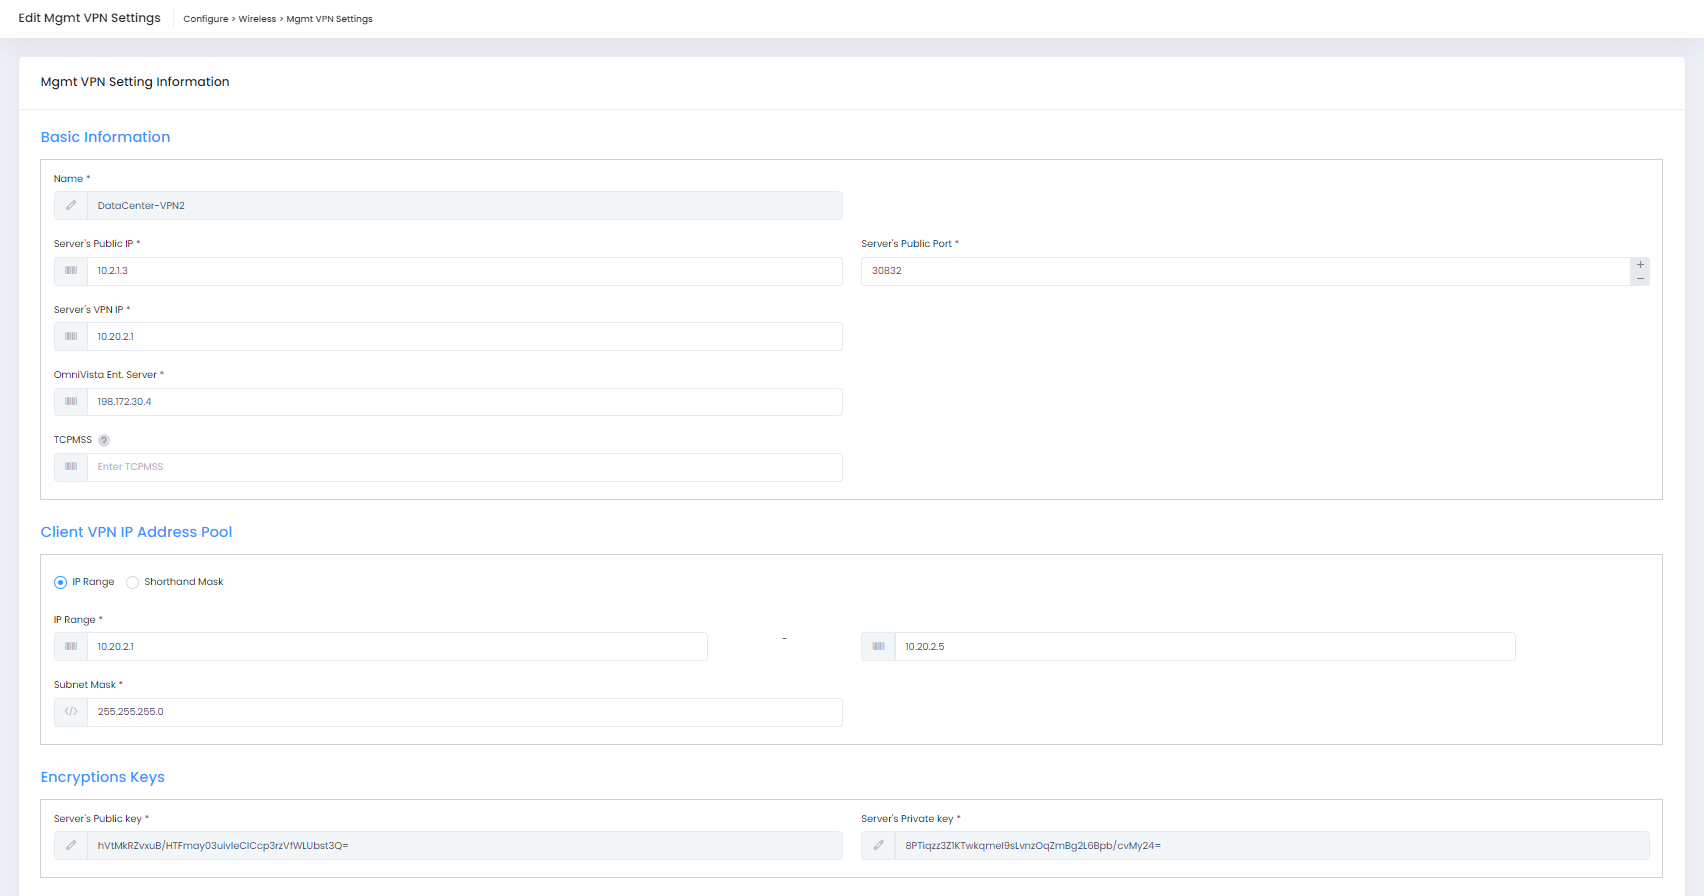
Edit the fields as described in Creating a Management VPN Tunnel, then click on Save to retain your changes.
Note that if the Management VPN Tunnel you are editing is assigned to a remote AP(s), you will receive the following prompt to reset the remote AP so that the AP can get the updated VPN Tunnel settings. (You are not prompted to reset the AP if the Management VPN Tunnel is not assigned to any remote APs.)
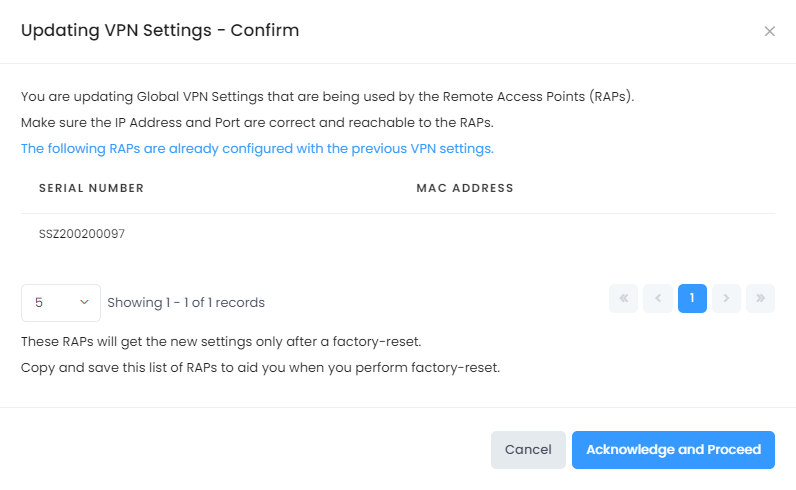
Click on Acknowledge and Proceed to confirm your changes to the VPN Tunnel settings. The Activation Status for the remote AP that was assigned to the updated tunnel settings will change to “Factory Reset Required” on the Device Catalog list. You must then reset the AP by restarting the activation process.
Restarting the Activation Process
To reset an AP to update the AP with VPN Tunnel settings, use one of the following methods to restart the activation process for the AP:
-
Manually Reset the AP - Press the "Reset" button on the device until the LED starts flashing Red. When the light stops flashing or goes out, release the reset button.
-
SSH to the AP and Reboot the AP - SSH to the AP and execute "firstboot" and "reboot" commands.
-
Use the Express UI - If the AP Work Mode column on the OmniVista 2500 NMS Device Catalog screen displays "Cluster", go to the Express UI, select the device(s) you want to add to OmniVista and click on the Connect to OmniVista Cirrus button.
Deleting a Management VPN Tunnel
Select the Management VPN Tunnel that you want to delete from the Mgmt VPN Settings List, then click on Delete from the “Actions” drop-down menu.
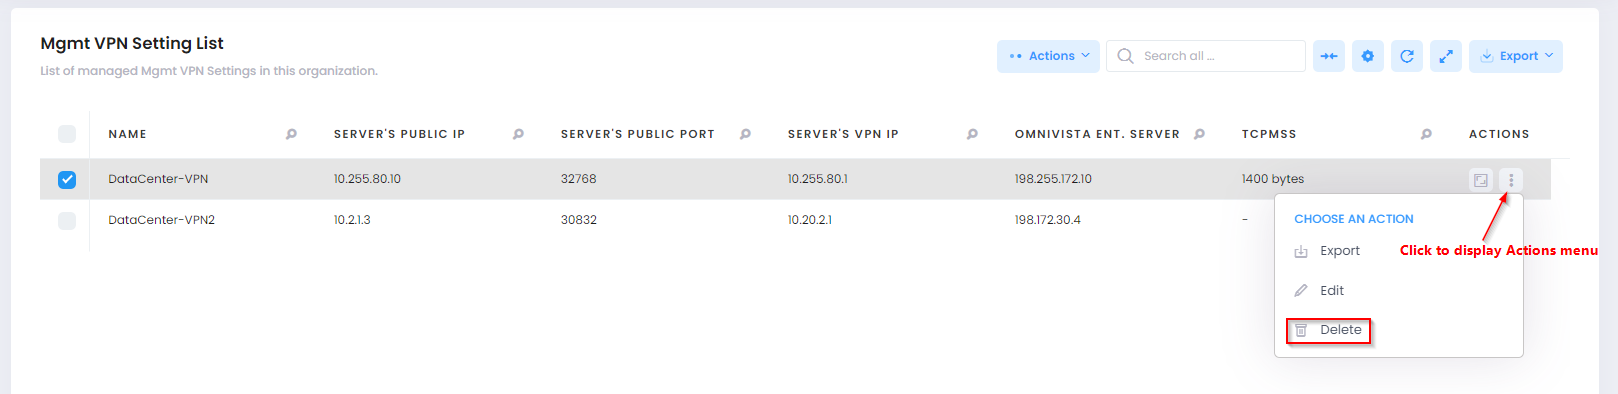
Click Delete when prompted to confirm that you want to delete the profile.
Exporting Management VPN Tunnel Settings
Select a Management VPN Tunnel in the Mgmt VPN Settings List and click on Export in the “Actions” drop-down menu.
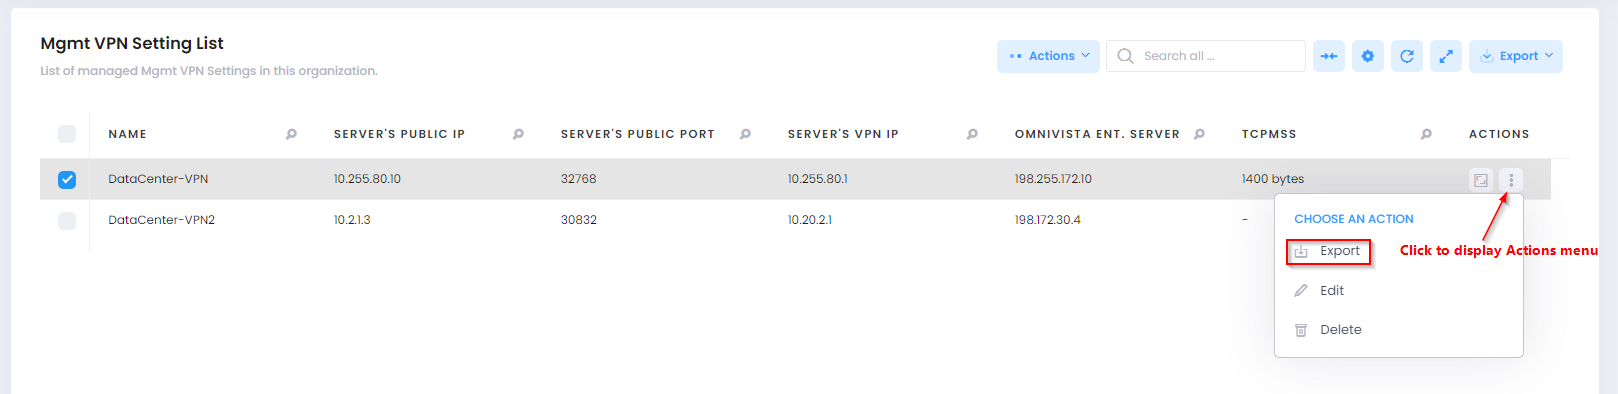
The settings will be downloaded in a .conf file to your Download Directory. You can then import the settings into a Remote Data VPN Server.
Display Additional Management VPN Information
Click the icon in the “Actions” column next to a Management VPN Settings entry to display the Additional Information screen. The information displayed on this screen is defined below.

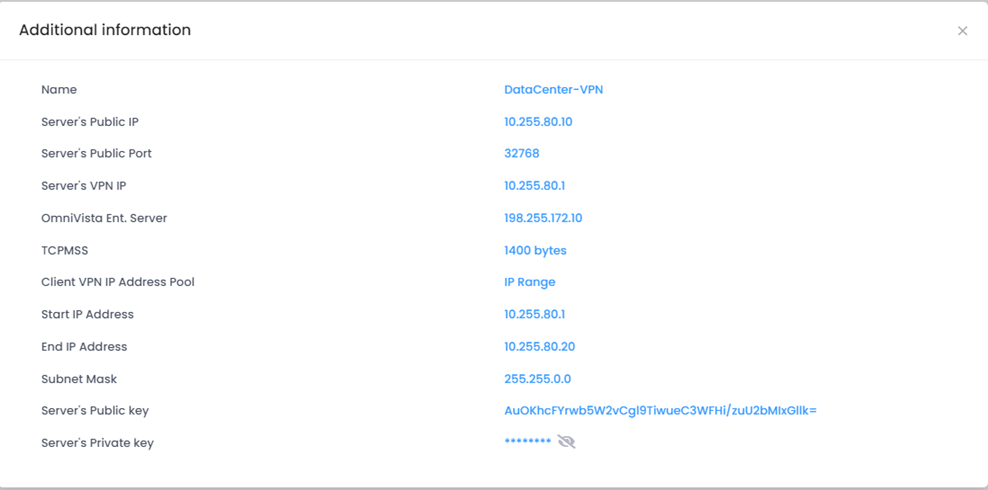
The following information is displayed for the selected Management VPN Settings:
-
Name - User-configured name for the Management VPN Server. It must be unique. (1 - 64 characters)
-
Server's Public IP - The public IP address of the Management VPN Server.
-
Server's Public Port - The network port of the Management VPN Server.
-
Server's VPN IP - The VPN IP address of the Management VPN Server.
-
OmniVista Ent. Server - The IP address of OmniVista 2500 NMS server that will manage the remote APs.
-
TCPMSS - The TCPMSS value, if used.
-
Client VPN IP Address Pool - Whether IP Range or Shorthand Mask is used to specify the IP address pool from which IP addresses are assigned to clients connecting to the VPN tunnel.
-
Network IP Address - Displays the network IP address if the Shorthand Mask option is used to specify the Client VPN IP Address Pool,
-
Length IP Address - Displays the length of the IP address if the Shorthand Mask option is used to specify the Client VPN IP Address Pool.
-
Start IP Address - Displays the starting IP address if the IP Range option is used to specify the Client VPN IP Address Pool.
-
End IP Address - Displays the ending IP address if the IP Range option is used to specify the Client VPN IP Address Pool.
-
Subnet Mask - Displays the value of the subnet mask if the IP Range option is used to specify the Client VPN IP Address Pool.
-
Server's Public Key - The Management VPN Server’s public key used for secure communication between the Management VPN Server and client.
-
Server's Private Key - The Management VPN Server’s private key used for secure communication between Management VPN Server and client.