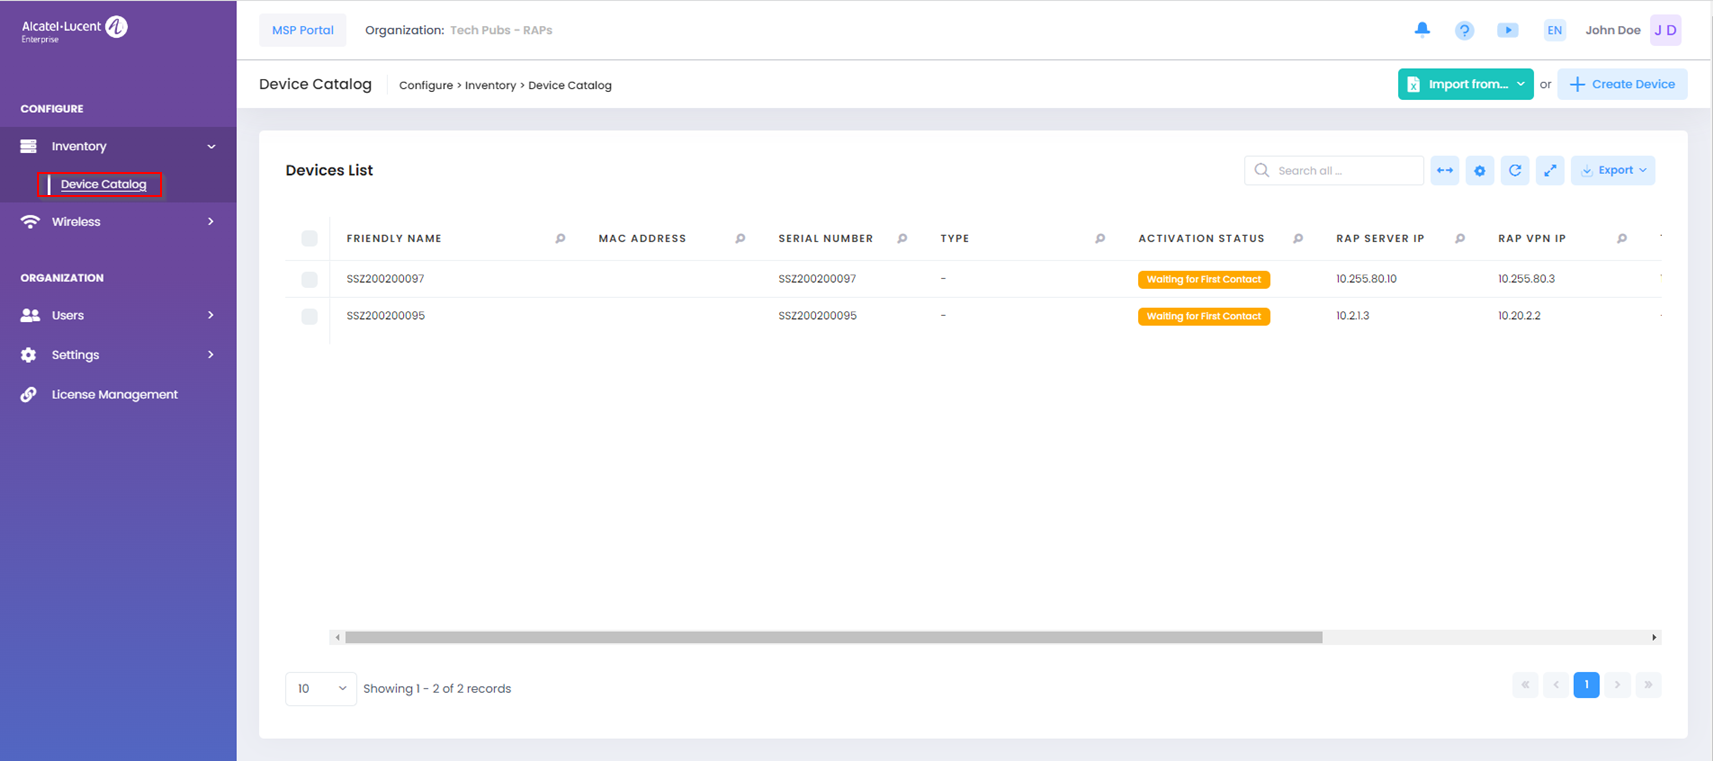
The Device Catalog screen for the RAP Organization displays information about Remote Access Points (RAPs) that are declared in OmniVista Cirrus 10 for remote management by an OmniVista 2500 NMS server. Use this screen to add, edit, or delete remote APs from the Devices List.
To access the Device Catalog screen, click on Inventory > Device Catalog under the “Configure” section of the RAP Organization Menu.
Adding Remote Access Points
There are two methods for adding remote AP devices to the Device Catalog:
Import Multiple AP Devices from an XLSX Sheet
To import devices from an existing Excel sheet (.xlxs), click on Import from… and select XLSX template file. You will then be prompted to download an XLSX template file that contains instructions on how to configure the Excel file with the necessary device information.

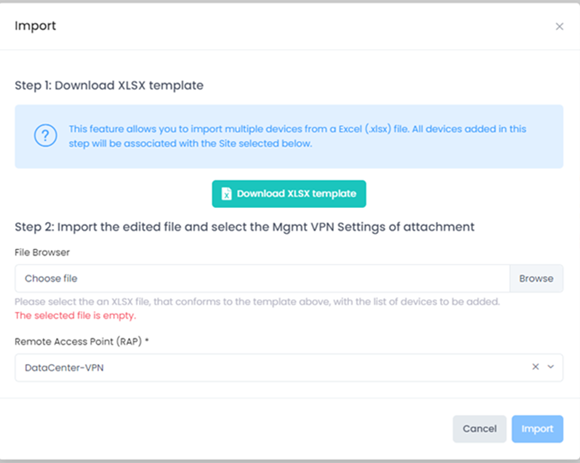
Click on Download XLSX template and specify where you would like to save the template file. When you open the template file, instructions are provided about how to define the devices to be added.
Fill out the template with information for each device that is to be imported. Once the file is complete and saved, return to Step 2 on the Import form and complete the following fields:
-
File Browser - Click in this field to find and select the existing template file to import.
-
Remote Access Point (RAP) - Click in this field to display a list of Management VPN Tunnels and select the tunnel that each device in the template will be assigned.
Once the Import template is complete, click on Import. The Device Catalog list for the RAP Organization is populated with the imported AP devices.
Import Multiple AP Devices from a CSV File
To import devices from an existing OmniVista .csv file, click on Import from… and select OmniVista CSV file. You will then be prompted to download a CSV template file that contains instructions on how to fill out the template with the necessary device information.

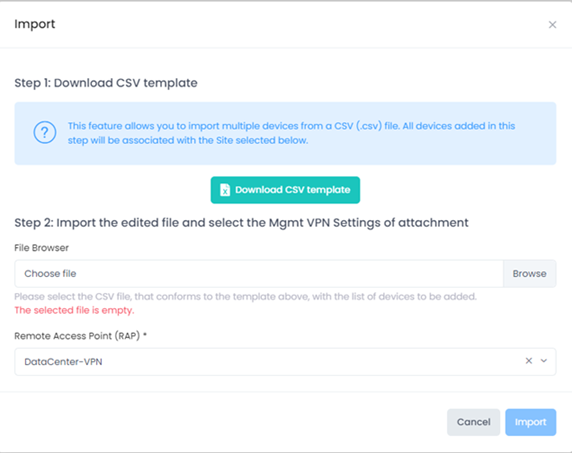
Click on Download CSV template and specify where you would like to save the template file. When you open the template file, instructions are provided about how to define the devices to be added.
Fill out the template with information for each device that is to be imported. Once the file is complete and saved, return to Step 2 on the Import form and complete the following fields:
-
File Browser - Click in this field to find and select the existing template file to import.
-
Remote Access Point (RAP) - Click in this field to display a list of Management VPN Tunnels and select the tunnel that each device in the template will be assigned.
Once the Import template is complete, click on Import. The Device Catalog list for the RAP Organization is populated with the imported AP devices.
Manually Add a Single AP Device
To manually add a single device to a specific Site, click on Create Device to bring up the Create Device form.
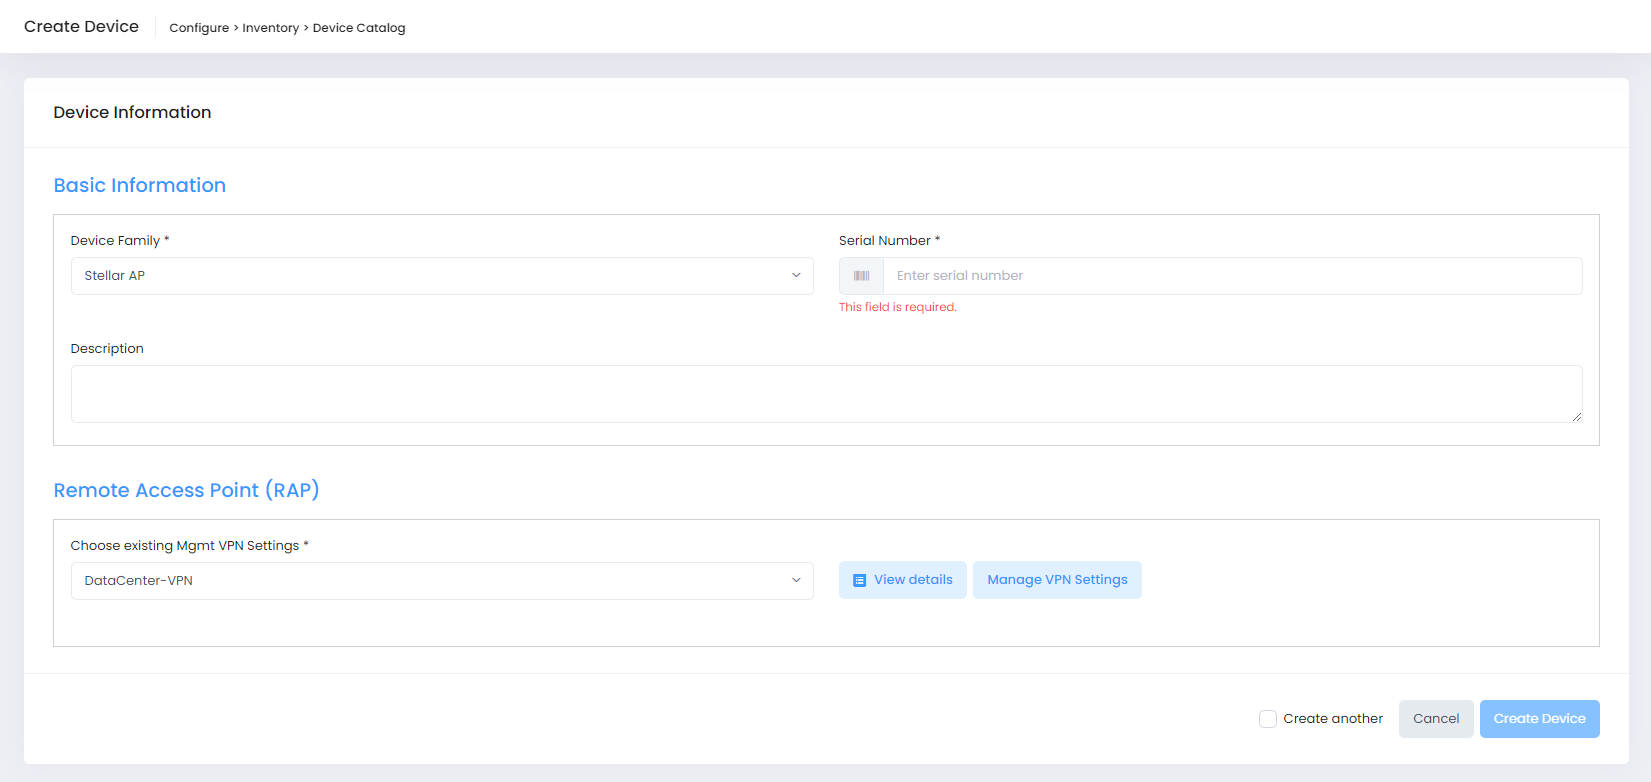
Complete the required fields in each section, as described below, then click on Create Device.
Click on Create another to return to the Create Device form to fill out for another device. If this box is not checked, the display returns to the Device Catalog screen.
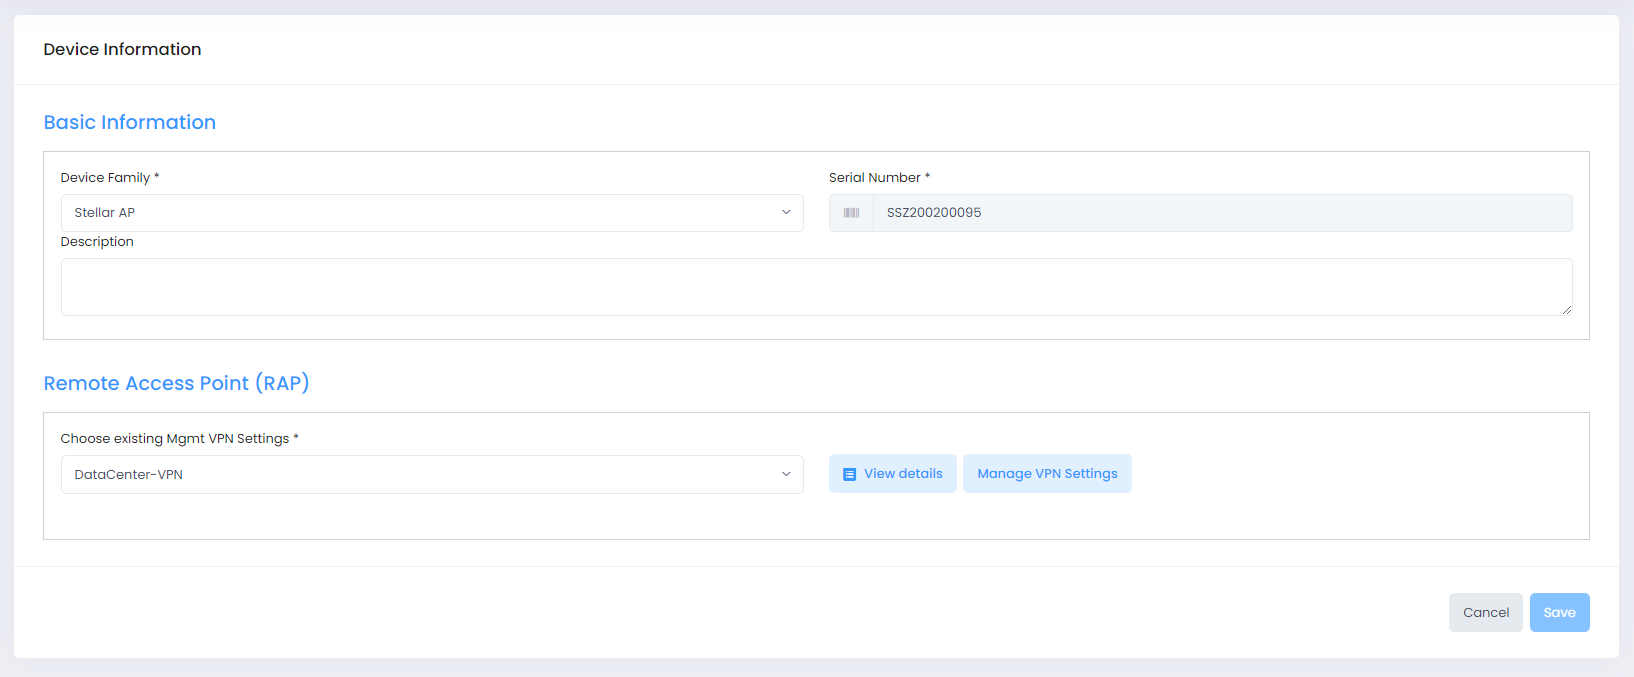
Basic Information
-
Device Family - Defaults to Stellar AP.
-
Serial Number - Enter the serial number for the AP device.
Remote Access Point (RAP)
-
Choose existing Mgmt VPN Settings - Click on this field to select an existing Management VPN Tunnel to assign to the RAP device. You can also click on View Details to view information about the selected VPN Tunnel or click on Manage VPN Settings to open the Mgmt VPN Settings screen to make changes.
Editing Remote Access Point Settings
Select the remote AP that you would like to edit and click on the pencil icon under the “Actions” column to open the Device Information screen for the selected AP.
On this screen you can edit the “Description” field and change the assigned Management VPN Tunnel settings for the AP.
Note that if you change the Management VPN Tunnel settings, you must reset the remote AP to update the AP with the new tunnel settings. The “Activation Status” for the AP changes to Factory Reset Required until the AP is restarted as described here.

Deleting a Remote Access Point
You can delete one or more remote AP devices from the Device Catalog using one of the following options:
-
To delete one or more devices, select the device(s) that you want to delete by checking the box next to each device(s), then click on Actions and select Delete. All the devices selected will be removed from the list.
-
To delete just one device, click on the Delete icon under the Actions column next to the device that you want to delete.
When you delete one or more remote AP devices, you are prompted to confirm your delete request.
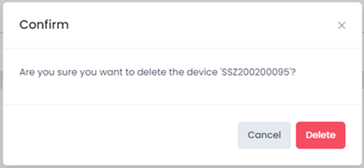
Click on Delete to confirm the remote AP device should be removed from the Device Catalog list.
Display Additional Device Information
Click the icon in the “Actions” column next to a device entry to display the Device Information screen. The information displayed on this screen is defined below.

The following information is displayed for each device:
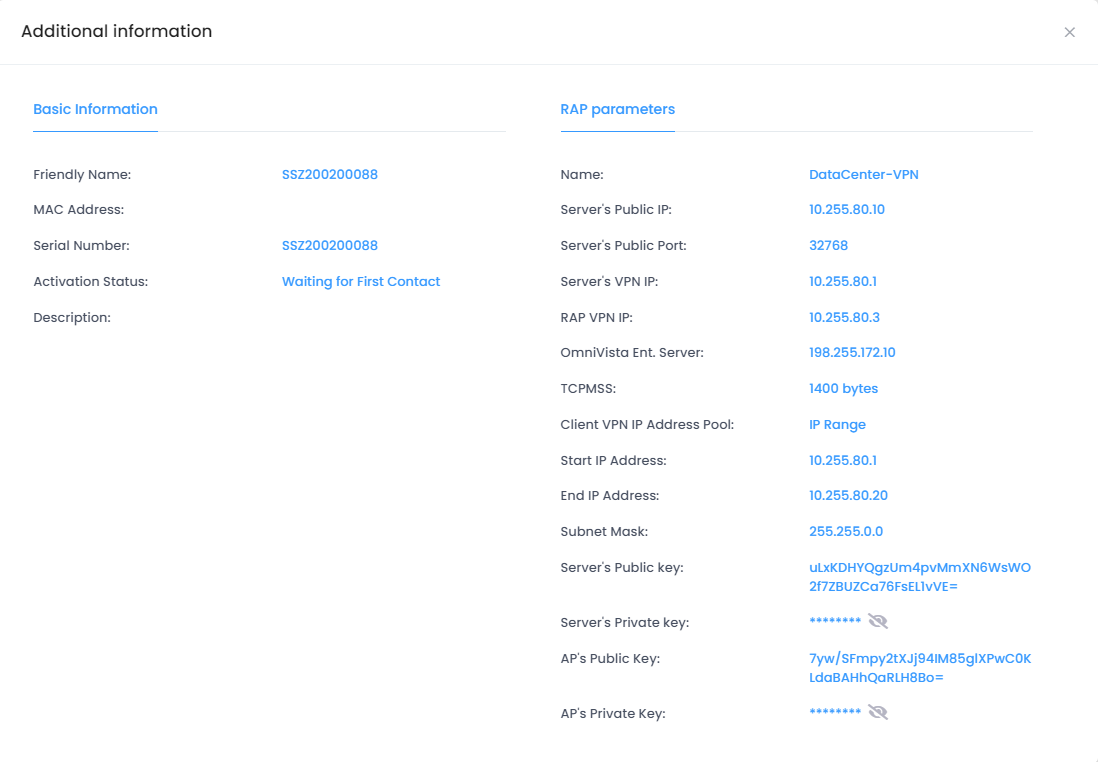
Basic Information
-
Friendly Name - The name assigned to the remote AP device. By default, the Friendly Name is set to the serial number of the device.
-
MAC Address - The MAC address of the remote AP device.
-
Serial Number - The serial number of the remote AP device.
-
Activation Status - The real-time device activation/provisioning status for the remote AP device, if applicable (for example, Waiting for First Contact, Registered, Factory Reset Required).
-
Description - An optional user-defined description.
RAP Parameters
-
Name - The user-configured name assigned to the Management VPN Tunnel settings.
-
Server’s Public IP - The public IP address of the Management VPN Server.
-
Server's Public Port - The network port of the Management VPN Server.
-
Server's VPN IP - The VPN IP address of the Management VPN Server.
-
RAP VPN IP - The IP address assigned to the remote AP device from the Client VPN IP Address Pool.
-
OmniVista Ent. Server: - The IP address of the OmniVista 2500 NMS server that will remotely manage the AP device.
-
TCPMSS - The TCPMSS value, if used.
-
Client VPN IP Address Pool - Whether IP Range or Shorthand Mask is used to specify the IP address pool from which IP addresses are assigned to clients connecting to the VPN tunnel.
-
Network IP Address - Displays the network IP address if the Shorthand Mask option is used to specify the Client VPN IP Address Pool,
-
Length IP Address - Displays the length of the IP address if the Shorthand Mask option is used to specify the Client VPN IP Address Pool.
-
Start IP Address - Displays the starting IP address if the IP Range option is used to specify the Client VPN IP Address Pool.
-
End IP Address - Displays the ending IP address if the IP Range option is used to specify the Client VPN IP Address Pool.
-
Subnet Mask - Displays the value of the subnet mask if the IP Range option is used to specify the Client VPN IP Address Pool.
-
Server's Public Key - The Management VPN Server’s public key used for secure communication between the Management VPN Server and client.
-
Server's Private Key - The Management VPN Server’s private key used for secure communication between Management VPN Server and client.
-
AP’s Public Key - The AP’s public key used to encrypt the data in the VPN tunnel.
-
AP’s Private Key - The AP’s private key used to encrypt the data in the VPN tunnel.