The Tunnel Profile Screen displays information about configured Tunnel Profiles and is used to create, edit, and delete GRE Tunnel Profiles or Data VPN Tunnel Profiles. A Tunnel Profile defines whether GRE or Data VPN encryption is used to securely forward traffic.
-
A GRE Tunnel is typically used to tunnel Guest traffic from an AP to an AOS Switch. The AOS Switch acts as a Guest Tunnel Termination Switch.
-
A Data VPN Tunnel is used to tunnel Guest traffic from an AP to a Data VPN Server.
When you create an Access Role Profile to authenticate a Guest Client, you specify the Tunnel Profile to use for forwarding Client traffic that is mapped to the Access Role Profile.
To create a Tunnel Profile, navigate to the Tunnel Profile screen by clicking on Network Access > Unified Access > Tunnel Profile under the “Configure” section of the OmniVista Cirrus Menu. The Tunnel Profile screen displays.
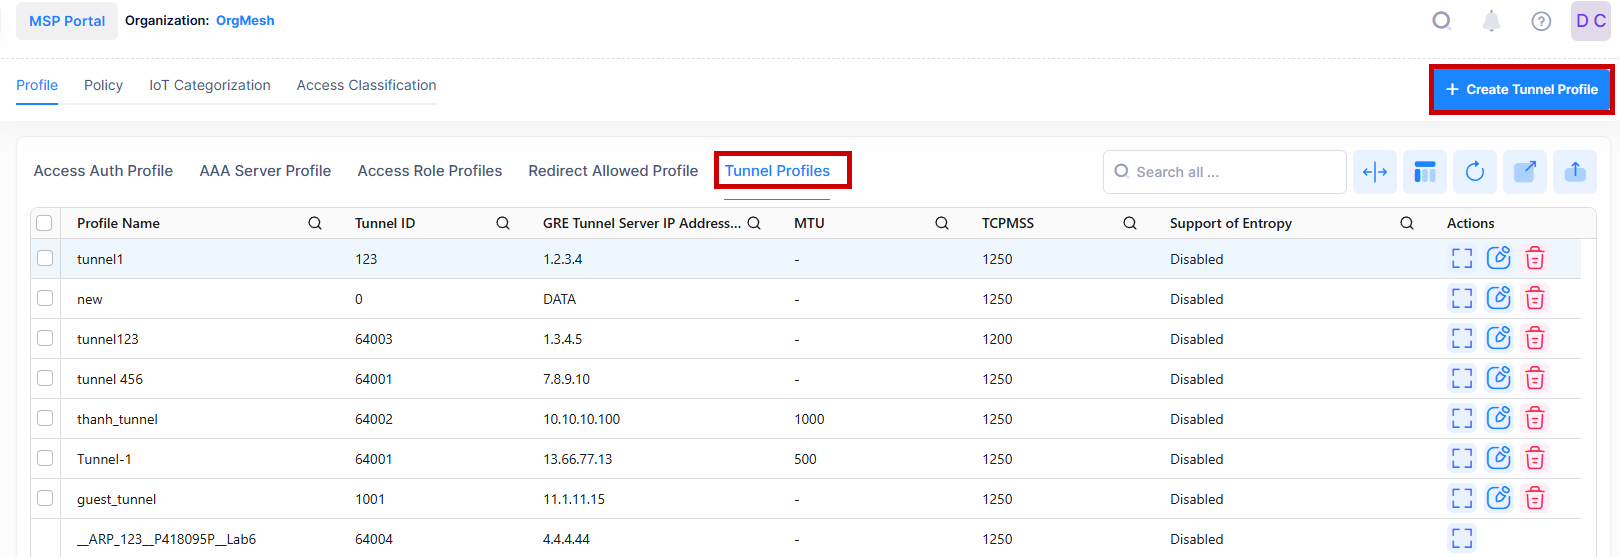
Creating a Tunnel Profile
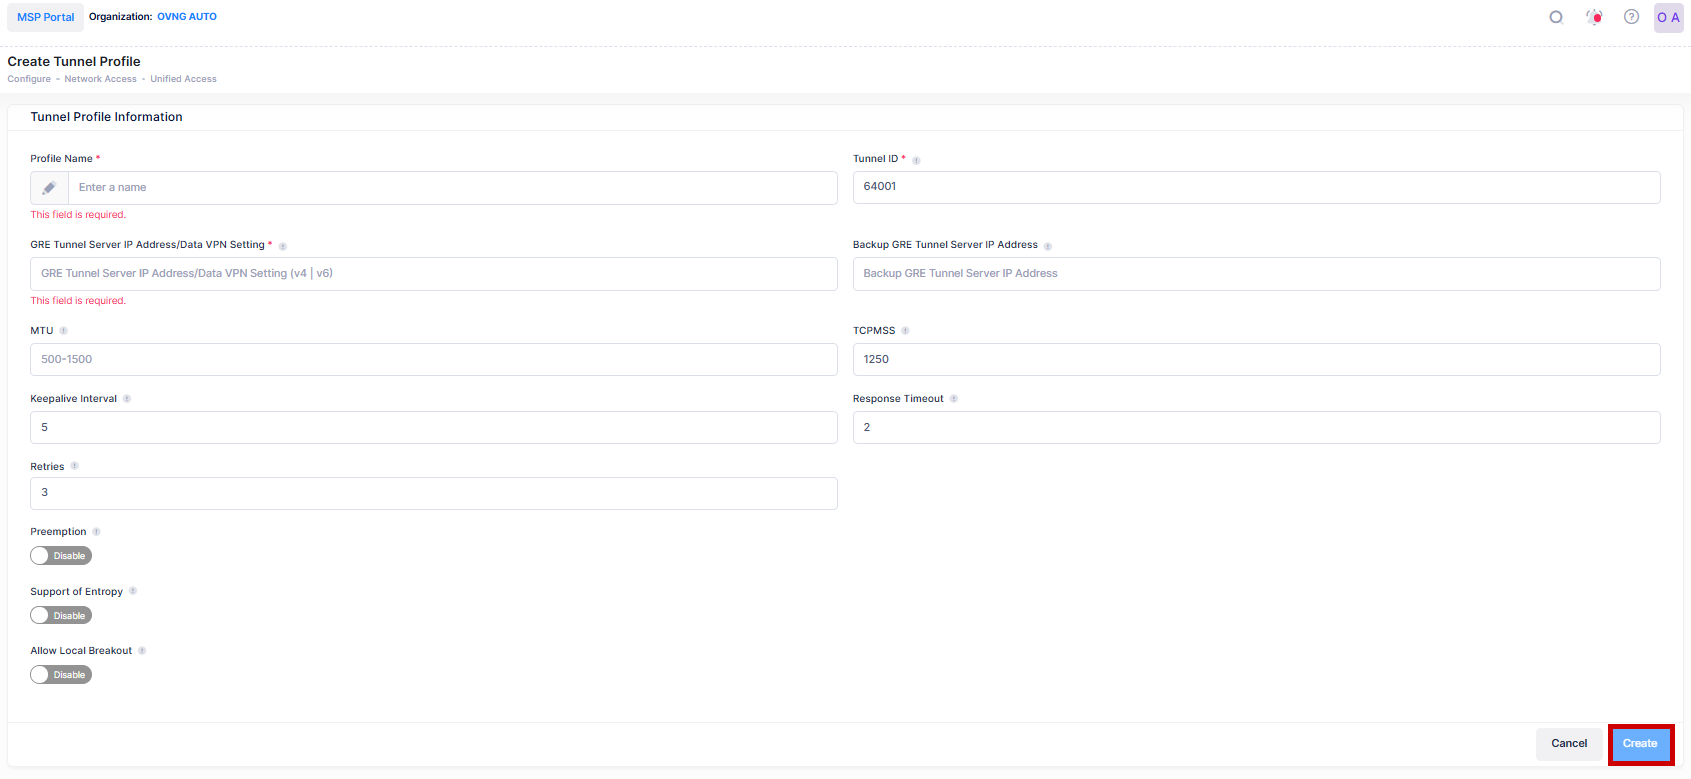
Click on Create Tunnel Profile and complete the fields as described below. When you are finished, click on the Create button. Each tunnel should have a unique Tunnel ID - GRE Tunnel Server/Data VPN Server pairing.
-
Profile Name - The Tunnel Profile name.
-
Tunnel ID - The VPN ID used for Access Role Profile mapping. (Range = 0 - 16777215, suggested range of 64001 - 65000). If the Tunnel ID is set to "0", no GRE Key is sent.
-
GRE Tunnel Server IP Address/Data VPN Setting - Enter the IP address of the Tunnel Termination Switch (GRE Tunnel Server) or select a Data VPN Server Setting from the drop-down list.
-
Backup GRE Tunnel Server IP Address - The IP address of a backup GRE Tunnel Server to provide GRE tunnel redundancy between an AP and GRE Tunnel Server. Select a switch from the drop-down or enter an IP address. When the primary GRE Tunnel Server IP address goes down, the backup Tunnel Server takes over.
-
MTU - Enter the MTU value. The recommended value is 1476 for RAW GRE and 1416 for GRE over wire guard interface. Leave it blank if you do not want to set a specific value.
-
TCPMSS - The TCP Maximum Segment Size (TCP MSS) attribute can be used to control the maximum size of packets going out through a connection. Specifically, it will cause the AP and VPN Server to choose a smaller TCP window and frame size to avoid fragmentation as much as possible. This is especially useful for Dual-stack Lite(DS-Lite) ISP connections. You can configure or adjust the TCPMSS value on the Tunnel profile for Access Role configuration. The default value is 1250. The range is from 500 to 1460.
-
Keepalive Interval - The time interval, in seconds, for APs to check the status of the far-end IP address for the GRE Tunnel Server. (Range = (2 to 5) seconds, Default = 5 seconds).
-
Response Timeout - The amount of time, in seconds, to wait for a response from the GRE Tunnel Server to keepalive requests. (Default = 2 seconds).
-
Retries - The number of times to retry after a failed Keepalive request. (Range = 3 - 5, Default = 3). A failover to the backup GRE Tunnel Server IP address occurs after the last retry has failed.
-
Preemption - Enables/Disables whether to go back to the primary GRE Tunnel Server. (Default = Disabled). When enabled:
-
Preemption Countdown Timer - Specify the amount of time to wait, in seconds, after a failover to the backup GRE Tunnel Server before attempting to go back to the primary GRE Tunnel Server. The countdown timer restarts on every switchover to the backup server. (Default = 300 seconds)
-
-
Support of Entropy - Enables/Disables entropy. An ALE switch acting as a GRE Tunnel Server requires Entropy; however, some third-party GRE Tunnel Servers (e.g., Linux) do not require Entropy.
-
Allow Local Breakout - Enables/Disables Local Breakout on the tunnel. If enabled, enter the Static Route(s) to be used for entering the Tunnel. All other traffic will go out through the local network. Make sure you have applied the relevant Data VPN Server to AP Groups in the SSID before choosing Data VPN Server as the Tunnel endpoint. To apply a Data VPN Server to an AP Group, go to the Provisioning Configuration (Wireless > Profile > Provisioning Configuration) associated with the AP Group and edit the Data VPN Setting. Note that only one VLAN inside the tunnel (tunnel ID different from 0 if tagged, 0 if untagged) can be enabled with Local Breakout.
-
Static Routes - Specify the static routes to be used for entering the tunnel. All other traffic will go out through the local network.
-
Avoid specifying static routes pertaining to the VLAN ID of the traffic that enters the Tunnel. For example, if VLAN ID = 41 is specified to be carried within the Tunnel and if the network subnet that corresponds to VLAN 41 is 192.168.41.0, the AP will automatically set up this route and make sure traffic destined for 192.168.41.0 will enter the Tunnel. The AP will automatically set up this route and make sure traffic with VLAN ID = 41 will enter the Tunnel. Do not specify an explicit Route with Destination = 192.168.41.0, as that will confuse the AP and lead to poor performance.
-
The static routes specified will be accumulated on an AP across all SSIDs assigned to the AP. For example, if you have two SSIDs configured on the same AP and configure SSID1 to use Tunnel Profile T1 with Static Routes A and B, and configure SSID2 to use Tunnel Profile T2 with Static Routes C and D, all of the routes (A, B, C, and D) will be applicable for SSID 1 and SSID 2.
-
Across all of the routes applied on an AP from the different SSIDs, make sure any destination IP subnet is specified only once. Each route applied on an AP should be for a different IP subnet, even across the SSIDs. Also, avoid specifying static routes pertaining to the VLAN ID of the traffic that enters the tunnel. The AP will automatically set up such routes. If a route to IP subnet X already exists in an SSID and that SSID is applied to an AP, another route to the same IP subnet X must not be specified in the same or a different SSID that is applied to the same AP.
-
-
Local Breakout Configuration Examples for RAP Devices - The following configuration examples use a Remote Access Point (RAP) with local IP address 192.168.1.157/24, GW 192.168.1.254. The VLAN assigned to RAP clients is VL-1010 with subnet 10.44.10.0/24, GW 10.44.10.254
-
Without local breakout:
-
The client device obtains its IP address from DHCP. The default gateway is the VLAN-assigned RAP SSID gateway within the tunnel. For example, 10.44.10.50/24, GW 10.44.10.254.
-
All traffic passes through the tunnel.
-
-
With local breakout:
-
The AP creates an IP interface in the VLAN assigned to the RAP service, such as “br-g1v1010.” This interface obtains its IP address from the DHCP server (for example, GW 10.44.10.108).
-
The client device obtains its IP address from DHCP, the default gateway is replaced by the AP and becomes the interface on the AP itself. For example, 10.44.10.50/24, GW 10.44.10.108.
-
OmniVista configures static routes on the remote APs, based on the “Local Breakout” configuration. For example, 10.0.0.0/8 GW 10.44.10.254.
-
The AP routes all client device traffic as follows: everything goes to the local router (which performs NAT for local access) except traffic specified in the static routes.
-
The AP routes client traffic based on its routing table. For example, traffic to 10.10.10.10 goes through the tunnel via gateway 10.44.10.254, while traffic to 8.8.8.8 goes to the local router at 192.168.1.254.
-
-
-
If you create two tunnel profiles with the same Remote IP and Tunnel ID, the "Support of Entropy" status must be the same on both tunnels (both must be "enabled" or "disabled"). Choose the value based on what use case you plan to deploy.
Editing a Tunnel Profile
Select the profile in the Tunnel Profile List and click on the Edit icon to bring up the Edit Tunnel Profile Screen. Edit the fields as described above then click on the Save button to save the changes. Note that you cannot edit the profile name.
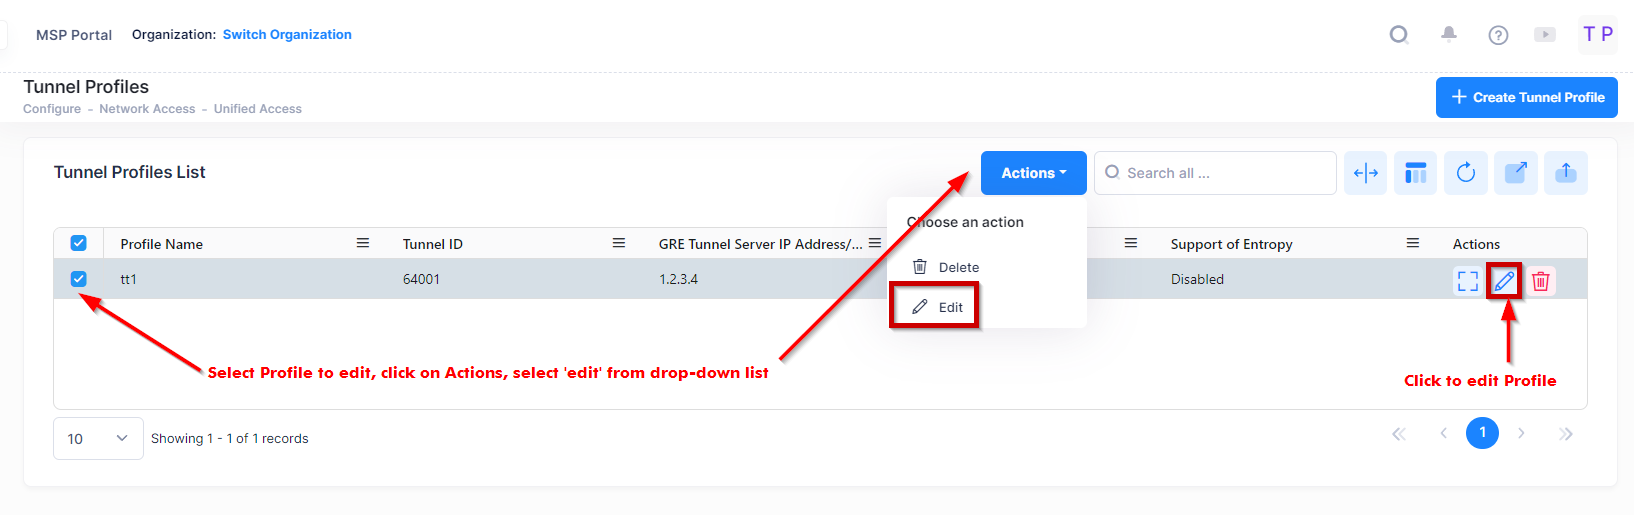
Use one of the following methods to access the Edit Tunnel Profile screen (as shown above):
-
Select the profile to edit by clicking on the checkbox next to the profile, click on Actions, then select Edit from the drop-down menu.
-
Click on the pencil icon under the “Actions” column next to the profile that you want to edit.
Edit the fields as described above, then click on Save.
Display Information of a Tunnel Profile
The Tunnel Profiles list displays information for the configured Tunnel Profiles.

The following information is displayed. This screen also allows you to export, search and filter the data.
-
Profile Name - The Tunnel Profile name.
-
Tunnel ID - The VPN ID used for Access Role Profile mapping. (Range = 0 - 16777215, suggested range of 64001 - 65000). If the Tunnel ID is set to "0", no GRE Key is sent.
-
GRE Tunnel Server IP Address/Data VPN Setting - The IP address of the Tunnel Termination Switch (GRE Tunnel Server).
-
MTU - The MTU value.
-
TCPMSS - The TCPMSS value on the Tunnel profile for Access Role configuration. The default value is 1250. The range is from 500 to 1460.
-
Support of Entropy - Enables/Disables entropy. An ALE switch acting as a GRE Tunnel Server requires Entropy; however, some third-party GRE Tunnel Servers (e.g., Linux) do not require Entropy.
You can click on Additional Information icon under the “Actions” column. The information displayed on this screen is defined below.
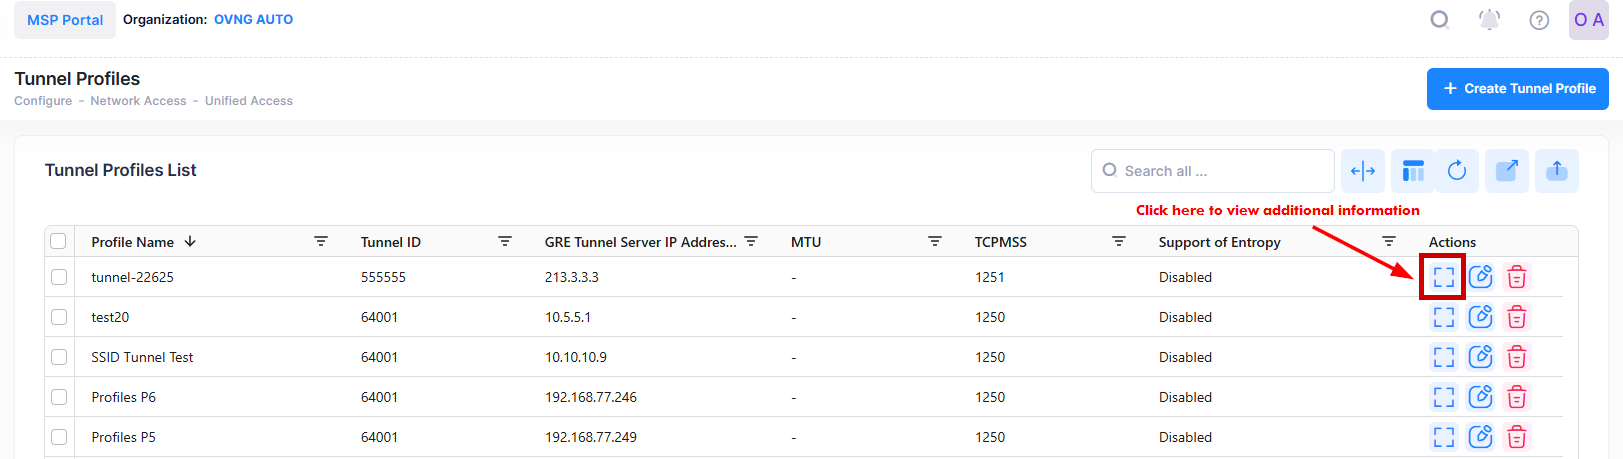
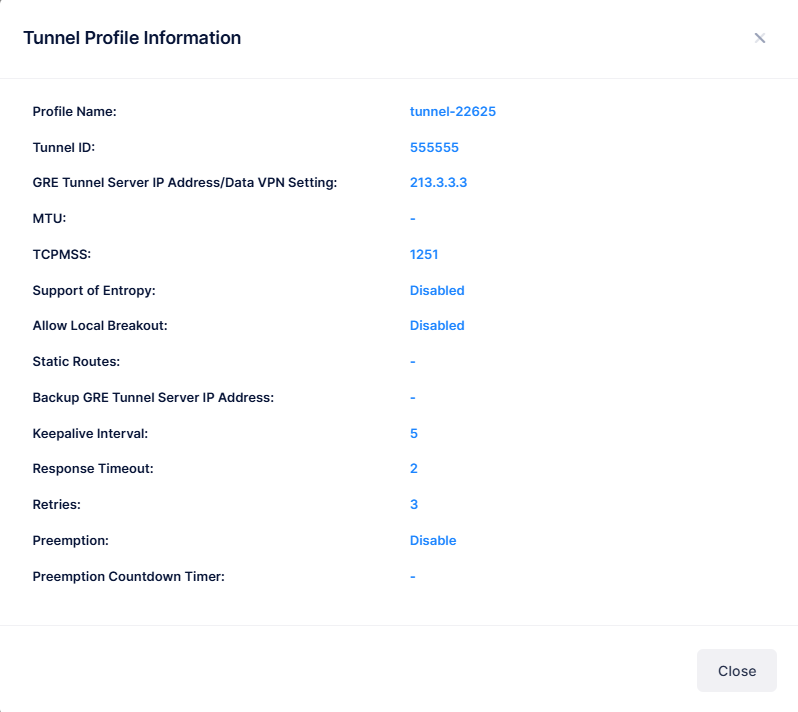
The following information is displayed for each Tunnel Profile:
-
Profile Name - The Tunnel Profile name.
-
Tunnel ID - The VPN ID used for Access Role Profile mapping. (Range = 0 - 16777215, suggested range of 64001 - 65000). If the Tunnel ID is set to "0", no GRE Key is sent.
-
GRE Tunnel Server IP Address/Data VPN Setting - The IP address of the Tunnel Termination Switch (GRE Tunnel Server).
-
MTU - The MTU value.
-
TCPMSS - The TCPMSS value on the Tunnel profile for Access Role configuration. The default value is 1250. The range is from 500 to 1460.
-
Support of Entropy - Enables/Disables entropy. An ALE switch acting as a GRE Tunnel Server requires Entropy; however, some third-party GRE Tunnel Servers (e.g., Linux) do not require Entropy.
-
Allow Local Breakout - Enables/Disables Local Breakout on the tunnel. If enabled, enter the Static Route(s) to be used for entering the Tunnel.
-
Static Routes - Specify the static routes to be used for entering the tunnel. All other traffic will go out through the local network.
-
Backup GRE Tunnel Server IP Address - The IP address of a backup GRE Tunnel Server to provide GRE tunnel redundancy between an AP and GRE Tunnel Server.
-
Keepalive Interval - The time interval, in seconds, for APs to check the status of the far-end IP address for the GRE Tunnel Server. (Range = (2 to 5) seconds, Default = 5 seconds).
-
Response Timeout - The amount of time, in seconds, to wait for a response from the GRE Tunnel Server to keepalive requests. (Default = 2 seconds).
-
Retries - The number of times to retry after a failed Keepalive request. (Range = 3 - 5, Default = 3). A failover to the backup GRE Tunnel Server IP address occurs after the last retry has failed.
-
Preemption - Enables/Disables whether to go back to the primary GRE Tunnel Server. (Default = Disabled).
-
Preemption Countdown Timer - Specify the amount of time to wait, in seconds, after a failover to the backup GRE Tunnel Server before attempting to go back to the primary GRE Tunnel Server. The countdown timer restarts on every switchover to the backup server. (Default = 300 seconds).
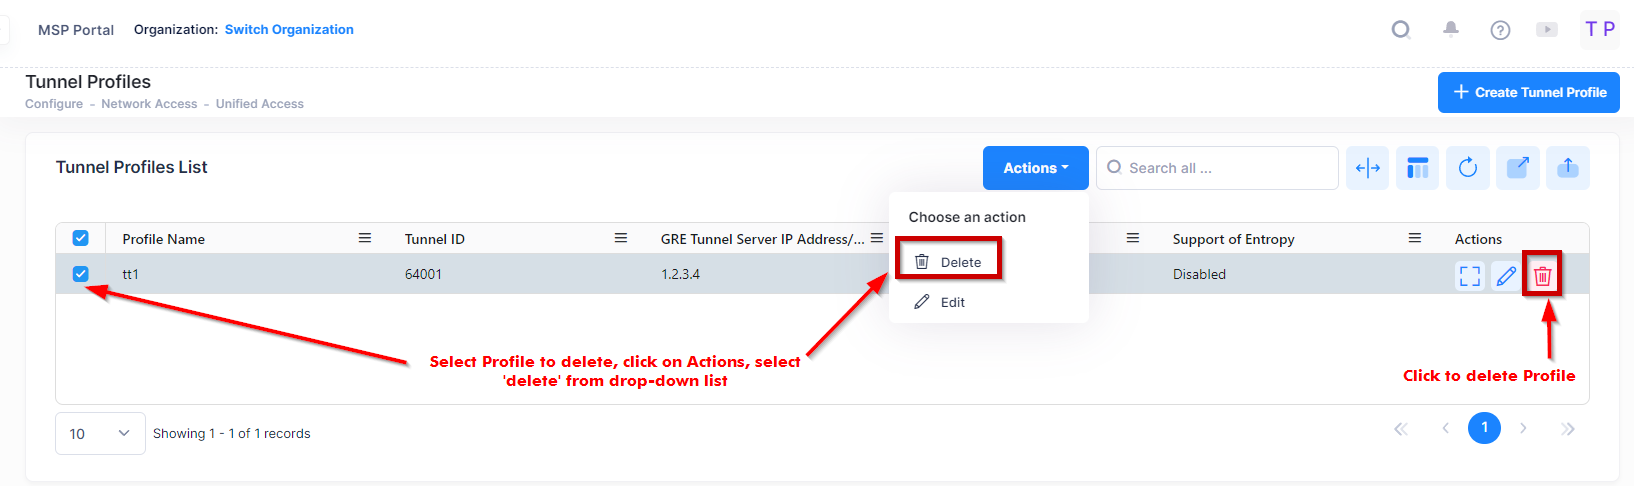
Deleting a Tunnel Profile
To delete a Tunnel Profile, use one of the following methods to select the profile you want to delete:
-
Select the profile to delete by clicking on the checkbox next to the profile, click on Actions, then select Delete from the drop-down menu.
-
Click on the trash can icon under the “Actions” column next to the profile that you want to delete.
When you select the profile you want to delete, the following confirmation prompt appears:
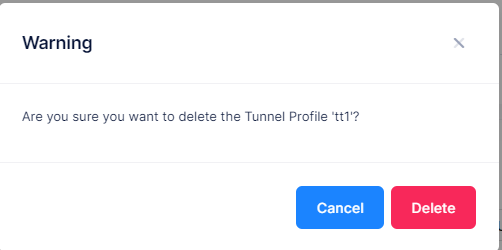
Click on Delete to confirm that you want to delete the Tunnel Profile.