The Authentication Servers RADIUS Server Management screen displays all RADIUS Servers known to OmniVista Cirrus. It also enables you to add, edit, and delete RADIUS Servers from the list of RADIUS Servers known to OmniVista Cirrus. A built-in RADIUS Client is available on the device. A RADIUS Server that supports Vendor Specific Attributes (VSAs) is required. VSAs carry specific authentication, authorization, and configuration details about RADIUS requests to and replies from the server. Refer to "Managing Authentication Servers" in your Network Configuration Guide for specific information on the VSAs required. Before you add a RADIUS Server to the list of RADIUS Servers known to OmniVista, you must first install and configure the RADIUS Server.
-
You cannot add, modify, or delete users and user privileges from RADIUS Servers in OmniVista Cirrus.
-
RADIUS Server Management supports both Switch and wireless devices; however certain attributes may not be supported on wireless devices. See the configuration fields below for more information.
-
If you change the Shared Secret of the UPAM RADIUS Server, then you must also update the Shared Secret of the NAS Clients. The UPAM RADIUS Server and the NAS Clients must use the same Shared Secret.
-
OmniVista Cirrus converts an IPv6 address to its compressed form before saving the address to the database.
Adding a RADIUS Server
After configuring a RADIUS Server, you must add it to the list of RADIUS Servers known to OmniVista Cirrus. To add a new RADIUS Server, navigate to the RADIUS Servers Management screen by clicking on Network Access > Auth Servers > RADIUS Servers under the “Configure” section of the OmniVista Cirrus Menu. The RADIUS Servers Management screen displays.
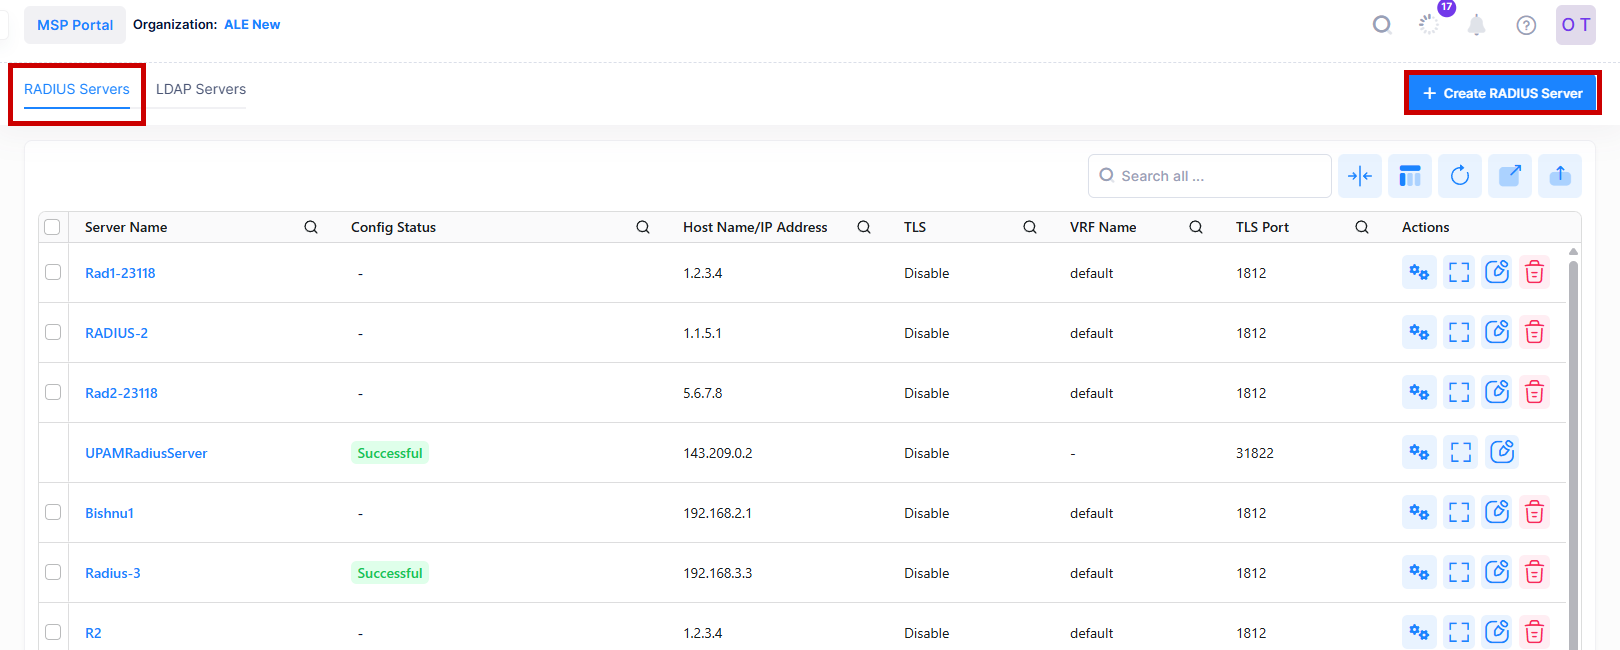
A default RADIUS Server (“UPAMRadiusServer”) is provided for OmniVista UPAM RADIUS authentication. You can edit the information for this server, but you cannot delete the server entry.
To add a new RADIUS Server, click on Create RADIUS Server and complete the fields as described below. When you are finished, click on Create.
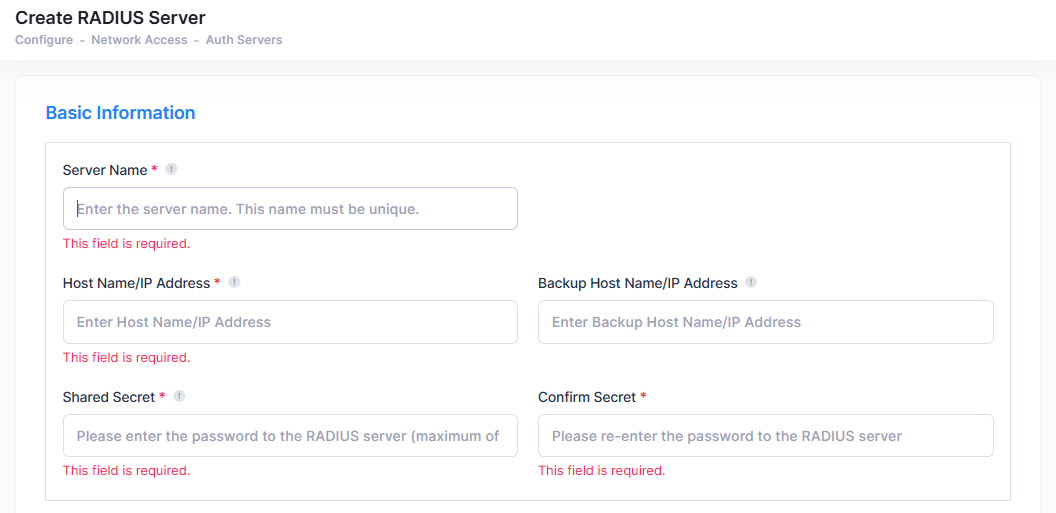
Basic Information
-
Server Name - Unique name for the RADIUS Server. This name will be used by OmniVista and the device to identify the Server.
-
Host Name/IP Address - The name of the computer where the server is located OR the IP address of the computer where the Server is located.
-
Backup Host Name/IP Address - Each RADIUS Server may optionally have a backup server. If you wish to define a backup server that will be used if this server is unavailable, enter the name of the computer where the backup server is located OR enter the IP address of the computer where the backup Server is located.
-
Shared Secret - The password to the RADIUS Server (AP: 1-64 characters, Switch: 1-63 characters). The "Shared Secret" is essentially the server password. Note that the password you enter must be configured identically on the RADIUS Server. In addition, if you use a remote RADIUS Server with a Shared Secret greater than 16 characters, OmniVista only supports PAP and CHAP authentication. (Note: The exclamation point '!' is not a valid password character. Some special characters like '$' must be escaped. To use '$' in a password (e.g., test$1234), enter it as 'test\$1234').
-
Confirm Secret - Re-enter the Shared Secret.
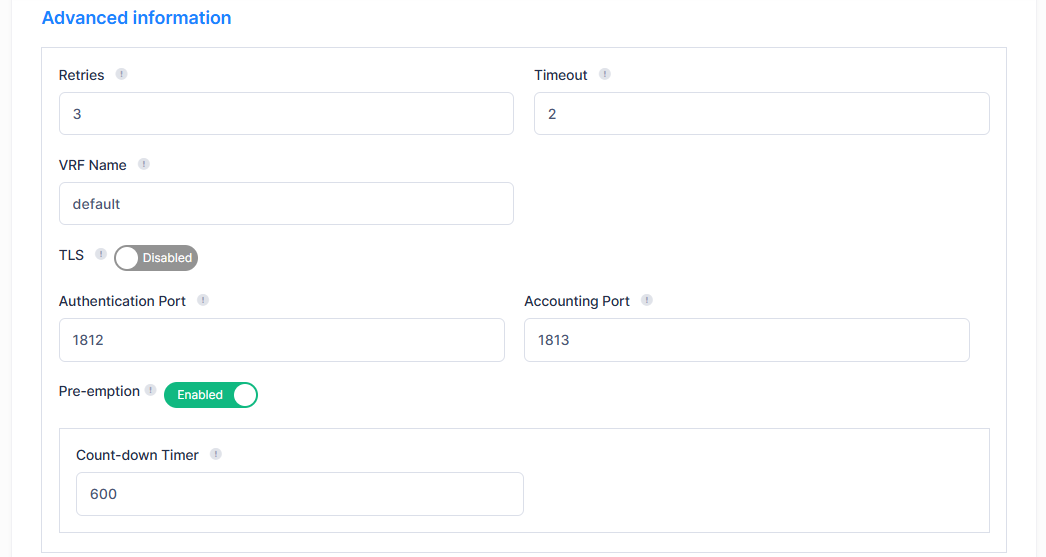
Advanced Information
-
Retries - The number of retries that you want the device to attempt when trying to contact the RADIUS Server (AP Range = 1-3, Switch Range = 1-32, Default = 3).
-
Timeout - The number of seconds that you want the device to wait before a request to the RADIUS Server is timed out (Range = 1 - 30, Default = 2).
-
VRF Name - The name of the VRF instance associated with the RADIUS Server, if applicable. A RADIUS Server can be configured on any VRF instance including the default VRF instance. However, all of the servers (for example, all the RADIUS servers) must reside on the same VRF instance. Default value is "default". (Not supported on wireless devices and ignored when applied to those devices.)
-
TLS - Enable/disable the use of the Transport Layer Security encryption method. Enable the TLS option to allow the RADIUS Server to use RadSec (RADIUS-over-TLS). Note that an AP can only support one RadSec Server. If you set up multiple RadSec (TLS-Enabled Radius) servers in OmniVista, make sure that all SSIDs within an AP Group are configured to use the same RadSec server. In addition, an AP does not support MAC authentication or External Captive Portal using RadSec. (Applies only to Access Point configuration.)
-
TLS Port - The TLS port number for the RADIUS Server (Range = 1 - 65535, Default = 2083).
-
-
Authentication Port - The port to access the Server (Range = 1 - 65535, Default = 1812).
-
Accounting Port - The port for accounting information (Range = 1 - 65535, Default = 1813).
-
Pre-emption - If Pre-emption is enabled, the device will switch back to primary RADIUS server at the end of Count-Down Timer. If Pre-emption is disabled, then the device will switch to use the primary RADIUS server only if the backup RADIUS server is timed out. By default Pre-emption is Enabled. (Applies only to Access Point configuration.)
-
Count-down Timer - Enter the number of seconds for the device to adhere with the Secondary server, before moving back to Primary (Default is 600 seconds). (Applies only to Access Point configuration.)

Require Message Authenticator
-
Require Message Authenticator - Enables/Disables checking for the Message-Authenticator attribute in RADIUS response packets coming from the RADIUS Authentication server. Enabling the Require Message Authenticator check is the recommended setting to prevent attempts to forge authentication responses by spoofing UDP-based RADIUS response packets. Checking for this attribute is also configurable when defining a UPAM NAS Client and a UPAM External RADIUS server. Refer to Require Message Authenticator Use Cases for more information.
-
Enabled - Checks for the Message-Authenticator attribute and drops any response packets that do not contain this attribute. Access Points running >= AWOS 5.0.2 check for the Message-Authenticator attribute; however, you must use the aaa radius message-authenticator CLI command to enable an OmniSwitch to check for this attribute.
-
Disabled - Does not check for the Message-Authenticator attribute in RADIUS response packets. Note that this attribute is not checked by Access Points running less than AWOS 5.0.2.
-
-
If the TLS option is enabled for the RADIUS Server, the Require Message Authenticator option is not available.
-
Require Message Authenticator is:
-
enabled by default when you are adding a RADIUS Server.
-
enabled for the existing UPAMRadiusServer on a fresh installation.
-
disabled by default for existing servers that were created in OVC 10.4.3. This ensures that devices managed in OVC 10.4.3 can still pass RADIUS authentication after an upgrade to OVC 10.5.1.
-
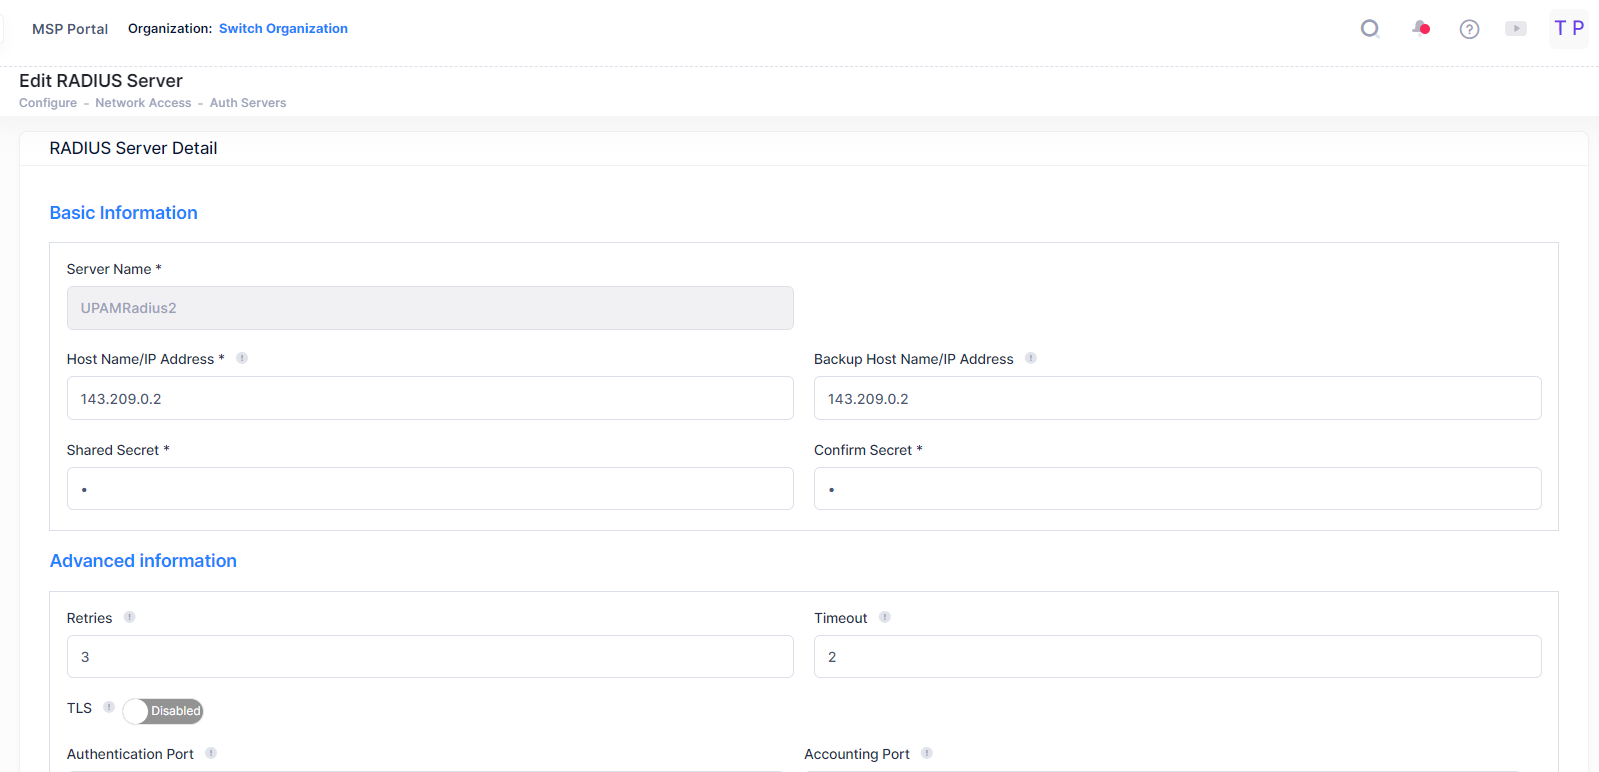
Editing a Radius Server
Select a RADIUS Server in the list and click on the Edit icon. It is important to note that you cannot modify values indiscriminately. The values must match those of the actual RADIUS Server. For example, if you want to change the RADIUS Authentication port, you must first use the tools provided by your RADIUS Server's vendor to change the port on the RADIUS Server itself. You can then inform OmniVista that the port number has changed by modifying the Authentication Port field.
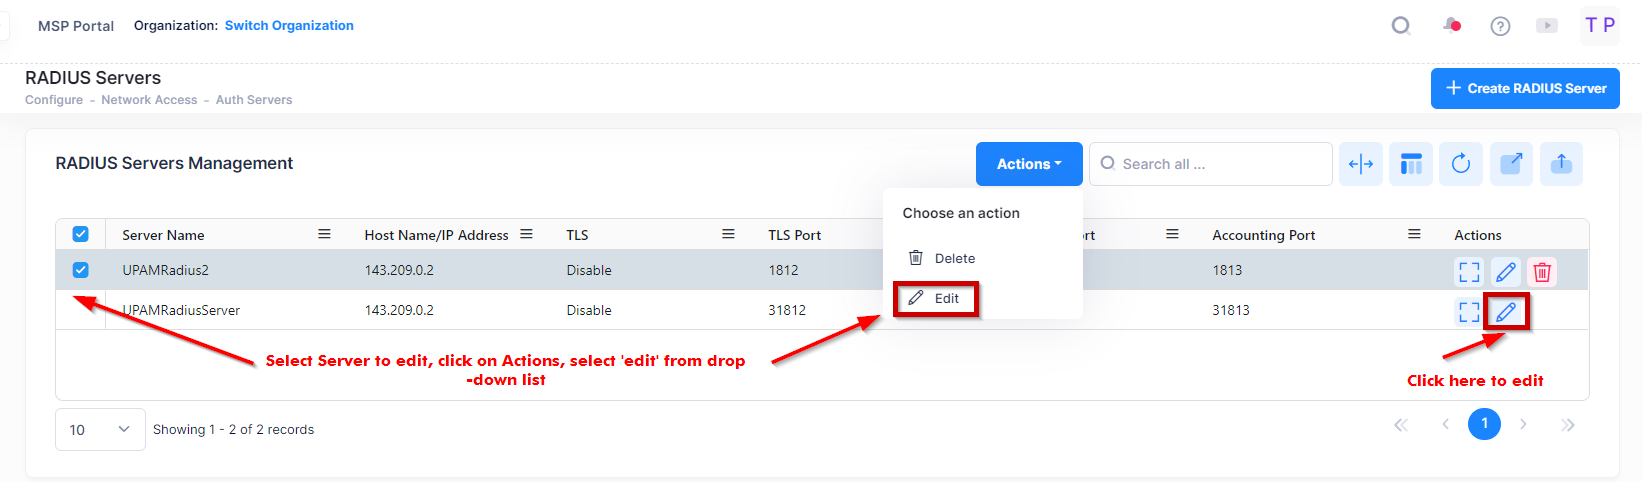
Use one of the following methods to access the Edit RADIUS Servers screen (as shown above):
-
Select the server to edit by clicking on the checkbox next to the server name, click on Actions, then select Edit from the drop-down menu.
-
Click on the pencil icon under the “Actions” column next to the server name that you want to edit.
The following Edit RADIUS Server screen displays. Edit the fields as described above, then click on Save.
A default “UPAMRadiusServer” is provided. This default server cannot be deleted. In addition, you can not enable TLS on this server. This functionality is not needed between an AP and the UPAM RADIUS Server.
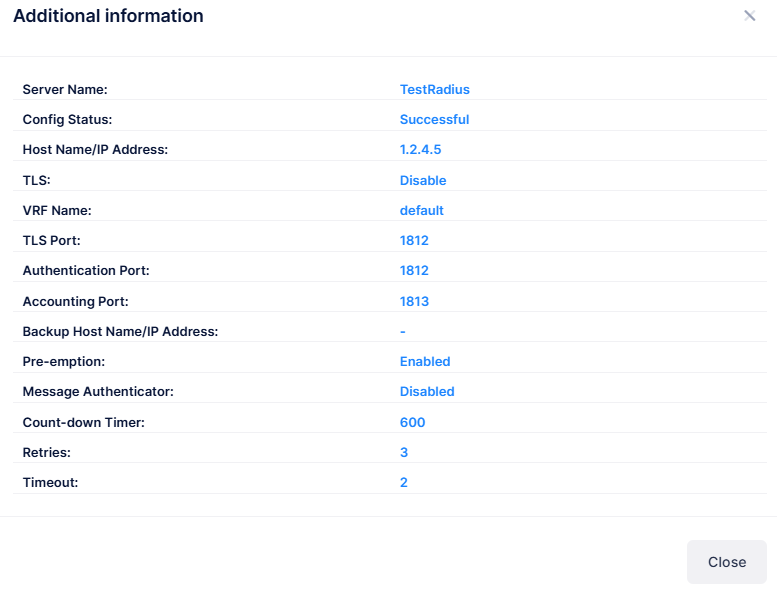
View Additional RADIUS Server Information
Select the RADIUS Server in the list and click on the Additional Information icon to view additional information about the selected RADIUS Server.
-
Server Name - Unique name for the RADIUS Server. This name will be used by OmniVista and the switch to identify the Server.
-
Config Status - The configuration status of the RADIUS Server.
-
Host Name/IP Address - The name of the computer where the server is located OR the IP address of the computer where the Server is located.
-
TLS - Whether the TLS encryption method is enabled or disabled.Authentication Port - The port you to access the Server (Range = 1 - 65535, Default = 1812).
-
VRF Name - The name of the VRF instance associated with the RADIUS Server.
-
TLS Port - The TLS port number, when TLS is enabled.
-
Authentication Port - The port to access the RADIUS Server.
-
Accounting Port - The port for accounting information (Range = 1 - 65535, Default = 1813).
-
Backup Host Name/IP Address - Each RADIUS Server may optionally have a backup server. If you wish to define a backup server that will be used if this server is unavailable, enter the name of the computer where the backup server is located OR enter the IP address of the computer where the backup Server is located. (Not supported on wireless devices and ignored when applied to those devices.)
-
Pre-emption - If Pre-emption is enabled, Access Point (AP) will switch back to primary RADIUS server at the end of Count-Down Timer. If Pre-emption is disabled, then AP will switch to use the primary RADIUS server only if the backup RADIUS server is timed out. By default Pre-emption is Enabled.
-
Message Authenticator - Whether the check for the Message-Authenticator attribute in RADIUS response packets is enabled or disabled.
-
Count-down Timer - The number of seconds for the AP to adhere with the Secondary server, before moving back to Primary (Default is 600 seconds).
-
Retries - The number of retries that you want the switch to attempt when trying to contact the RADIUS Server (AP Range = 1-3, Switch Range = 1-32, Default = 3).
-
Timeout - The number of seconds that you want the switch to wait before a request to the RADIUS Server is timed out (Range = 1 - 30, Default = 2).
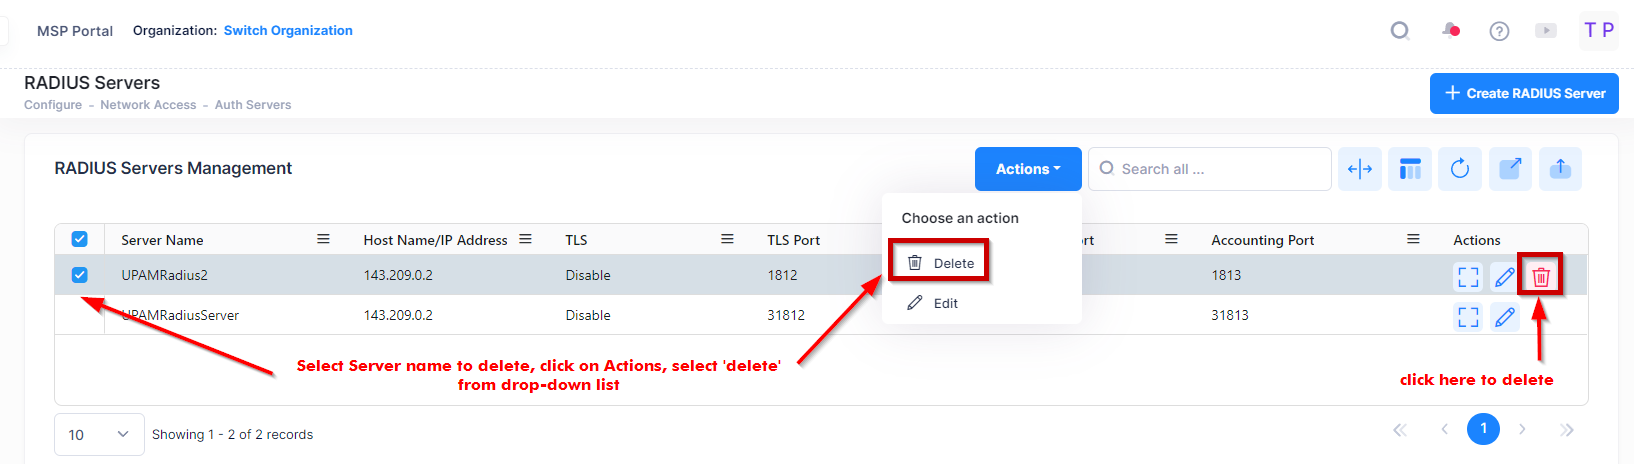
Deleting a RADIUS Server
To delete a RADIUS Server, use one of the following methods to select the Server Name you want to delete:
-
Select the RADIUS Server to delete by clicking on the checkbox next to the server name, click on Actions, then select Delete from the drop-down menu.
-
Click on the trash can icon under the “Actions” column next to the server name that you want to delete.
Note that when deleting an RADIUS Server known to OmniVista Cirrus, it will send a delete alert message to the Switch if it has not been used in another profile.
When you select the server you want to delete, the following confirmation prompt appears:
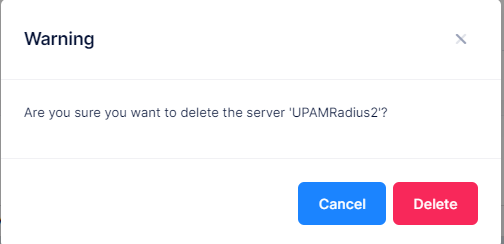
Click on Delete to confirm that you want to delete the RADIUS Server.