To create a new report, click on Create Report on the Reports List screen. You will be prompted for the type of report that you want to schedule or generate.
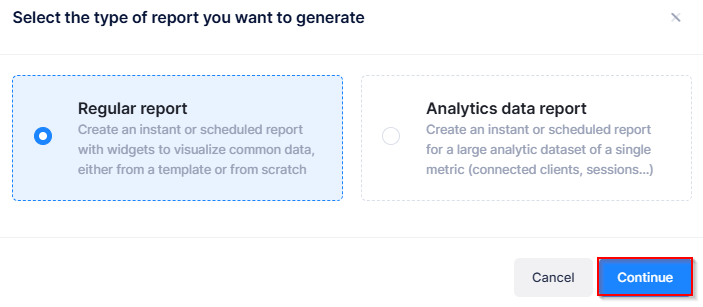
Two types of reports can be generated covering multiple Metrics, Analytics, QoE and KPIs.
-
Regular report - Create an instant or scheduled report by selecting widgets from a set of available widgets.
-
Analytics data report - Create a new instant or scheduled report to export a large amount of client analytic data.
Click Continue to open the Report Information screen.
Regular Report
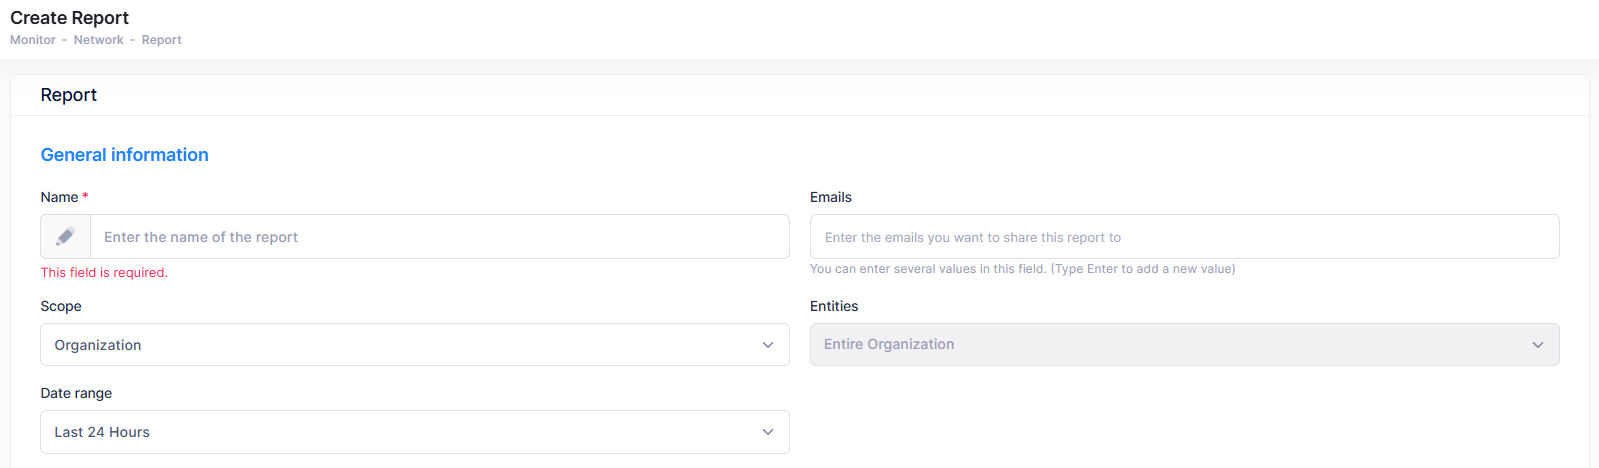
When you select Regular report, the Create Report screen appears. Complete each section as described below, then click Create Report.
General Information
-
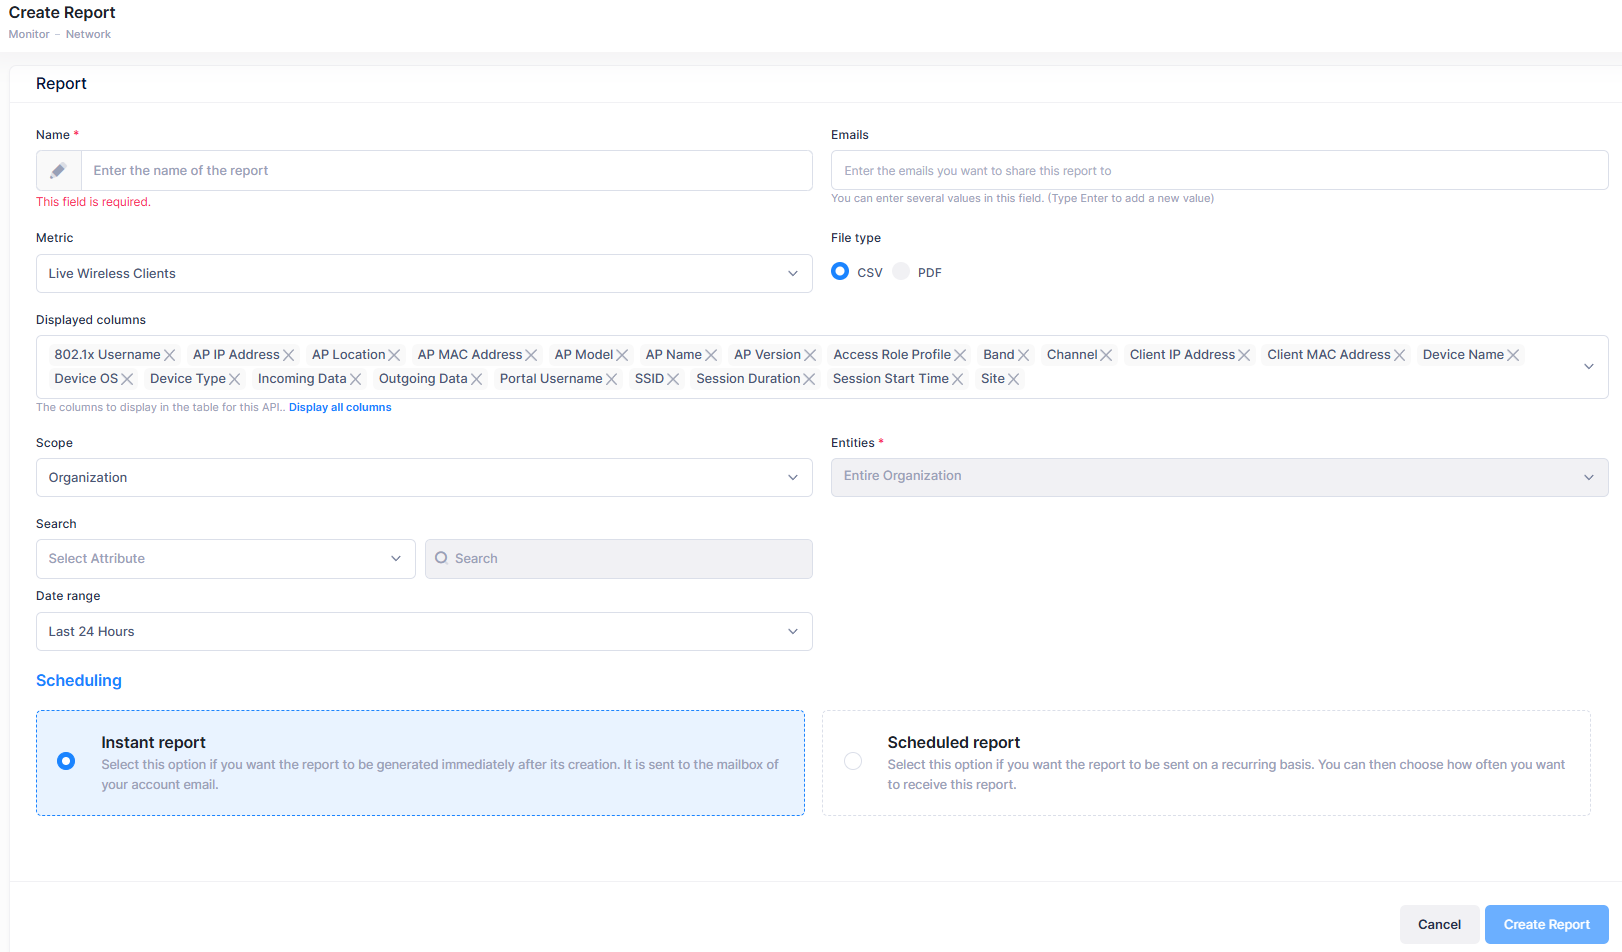
Name - Enter a logical name for the report.
-
Emails - Enter the email addresses that you want to receive the report. You can specify email addresses of users not registered with OmniVista Cirrus. This allows you to share reports with users that do not have access to OmniVista.
-
Scope - Select the scope from the drop-down list that will be used to filter the report results based on Organization, Site, Building, Floor, or Access Point.
-
Entities -Select the entities from the drop-down list with reference to the scope that will be applied to this report. Note that if you selected Organization as the scope, all entities of the Organization will be included in the report.
-
Date range - Select a relative time duration or a specific time range by using the Custom option.
Report Contents
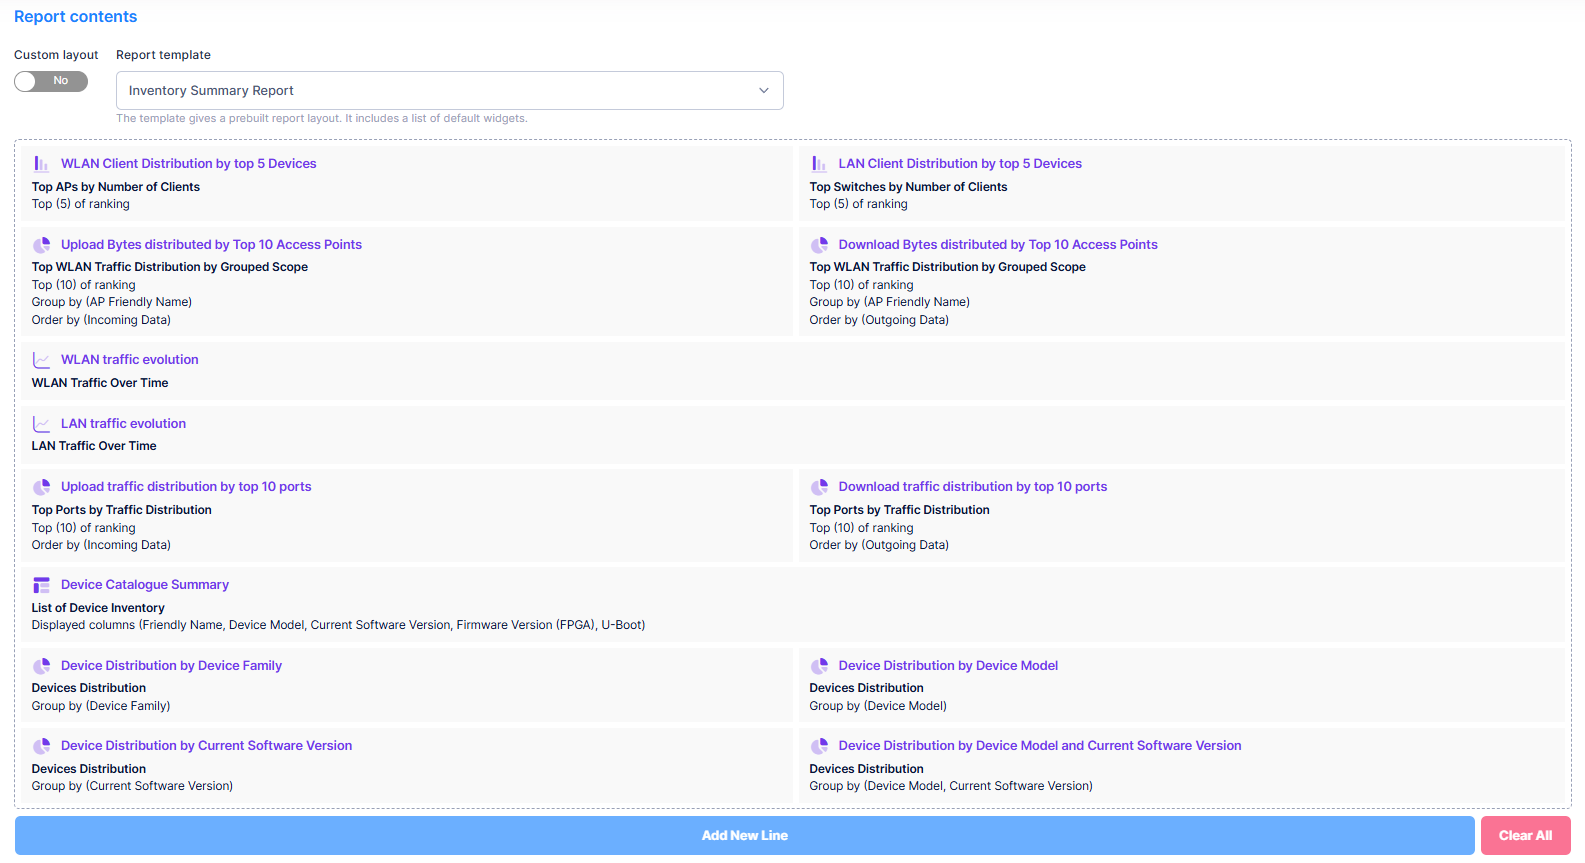
Select the template to be used for the report's content.
-
Report template - Select the template to use for the report's content from the drop-down list. A template includes a list of default widgets. For more information, see Report Templates.
-
Custom layout - You can customize a report layout by editing the widgets. By default, this option is disabled. Click on “Yes” to enable. For more information, see Custom Layout.
Scheduling

Select the type of report that you want to generate. There are two options:
-
Instant report - Select this option if you want the report to be generated immediately after it is created. You will receive the report within few minutes by email.
-
Scheduled report - Select this option if you want the report to be sent on a recurring basis. You can then choose how often you want to receive this report.
-
Send report now - Click the slider to “On” if you want an initial report sent right after the report is created. Subsequent reports are sent based on the specified recurrence interval. This option only displays when you select “Scheduled report” as the Report Type.
-
Custom Layout
When you enable the Custom layout option, you can modify the report contents and layout. Instead of selecting a pre-built template, you can add widgets and select the metrics required for your custom report.
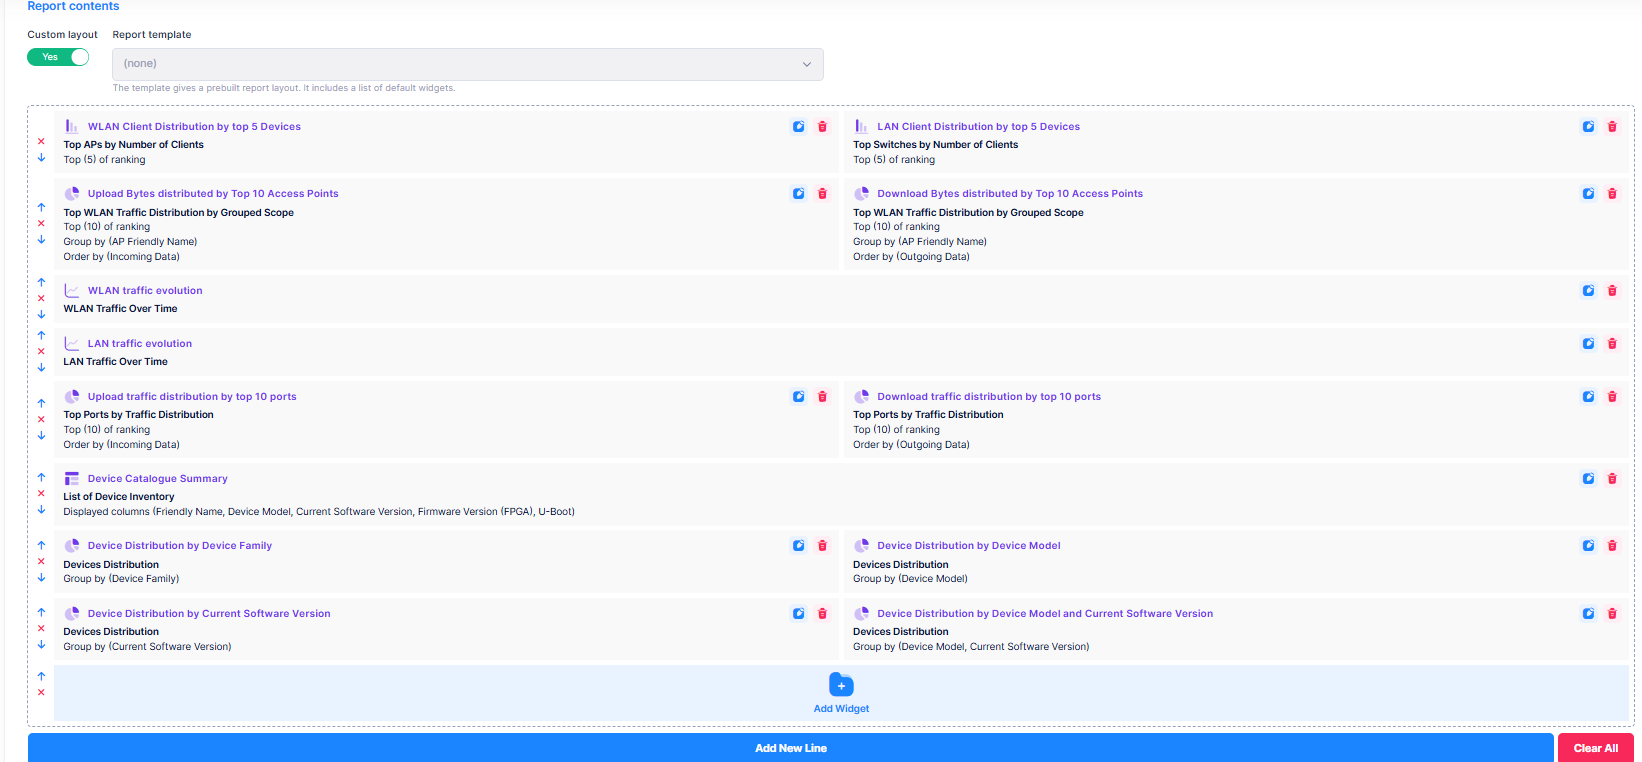
Click on the Edit icon for the widget to add or remove specific metric information for the widget in the report.
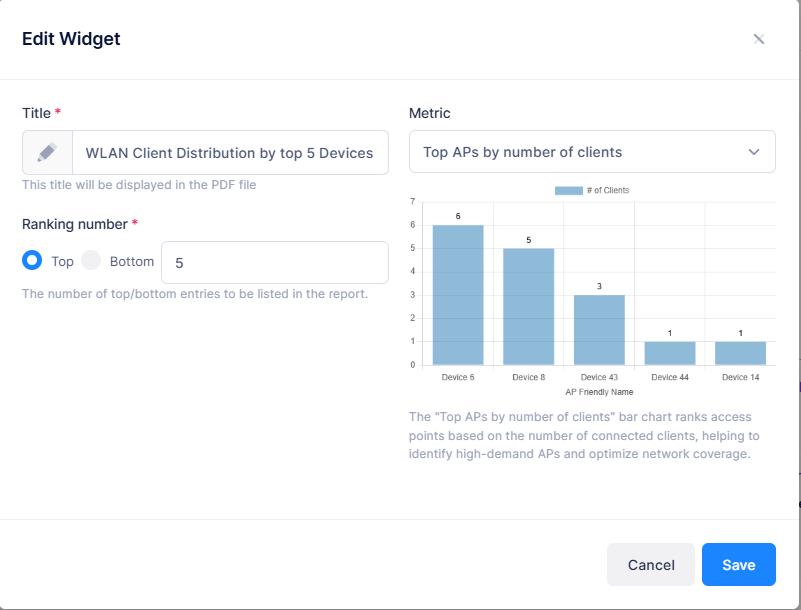
Click on the Delete icon or the red “x” next to the widget to remove the widget from the report.
You can also add widgets to the custom template by clicking on Add New Line, then click on the Add Widget icon. The below screen appears:
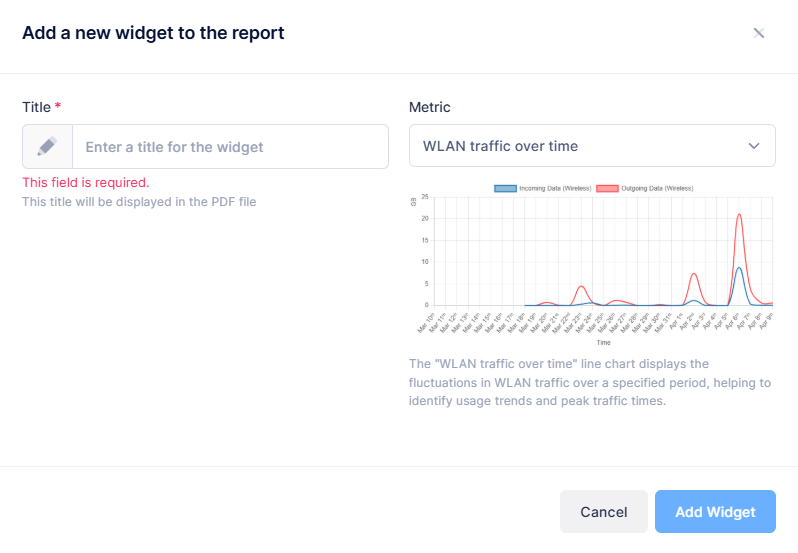
Enter the required information for the widget. You can add multiple widgets with different metric details in the custom report.
Click on Create Report. A new report is created and is displayed on the Reports List screen.
For information on editing a report, see Edit Reports.
Analytical Data Reports
When you select Analytics data report, the following Create Report screen appears.
You can create a new instant or scheduled report to export large analytic data.
Enter the required Report Information to create a report.
-
Name - Enter a logical name for the report.
-
Emails - Enter the email addresses that you want to receive the report. You can specify email addresses of users not registered with OmniVista Cirrus. This allows you to share reports with users that do not have access to OmniVista.
-
Metric - Select the metric that is required in your analytical report.
-
File type - Select the file format you would like to export to: CSV or PDF.
-
Displayed Columns - Specify which column you would like to display in the table for this API of the report.
-
Scope - Select the scope from the drop-down list that will be used to filter the report results based on Organization, Site, Building, Floor, or Access Point.
-
Entities - Select the entities from the drop-down list with reference to the scope that will be applied to this report. Note that if you selected Organization as the scope, all entities of the Organization will be included in the report.
-
Search - Select the attribute value from the drop-down list and search for the specific widget.
-
Date range - Select a relative time duration or a specific time range by using the Custom option.
-
Scheduling - Select the type of report that needs to be generated. There are two options:
-
Instant report - Select this option if you want the report to be generated immediately after it is created. You will receive the report within few minutes by email.
-
Scheduled report - Select this option if you want the report to be sent on a recurring basis. You can then choose how often you want to receive this report.
-
Send report now - Click the slider to “On” if you want an initial report sent right after the report is created. Subsequent reports are sent based on the specified recurrence interval. This option only displays when you select “Scheduled report” as the Report Type.
-
-
Click on Create Report. A new report is created and is displayed on the Reports List screen.
-
If you have selected the Instant Report option, you will receive the report within few minutes by email.
-
Client Health Reports will not be generated for durations of 5 minutes or less because the minimum duration to collect analytics data is 5 minutes.