The Access Authentication Profile defines the authentication process for client traffic received on both wired devices (Switch devices) and wireless devices (Steller AP downlink Port). Profile parameters are used to configure 802.1X and MAC authentication, Access Classification, the AAA Server Profile to use for authentication, the Access Role Profile to assign, etc.
Use the Access Auth Profile screen to display information about all of the configured Access Authentication Profiles. This screen also allows you to create, edit, and delete profiles. To access the Access Auth Profile screen, click on Network Access > Unified Access > Access Auth Profile under the “Configure” section of the OmniVista Cirrus Menu.
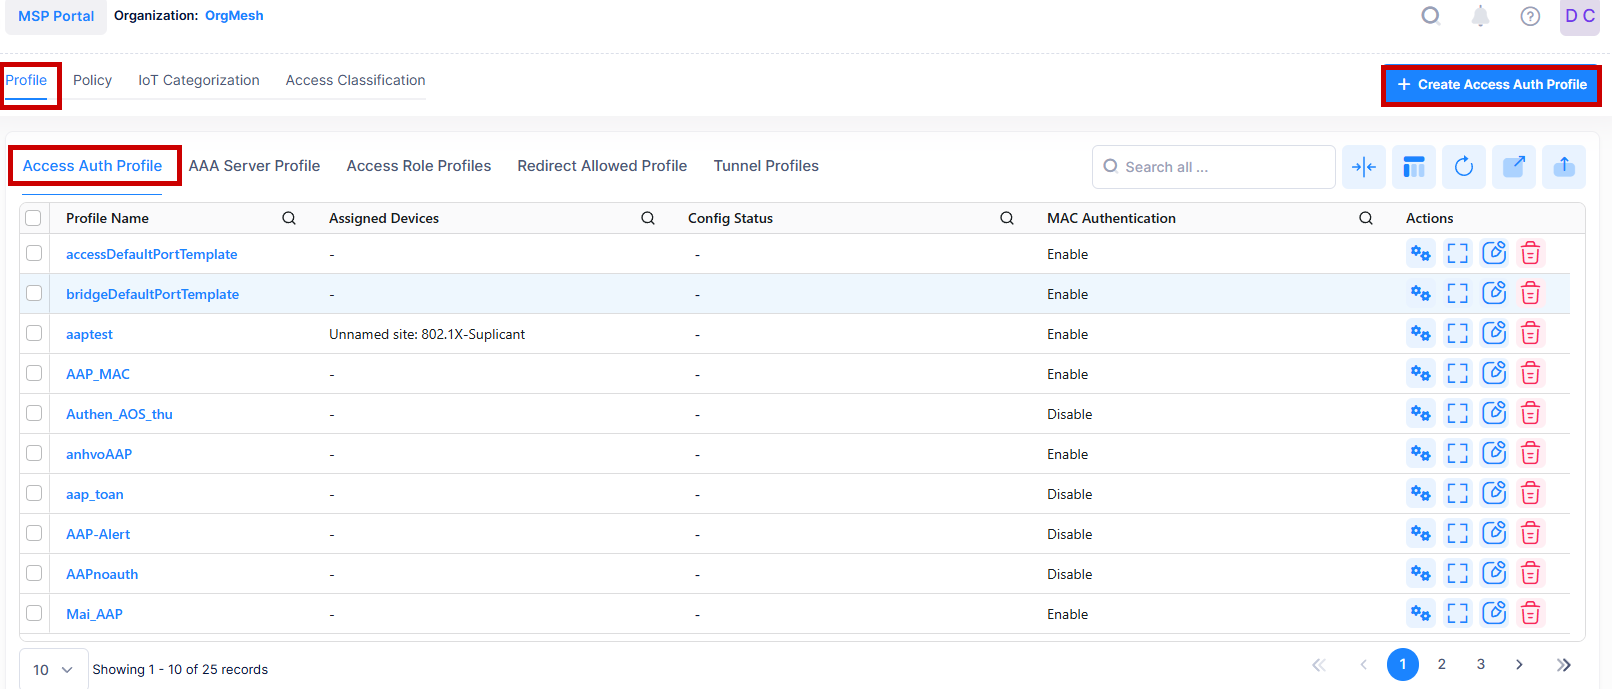
Creating an Access Authentication Profile
The Create Access Auth Profile screen is used to select profile settings, devices, and the downlink ports to which the profile is applied. To access this screen, click on Create Access Auth Profile.
Consider the following use cases when configuring Access Authentication Profile:
-
When a Switch device polls for Access Auth profile information and the database does not have an existing Access Auth Profile, OmniVista will automatically create an Access Auth Profile with the correct configuration and Assignment Port that polls from the Switch device.
-
When a Switch device polls for Access Auth profile information and the database already has an existing Access Auth Profile, OmniVista will only update the Network Assignment Port of the Access Auth Profile belonging to that specific Switch device, not the device configuration.
-
When a Switch device polls and there is no Access Auth profile information, but the database has an existing Access Auth Profile, OmniVista will delete the Network Assignment - Port belonging to that specific Switch device.
-
You can apply the AAA Server Profile on the Access Auth Profile page to Switch and verify that the AAA server profile has been successfully applied.
-
You can change the new AAA Server profile on the Access Auth Profile screen for Switch, and verify that the AAA server profile should be applied to Switch.
-
You can create an Access Auth profile without an AAA server profile and verify no AAA server profiles are pushed to Switch.
-
You can unlink the AAA server profile on the Access Auth Profile page. However, the AAA server profile wouldn't be deleted from Switch, only if that AAA server profile is still being used somewhere in Switch. The AAA server profile template would still be retained on the User Interface screen.
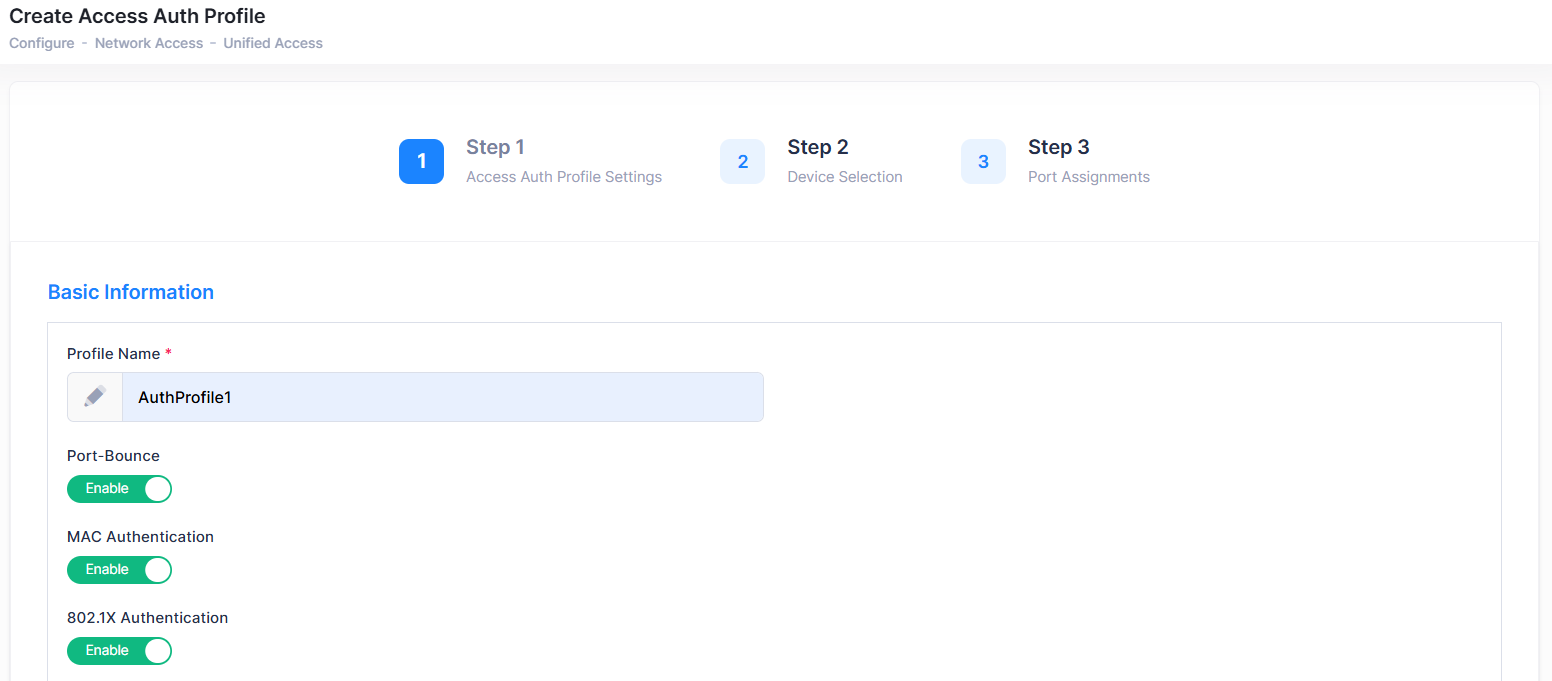
The Create Access Auth Profile screen provides the following step-by-step process for creating an Access Authentication Profile:
1. Access Auth Profile Settings
-
Basic Information - Configures the profile name and the status of MAC and 802.1X authentication.
-
No Auth/Failure/Alternate - This section is used to configure the actions taken if a device assigned to a profile fails authentication.
-
Advanced Settings - Configures the advanced 802.1X authentication settings for the Profile.
Select the specific set of devices or Group of devices from the available device list. The Access Authentication Profile is applied to those APs or Switch devices.
-
Ports - An Access Auth Profile can be assigned to the Switch devices or Steller APs. Select the Switch Port(s) or AP downlink port(s) to which OmniVista will apply the Access Authentication Profile.
1. Access Auth Profile Settings
Complete the fields for the Basic Information and No Auth/Failure/Alternate sections on the Access Auth Profile Settings tab as described below, then click Next to go to the next tab (Step 2).
Basic Information
This section is used to configure basic settings for the profile.
-
Profile Name (required) - Specify a name to assign to the profile.
-
Port Bounce - Enables/Disables Port Bounce. Always enabled on wireless devices. This feature is required to handle scenarios where a client is switched from one VLAN to another after a Change of Authorization (COA) request. When Port Bounce is enabled, the port is administratively shut down. This is to trigger DHCP renewal and re-authentication, if necessary.
-
MAC Authentication - Enable/Disable MAC Authentication for the port.
-
802.1X Authentication - Enable/Disable 802.1X Authentication for the port.
-
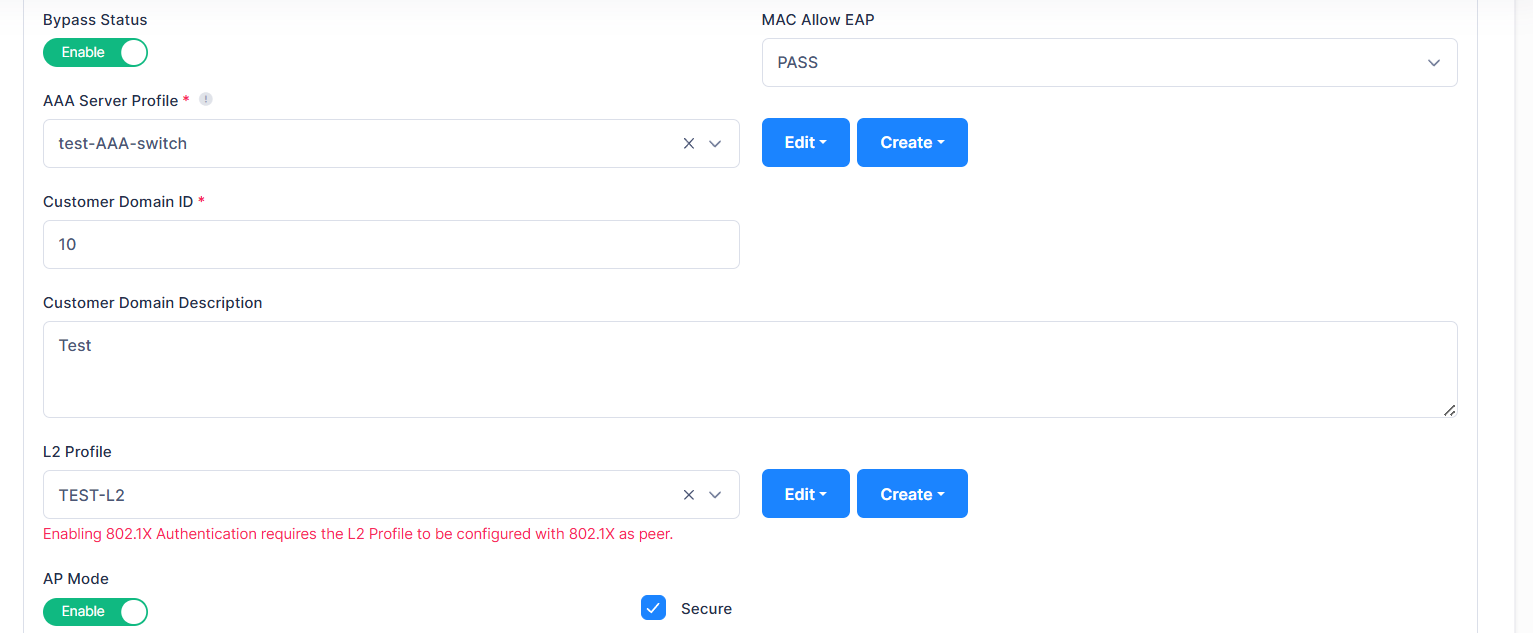
Bypass Status (802.1X authentication only) - Enable/Disable 802.1X bypass. When 802.1X Bypass is enabled, both MAC authentication and 802.1X authentication are performed - MAC authentication is performed first, then 802.1X authentication.
-
MAC Allow EAP - When 802.1X Bypass is enabled, select Pass, Fail, No-Auth or None for MAC Allow EAP.
-
PASS - 802.1X authentication is performed if MAC authentication passes.
-
FAIL - 802.1X authentication is performed if MAC authentication fails.
-
NO-AUTH - Allows 802.1X (EAP frame) authentication if there is no MAC authentication configured on the port.
-
NONE - It prevents 802.1X authentication. Only MAC authentication is performed on any device accessing this port.
-
-
-
AAA Server Profile - Select an existing authentication, authorization, and accounting (AAA) Server Profile from the drop-down list. An AAA Server profile identifies the authentication servers and attributes that are used in an Access Authentication Profile. This field is required only if MAC or 802.1X authentication is enabled.
-
Click on Edit to modify settings for the selected AAA Server Profile.
-
Click on Create button to create a new profile (see the AAA Server Profile online help).
-
-
Customer Domain ID - Select a Customer Domain ID for the profile, if applicable.
-
Customer Domain Description - Provide a description for Customer domain ID.
-
L2 Profile - Select an existing L2 profile from the drop-down list. A Layer 2 profile defines how control frames received on a UNP access port are processed.
Note: Enabling 802.1X Authentication requires the L2 Profile to be configured with 802.1X as peer.
-
AP Mode - Enables/Disables the Access Point Mode for the port. When enabled (the default), the Switch device automatically detects, learns, and manages a Stellar AP that is connected to the port. Wireless Client traffic is then forwarded from the AP to the Switch device onto the wired network.
-
Secure - If the AP Mode is enabled, you can check this box to secure the AP Mode. The AP Mode is not secured by default (box is not checked). When an AP device is detected on a UNP port, the trust tag function is operationally enabled to trust the AP Client traffic. If the AP device fails authentication but is still learned as forwarding, the client traffic is still trusted and forwarded on the port. When the AP Mode is secured (box is checked), the trust tag function is not enabled for Client traffic until after the AP device successfully authenticates.
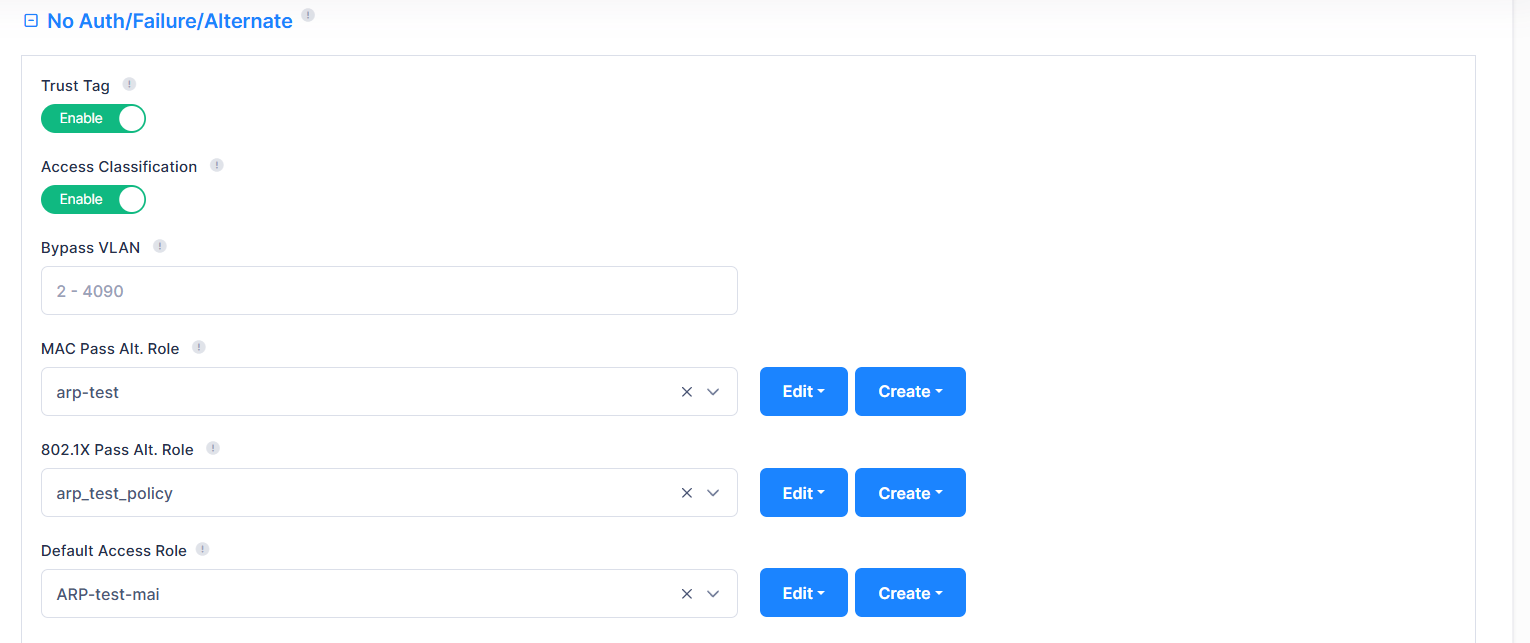
No Auth/Failure/Alternate
This section is used to configure alternate actions taken if MAC or 802.1X authentication was not enabled, authentication fails, or the returned role was not found.
-
Trust Tag - Enable/Disable whether the VLAN ID of a tagged packet is trusted to determine how the packet is classified. Enabling the trust VLAN ID tag option provides an implicit method of VLAN tag classification that will accept tagged traffic without the need to create specific classification rules for those profiles.
-
Access Classification - Enable/Disable device classification. When enabled, device traffic is classified based on a classification rule (see the Access Classification online help).
-
Bypass VLAN - Enter a Bypass VLAN ID (Range = 2 - 4094). The feature improves wired port forwarding performance by skipping the CPU process. When a Bypass VLAN is configured, traffic from the AP uplink port to the downlink port, or vice versa, is forwarded directly through without CPU intervention. The Bypass VLAN has higher priority than Trust Tag. Note that when Bypass VLAN is configured, Authentication/ACL/Policy etc. features cannot be applied to the traffic in the Bypass VLAN. When an Access Auth Profile is applied to an AP Group, OmniVista will pass the Bypass VLAN attribute to all APs in the AP Group. APs that support Bypass VLAN will accept it, other APs in the group will silently ignore this attribute.
-
MAC Pass Alt. Role (MAC authentication only) - Select the Access Role Profile that is applied to clients that have passed MAC authentication but did not receive an Access Role Profile from the authentication server or the Access Role Profile was not found on the AP.
-
Click on Edit to modify settings for the selected Access Role Profile.
-
Click on Create Access Role Profile to create a new profile (see the Access Role Profiles online help).
-
-
802.1X Pass Alt. Role (802.1X authentication only) - Select the Access Role Profile that is applied to clients that have passed 802.1X authentication but did not receive an Access Role Profile from the authentication server or the Access Role Profile was not found on the AP.
-
Click on Edit to modify settings for the selected Access Role Profile.
-
Click on Create Access Role Profile to create a new profile (see the Access Role Profiles online help).
-
-
Default Access Role - Select the Default Access Role Profile that is applied to clients if authentication or classification methods fail to match traffic with any role. This is the last-resort role.
-
Click on Edit to modify settings for the selected Access Role Profile.
-
Click on Create Access Role Profile to create a new profile (see the Access Role Profiles online help).
-
Advanced Settings
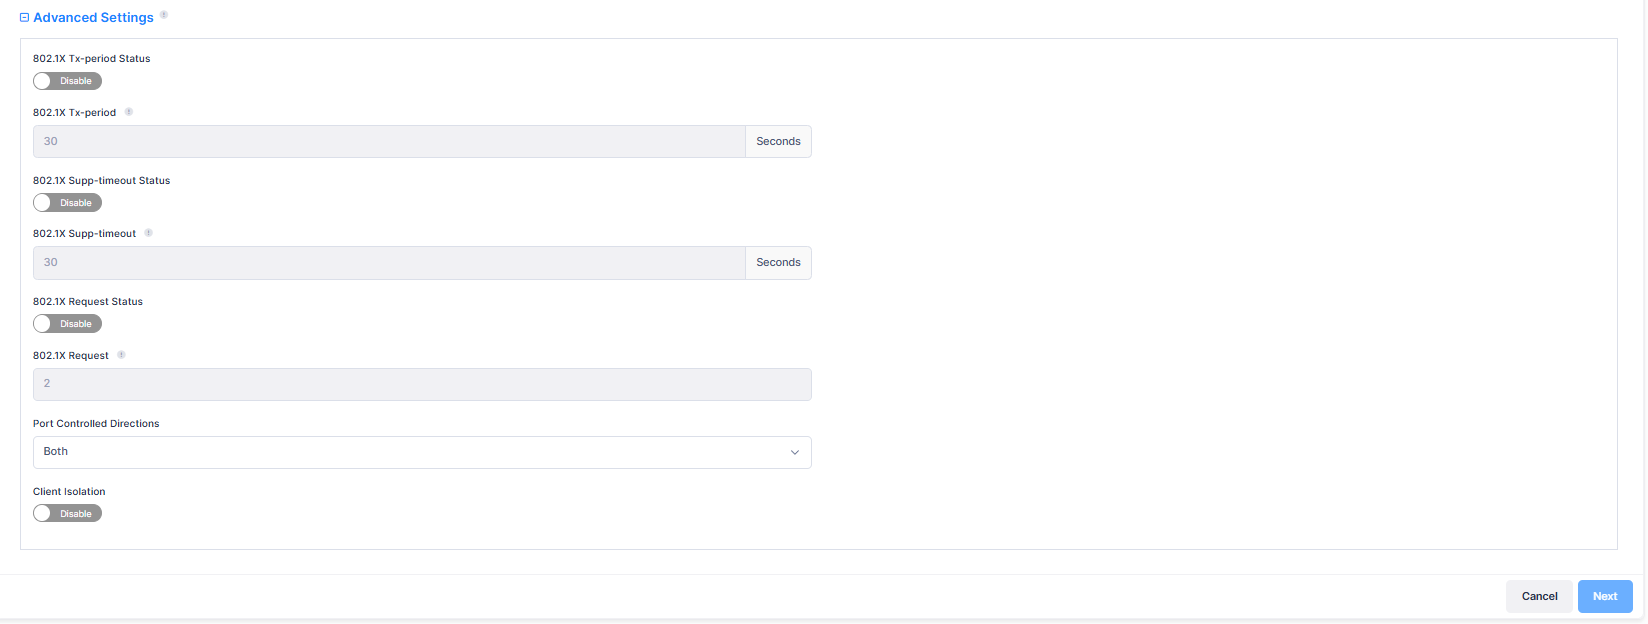
This section is used to create the advanced 802.1X authentication settings for the Profile. The Client Isolation default value is disable.
-
802.1X Tx Period Status - Enables/disables the Access Auth profile 802.1X Period Status. By default, it is disabled.
-
802.1X Tx Period - Specifies the Access Auth Profile 802.1x Tx period, in seconds. (Note: Input a number between 1-65535 for AOS6 devices or 1-60 for AOS8/AOS5 devices).
-
802.1X Supp Timeout Status - Enables/disables the 802.1X Authentication Support Timeout Status. By default, it is disabled.
-
802.1X Supp Timeout - Specifies the 802.1X Authentication Support Timeout, in seconds. (Note: Input a number between 1-2147483647 for AOS6 devices or 1-120 for AOS8/AOS5 devices).
-
802.1X Request Status - Enables/disables the 802.1X Authentication Max Request number Status. By default, it is disabled.
-
802.1X Request - Specifies the 802.1X Authentication Max Request number. (Note: Input a number between 1-10 for AOS6 devices or 0-10 for AOS8/AOS5 devices).
-
Port Controlled Directions - Configures whether Network Access control is applied to both incoming and outgoing traffic, or only applied to incoming traffic.
-
Client Isolation - Enables/Disables Client Isolation (Default = Disabled). When enabled, traffic between Clients on the same AP in the SSID is blocked; Client traffic can only go toward the default gateway. You can create a list of device MAC addresses that a client can still access when Client Isolation is enabled.
The Client Isolation advanced setting is only supported on Access Points and is not available for Switch devices.
2. Device Selection
The Device Selection tab is used to select the AP(s) or Switch devices from the available list of devices to which the Access Authentication Profile will be applied to devices within those groups. Complete the device selection as described below, then click Next to to the the next tab (Step 3).
-
Device Assignment - Select the specific set of Devices from the available list to assign the profile.
-
Group Assignment - Select the specific group of Devices from the available list to assign the profile. The Access Authentication Profile is applied to the selected group of devices from the list.
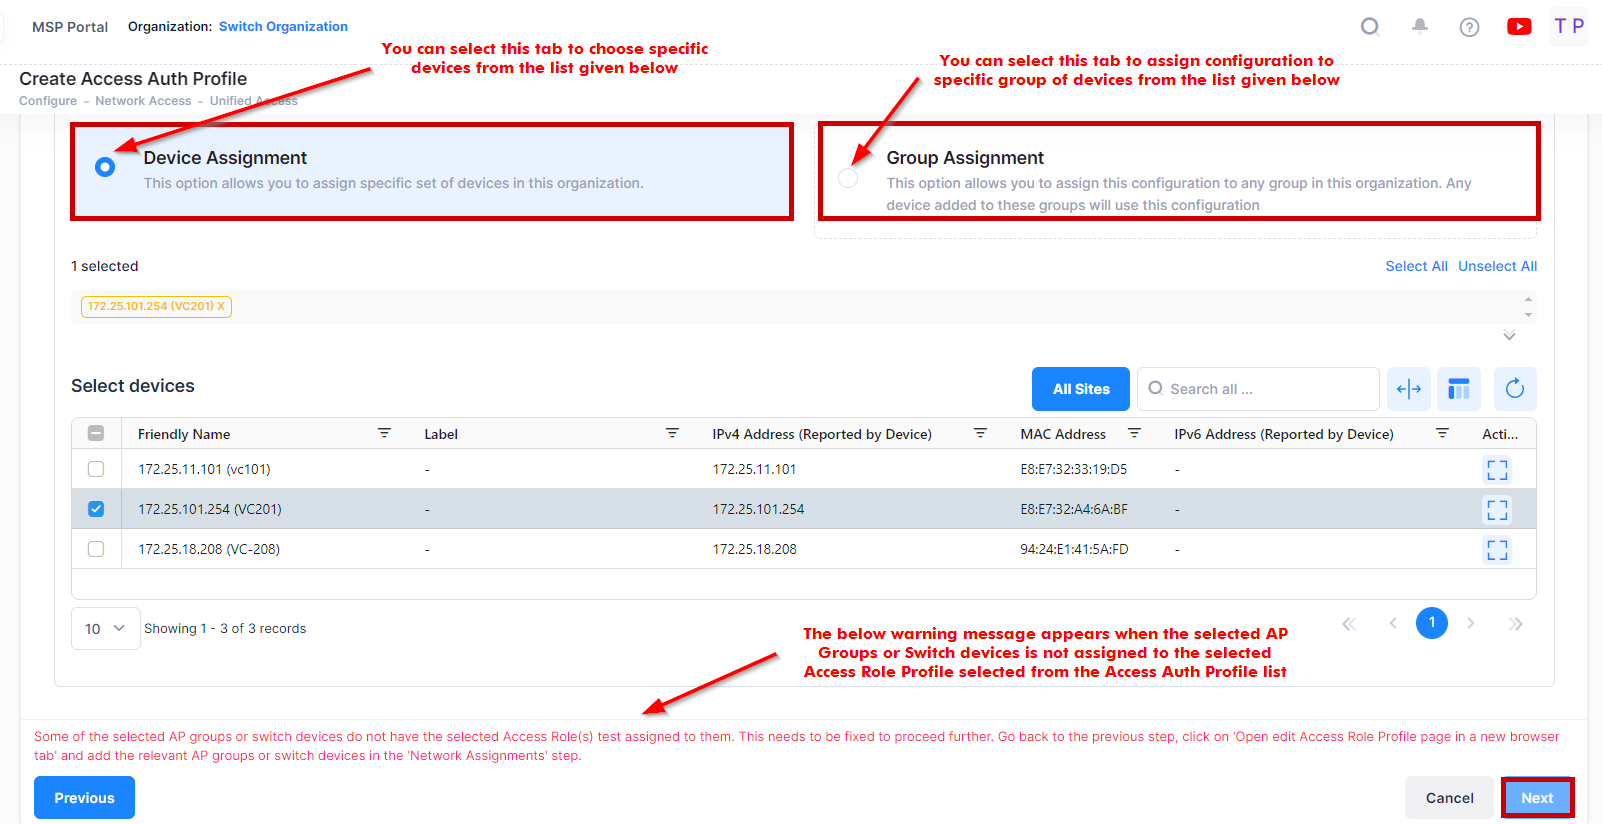
Note: In case of failing to apply an Access Authentication Profile to devices, if you want to re-apply the profile with no change in the configuration, click on the Profile name to navigate to the device configuration detailed view. Then, select the Device configuration entry you want to reapply, click on edit button, and save the Profile without modifying any fields.
3. Port Assignments
The Port Assignments tab is used to select the port(s) to which OmniVista will apply the Access Authentication Profile. The profile is applied to client traffic received on the selected port(s).
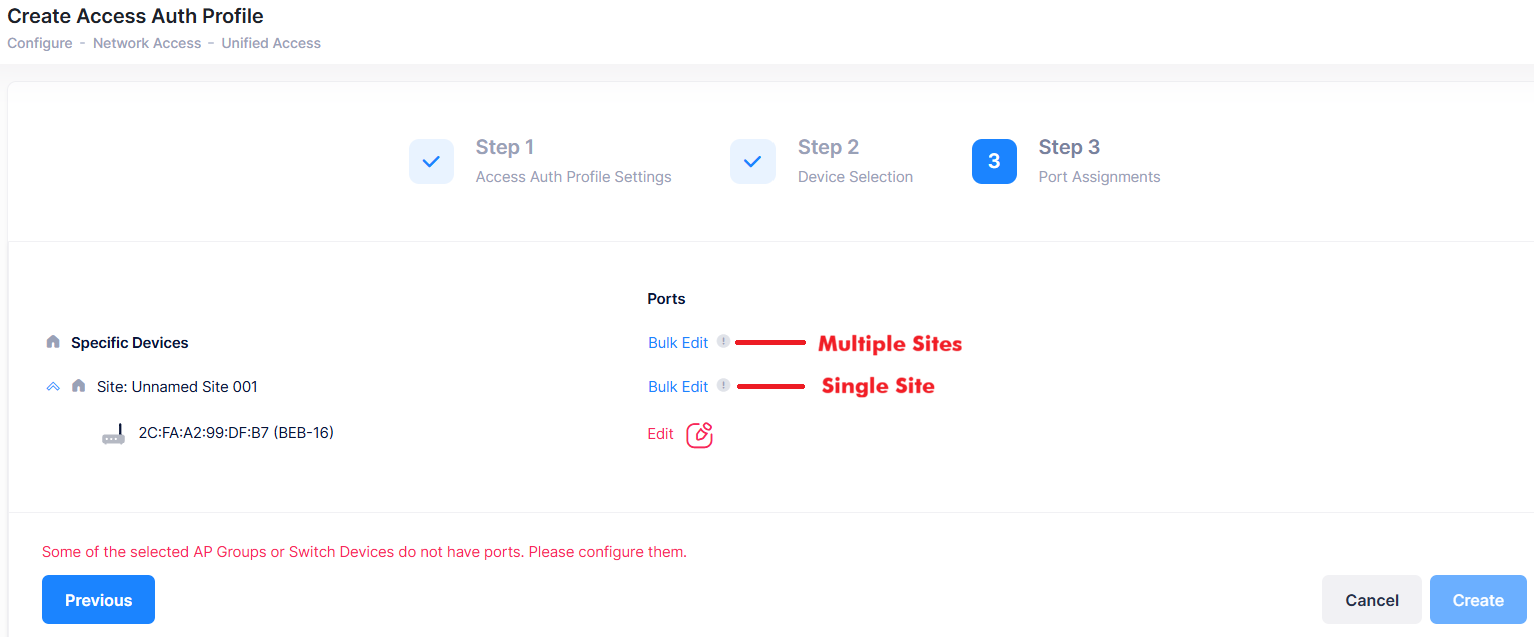
You can make a port selection for all AP Groups or Switch devices across all Sites in the Organization, for all AP Groups or Switch devices associated with a specific Site, or for the selected devices using the Bulk Edit and Edit options.
-
Bult Edit
-
Multiple Site - Click on this option to apply one or multiple UNP port type for all selected devices across all the selected sites in a single operation.
-
Single Site - Click on this to apply one or multiple UNP port type for all selected devices at this site in a single operation.
-
Select the required option and click Bulk Edit. Port Selection window is displayed.
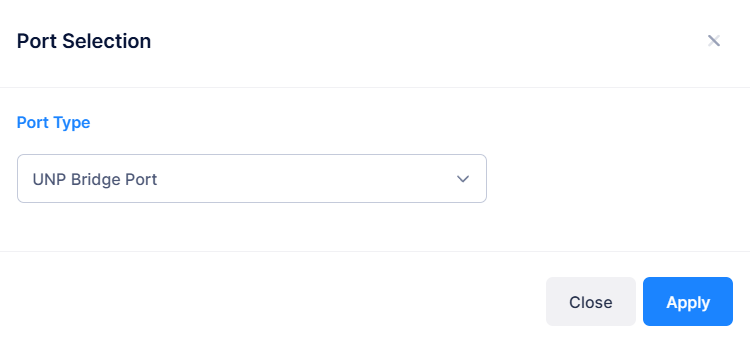
Port Type - Select the port type from the drop-down (UNP Bridge Port or UNP Access Port), and click on Apply button. Selected port type is applied to all the selected devices.
-
Edit - Click on Edit option to apply one or multiple ports for a specific device/s. The following window is displayed.
Complete the following field values:
-
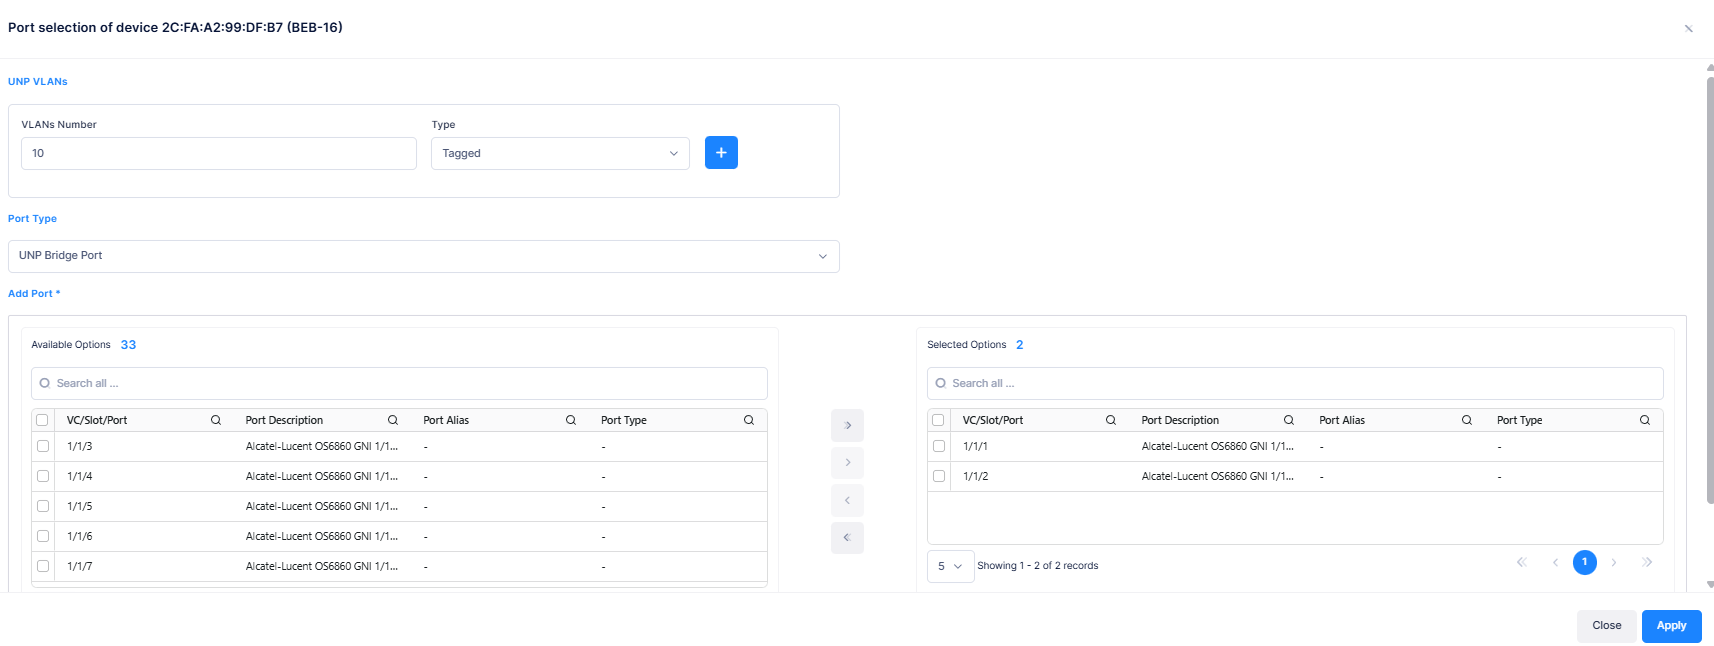
UNP VLANs - The VLANs configured for dynamically-created UNP VLANs. For 8.x Devices, select a traffic type (Tagged, Untagged). Enter the VLAN number and select the traffic type from the drop-down.
-
Port Type - The port type (UNP Bridge Port or UNP Access Port).
-
Add Port - Select the switch port(s) to be configured for the Profile.
-
The Available Options tab lists the ports for selection. Select all or specific ports by checking the check box next to each port, then use the arrow keys to move them to the Selection Options tab. Click on the Apply button. Selected ports appear in the Ports tab.
-
When you are finished, click on the Create button. The Access Authentication Profile is created and applied to client traffic received on the selected ports.
Consider the following use cases while selecting the Port assignments.
-
Select different ports for different Access Authentication Profiles. No two different profiles can use the same ports.
-
If any profile is using the selected switch port, then the other profile should be removed from that port.
Not all AP models have the same number of downlink ports (for example, some may have three and some may have four). If an AP Group contains an AP that does not support the selected downlink port(s), the AP will ignore the Access Authentication Profile configuration for that port and only apply the configuration to the available ports.
The downlink ports are displayed (Eth1, Eth2, Eth3, Eth4, USB0) on the Port Selection prompt, shown below, or next to the individual AP Group based on if you selected a Bulk Edit option or the individual AP Group to assign ports to the Access Authentication Profile.
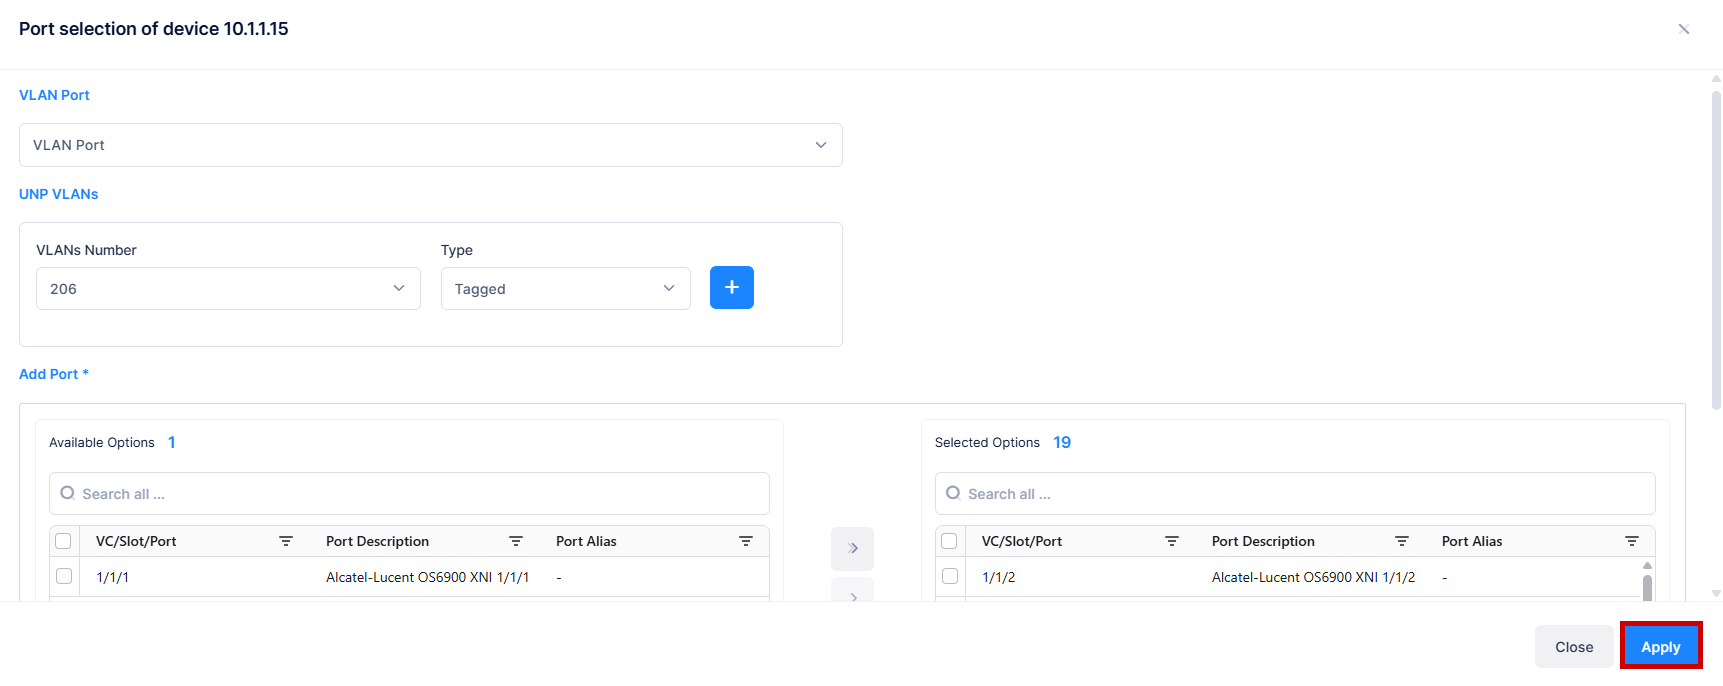
Complete the following field values:
-
Port Type - The port type (VLAN Port, SPB Access Port, VXLAN Access Port).
-
UNP VLANs - The VLANs configured for dynamically-created UNP VLANs. For 8.x Devices, select a traffic type (Tagged, Untagged).
-
Add Port - The switch port(s) configured for the Profile.
When you are done selecting the device ports, click on Apply. The Access Authentication Profile is created and applied to client traffic received on the selected ports.
Editing an Authentication Access Profile
You can edit the parameter values for an existing Access Authentication Profile by accessing the Edit Access Auth Profile screen.
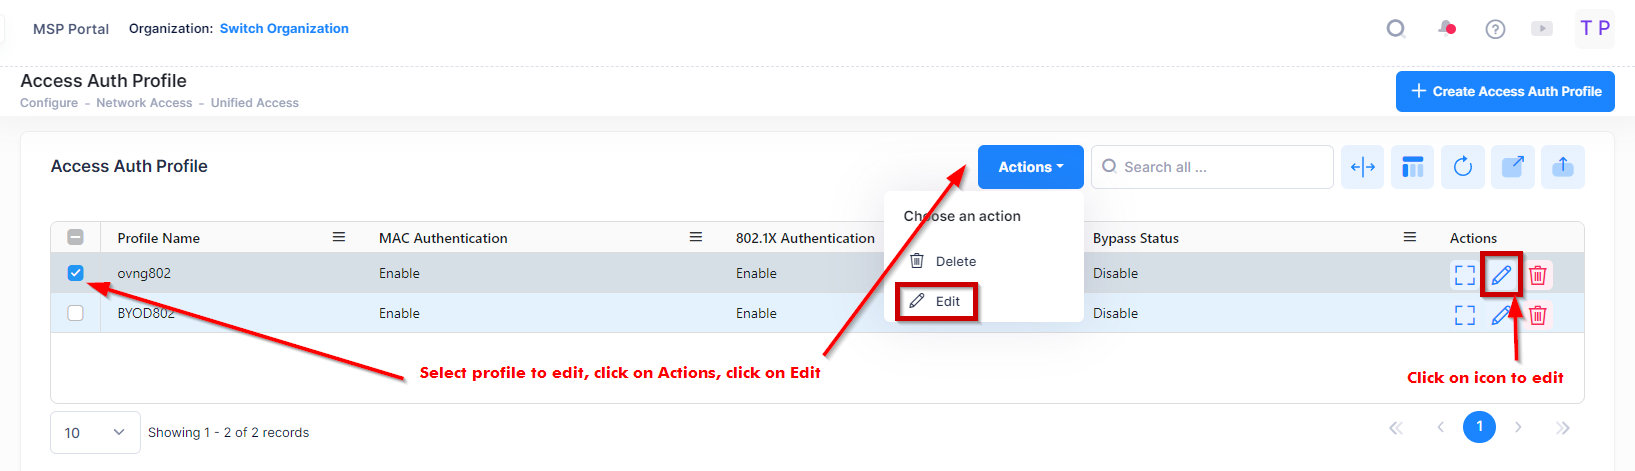
Use one of the following methods to access the Edit Access Auth Profile screen (as shown above):
-
Select the profile to edit by clicking on the checkbox next to the profile, click on Actions, then select Edit from the drop-down menu.
-
Click on the pencil icon under the “Actions” column next to the profile that you want to edit.
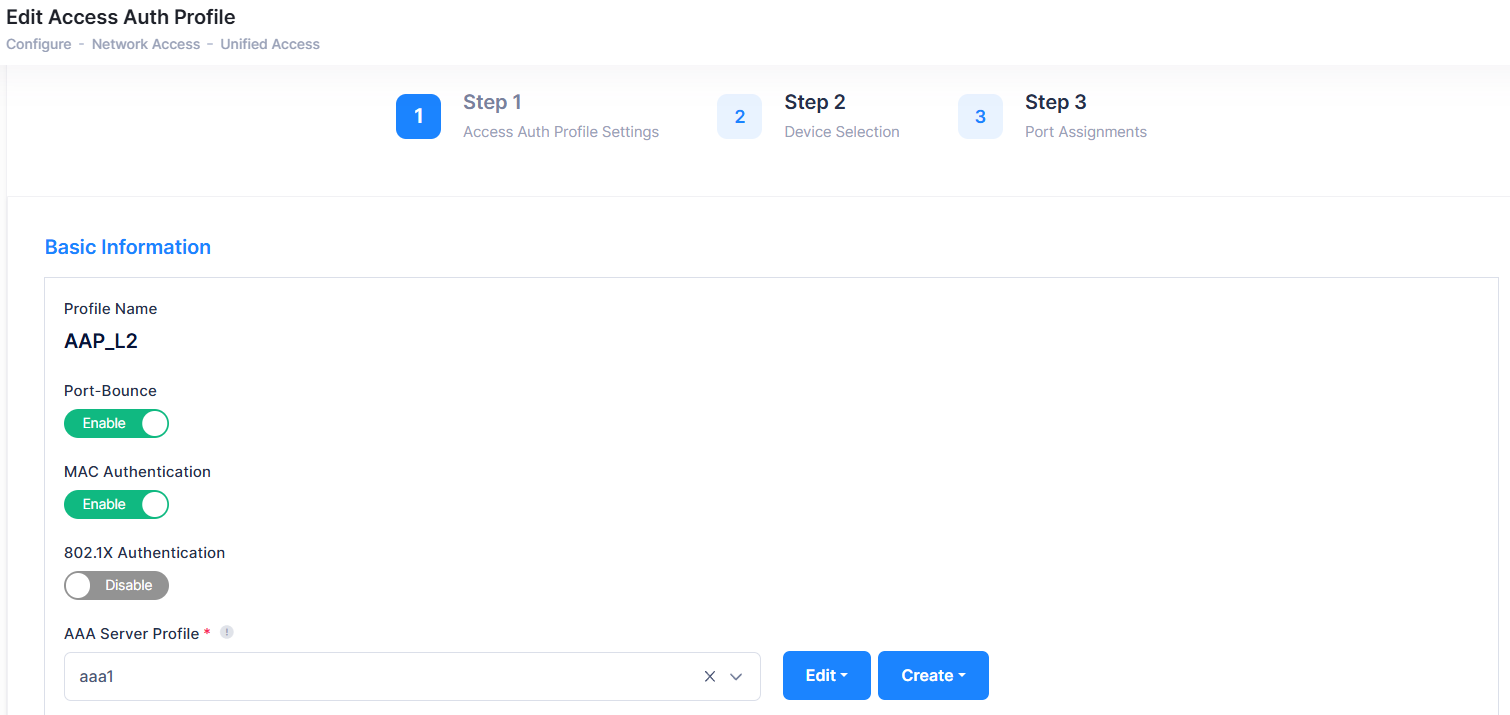
The following Edit Access Auth Profile screen displays. Edit the fields as described above, then click on Save.
Deleting an Access Authentication Profile
To delete an Access Authentication Profile, use one of the following methods to select the profile you want to delete:
-
Select the profile to delete by clicking on the checkbox next to the profile, click on Actions, then select Delete from the drop-down menu.
-
Click on the trash can icon under the “Actions” column next to the profile that you want to delete.
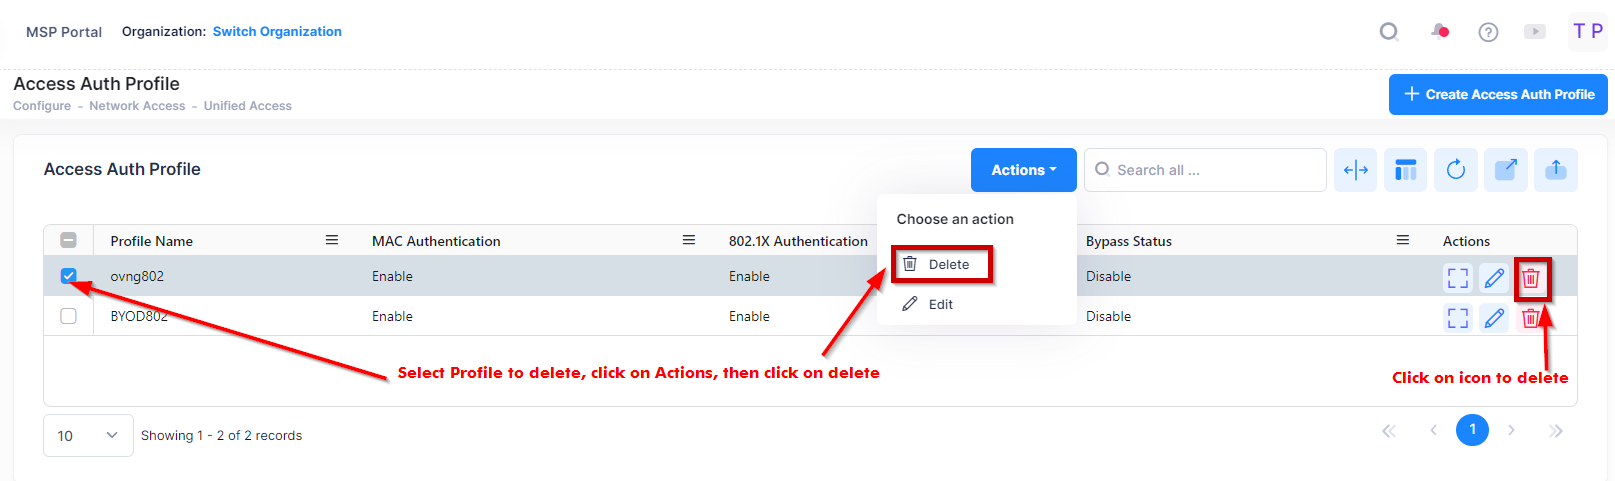
When you select the profile you want to delete, the following confirmation prompt appears:
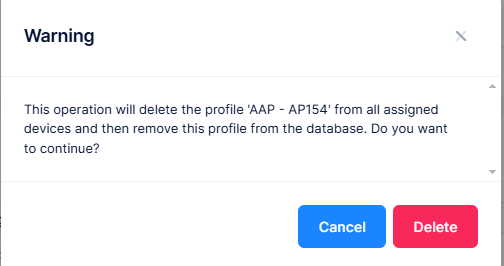
Click on Delete to confirm that you want to delete the Access Authentication Profile.
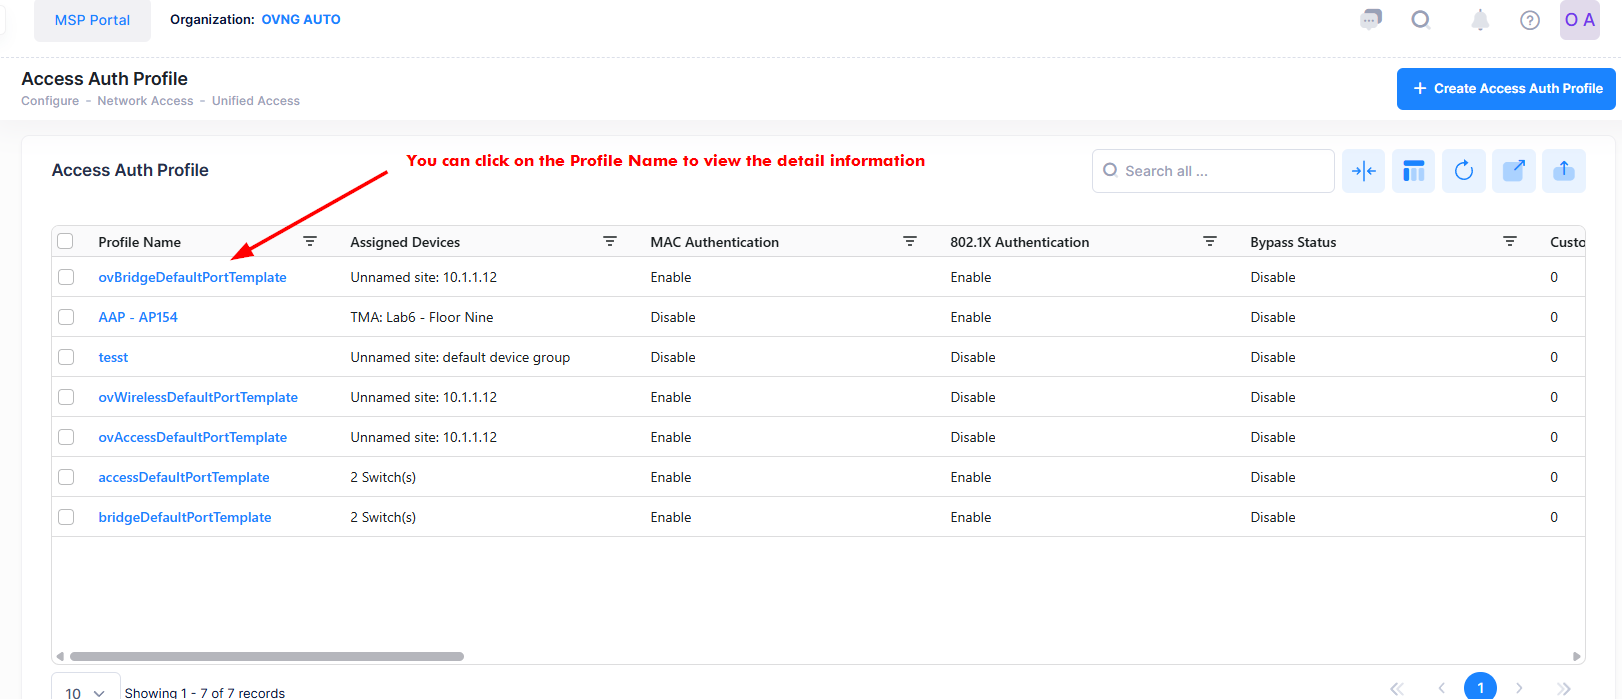
Display Assigned Switch Configuration Details
The Access Authentication Profile list displays information for the configured Access Authentication Profiles. To display assigned switch configuration detailed information about a specific Profile, click on the Profile Name as shown below.
The below screen will appears:
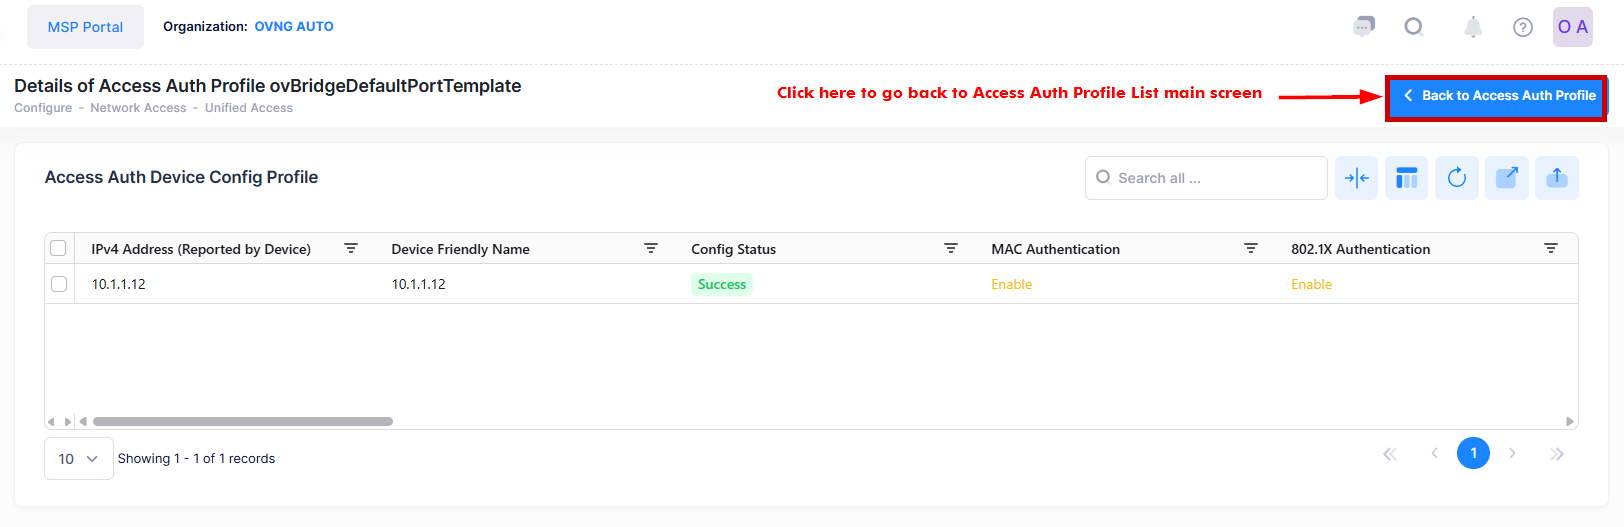
You can now view the current profile configuration for selected Switch that is assigned to an Access Authentication Profile. This screen also allows you to export, search and filter the data.
-
IPv4 Address - The IPv4 address of the device.
-
Device Friendly Name - The name assigned to the device is derived from the Preferred Device Naming convention specified in the user preference settings. By default, the Friendly Name is set to IP Address (System Name).
-
Config Status - The configuration status of the device. (Successful or Failed or Pending).
-
Pending - The configuration is being pushed to the device and is still not receiving a response from the device.
-
Failed - The configuration failed to apply to the device. Possible reasons include a timeout while applying the configuration due to the device being unreachable or a network issue, or the configuration being invalid and rejected by the device. Check alerts to identify the specific reason.
-
Successful - The configuration is pushed to the device successfully.
-
-
MAC Authentication - Enable/Disable MAC Authentication for the port.
-
802.1X Authentication - Enable/Disable 802.1X Authentication for the port.
Note: You can now view the current profile configuration for each switch assigned to an Access Authentication Profile. You can edit the configuration on one or more assigned devices directly. If a device's configuration differs from the profile, the mismatched attributes will be highlighted, and you will have the option to synchronize them.
Display Access Authentication Profile Additional Information
You can click on Additional Information icon under the “Actions” column. The information displayed on this screen is defined below.
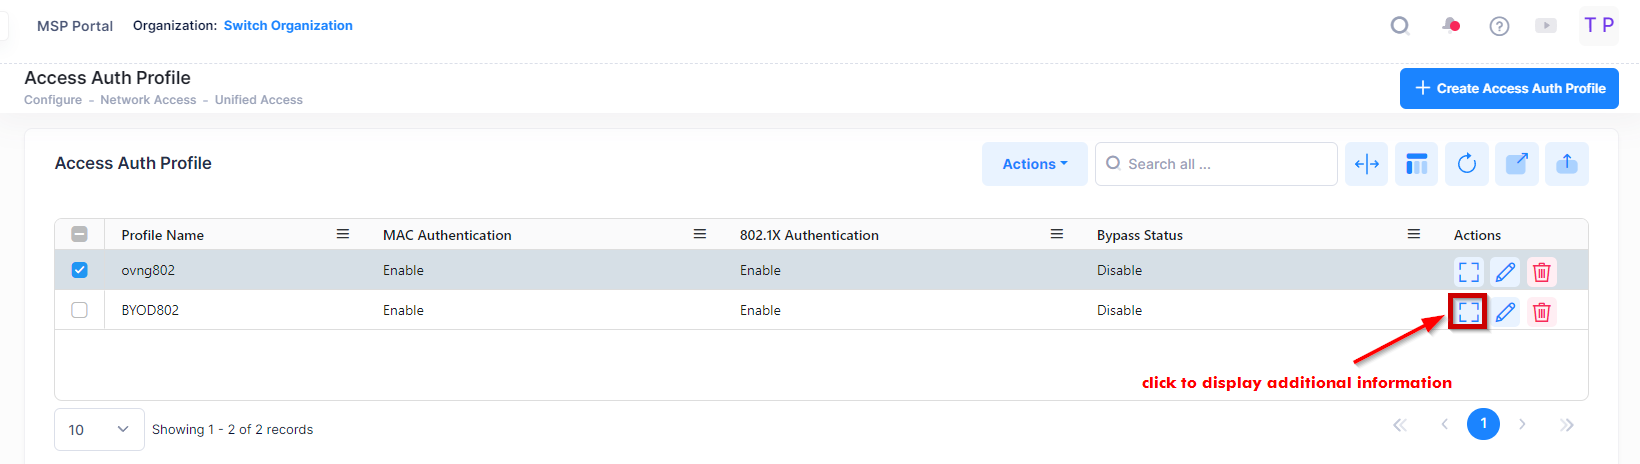
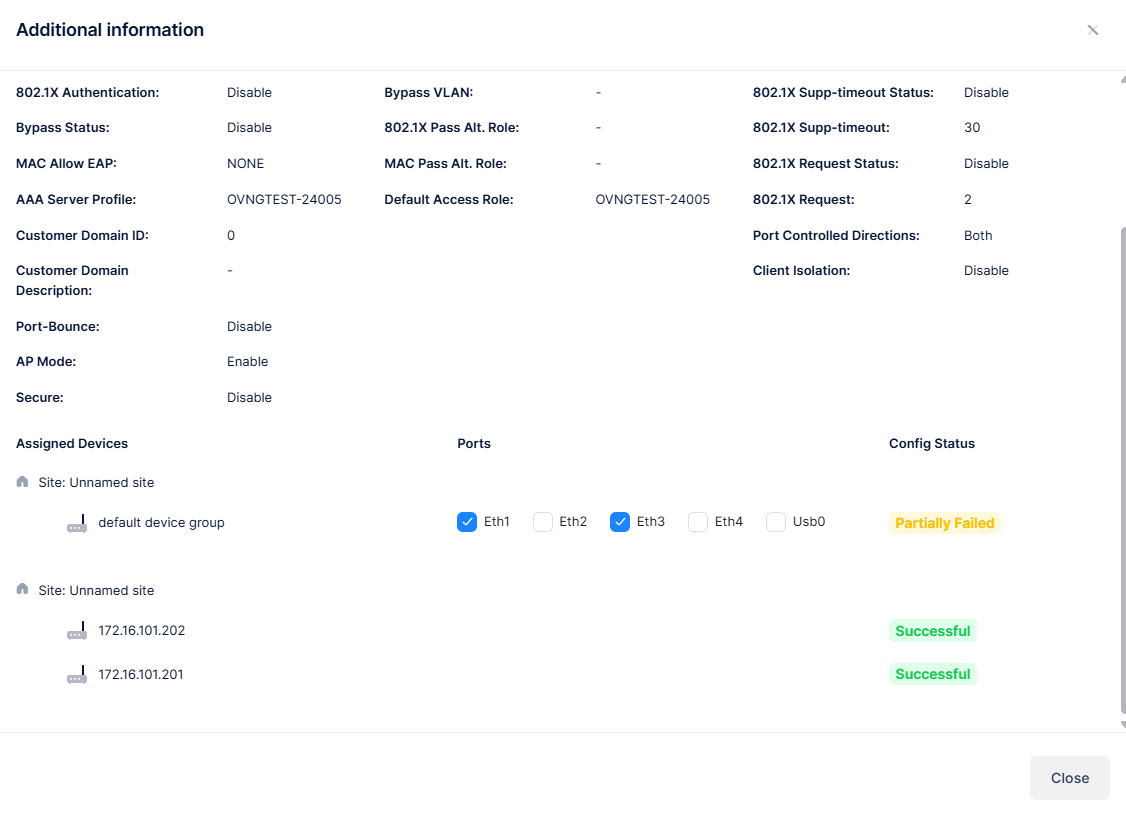
The following information is displayed for each Access Authentication Profile:
-
Profile Name - The name assigned to the Access Authentication Profile.
Basic Information
-
MAC Authentication - The status of MAC authentication (Enable/Disable). When enabled, MAC authentication is applied with the profile.
-
802.1X Authentication - The status of 802.1X authentication (Enable/Disable). When enabled, 802.1X authentication is applied with the profile.
-
Bypass Status - The status of 802.1X bypass (Enable/Disable). Applies only when 802.1X authentication is enabled. When Bypass Status is enabled, the 802.1X authentication process is skipped and either MAC authentication or Access Classification is applied based on the profile configuration.
-
MAC Allow EAP - Whether MAC Allow EAP is set to Pass or Fail (None). Applies only when 802.1X authentication and 802.1X bypass is enabled. If MAC Allow EAP is set to Pass, 802.1X authentication is performed only if MAC authentication passed.
-
AAA Server Profile - The name of the authentication, authorization, and accounting (AAA) Server Profile assigned to the Access Authentication Profile.
-
Customer Domain ID - Select a Customer Domain ID for the profile, if applicable.
-
Customer Domain Description - Provide a description for Customer domain ID.
-
Port-Bounce - Enables/Disables Port Bounce. Always Enabled on wireless devices. If port bounce is enabled, the port will be administratively put down.
-
AP Mode - Enables/Disables the Access Point Mode for the port.
-
Secure - If the AP Mode is enabled, you can check this box to secure the AP Mode. The AP Mode is not secured by default.
No Auth/Failure/Alternate
-
Access Classification - The status of device classification (Enable/Disable). When enabled, classification rules are applied if other authentication methods are not enabled or fail.
-
Trust Tag - The Trust Tag status (Enable/Disable). When enabled, the VLAN ID of tagged traffic is trusted to determine how traffic is classified if other authentication methods are not enabled or fail.
-
Bypass VLAN - The Bypass VLAN ID specified for this profile.
-
802.1X Pass Alt. Role - The Access Role Profile that is applied to clients that have passed 802.1X authentication but did not receive an Access Role Profile from the authentication server. Applies only when 802.1X authentication is enabled.
-
MAC Pass Alt. Role - The Access Role Profile that is applied to clients that have passed MAC authentication but did not receive an Access Role Profile from the authentication server. Applies only when MAC authentication is enabled.
-
Default Access Role - The Access Role Profile that is applied to clients if authentication or classification methods fail to match traffic with any role.
Assigned Devices
-
Site - The AP Group(s), Switches and associated Sites to which the Access Authentication Profile is applied.
Ports
-
Eth1, Eth2, Eth3, Eth4, USB0 - The ports to which the Access Authentication Profile is applied via Port type VLAN_PORT. USB0 indicates an Ethernet-over-USB dongle. Switch ports are identified by chassis/slot/port.
Config Status
The status of applying the profile to devices (Successful, Failed, Pending, or Partially Failed).
-
Pending - The configuration is being pushed to the devices and has still not received any response from any device.
-
Failed - The configuration failed to apply to all the selected devices. Possible reasons include a timeout while applying the configuration due to the device being unreachable or a network issue, or the configuration being invalid and rejected by the device. Check alerts to identify the specific reason.
-
Successful - The configuration is pushed to all the selected devices successfully.
-
Partially Failed - The configuration is pushed to some devices successfully, while to others it failed or remains in a pending state.
The table below displays the combinations of configuration status for all device configurations in the Profile template.
|
Device Configuration Status |
Template |
|---|---|
|
All Failed |
Failed |
|
All Successful |
Successful |
|
All Pending |
Pending |
|
Some failed, some successful |
Partially Failed |
|
Some pending, some successful |
Pending |
|
Some pending, some failed |
Partially Failed |
|
Some pending, some failed, some successful |
Partially Failed |