
This section describes the basic requirements, dependencies, and steps to install the OmniVista Network Advisor application.
System Requirements
The following are the suggested minimum requirements for installing and running the OmniVista Network Advisor application.
-
Internet access is mandatory.
-
Processor: Quad-core. The CPU must support Advanced Vector Extensions (AVX).
-
RAM: 8 GB
-
HDD: Up to 200 devices, 50 GB (To allow for storage of syslog messages)
-
For 1,000 devices, 120GB storage is recommended
-
For 2,000 devices, 210GB storage is recommended
-
-
Linux OS:
-
Ubuntu 22.04 Server Edition (OVNA is not compatible with Ubuntu 26)
-
Debian 11, Debian 12
-
Red Hat Enterprise Linux 9.3
-
-
For installation on RHEL, ensure that firewalld is turned off before installation.
-> sudo systemctl stop firewalld
-> sudo systemctl disable firewalld
-
The minimum requirements for OmniVista Network Advisor support on OmniVista are:
-
OmniVista 2500 4.8R2 / OmniVista Cirrus 4.8.2 and above.
-
OmniVista Cirrus 10.6.1 / OmniVista Terra 10.6.1 and above.
-
-
When using OmniVista with Microsoft Teams notification system, ensure that smba.trafficmanager is turned on.
-> sudo systemctl stop samba-trafficmanager
-> sudo systemctl disable samba-trafficmanager
-
Ports: UDP/TCP 10514/TCP 6514 (syslog/syslog-TLS), TCP 22 (SSH/SFTP Application to devices or access to Application), TCP 443 (Cloud Services).
By default, Kubernetes uses the following IPv4 address ranges for its various components:
|
Component |
Default IP Range |
|---|---|
|
Pods |
10.42.0.0/16 |
|
Services |
10.43.0.0/16 |
|
CoreDNS |
10.43.0.10 |
Please ensure that these address ranges do not conflict with any existing networks or services in your environment, as this may cause connectivity issues with your Kubernetes cluster.
Note: If upgrading from a previous version of OmniVista Network Advisor please refer to Appendix C - Migration to OmniVista Network Advisor 2.0 version prior to installing OmniVista Network Advisor 2.0.
Installation Procedure
-
Download the
ale-ovna.debpackage from ALE MyPortal → Network Products -> Network Management -> OmniVista Network Advisor. -
Add sudo rights for the installation user (Linux host preparation):
usermod -aG sudo <username> -
Check that the user has sudo rights by logging in to the user session and typing sudo -v.
-
Use SFTP to transfer the application archive (
ale-ovna.deb) to the Linux host. -
Install the package:
sudo dpkg -i ale-ovna.deb. -
Start the installation workflow:
sudo ale-ovna install. For example,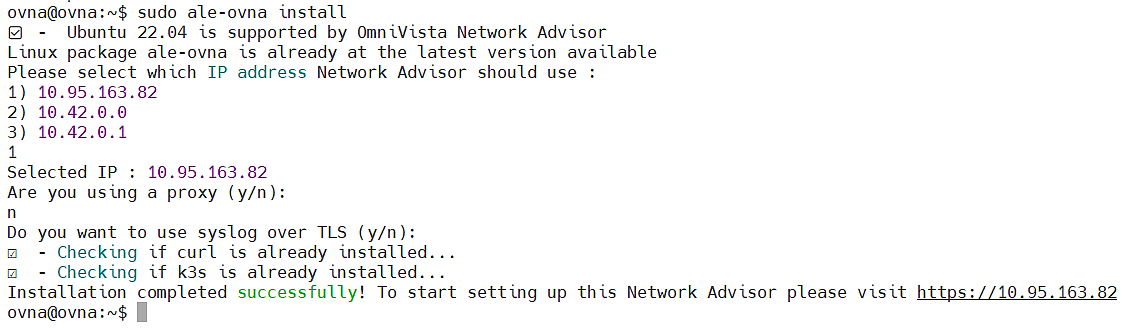
-
Complete the installation options prompts:
-
Please select which IP address Network Advisor should use (for example,
172.25.159.109) -
Are you using a proxy? No (default) or Yes
-
Do you want to use the default K3s pod/service subnets? (Pod: 10.42.0.0/16, Service: 10.43.0.0/16) Yes (default) or No, I want to specify
-
Do you want to use syslog over TLS? No (default) or Yes
-
Do you want to use OmniVista Cirrus/Terra as your management platform for Network Advisor? Enter No (for standalone OVNA installation)
-
-
At the end of installation, use the identifiers printed by the installer to declare the instance in OmniVista:
-
APP_UUID(for example:11111111-2222-4333-8444-555555555555) -
SERIAL_NUMBER(for example:ABCDE12345F6789)
-
-
OmniVista Network Advisor Configuration completed.
Command Reference
You can use the command sudo ale-ovna --help to view help on OmniVista Network Advisor commands.
-
Add sudo rights for the installation user (Linux host preparation):
usermod -aG sudo -
Verify sudo access for the user session:
sudo -v -
Install package file:
sudo dpkg -i ale-ovna.deb -
Run installation workflow:
sudo ale-ovna install -
Display comprehensive installation status, versions, and configuration:
sudo ale-ovna status -
Display OVNA instance identifiers only (including Application UUID and Serial Number):
sudo ale-ovna id -
Show available Advisor Edge commands:
sudo ale-ovna --help -
Show help for a specific command:
sudo ale-ovna [command] --help -
Run a full installation health and connectivity check:
sudo ale-ovna sanitycheck -
Perform health checks with the global healthcheck flag (connectivity, resources, prerequisites):
sudo ale-ovna --healthcheck -
Collect diagnostic logs and system information into an archive:
sudo ale-ovna collect -
Restart OVNA components to apply changes or recover from errors:
sudo ale-ovna rollout -
Configure OVNA settings and parameters:
sudo ale-ovna configure -
Manage SSL/TLS certificates:
sudo ale-ovna configure certs -
Run software update:
sudo ale-ovna update -
Run update with core package refresh (required for some upgrade paths, such as 1.4 to 1.5):
sudo ale-ovna update -c -
Force download and update of the latest watchdogs:
sudo ale-ovna watchdog -
Display CLI version information without requiring K3s to be running:
sudo ale-ovna --version -
Completely remove OVNA from the system:
sudo ale-ovna uninstall -
Host Service Commands Used In Installation Prerequisites:
-
Stop RHEL firewall service before installation (when applicable):
sudo systemctl stop firewalld -
Disable RHEL firewall service before installation (when applicable):
sudo systemctl disable firewalld -
Stop Microsoft Teams traffic manager service when required by your OmniVista integration context:
sudo systemctl stop samba-trafficmanager -
Disable Microsoft Teams traffic manager service when required by your OmniVista integration context:
sudo systemctl disable samba-trafficmanager
-
Update Procedure
Good Practices Prior to Upgrading
-
Back Up Before Upgrade: Always create a snapshot of the VM or back up OVNA before upgrading. This makes it possible to restore the previous version in case of any update issues.
-
Back Up Data: A backup of the data can be done from the UI. The back up can be used to restore the data after a reinstall. (Settings->Configuration->Backup-Restore, click +Create backup)
-
Test Updates : Test new updates before applying them. This allows you to identify any potential issues in a controlled setting.
-
Version Compatibility: Only upgrade from older to new versions. Ensure compatibility to prevent unexpected issues.
-
No Downgrade Option: Downgrading is unsupported. If a rollback is required, uninstall and reinstall OVNA, then restore from a backup.
Following these practices can help ensure smooth and reliable upgrades.
To update the package, use the following commands. When upgrading from 1.5 to 2.0 it is recommended to force the update of the core package using '-c'. It will update the version of k3s. (Kubernetes light)
-> sudo ale-ovna update -c
For example:

-
The command will first check if a .deb has to be updated.
-
`if yes, the new .Deb is downloaded after which command will exit saying that a new .Deb has been installed and invite the user to relaunch "ale-ovna update" to update the software using the last ale-ovna
-
if no , software update is performed normally.
-
Configure OmniVista Network Advisor
After the installation is complete, configure OmniVista Network Advisor as needed.