Certificates
The Certificates screen displays information and is used to create/upload the following certificates:
Web Server/External Portal Server Certificate - Used to establish a secure connection between OmniVista Cirrus and APs when using the Web UI Device Management Tool as well as a secure connection to an External Portal Server.
Local LDAP Certificate - Used to establish a secure connection between an AP and a Local LDAP Server.
802.1X Client Certificate - Used to establish a secure connection between an AP and an OmniSwitch.
Stellar BLE Certificate - Used to establish a secure connection between an AP and a BLE destination server for Asset Tracking.
Stellar WiFi RTLS Certificate - Used to establish a secure connection between an AP and an external server to provide real-time location data.
Local RadSec - Used to establish a secure connection between an AP and a local, third-party RADIUS Server that uses RadSec (RADIUS-over-TLS).
Once the certificates are created/uploaded, they are applied to Access Points at the AP Group level using the AP Group screen. An Access Point retrieves the certificates to use from the AP Group to which the AP belongs. Each AP Group is associated with a Provisioning Configuration. APs that are members of the AP Group utilize the Provisioning Configuration to boot up and get a basic configuration. The associated Provisioning Configuration is where the certificates to use are specified.
A Certificate file is an Organization-level entity. The Certificate is created in an Organization with a name that is unique across the entire Organization. You can not create two Certificates with the same name in the same Organization.
To manage the Certificates configuration, navigate to the Certificates screen by clicking on Wireless > Advanced > Certificates under the “Configure” section of the OmniVista Cirrus Menu.
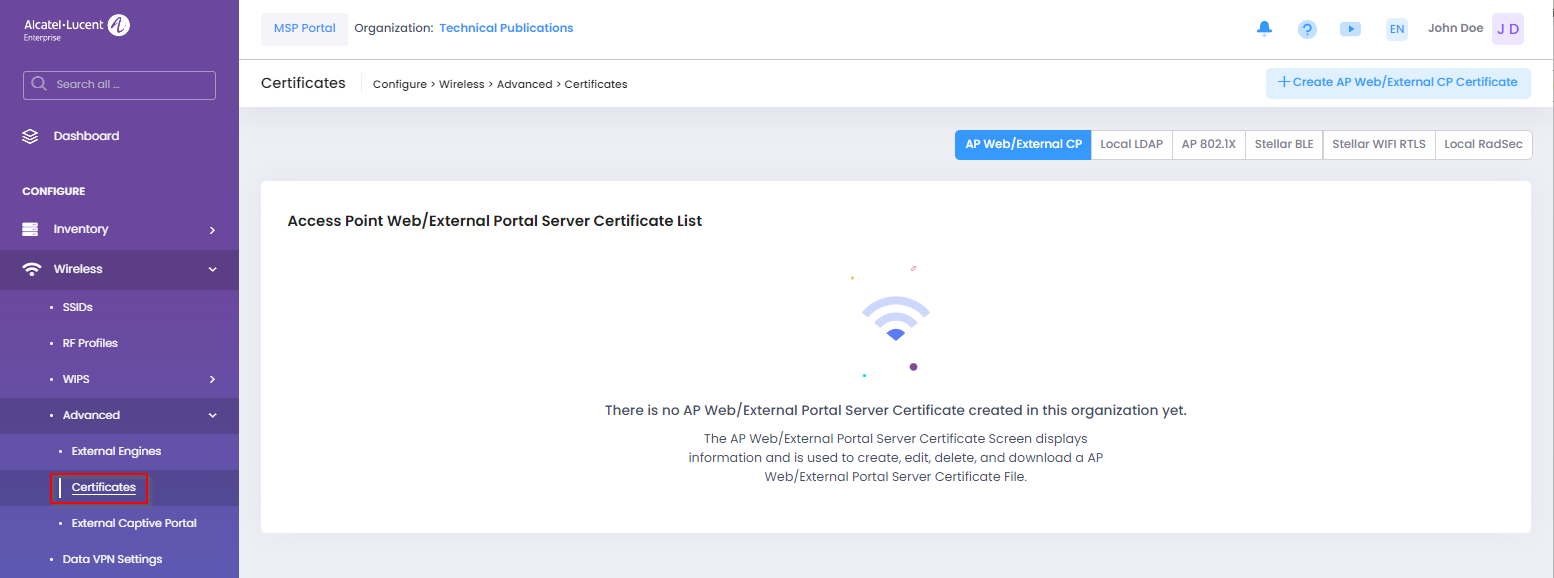
The Certificates screen is where you can view existing certificate information, create/upload, edit, and delete certificates. The screen provides a separate tab for each of the six types of certificates. Click on the desired tab to view existing certificates and/or create new ones.
Creating a Certificate
Click on one of the tabs shown to select which certificate you want to create and/or upload.
Creating an Access Point Web/External Portal Server Certificate
Select the Access Point Web/External Portal Server tab on the Certificates screen, then click on Create AP Web/External Portal Server Certificate to open the following screen to define the certificate information:
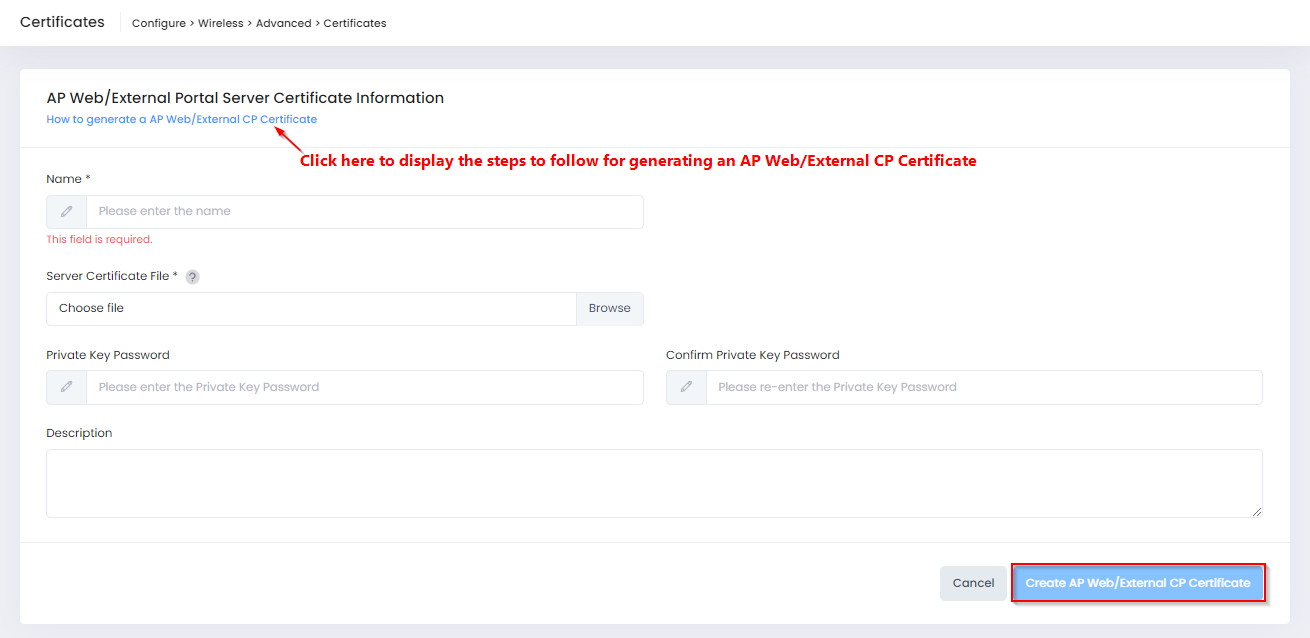
Complete the fields as described below, then click on Create AP Web/External Portal Server Certificate when you are finished creating/uploading the certificate.
Name - The name of the certificate file.
Server Certificate File - Click on Browse to locate the PEM file to upload.
Private Key Password - The Private Key Password to use when generating the key file.
Confirm Private Key Password - Re-enter the password.
Description - Enter a description for the certificate file.
Important Note: APs only support certificates based on FQDN, not IP Address. When generating the CSR file, you must match the "CN" field to the URL "mywifi.al-enterprise.com".
Uploading a Local LDAP Certificate
Select the Local LDAP tab on the Certificates screen, then click on Create Local LDAP Certificate to open the following screen to define the certificate information:
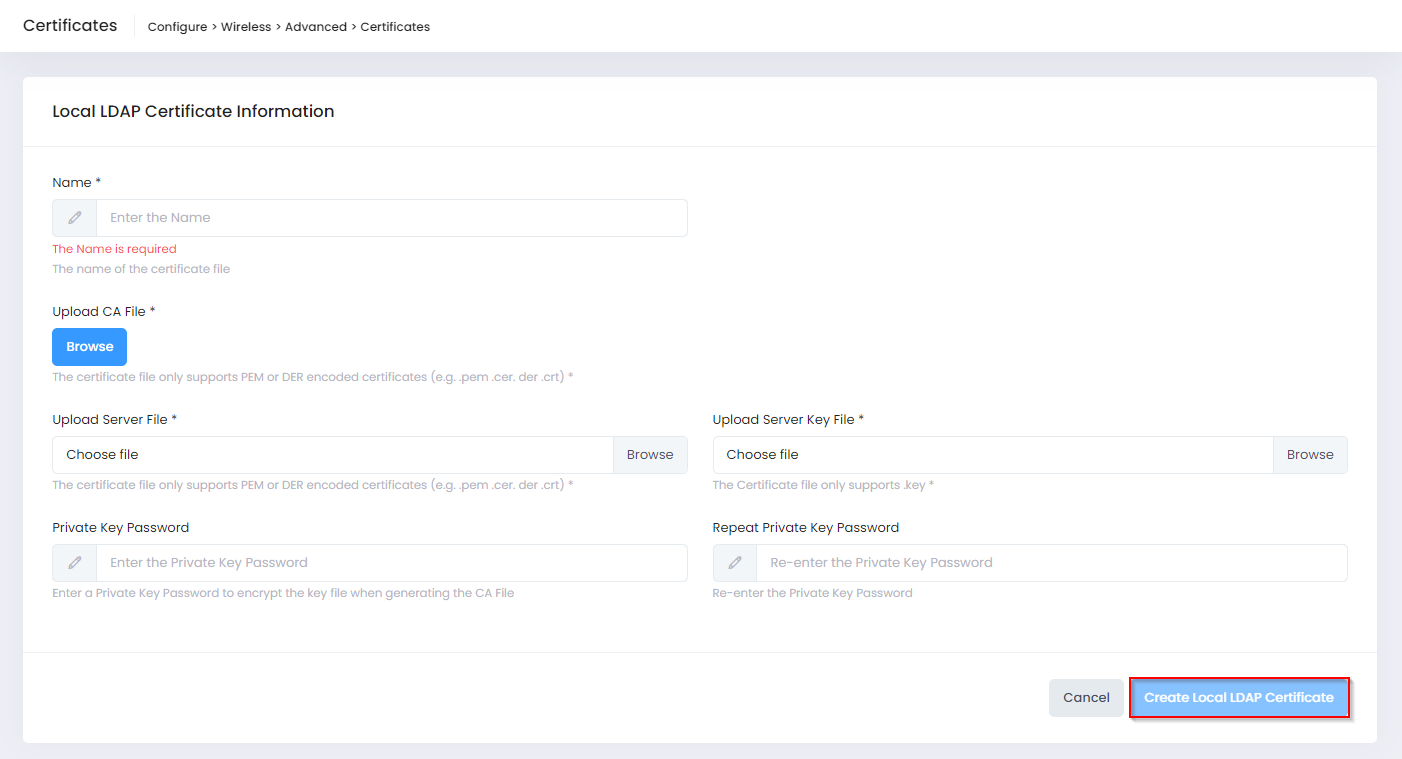
Complete the fields as described below, then click on Create Local LDAP Certificate when you are finished uploading the certificate.
Name - Enter a Name for the Certificate.
Upload CA File - Click on Browse to locate and import the LDAP Server's CA Certificate (PEM or DER encoded certificates only).
Upload Server File - Click on Browse to locate and import the AP Certificate File (PEM or DER encoded certificates only).
Upload Server Key File - Click on Browse to locate and import the AP Certificate Private Key File.
Private Key Password - Enter a Private Key Password to encrypt the key file when generating the CA File.
Repeat Private Key Password - Re-enter the Private Key password.
Uploading an 802.1X Client Certificate
Select the AP 802.1X tab on the Certificates screen, the click on Create AP 802.1X Certificate to open the following screen to define the certificate information:
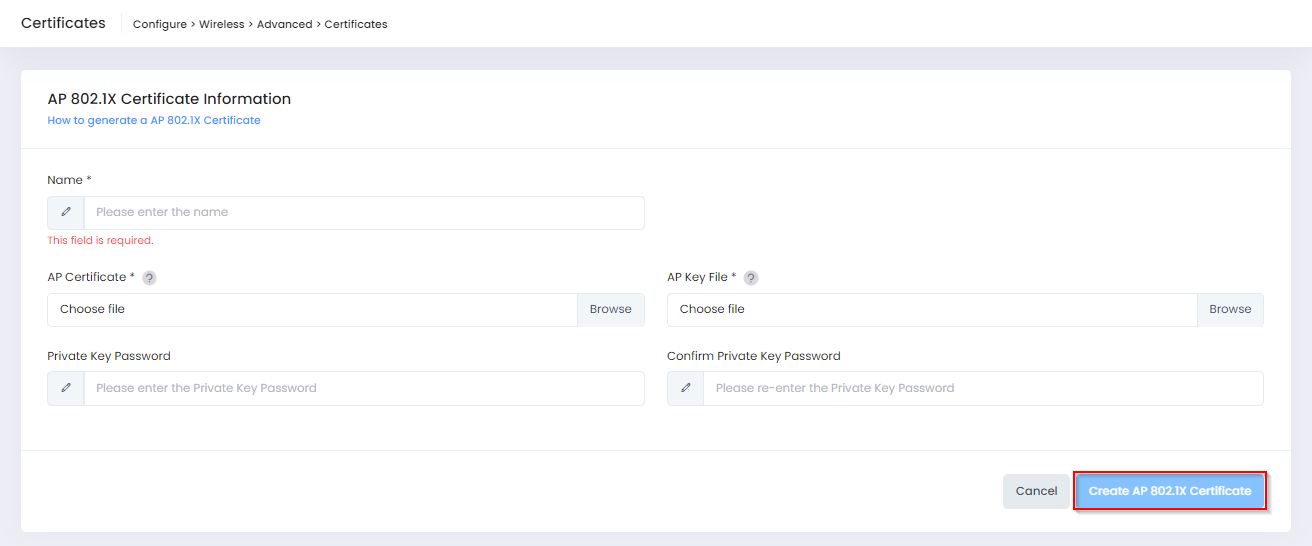
Complete the fields as described below, then click on Create AP 802.1X Certificate when you are finished uploading the certificate.
Name - Enter a Name for the Certificate.
AP Certificate - Click on Browse to locate and import the 802.1X Client CA Certificate (PEM or DER encoded certificates only).
AP Key File - Click on Browse to locate and import the AP Certificate Private Key File (.key certificates only).
Private Key Password - Enter a Private Key Password to encrypt the key file when generating the CA File.
Confirm Private Key Password - Enter the Private Key Password again.
Uploading a Stellar BLE Certificate
The Stellar BLE data reporting channel to any Asset Tracking application uses Kafka. However, the built-in common device certificate on the AP allows communication only with Stellar AP Asset Tracking solutions. You can now upload a custom device certificate to the AP that will support sending BLE data to third-party Asset Tracking applications.
Refer to Stellar BLE Data Format for information about the data format used to send BLE messages to third-party Asset Tracking applications.
To upload a device certificate, select the Stellar BLE tab on the Certificates screen, then click on Create Stellar BLE Certificate to open the following screen to define the certificate information:
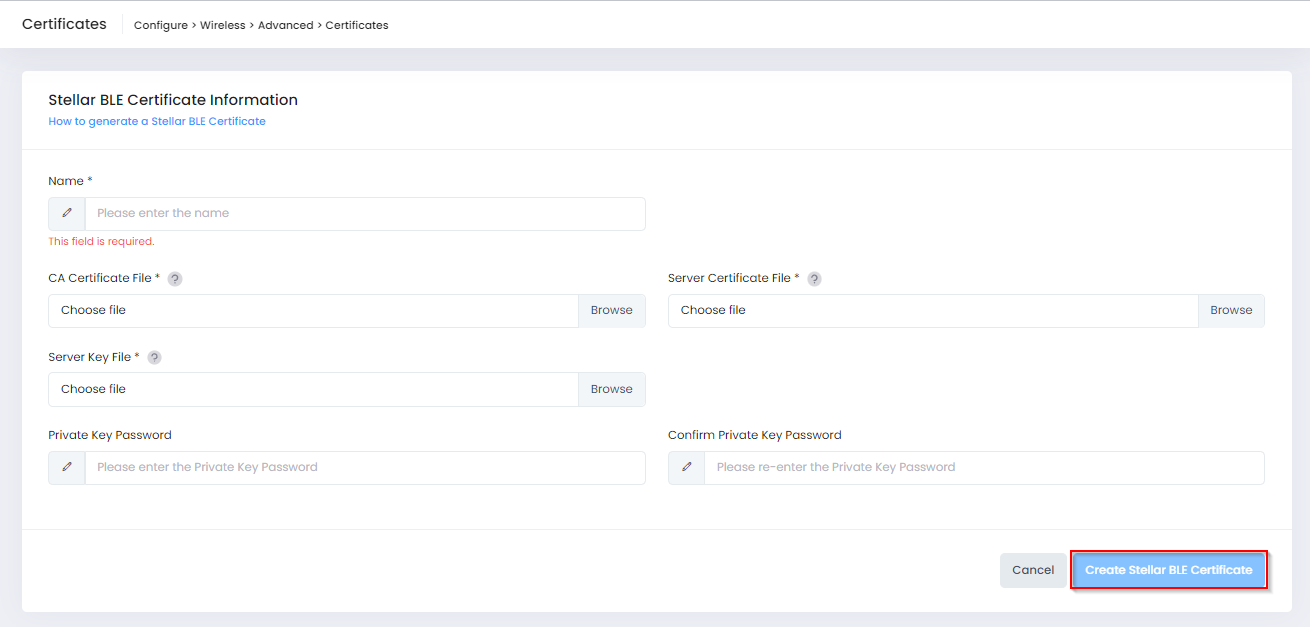
Complete the fields as described below, then click on Create Stellar BLE Certificate when you are finished uploading the certificate.
Name - Enter a Name for the Certificate.
CA Certificate File - Click on Browse to locate and import the Stellar BLE CA Certificate (PEM or DER encoded certificates only).
Server Certificate File - Click on Browse to locate and import the AP Certificate File (PEM or DER encoded certificates only).
Server Key File - Click on Browse to locate and import the AP Certificate Private Key File (.key certificates only).
Private Key Password - Enter a Private Key Password to encrypt the key file when generating the CA File.
Confirm Private Key Password - Enter the Private Key Password again.
Uploading a Stellar WiFi RTLS Certificate
The Stellar WiFi RTLS data reporting channel uses Kafka. However, the built-in common device certificate on the AP allows communication only with the OmniVista Cirrus 10 Stellar WiFi engine. You can now upload a custom device certificate to the AP that will support sending WiFi RTLS data to third-party RTLS applications.
Refer to Stellar WiFi RTLS Data Format for information about the data format used to send RTLS messages to third-party RTLS applications.
To upload a device certificate, select the Stellar WIFI RTLS tab on the Certificates screen, then click on Create Stellar WIFI RTLS Certificate to open the following screen to define the certificate information:
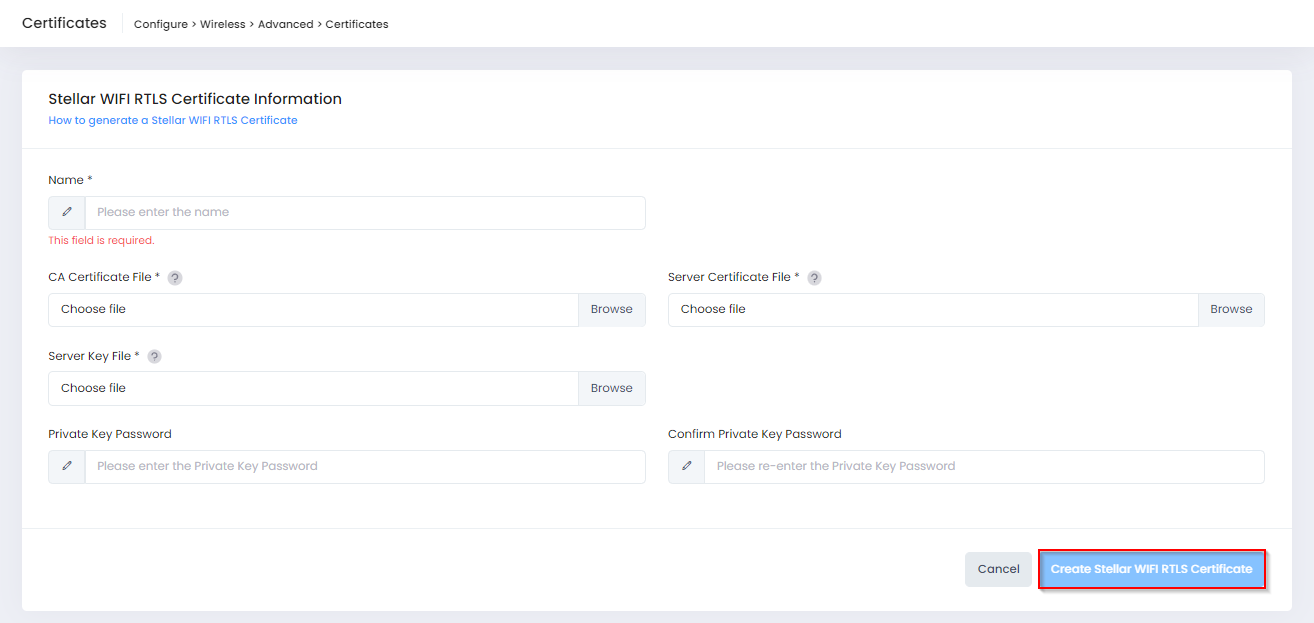
Complete the fields as described below, then click on Create Stellar WIFI RTLS Certificate when you are finished uploading the certificate.
Name - Enter a Name for the Certificate.
CA Certificate File - Click on Browse to locate and import the Stellar WIFI RTLS CA Certificate (PEM or DER encoded certificates only).
Server Certificate File - Click on Browse to locate and import the AP Certificate File (PEM or DER encoded certificates only).
Server Key File - Click on Browse to locate and import the AP Certificate Private Key File (.key certificates only).
Private Key Password - Enter a Private Key Password to encrypt the key file when generating the CA File.
Confirm Private Key Password - Enter the Private Key Password again.
Uploading a Local RadSec Certificate
An AP can communicate as a RadSec client with a local RADIUS Server that uses RadSec (RADIUS-over-TLS). To establish a secure connection between an AP RadSec client and the local RADIUS Server:
Upload a RadSec Certificate to the AP (refer to Local RadSec Certificate for more information).
Enable TLS on the local RADIUS Server.
To upload a RadSec Certificate, select the Local RadSec tab on the Certificates screen, then click on Create Local RadSec Certificate to open the following screen to define the certificate information:

Complete the fields as described below, then click on Create Local RadSec Certificate when you are finished creating/uploading the certificate.
Name - Enter a Name for the Certificate.
CA File - Click on Browse to locate and import the RadSec Server CA Certificate (PEM or DER encoded certificates only). The CA Certificate file is used to verify RadSec and is added to the trust store for the AP.
Client File - Click on Browse to locate and import the AP Certificate File (PEM or DER encoded certificates only).
Client Key File - Click on the Browse and locate the AP Certificate Private Key File (.key certificates only).
Private Key Password - Enter a Private Key Password to encrypt the key file when generating the CA File.
Confirm Private Key Password - Enter the Private Key Password again.
Editing a Certificate
The only attribute you can edit is the description of a Web Server/External Portal Server Certificate (Local LDAP certificates cannot be edited). Click on Access Point Web/External Portal Server tab and select the certificate in the Certificate List, then click on the Edit icon under the “Actions” column. When you are done editing the description, click on Save.
Deleting a Certificate
To delete a certificate, select the certificate in the Certificate List and click on the delete icon under the “Actions” column. When the confirmation prompt appears, click on Delete to delete the selected certificate.
You cannot delete an AP Web/External Portal Server Certificate if it is associated with a Provisioning Configuration.
Certificate List
Web Server/External Portal Server File
Name - The name of the certificate file.
Validity Start Time - Validity starting time of the certificate file.
Validity Stop Time - Validity ending time of the certificate file.
Description - User-configured description for the certificate file.
Local LDAP File
Name - The name of the certificate file.
Validity Start Time - Validity starting time of the certificate file.
Validity Stop Time - Validity ending time of the certificate file.
CA File Name - The name of the CA file.
Server File Name - The name of the certificate file.
Key File Name - The name of the key file.
AP 802.1X File
Name - The name of the certificate file.
Validity Start Time - Validity starting time of the certificate file.
Validity Stop Time -Validity ending time of the certificate file.
AP Certificate File Name - The name of the CA file.
Key File Name - The name of the key file.
Stellar BLE
Name - The name of the certificate file.
Validity Start Time - Validity starting time of the certificate file.
Validity Stop Time - Validity ending time of the certificate file.
Client CA File Name - The name of the CA file.
Client Certificate File Name - The name of the client certificate file.
Client Certificate Key File Name - The name of the client key file.
Issued By- The entity that issued the certificate.
Issued To - The entity to which the certificate was issued.
Stellar WiFi RTLS
Name - The name of the certificate file.
Validity Start Time - Validity starting time of the certificate file.
Validity Stop Time - Validity ending time of the certificate file.
Client CA File Name - The name of the CA file.
Client Certificate File Name - The name of the client certificate file.
Client Certificate Key File Name - The name of the client key file.
Issued By- The entity that issued the certificate.
Issued To - The entity to which the certificate was issued.
Local RadSec
Name - The name of the certificate file.
Validity Start Time - Validity starting time of the certificate file.
Validity Stop Time - Validity ending time of the certificate file.
CA File Name - The name of the CA file.
Client Certificate File Name - The name of the client certificate file.
Client Certificate Key File Name - The name of the client key file.
Issued By- The entity that issued the certificate.
Issued To - The entity to which the certificate was issued.